Apprenticeship Service (AS) Management
Introduction
As part of the introduction of the apprenticeship levy system, the government have created the Apprenticeship Service (AS), which went live in April 2017 and enables employers to:
- Plan their apprenticeship programme
- Choose apprenticeship training and assessment
- Advertise a vacancy to recruit an apprentice
- Manage the funding for their apprenticeship
- Start a new apprenticeship contract
Providers can upload their courses and venues manually one at a time or via bulk upload functionality to the Course Directory Provider Portal.
To facilitate this in Maytas, the AS Management module has been created which allows you to enter the required data on the locations and apprenticeships they offer and generate a file to upload to the AS.
The Apprenticeship Service (AS) was renamed from the Digital Apprenticeship Service (DAS). As of the 5.14 Maytas upgrade, all references to the DAS in Maytas have been renamed to the AS
Setup
The setup for the AS Management module involves importing a licence and configuring permissions in Maytas.
Import Licence
Once you have received your licence file for the AS module from Tribal, it must be imported as follows:
- Open Maytas 5 Server Manager.
- Select the appropriate data service and click Licenses.
- Click the
 button.
 - Browse to and select the licence file and click Open.
- Click Close.
- Click Stop on the data service. Once it has stopped, click Start to restart it.
Configure Permissions
- In Maytas, Go to Tools | Edit Permissions.
- Select the user or group which requires permission.
- On the Modules tab, set the AS Management dropdown box to Visible.
-
Go to the Commands tab and expand the AS Module section.

- Set each of the AS permissions as required.
- Click Apply and restart Maytas for the changes to take effect.
Using the AS Management Module
The general process for using the AS Management module is as follows:
- Create provider records and add locations for those providers.
- Add AS entries for the providers, specifying which Apprenticeship standard or framework they apply to.
- Add delivery locations for each AS entry (these can be generated from assessor details).
- Export the AS file for submission.
Create a Provider Record
To create a provider record:
-
Go to Management on the toolbar and click Providers on the AS Directory panel of the ribbon.

-
This will open the providers window, where you can add new provider records or view and edit existing provider records. Click New to add a new record.
-
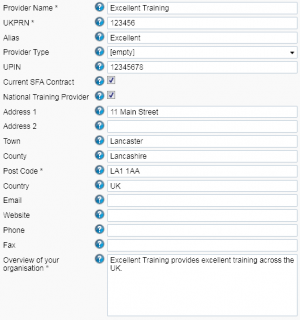
Enter the provider details. At minimum, the Provider Name, UKPRN, Post Code and Overview of your organisation fields must be completed.
The Provider Name field must match the name that is registered on the AS portal. The Alias field can be used to include another name which the provider is known by.
- Click Apply when finished.
Add Locations to a Provider
Each provider record should have one or more locations added for it. To add a location:
- Go to Management on the toolbar and click Locations on the AS Directory panel of the ribbon.
-
This will open the locations window, where you can add new locations or view and edit existing locations. Click New to add a new location.
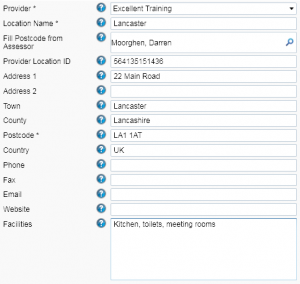
- Enter the location details. At minimum, the Provider, Location Name and Postcode fields must be completed (note that the Provider dropdown list is populated by the provider records added to the system).
- The Fill Postcode from Assessor field can be used to populate the Postcode field using the postcode from an assessor record. To use this, click the
 button, search for and select the assessor to use and click OK.
 - Click Apply when finished.
Add an AS Entry
- Click the M5 button at the top-left and go to New | AS Entry.
-
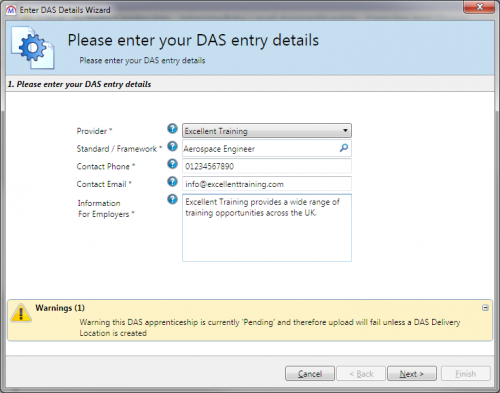
This will open the AS entry wizard. Complete the details on the first page, using the search tool to find and select the Apprenticeship standard or framework which this entry relates to.
-
Click Next. A warning message will appear saying that this entry is currently 'Pending' and that the upload will fail unless an AS Delivery Location is created. Click Next and then Finish to create the AS entry.
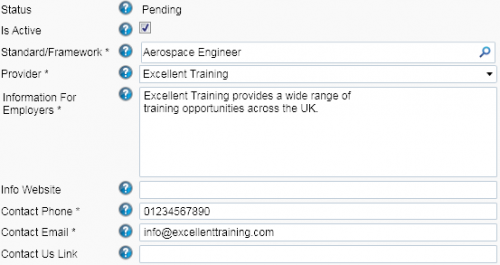
-
Two additional fields - Info Website and Contact Us Link - can be completed at this stage. Also note that the Status field is set to Pending. This is because no delivery locations have been added to the entry yet.
If the entry is discontinued or is not yet ready to be exported, un-tick the IsActive checkbox.
- Click Apply.
Add Delivery Locations to an AS Entry
With an AS entry open, go to the Delivery tab. There are two ways to add delivery locations to an AS entry: Create from assessor, which generates locations from one or more assessor records, or Create new, which lets you enter the location details manually.
To use Create from assessor:
- Enter a search term for the required assessors and click the
 button.
 -
Select the assessors from the list that appears. Multiple assessors can be selected, and each one will generate a delivery location if an existing location match cannot be found. Note that only assessors with a valid entered postcode can be selected.
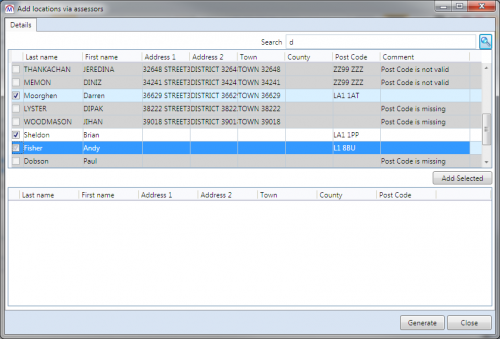
-
Click Add selected. The selected assessors will appear in the bottom half of the window.
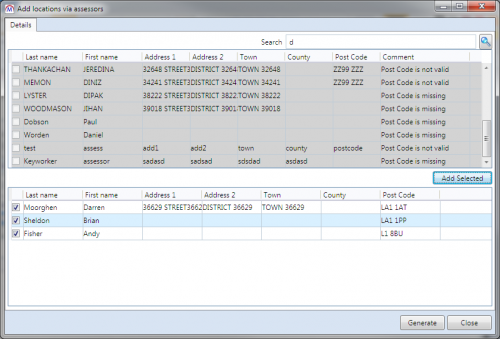
- Click Generate.
- When it has finished, the assessors will disappear from the bottom half of the screen. Click Close.
-
The generated locations will now appear in the grid.

- The default catchment area radius is set to 5 miles (i.e. the radius from the location within which you are prepared to deliver Apprenticeships) and the default delivery mode is DM1 (100% employer-based). These can be amended by selecting a location and clicking the
 button, or by directly entering into the radius field.
To use Create new:
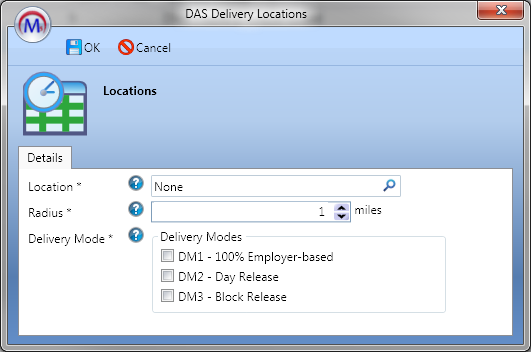
- Click the
 button and search for the location to add (these are taken from the AS locations for your provider). Select the location and click OK.
 - Enter the catchment area radius in miles. This should be the radius from the location within which you are prepared to deliver Apprenticeships.
- Select the delivery modes which apply to the Apprenticeship in this location (at least one delivery mode must be selected).
- Click OK.
- The location will now appear in the grid.
Click Apply when finished.
Export the AS File
To export the AS file:
-
Go to Management on the toolbar and click Export on the AS Directory panel of the ribbon.
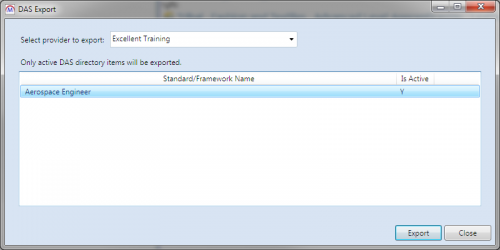
- Select the provider from the dropdown box. This will populate the list of AS entries in the bottom part of the window. All entries which are marked as active will be included in the export.
- Click Export.
- Browse to where you wish to save the file and click Save.
- Click OK to the message which appears.
- Click Close.
The file can then be uploaded to the AS portal.
AS Apprenticeship Upload
An export file of Apprenticeship starts can be produced for upload to the AS. The option to do this must first be enabled in a permission:
- Go to Tools | Edit Permissions.
- Select the user or group that requires permission.
- Go to the Commands tab.
- Expand the AS Module section.
- Set the Manage App Starts permission to Visible.
- Click Apply.
- Restart Maytas for the permission to take effect.
Once enabled, the Apprenticeship starts export screen can be opened by going to Management | Export App Starts (on the AS Directory panel of the ribbon).
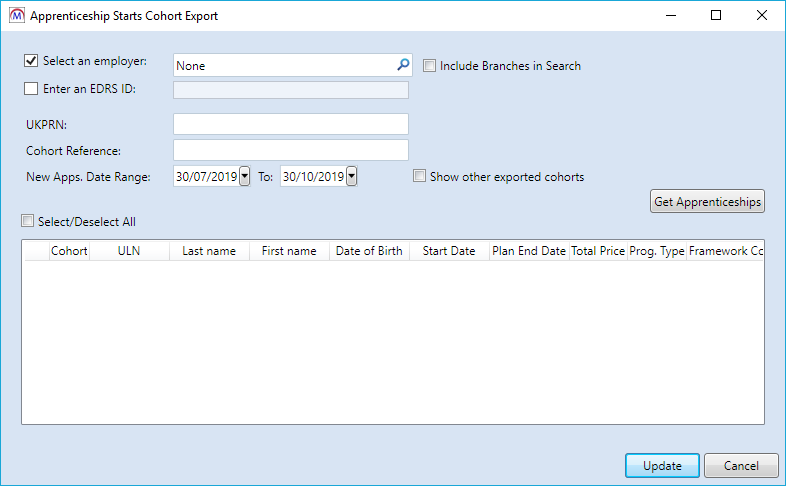
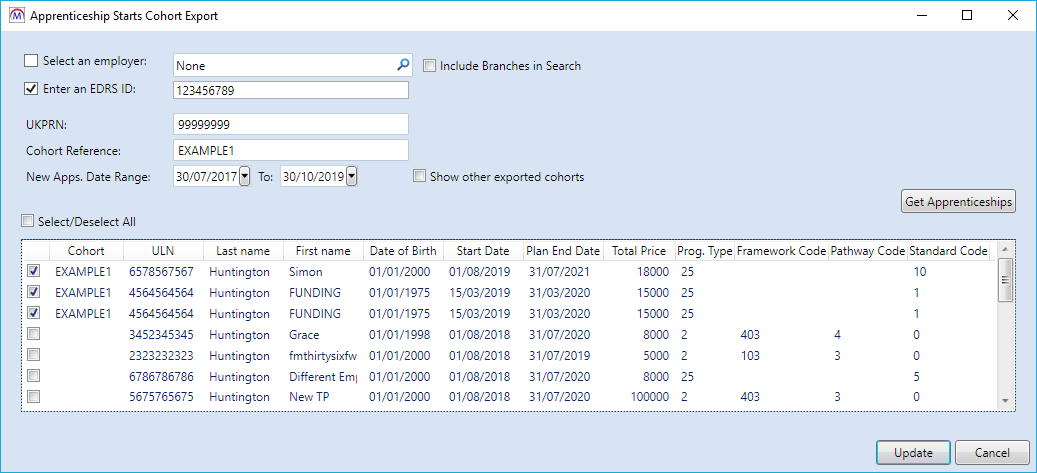
This screen lets you search for and select the learners to export.
-
The export must be for the learners at a specific employer, based on the EDRS ID. The employer can be selected by either searching for an employer record in Maytas or simply entering the EDRS ID. In both cases, these link to the EDRS ID entered for learners in an ILR employment status row (the Employer identifier field).
To use an employer record in Maytas, click the
 button, search for and select the employer and click OK. Note that the results will only include employer records where the EDRS ID matches that of an ILR employment status EDRS ID. Also note that the employers included in the results do not necessarily have to be attached to learners in Maytas – the link is done purely on the EDRS ID.
To use an EDRS ID, select Enter an EDRS ID and then enter an EDRS ID. This does not need to have a corresponding employer record in Maytas.
- Enter the UKPRN. This must match the latest UKPRN field on the contractor for the learners you wish to search for.
- Enter the cohort reference to search for or apply to learners in the results.
- Select the date range for the search, which will include apprenticeships which started between the dates (inclusive).
-
If you wish to include learners who have already been exported under a different cohort reference, tick the Show other exported cohorts box. This will allow you to move them to the entered cohort reference instead.
-
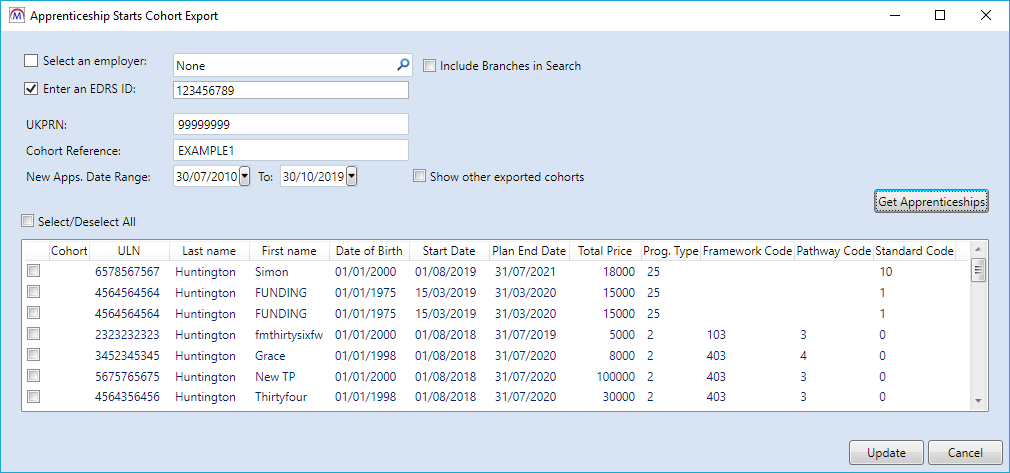
Click Get Apprenticeships to perform the search.
-
The results will show all unexported FM36 starts within the date range where their UKPRN and employer's EDRS ID match the ones entered. It will also show learners with a matching UKPRN and EDRS ID that have already been exported under the entered cohort reference.
A cohort in this context is a defined group of learners with the same EDRS ID, UKPRN and apprenticeship. These learners can be grouped under a cohort reference.
Learners can be selected to be added to the cohort by ticking the box at the far left of their row. You can also select or deselect all rows by ticking or unticking the Selected/Deselect All box.
Learners who have already been exported under the entered cohort reference will already be ticked, and will display the reference in the Cohort column. If you wish to remove a learner from the cohort, un-tick their box.
- Once you have selected the learners you wish to export under the entered cohort reference, click Update. This will populate the AS_EXPORTED_APPS table with a list of the learners under the specified EDRS ID, UKPRN and apprenticeship, along with the cohort reference they have been grouped under. An export file of the data will also be produced.
- Browse to the location you wish to save the export file and click Save.
-
You will be asked if you wish to open the file location. Click Yes or No as required.
The DOB field exports in the correct format of YYYY-MM-DD. However, if you open the export file in Excel, the date will be reformatted, so if you make any changes to the file in Excel then it is important to ensure that the DOB column is formatted as YYYY-MM-DD before saving.
-
The entered cohort reference will be applied to the selected learners.
- Click Close on the Apprenticeship Starts Export window.
Total Price
The Total Price column is calculated by first getting the latest TNP-1 or TNP-3 value from the Apprenticeship Financial Record grid for the relevant apprenticeship, where the financial date is within the date ranged selected on the export screen. E.g. If there is a TNP-1 on 01/08/2017 and a TNP-3 on 02/08/2017, the value for TNP-3 will be used for the base price.
The latest value for TNP-2 or TNP-4 within the selected date range is then added to get the total price.
The records included in the export are as follows:
- For a POT to be included, ALL the below criteria must be true:
- The main aim funding model is 36.
- The contractor’s UKPRN matches the UKPRN entered on the export screen (see section 2.2 for details on which UKPRN field is used).
- An employment status record exists for the learner with a status of 10 (in paid employment), an employment date which is between the selected date range on the export screen and an EDRS ID which matches the one entered on the export screen (or for the branches of the selected employer).
- The programme start date is between the selected date range on the export screen.
- POTs are excluded if they are a continuation of an apprenticeship from an earlier POT (i.e. where the programme completion status is 6).
Employer Terms and Costs
Employer contract terms agreed with a training provider can be recorded against the employer. The terms can then be used for invoicing purposes (note that this requires the Allowances and Payments module).
Add the Contract Terms
- Open the employer record for the employer you wish to add contract terms to.
- Go to the Contracts tab.
-
Click the
 button to add a new row.
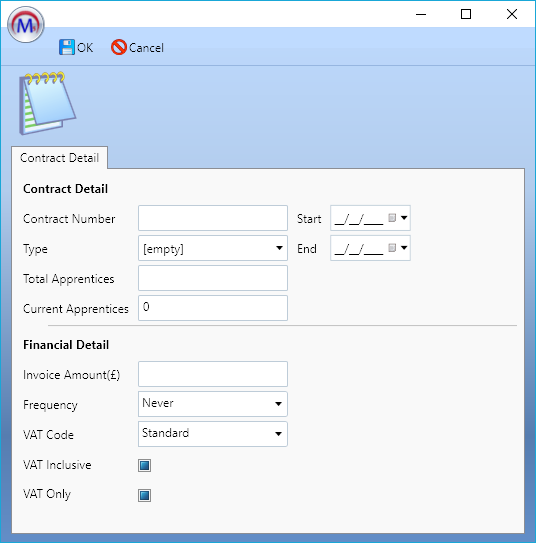
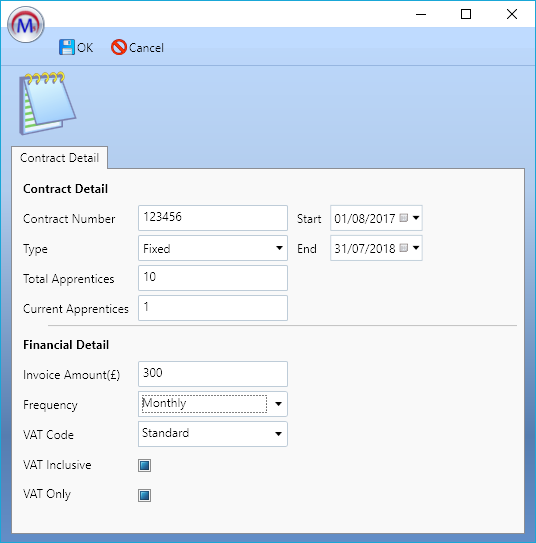
- Complete the contract details:
- Contract Number – This can be any number you want providing it is unique from other used contract numbers. This number is then entered against learners to link them to the contract (detailed later in these instructions).
- Type – This can either be fixed or ongoing. It has no functional purpose other than to describe the type of contract.
- Total Apprentices – Enter the total number of apprentices that the contract should have.
- Current Apprentices – This is not entered, as it is automatically determined by the number of learners attached to the employer who have been assigned the contract number.
- Start / End – These are the start and end dates of the contract terms. Invoices will only run for learners attached to the contract where their learning start/end dates overlap with the contract terms start/end dates. For example, if a learner is in learning from 01/10/2017 to 01/09/2018 and the contract terms are from 01/08/2017 to 31/07/2018, then invoices for this contract will only be generated for the learner from 01/10/2017 until 31/07/2018.
- Invoice Amount(£) – This is the amount in pounds which should be generated for each invoice.
- Frequency – This is the frequency in which invoices should be generated.
- VAT Code – This is the VAT code to use for the invoices.
- VAT Inclusive – Tick this if the invoice amount specified above includes VAT.
VAT Only – Tick this if the invoice amount specified above is ONLY the VAT.
- Click OK when finished, then click Apply.
Assign the Contract to Learners
- Open the relevant employer record and go to the Trainees / Assessors tab.
- Select a learner to assign to the contract and click Edit. Note that you can instead open a learner record and open the employer link from the grid on the Summary tab.
-
Go to the Employer Contract tab.
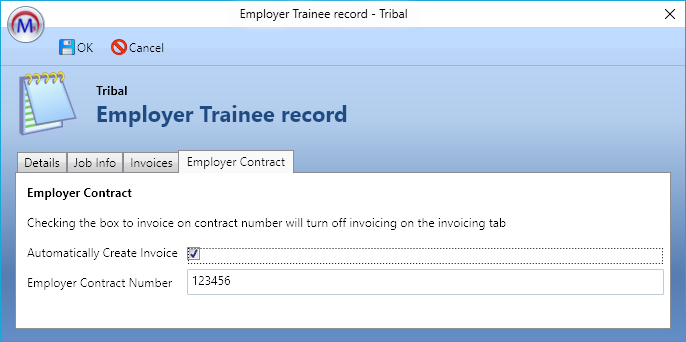
- Enter the Employer Contract Number, which should match the contract number entered on the contract.
-
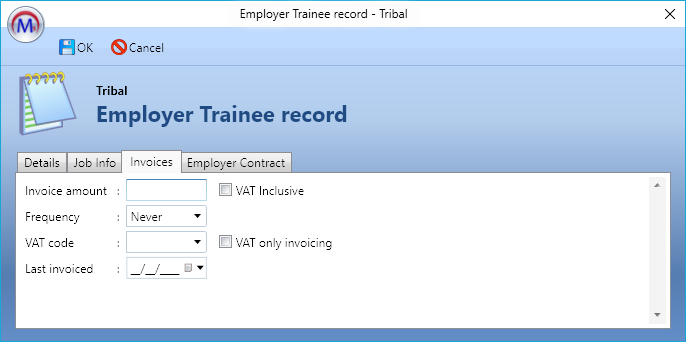
Tick the Automatically Create Invoice box. Note that this is mutually exclusive to invoicing using the Invoices tab, and once ticked it will change the frequency on the Invoices tab to Never. Similarly, changing the frequency on the Invoices tab will untick the box on the Employer Contract tab.
-
Click OK, then click Apply.
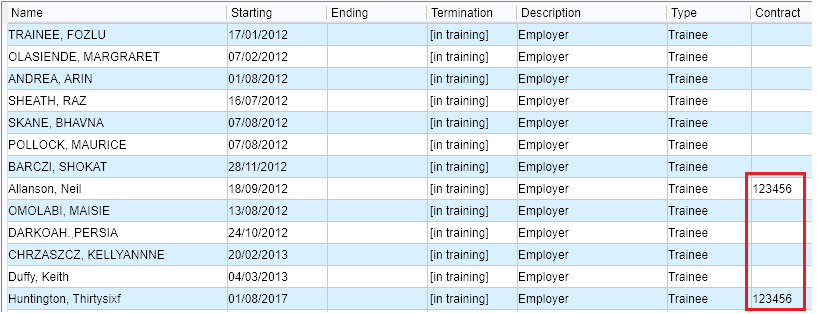
The contract number will be displayed on the Trainee / Assessors grid.
If you wish to use this field in custom reports, the table/column is TREMPLOYER.CONTRACTNUMBER.
-
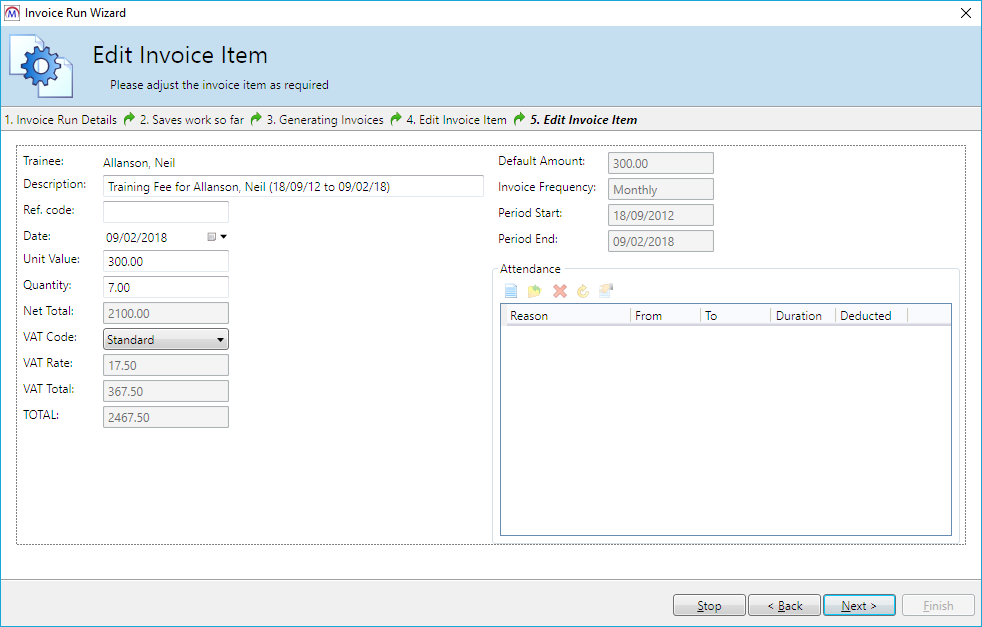
Repeat for additional learners as required. When you perform an invoice run, the invoices for these learners will now be generated.
AS Exported Apprenticeships Tab
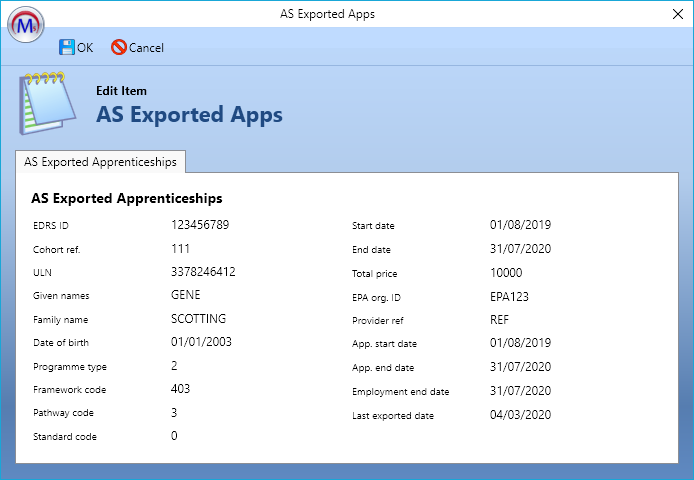
The AS Exported Apprenticeships tab shows what has been exported from the AS export for a learner.
To view the tab, open a learner record and go to AS Exported Apprenticeships. The tab consists of a grid which lists all data produced by the AS export for the learner.

Select a row and click the  button to view full details.
Bulk Upload
Exported AS export files can be imported back into Maytas. Existing cohort details in the AS_EXPORTED_APPS table will be updated so that they reflect the data in the import file.
To import a file:
- Go to Management on the toolbar and click Import on the AS Directory panel of the ribbon.
- Browse to and select the file to import and click Open.
-
The UKPRN, EDRS ID and cohort reference will be derived from the import file. You will be prompted to check and revise them if necessary. Click OK when ready.
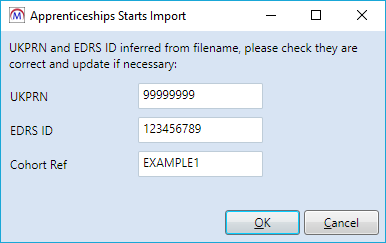
- The import will begin. Click OK on the confirmation message which appears.
- The progress of the import can be checked by going to Home on the toolbar and selecting Server Tasks | View Jobs.
Agreement ID
The Agreement ID field is included on the EDRS Number Lookup tab on employer records so that the Agreement ID can be included in the AS export.
If employer branches are included in the AS export search and a branch has a different Agreement ID to the base employer record, the exported file will the Agreement ID from the branch.

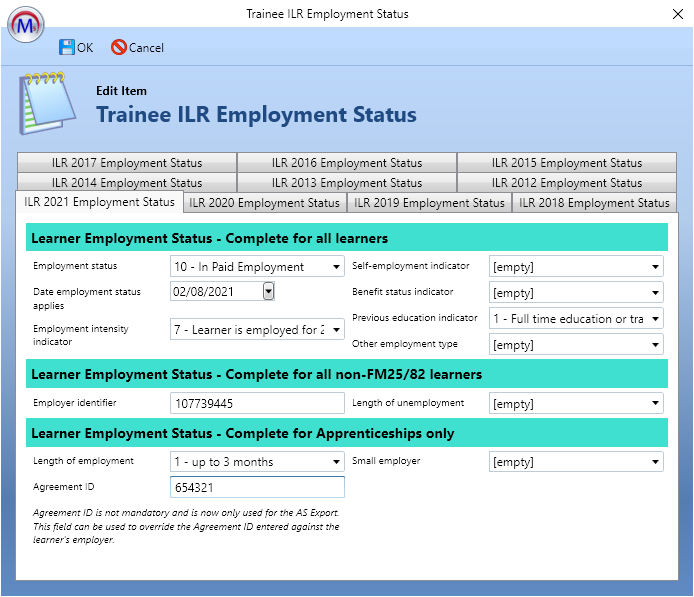
The Agreement ID can also be overridden for individual learners by entering in on the ILR Employment Status record.
