Digital Signatures
Digital signatures allow you to sign a document directly on your computer, tablet or mobile device, without having to print it out. The module allows you to completely digitise your processes, which cuts the need for paperwork and reduces the time it takes to verify paper forms and claim funding. It also reduces the risk associated with audit trails and losing paperwork, as well as removing the need and expense of digital pens.
Signatures can be requested for learners, employers or assessors, and the system tracks requests so you know which documents are waiting to be signed. You can also email documents to be signed, which means the signee does not have to be there in person.
The system records biometric details of each signature, such as the speed of each stroke, to ensure that they are genuinely unique and identifiable to an individual.
There are three parts to digital signatures:
- Signature setup - Before a document can be signed, it must be configured to tell the system whereabouts on the document the signature should go.
- Signing documents - This is the process of actually signing a document.
- Tracking signature requests - Details of each signature request are recorded, including which are pending or have been completed.
Before continuing, you should follow the Digital Signatures Configuration instructions to ensure your system is correctly configured for using Digital Signatures.
Signature Setup
There are two ways of defining where the signature goes on a document:
- A pre-defined, fixed location on a document. This is recommended if the signature will always be at the same position on the same page of a document.
- For documents which can differ in length (i.e. reports), the signature location can be defined adhoc.
Fixed Location Signatures
Prepare PDF and XML
Before a document can be used for signatures, the document must be configured so that the system knows where on the document the signature should go. This only needs to be done once per document (not per signing).
-
First, a PDF must be prepared. If you wish to use one of the PDF exports available in processes, simply use the PDF file from the PDF folder of the Maytas 5 client (please contact Maytas support if you require assistance in locating the client folder).
If you wish to use a report as the document to sign, the report should be run and exported as a PDF. Please note that this is only used for specifying the position of the signature on the document; the data in the report will be generated dynamically during the signature process.
It is important to note that the location of the signature will be fixed once you specify it - i.e. it will not change position dynamically depending on the data. For example, if you have a report that is sometimes 2 pages long and other times 3 pages long, depending on data, and you place the signature position on page 2, the signature will still appear in the same place on page 2 even if the report goes to 3 pages. Therefore if you are using a report to sign, it is advisible to place the signature either in a footer or on a separate signature page so that it is always in the correct place.
- Once you have prepared a PDF, a corresponding XML file must be generated. To do this you must go to a URL on your Digital Signatures server, which will be [server URL]:57004. e.g. If your Digital Signatures server is http://digitalsigs.mycompany.com you would go to http://digitalsigs.mycompany.com:57004.
- Click Open Document at the top-left.
- Click Choose File, browse to and select the PDF and click Upload.
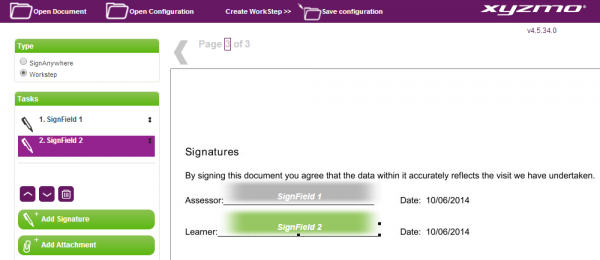
- A preview of the document will be shown. Click Add Signature on the left.
-
A green signature box will appear on the document preview. Click and drag this to the location where you want the signature to go. You can also resize the signature area using the controls around the edge of it, and multiple signatures can be added if required (e.g. for a learner and assessor). If your PDF is over two or more pages, you can go to different pages using the arrow buttons above the preview.

- When finished, click Save configuration at the top of the screen. This will save a file called SaveAnywhereConfiguration.xml. Make note of where this file is, as it is required at a later stage.
The window can be closed at this point.
Prepare Document in Maytas
Once you have generated the XML, the document must be configured in Maytas. To do this, go to Management on the toolbar and select Signature | Definitions.

- Click the
 button.
 - Enter a name for the document (i.e. as it will appear in Maytas).
-
The document can either be generated from a report or one of the PDFs available for use in processes.
If you wish to use a report, select Report, click the
 button and choose the report from the list.
If you wish to use a PDF, select PDF and choose the PDF from the dropdown list.
- Tick the type of person(s) who will need to sign the document (i.e. trainee, assessor or employer). There is also a checkbox to make the document available for signing in Maytas Hub.
- If you have selected a report, you will need to choose the base type of the report (i.e. trainee, assessor, employer or visit). You will also need to specify the field mappings for any parameters on the report:
- Click the
 button.
 A window will appear listing the report parameters in the top-left. Select the parameter you wish to set a value for.
If a parameter has a default value set, you do not necessarily need to map a value to it. All parameters must have either a default value or a mapped value, however.
- Choose the table and field to map to the parameter from the list at the top-right.
- Click Add.
- Repeat for any other parameters which need fields mapping to them and click OK.
- Click the
- Click the
 button next to Workstep Configuration.
 - Browse for and select the XML file that was prepared earlier and click Open. The XML will be copied into the box at the bottom of the screen.
-
One of the lines of XML must now be modified. Locate the following line:
<ServerAction callSynchronous="0">http://localhost:50100/CleanupFinishedWorksteps.aspx?WorkstepID=##WorkstepId##</ServerAction>
-
Replace it with this line:
<ServerAction callSynchronous="0">http://EXTERNALSERVICE/SignatureListenerService.svc/FinishWorkstep/##WorkstepId##</ServerAction>
Please note that this is case sensitive.
- EXTERNALSERVICE must be replaced with the external URL to your data service, which can be found in Maytas 5 Server Manager (please contact Maytas Support if your database is hosted by Tribal):
- In Server Manager, select your data service and click Edit.
The URL can be found in the External Address field. It will look similar to
net.tcp://machinename/service
Copy the folder path - i.e. everything after
net.tcp://
In this example, you would copy machinename/service.
- Click Cancel when closing the data service.
-
Back in Maytas 5 on the definitions page, replace EXTERNALSERVICE with the external URL you have copied (e.g. machinename/service). The row should now look similar to this:
<ServerAction callSynchronous="0">http://machinename/service/SignatureListenerService.svc/FinishWorkstep/##WorkstepId##</ServerAction>
- Click Apply.
Your document will now be prepared and ready for signing.
Adhoc Signatures
Prepare Report
With definitions that use an adhoc signature location, no workstep configuration XML needs to be defined. Instead, Maytas looks for a particular string which can be placed on a report and places the signature there. The string that appears on the report (e.g. in a field) should be as follows:
`sig,fd=Field Description`
Where Field Description is the text you wish to appear before the signature (e.g. Learner signature:). It is important to note that the ` character at either side of the string is a grave accent, NOT an apostrophe. This is the key to the left of the number 1 on UK keyboards.
Please note that Tribal does not offer support with modification of Reporting Services reports. If you would like to discuss purchasing bespoke report work, please contact your account manager.
Prepare Definition in Maytas
Once you have prepared a report, the definition must be configured in Maytas.
Once you have generated the XML, the document must be configured in Maytas. To do this, go to Management on the toolbar and select Signature | Definitions.

- Click the
 button.
 - Enter a name for the document (i.e. as it will appear in Maytas).
- Select Report, click the
 button and choose the report prepared in the previous section from the list.
 - Tick the type of person(s) who will need to sign the document (i.e. trainee, assessor or employer). There is also a checkbox to make the document available for signing in Maytas Hub.
- Choose the base type of the report (i.e. trainee, assessor, employer or visit). You will also need to specify the field mappings for any parameters on the report:
- Click the
 button.
 A window will appear listing the report parameters in the top-left. Select the parameter you wish to set a value for.
If a parameter has a default value set, you do not necessarily need to map a value to it. All parameters must have either a default value or a mapped value, however.
- Choose the table and field to map to the parameter from the list at the top-right.
- Click Add.
- Repeat for any other parameters which need fields mapping to them and click OK.
- Click the
- For the Workstep Configuration, instead of importing an XML file, simply click in the text area and enter the word ADHOC. This will tell Maytas to look for the string in the report as defined in the previous section.
- Click Apply.
Your document will now be prepared and ready for signing.
Signing Documents
To sign a document, open the record of the person who needs to sign it (i.e. a learner, assessor or employer record). For this example we will use a learner record:
- In the learner record, click Sign Forms on the ribbon and select the document to sign.
- In the window that appears, choose who to send the signature request to (assessor, employer or trainee). This will automatically populate the Employer, Assessor and Email Address fields on the window.
- If you wish to send the signature request to a different email address than the one shown, change it as required.
- You can optionally click Preview to see what the document will look like (minus the signature).
- Click Next.
- An email will be composed containing three links: one for signing on a PC (the top link), one for signing on an iPad and one for signing on an Android device. Either send the email onto the recipient or simply follow the appropriate link to sign yourself. This will launch a browser and connect you to the signing screen.
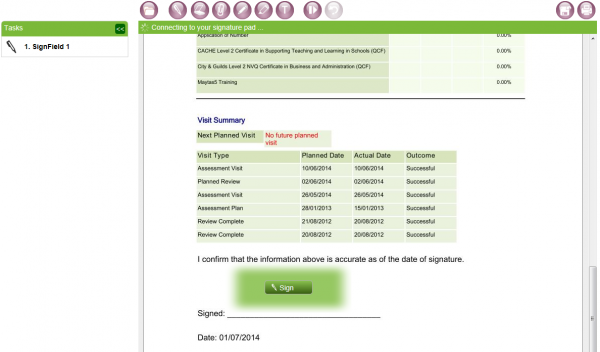
- If you are signing on a PC, the system will attemp to connect to a USB signature pad. If you do not have a signature pad, it will ask if you wish to sign by mouse or search for a pad again. Choose an option and click OK.
-
Locate the signature area on the document - this will be a green area with a Sign button. Click the button.

- You will now be prompted to sign. Make your signature and click OK (note that on some signature pads, you may need to tap OK on the pad itself). Alternatively, click Retry if you wish to sign again.
-
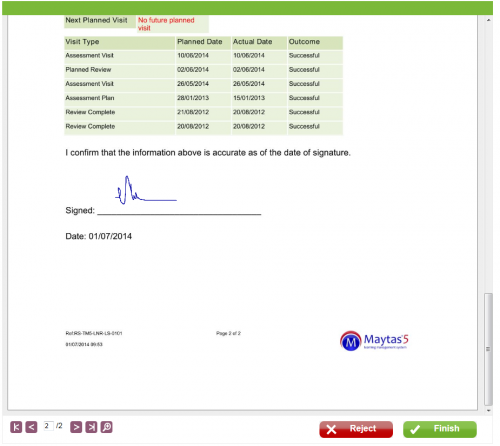
The signature will now appear on the document. At the bottom of the screen there are buttons to Finish or Reject. If you are happy with the result, click Finish and click OK to confirm. This will now store the document and the signature details in Maytas. You can also save a copy of the document by clicking the
 button at the top-right of the screen.
Signature Requests
All signature requests are logged in Maytas. To view these, go to Management on the toolbar and select Signature | Requests.

The requests table defaults to only showing signed requests. To show more requests, click the  button and choose whether to show requests with a status of awaiting, rejected, signed or confirmed (or all requests).
To view the details of a request, select the row then click the  button.
To refresh the status of a row, select the row then click the  button.
To set a row's status as confirmed, select the row then click the  button.
To download the document for a request that has been signed, select the row and click the  button.