Scheduler
The Scheduler is a centralised tool for setting up and viewing all things that can be scheduled in Maytas, including auto-contact, the funding cache and report batches.
To enable the Scheduler for a user:
- Go to Tools | Edit Permissions.
- Select the user or group which requires permission.
- Go to the Commands tab and expand the Scheduler section.
- Set the permission Show Scheduler to Visible.
- Click Apply.
- Restart Maytas for the permission to take effect.
To access the Scheduler, go to Tools | Scheduler.
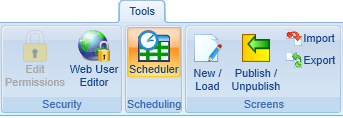
The Scheduler will open.
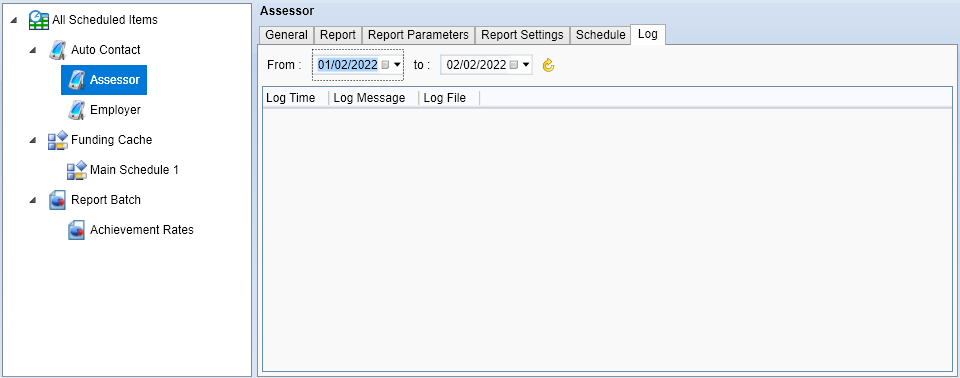
The tree view on the left lists all scheduled items, split by auto-contact reports, funding cache schedules and report batches.
Create a Funding Cache Schedule
- Go to Actions on the toolbar and select New | Funding Cache.
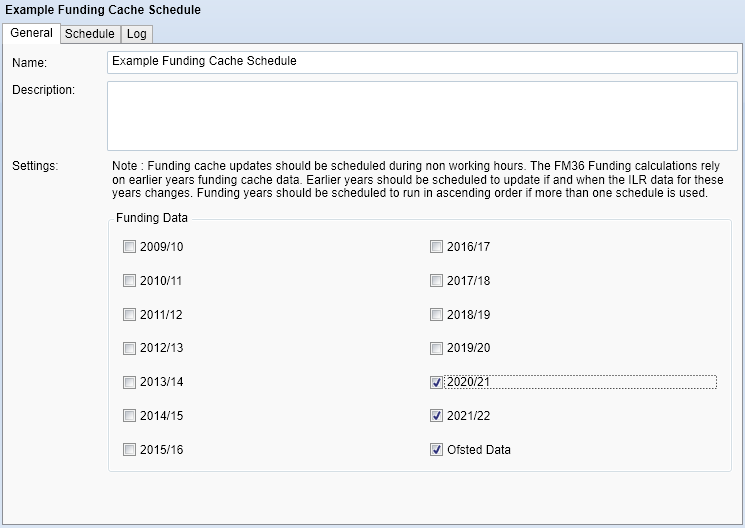
- On the General tab, enter a name and description for the schedule.
-
Choose the years to run the funding cache for. If you wish to include a refresh of the QAR cache as well, tick the Ofsted Data box.
For FM36 funding, funding cache information from previous years is used in the calculations. However, if data has not changed for a previous year since the last funding cache update, that year does not need to be included in the cache update each time as it will remain unchanged. As such (and taking into account that the more years that are included, the longer the cache update will take), it is recommended to only include previously cached years when data is likely to change for them (e.g. the previous year) or if you know of specific data that has changed for a past year.
-
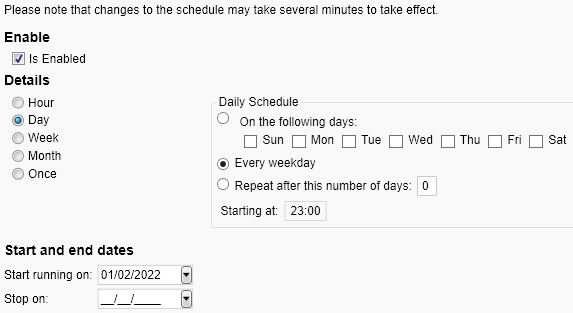
Go to the Schedule tab. This is where you can configure when (and how often) the funding cache will run.
-
Set the schedule in the Details section. It can be set to run periodically (e.g. every day, week, etc) or just once at a specified time. Please note that if you intend to start the schedule immediately, the start time should be at least 10 minutes in the future to ensure it is picked up by the system.
It is strongly recommended to schedule the funding cache to run out of business hours, as it can take a long time to complete depending on the size of the database and various other factors and may use a large amount of system resources during that time.
- Set the start date at the bottom of the window. The schedule will run indefinitely by default, but if you want the schedule to end on a particular date then tick the Stop this schedule on box and set the date.
- When you have finished configuring the schedule and want to activate the schedule, tick the Is Enabled box at the top of the tab.
- Click Apply on the ribbon to save the schedule.
The Log tab shows a log of when the schedule has been run, which can be filtered between two dates.
Create an Auto Contact Schedule
The Scheduler allows you to schedule a report which will automatically send an email or SMS to a list of learners, assessors or employers in the report. This is done by creating a mail merge report in Report Generator, configuring it for auto-contact and then deploying it in the Scheduler.
Configure the mail merge report
First, a report must be set up for mail merge and configured for the auto-communication settings. The report must at minimum contain the following:
- A list of learners, assessors or employers
- Their ID fields (e.g. TRAINEEID, ASSESSORID or EMPLOYERID)
- Their email addresses and/or phone numbers (depending on whether you want to send them emails or SMS, or both).
Several standard reports are available for this which can be used or amended as required. These are included with each release package and can be imported as follows:
- On the Home tab, click Edit on the Reports panel of the ribbon.
- Click Import.
- Browse to the Maytas 5\Extras\Auto-communications reports folder of the upgrade.
- Select the first report and click Open.
- Click OK on the message which appears.
- Repeat steps 2 to 5 to import the remaining reports.
-
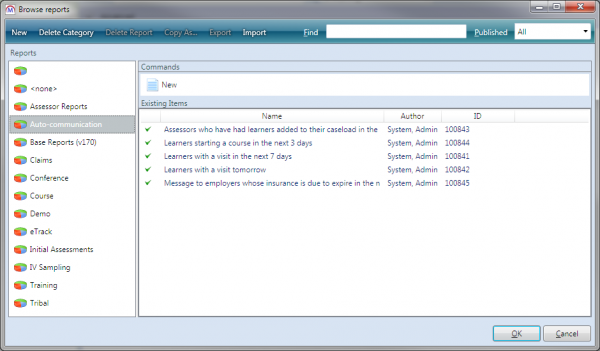
The imported reports can be found in the Auto-communication folder of the Browse Reports screen:
Once you have chosen a report, open it for editing in Report Generator:
- On the Home tab, click Edit on the Reports panel of the ribbon.
- Select the report and click OK.
- Click Run to run the report.
- To set up the report for email (this step is not required for SMS):
- Go to Mail Merge | Create new…
- The mail merge document will open. This will be used for the email body. At minimum, this requires the ID field and the email field, which can be added by clicking Insert Merge Field and selecting them.
- Save the document.
- When prompted, enter the mail merge name, select the action as Email, enter the email subject line and click OK.
- Sync and re-open the report editing screen.
-
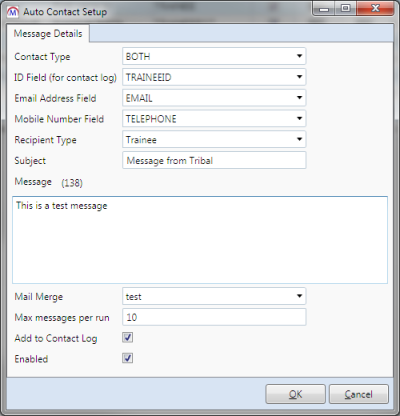
Click Set up Auto Contact.
-
The Contact Type lets you configure the report for sending SMS, email or both. You will not be able to select these options if the relevant system config options are not present:
For email, the config can be found under Maytas 5 | Admin | Maintenance and is called The SMTP server for sending emails in Maytas.
For SMS, the configs under Maytas 5 | SMS Text Integration must be completed.
For this example, we will use BOTH.
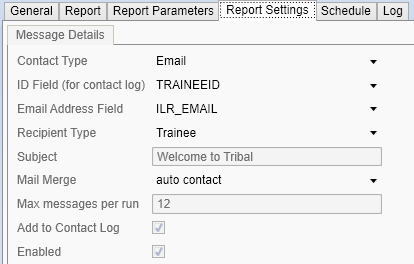
- Set the ID field to the relevant ID (e.g. TRAINEEID, ASSESSORID or EMPLOYERID, although alternative ID fields can be selected if needed).
- Select the field to use for the email address and mobile number. Again, these do not necessarily need to be the standard EMAIL or TELEPHONE / MOBILE fields.
- Choose the recipient type (e.g. for a list of assessors, choose Assessor).
- Enter the subject, which is used as both the SMS and email subject.
- Enter the SMS message.
- Select the mail merge to use for the email body.
- Max messages per run determines the maximum number of messages that can be sent every time the schedule is run (if you choose BOTH rather than just email or just SMS, a max of 10 would mean a max of 10 emails and 10 SMS, not 5 of each). Amend this as required.
- If you want to add sent messages to the contact log, tick the Add to Contact Log box.
- To make the report available for scheduling, tick the Enabled box.
- Click OK, then click Apply.
Configure the Auto-Contact
- Go to Tools | Scheduler.
- Go to Actions on the toolbar and select New | Auto Contact.
- On the General tab, enter a name for the schedule. Leave the subject and message for now.
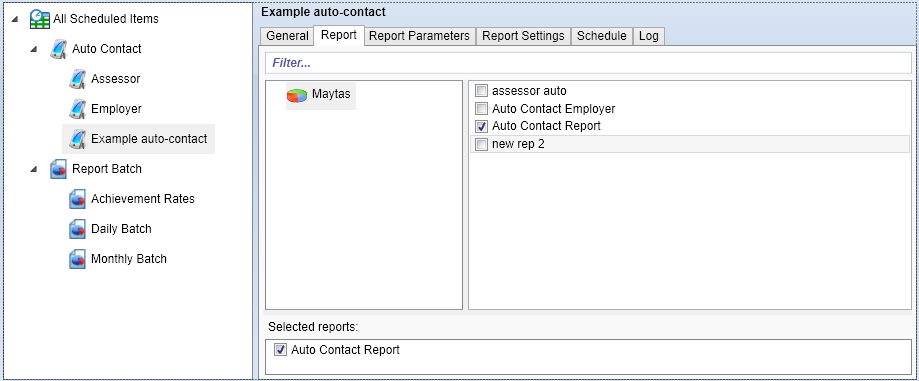
- Go to the Report tab and select Maytas on the left.
-
Select the report you wish to use on the right. Note that only reports configured for auto-communication will appear here.
- Go back to the General tab and amend the subject and message as required (they will default to the values entered when configuring auto-communication).
-
Go to the Report Parameters tab and click the arrow next to the chosen report to expand its parameters.
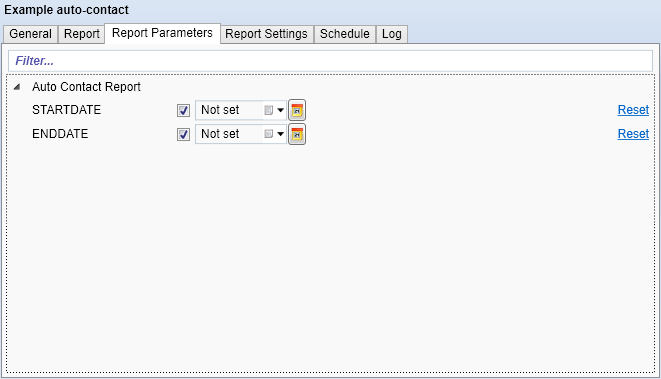
In this example, the report filters learners based on their POT start date being between the STARTDATE and ENDDATE parameters.
- Configure the parameters as required.
-
Go to the Schedule tab.
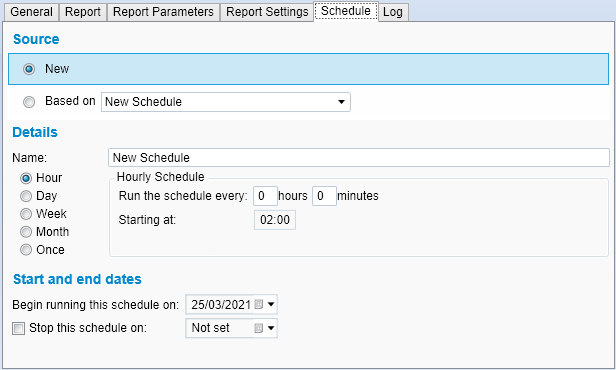
- On this screen, the schedule can be configured. If you have an existing schedule, you can choose it by clicking Based on and selecting it from the list. Otherwise select New.
- Set the schedule in the Details section. It can be set to run periodically (e.g. every hour, day, month, etc) or just once at a specified time. Please note that if you intend to start the schedule immediately, the start time should be at least 10 minutes in the future to ensure it is picked up by the system.
- Set the start date at the bottom of the window. The schedule will run indefinitely by default, but if you want the schedule to end on a particular date then tick the Stop this schedule on box and set the date.
- Click Apply on the ribbon to save the schedule.
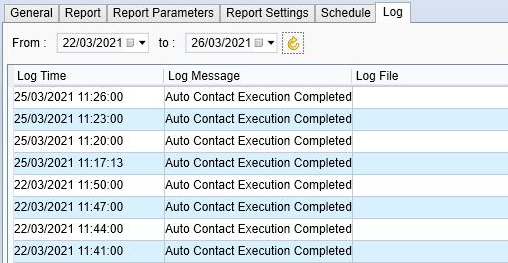
The Log tab shows a log of when the schedule has been run, which can be filtered between two dates.
The Report Settings tab shows key information about how the report auto-communication is configured. Note that this tab is read-only.
Create a Report Batch Schedule
- Go to Actions on the toolbar and select New | Report Batch.
-
On the General tab, enter a name for the batch and enter your recipient email addresses in the email recipients box at the bottom.
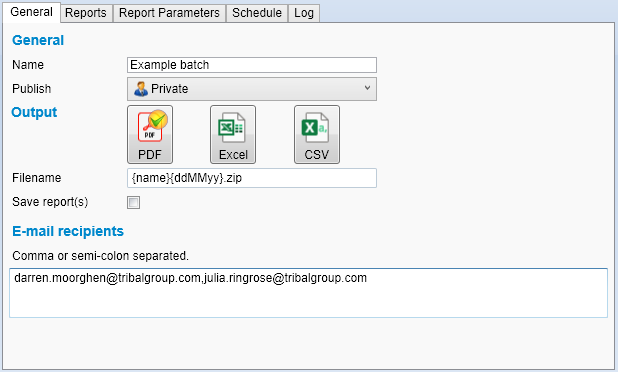
There are also options to publish privately, globally or to a group, to export to PDF, CSV or Excel and to alter the filename, but for this example we will accept the defaults. Note that the default filename of {name}{ddMMyy}.zip will create a file using the batch name and the date it was created.
-
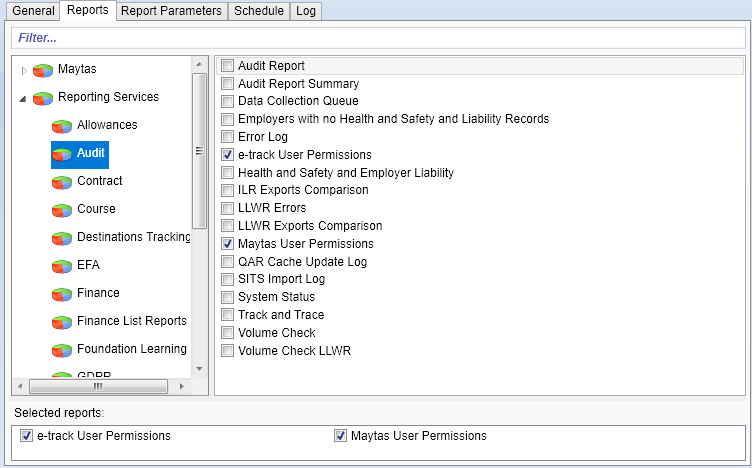
Go to the Reports tab, where you can choose which reports to include in the batch. Click the arrow next to Maytas or Reporting Services to shows reports created in Report Generator or reports from the Reports Library respectively. The select reports will be shown at the bottom of the screen.
-
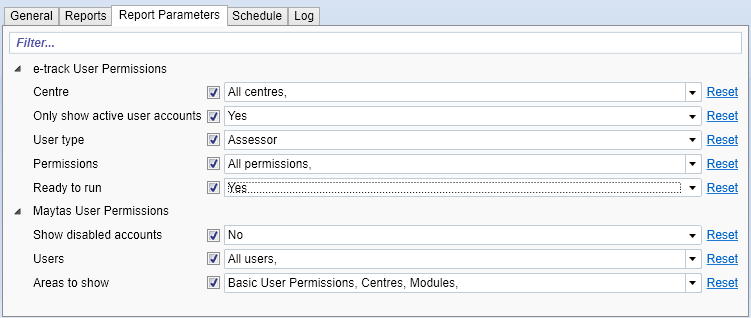
Go to the Report Parameters screen and click the arrow next to each report to expand its parameters. Configure the parameters as required.
-
Go to the Schedule tab.
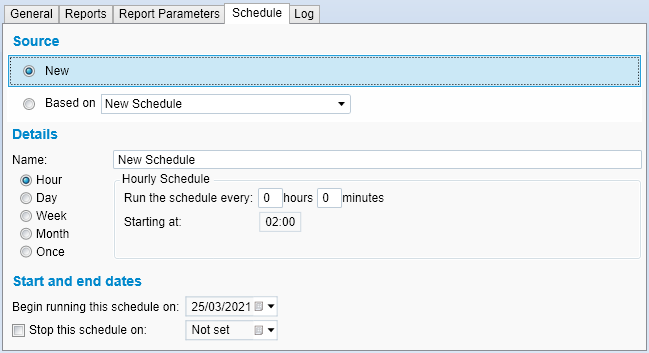
- On this screen, the schedule can be configured. If you have an existing schedule, you can choose it by clicking Based on and selecting it from the list. Otherwise select New.
- Set the schedule in the Details section. It can be set to run periodically (e.g. every hour, day, month, etc) or just once at a specified time. Please note that if you intend to start the schedule immediately, the start time should be at least 10 minutes in the future to ensure it is picked up by the system.
- Set the start date at the bottom of the window. The schedule will run indefinitely by default, but if you want the schedule to end on a particular date then tick the Stop this schedule on box and set the date.
- Click Apply on the ribbon to save the schedule.
The Log tab shows a log of when the schedule has been run, which can be filtered between two dates.
Report Scheduling Configuration Options
There are several configuration options which can be set for report scheduling:
- Click the M5 button at the top-left and select Options.
- Select Admin on the left (under the Maytas 5 header).
-
Scroll down to the Reporting section on the right. There are three applicable options:
- Scheduling Verbose Logging - Off by default. When this is enabled, the logs for report batches will include additional information. After enabling it, Maytas must be closed and the data service must be stopped and restarted in Maytas Server Manager (please contact Tribal if your Maytas server is managed by us).
- Include email messages in scheduling logs - Enabled by default. This will include the contents of email messages in the log entries.
- Remove mail attachments from scheduling log entries - Enabled by default. This will remove mail attachments when saving email content in log entries.
- An additional option, Scheduling Verbose Logging, can be found by selecting Auto Contact on the left (under the Maytas 5 header). This is off by default. When it is enabled, the logs for auto-contact schedules will include additional information. After enabling it, Maytas must be closed and the data service must be stopped and restarted in Maytas Server Manager (please contact Tribal if your Maytas server is managed by us).
- Click OK when finished.
How to configure the directory for saving scheduled reports
The base directory where scheduled reports are saved can be specified in a configuration option(each scheduled report can specify its own sub-folder within that directory).
If no base directory is specified in the configuration, reports will not be saved.
To specify the base directory:
- Click the M5 button at the top-left and click Options.
- Select Admin on the left (under the Maytas 5 header) and scroll down to the Reporting section on the right.
- Tick the checkbox next to the Base path for scheduled report exports config.
- Enter the base directory where scheduled reports should be saved (e.g. C:\Reports).
- Click OK.
Reports schedules will then let you specify a sub-folder within that directory:
- Go to Tools | Scheduler.
- Go to New | Report Batch.
-
On the General tab, tick the Save report(s) box. Additional settings will appear.
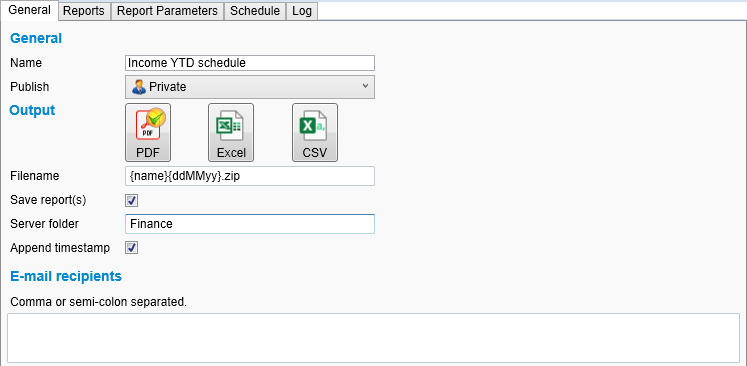
- Enter a Server folder. This is the sub-folder within the base directory where the scheduled reports will be saved.
- If you wish to include the date and time in the filename of saved reports, tick the Append timestamp box.
- Complete the rest of the batch as required and click Apply.