5.14 Maytas ESFA Release Notes
Note regarding submissions
We would like to remind providers to create a submission early and check for any errors using reports from the appropriate software (i.e. the FIS or LLWR-Inform). Welsh providers should also remember to download their ULI file. After submission to the ESFA or DfES, providers should check that data has submitted correctly using the available reports. Providers should check that all their expected starts and completions are submitted correctly, and that start and outcome payments correctly match the PFR or ACE funding reports.
Our support desk gets extremely busy in the days prior to the submission deadlines, and although we try and prioritise submission-related queries, we cannot guarantee assistance if queries are sent late. If you do encounter any issues, please ensure that you contact Maytas Support as soon as possible, as we can only rectify issues of which we are aware. We also recommend checking Maytas.net regularly for information on any known issues and solutions. Tribal cannot be held responsible for any issues caused by your failure to comply with this advice.
Data migration
Please note that it is important to ensure that all 2017/18 learners have been entered before the upgrades are applied. This is because the upgrade migrates 2017 data to the 2018 fields, and any 2017 learners entered after the upgrades will not be migrated. As such, if any 2017 learners do need to be entered after the upgrade, both the 2017 and 2018 tabs must be completed to ensure all data is present and correct.
Technical specification
The latest Maytas and e-track technical specification can be found here.
Once the upgrade has been completed, the version number should be checked to ensure it has been successful.
- Start Maytas and go to Support on the toolbar.
- Click About.
- The version numbers should read 181.20 / 5.14.6406.2. If you have any other version, please ensure you have followed the upgrade instructions correctly. If you require assistance, please contact Maytas Support.
It is the responsibility of customers to ensure that users carry out any required user acceptance testing and sign off on the upgrade.
Complete the Upgrade
Features Added in the Upgrade
These are the main updates in the upgrade:
- ILR tabs for 2017/18
- ILR reports for 2017/18
- Updated ESFA validation rules
- ILR rollover funding for 2017/18 using 2016/17 rules
- ILR batch export
- Lookup changes for new and revised fields
- Updates to AS Management
- Updates to Financial Planning
- Reports Centre auto-communication
- Fixes to a number of issues
Reports Library 1.0.2.4 is also included in the upgrade but must be installed separately. This is detailed in the Upgrade Guide. If you are a hosted customer, please contact the Service Desk to arrange for the reports library update to be applied.
Check the Contractor Details for the ESFA Export
- Open Maytas 5 and select Management | Contracts.
- Highlight the contractor name (company) you wish to edit.
-
Right-click and select Edit.
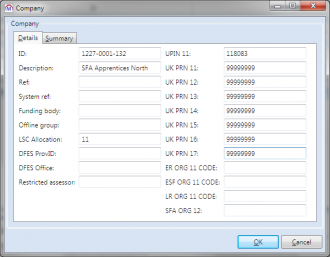
- The Company screen will be displayed. The technical upgrade will have copied the UK PRN field to the new 17 box. If necessary, you should amend this value.
- Providers need to ensure that these instructions are completed for each company (contractor) used for the ESFA export.
Create the 2017/18 ESFA Formula-Funded Contract
A 2017/18 ESFA formula-funded contract should be set up for each ESFA contractor. Without this contract, Maytas is unable to determine the funding rules, schemes and lookup codes to use.
- In the Contracts module, left-click the contractor (company) to which you wish to add the new contract.
- Click Add Contract on the ribbon.
-
Make sure that option 1. Existing company is selected then click Next.
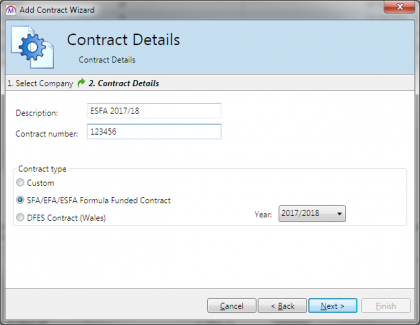
- Enter a contact description (e.g. ESFA 2017/18).
- Enter a contract number if required.
- Select the SFA/EFA/ESFA Formula Funded Contract option.
- Select year 2017/2018.
- Click Next.
- Amend the schemes you wish to include in the contract and click Next.
- Click Finish.
The Contract Wizard will create the appropriate funding model within Maytas and set up all of the schemes that apply.
Re-Import the FIS Data Sets
The FIS data sets must be re-imported for this upgrade, even if they were imported in a previous upgrade.
It is essential that the latest aim information is imported into Maytas for use by the ILR export. This should be done by importing the relevant information directly from the Data Service’s Funding Information System (FIS). To do this, you must have the FIS installed and correctly configured (please refer to the Data Service’s instructions for setting up the FIS).
Please ensure you have the latest version of the FIS with the 2017/18 components installed.
Once the FIS is installed and configured, the information can be imported as follows:
- Perform a sync in Maytas 5, then restart Maytas 5.
-
Go to Exports | Uploads | Upload FIS Data Sets.
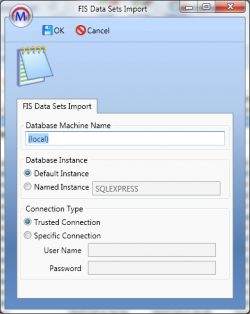
- There are three items to configure:
- Database Machine Name – If the FIS is installed on the same machine that you are using for Maytas 5, this can be left as (local). Otherwise, enter the machine name of the SQL server where the FIS database is held.
Database Instance – If the SQL server holding the FIS database has a named instance (e.g. MACHINENAME\INSTANCENAME), select Named Instance and enter the instance name. Otherwise leave this as Default Instance.
If you have no named instance and Default Instance does not work, you may need to select Named Instance and leave the instance name blank.
- Connection Type – This is the login for the SQL server holding the FIS database. Trusted Connection will use Windows authentication. If you wish to specify the login details, select Specific Connection and enter the credentials.
- Click OK. The FIS data will now be imported.
- If you have an Adult Skills budget contract and a transition factor, this must be entered on the contract:
- Go to Management on the toolbar and click Contracts on the ribbon.
- Select the relevant contractor, then select the Adult Skills contract on the right.
- Click the
 button.
 - Go to the Uplifts tab.
- Enter the ASB Transition Factor and click OK.
- Click Apply to save the change.
Note on the Funding Cache
By default, the funding cache will update overnight so that funding information in Maytas uses the newly-imported FIS and postcode information. Please check with your system administrator if you are unsure if or when the funding cache is updated on your system. You can also manually set the funding cache to update by going to Management | Profiles and clicking the Funding Cache button, though please be aware that this may take a long time and may use a large amount of system resources, which could affect performance for other users on the system.
Maytas 5 Version 5.14.6406.2 Release Notes
2017/18 Contract Year Updates
New Contract Year Tabs
New Maytas tabs for 2017/18 have been produced for the ILR and LLWR as per specifications from the Data Service and DfES. These will have been imported automatically in the upgrade. Please note that while both ILR and LLWR tabs are imported, the relevant tabs will only show for the relevant learners – i.e. ILR tabs will only show to learners on English schemes and LLWR tabs will only show to learners on Welsh schemes. Details of the tabs can be found below.
Please note that user permissions will need to be set for the new tabs, as by default they are available to all users. Also please note that if you have changed the field type for any ILR fields (e.g. to or from a lookup), these will need to be changed from the default field type in the screen designer.
ILR Changes for 2017/18
These are the main ILR changes for 2017/18 which have been implemented in Maytas:
New Tabs for 2017/18
There are six new ILR tabs for 2017/18:
- ILR 2017 App (starter and leaver info) – These are intended for learners on Apprenticeships.
- ILR 2017 16-19 (starter and leaver info) – These are intended for 16-19 (excluding apprenticeship) learners, including Traineeships funded through the 16-19 funding model.
- ILR 2017 Other (starter and leaver info) – These are intended to be used for all learners who are not on Apprenticeship or 16-19 schemes, including 19-24 Traineeships.
The following table shows the 2017 equivalents for the 2016 tabs:
| 2016 tab | 2017 equivalent tab |
|---|---|
| ILR 2016 App | ILR 2017 App |
| ILR 2016 EFA | ILR 2017 16-19 |
| ILR 2016 Non-App | ILR 2017 Other |
The Data Service has not published official ILR forms this year. As such, the tabs have been designed based on the ILR specification, with a simple two-column layout.
As in previous years, the tabs have been designed so that only the appropriate tabs appear for each scheme. However, we are aware that many providers have bespoke or non-standard scheme groups. In these cases, it is possible that the tabs may not appear on certain schemes. This can be rectified in the following way:
- Check the group type of the scheme (SCHEME.GROUPTYPE).
- In Maytas 5, go to Tools on the toolbar and click New / Load on the Screens panel.
- Select Trainee on the left.
- Double-click the ILR tab which is not appearing. The tabs for 2017/18 are:
- ILR 2017 App Starter Info
- ILR 2017 App Leaver Info
- ILR 2017 16-19 Starter Info
- ILR 2017 16-19 Leaver Info
- ILR 2017 Other Starter Info
- ILR 2017 Other Leaver Info
-
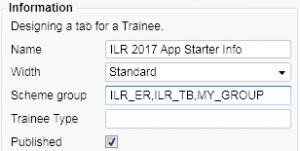
Alter the Scheme group as required. Each group should be separated with a comma (no spaces). For example, if the App tab is not showing for scheme 3, and the group type for scheme 3 is called MY_GROUP, the tab should be set as in the screenshot.
- Click Apply to save the changes.
Obsolete Fields
The following fields are now obsolete and have been removed from the 2017/18 tabs and reports:
- Learning difficulty assessment (LDA)
- Special projects and pilots (SPP)
New Fields
There are three new ILR fields for 2017/18:
- Pre-merger UKPRN – This appears in the learner information section on all three starter tabs.
- Work placement hours – This appears in the work placement grid on the ILR 16-19 and ILR Other starter tabs.
- End point assessment organisation – This appears in each aim section on the ILR App starter tab.
Notes on Continuing Learners and Migration
As part of the upgrade, data for continuing learners is migrated from the 2016/17 fields to the 2017/18 fields. Any changes to continuing learners and any late-notified learners entered after the upgrade should be completed on both the 2016/17 and 2017/18 tabs. This is because certain ILR fields are recorded in different fields in the database from year to year, and therefore it is important to ensure that all data is completed and correct on both tabs.
The following fields are NOT migrated from 2016/17 to 2017/18:
- Learner reference number in previous year
- UKPRN in previous year
- Accommodation
- Learning support cost
- Planned learning hours
- Planned EEP hours
- GCSE maths qualification grade
- GCSE English qualification grade
- High needs students
- Learner support reason
- Special educational needs
- Eligibility for 16-19 (excluding Apprenticeships) disadvantage funding
- GCSE maths condition of funding
- GCSE English condition of funding
- Free meals eligibility
- Pupil premium funding eligibility
- Financial support type (HE)
- Financial support amount (HE)
It is important to ensure these fields are completed on the 2017/18 tabs where required.
ILR Reports for 2017/18
Since the Data Service has not produced official ILR forms for 2017/18, the ILR reports have been created using the available ILR guidance for 2017/18. Providers should check with the ESFA that they are happy for the current reports to be used and that it is compliant for audit purposes. As this has been the case for the reports in previous years, we do not expect any issues in this regard.
There are reports available for apprenticeship, 16-19 (excluding apprenticeships) and non-16-19 learners.
The ILR reports are automatically imported in the upgrade and can be found in the ILR folder of the Reports Library.
The following table shows the 2017 equivalents for the 2016 reports:
| 2016 report | 2017 equivalent report |
|---|---|
| ILR Apprenticeship 2016-17 | ILR Apprenticeship 2017-18 |
| ILR EFA 2016-17 | ILR 16-19 2017-18 |
| ILR Non-App 2016-17 | ILR Other 2017-18 |
There are two ways to run the reports:
- On the Home tab, select Report Library | ILR and select the required report. This will let you search for a learner and choose whether to show codes or descriptions for the fields. It will also let you select the sections to show.
- In a learner record, click Process and select the appropriate ILR 2017/18 process. This will open a PDF export of the report for the learner / POT. It will use the default of showing code values.
ILR Export 2017/18
The ILR export for 2017/18 is now available in Maytas. To view the ILR export screen for 2017/18:
- Click Exports on the toolbar.
- Click ILR Export on the ribbon.
-
Click the
 button.
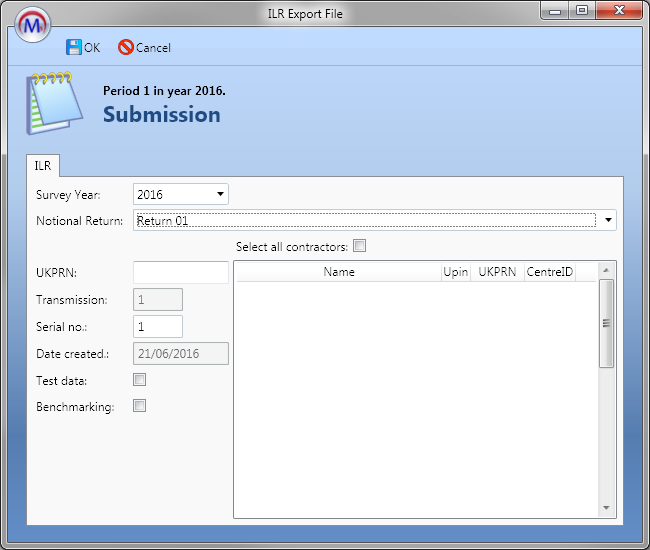
- Choose 2017 from the Survey Year dropdown box.
- Choose the Notional Return period.
- Amend the UKPRN as required.
- Once ready, click OK.
-
Locate the submission by expanding the contract year and period using the arrows to the left. Click the submission to select it. The status will say Generate pending until the export data has been generated. It will then say File preparation finished. Please note that this may take a while, depending on the amount of data being exported.

- Edit opens the export and allows you to view and edit the export settings. Please note that not all settings can be changed once an export has been created.
- Generate processes the export and produces a text file showing any errors for each learner. This allows you to correct any errors and re-generate before the batch file is created. The generation progress is shown with the circular progress bar to the right.
- View Log shows any errors in the export. These should be investigated and resolved and the data re-generated before outputting the XML.
- Output XML creates the actual batch file. The file will be created at C:\Temp on the Maytas server.
- Get File lets you download the batch file once it has been created.
The 2017/18 ILR export has been tested and validated against version 2 of the ILR specification as well as other supporting documentation. As of this release, the provider support manual has only very recently been released and any changes required from it are yet to be implemented. The export has been tested against the latest beta version of the FIS software which was available in July. While we have tested the ILR export to the best of our ability with the available specifications, there may be further issues which have not yet been identified. We also expect that future versions of the FIS and the ILR specification may require the export to be changed to meet any new criteria. Any changes that are required will be implemented in a follow-up release of Maytas.
ILR Export Notes
It is important that providers are aware of the following regarding the 2017/18 ILR export:
Correction of 2016/17 data after R14
The Provider Support Manual states that if data is found to be incorrect after the hard close of the 2016/17 contract year (R14), and the data is incorrect due to an administrative error, then the data should be corrected and continue to be submitted in 2017/18. For learners in this circumstance, the force export flag should be used to include them in the 2016/17 export. Please contact Maytas support if you require assistance with this.
Migration of ILR export override flags
The following details whether ILR export flags are migrated from 2016/17 to 2017/18. For information on setting these flags, please contact Maytas support.
Force Export Flag
The 2016/17 force export flag is not copied to the 2017/18 force export flag. To override the ILR export and include a POT that does not meet the 2017/18 ILR export criteria, the 2017/18 export flag must be set.
Blocking Flags
The 2016/17 blocking flags are copied to the 2017/18 blocking flags. Aims blocked from the 2016/17 export will continue to be blocked in the 2017/18 export.
Work experience aims
A new aim reference, ZWRKX001, has been introduced for work experience aims which start in 2017/18. The ILR export for 2017/18 will include data from the work placement grid if either this new aim reference or any of the old work experience aim references are entered.
Funding Information
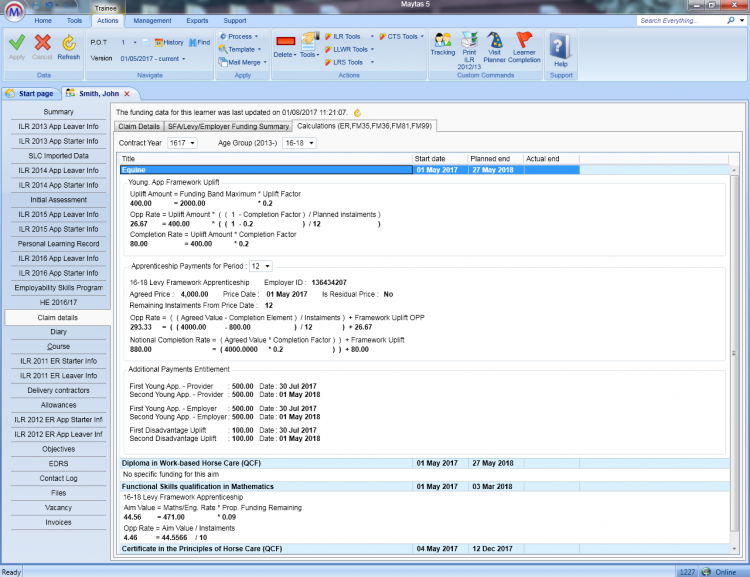
The funding information for 2017/18 in this upgrade is based on the funding rules for 2017/18, since full specifications were not available at the time of development. The 2017/18 funding information in this upgrade should be considered a beta version and is subject to change once specifications have been published.
Completion Status, Outcome and Apprenticeship Contract Type (ACT)
Updated versions of the ILR 2016/17 leaver tabs which use new fields for outcome, completion status and the ACT applies to date (referred to as the R14 fields) are included with this release. Data from the existing outcome, completion status and applies to fields is migrated to them during the upgrade, and in most cases these values do not need to be altered. The R14 fields are what will be used for the 2016/17 ILR export and the existing outcome, completion status and applies to fields will continue to be used from 2017/18 onwards.
The purpose of this change is to allow different values for 16/17 and 17/18 to be recorded, so that learners who completed in 16/17 who were on a break in learning or had an unknown outcome can be correctly included by the 17/18 ILR export. As with any other continuing learner, you should ensure that data is correct on the tabs for each contract year.
For late-notified leavers where the learner left in 16/17 but the data is entered during 17/18, it is important that you enter the outcome and completion status on both the 16/17 and 17/18 tabs, even though the learner has not continued into 17/18. This is to ensure the data is recorded in the existing / ongoing fields so that the correct data for these learners is included on reports.
Apprenticeship Service (AS) Updates
DAS renamed to AS
The Digital Apprenticeship Service (DAS) has been renamed to the Apprenticeship Service (AS). As such, all references to the DAS in Maytas have now been renamed to the AS.
2017/18 UKPRN
The UKPRN field for 2017/18 is now available on contractors (see the earlier section Check the Contractor Details for the ESFA Export for details on entering this). Calculations in the AS export which use UKPRN will now use the 2016/17 UKPRN for learners whose POT start date is before 01/08/2017 and the 2017/18 UKPRN where the POT start date is on or after 01/08/2017.
Exclude learners already exported
An option is available to exclude learners from the apprenticeship upload for a specific cohort if they have already been exported on that cohort. On the apprenticeship starts export screen, tick the Exclude already exported cohorts checkbox.
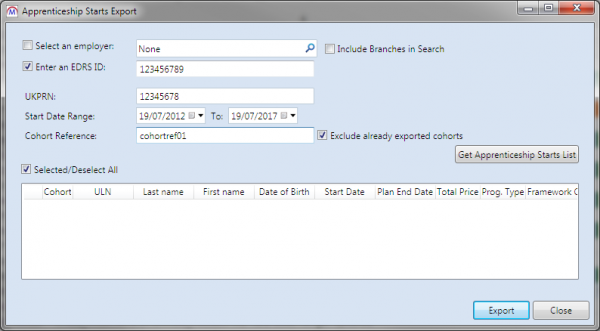
This will exclude any learners who have been previously included in the entered cohort (reference cohortref01 in the example above).
Update to upload header format
The AS upload specification has changed the format of the headers. As such, Maytas has been updated so that the headers in the apprenticeship upload match the new format.
Total Price and export details
We have received several queries asking how the Total Price column included in the apprenticeship starts export is calculated, and also which records are included in the export.
The Total Price starts by getting the latest TNP-1 or TNP-3 value from the Apprenticeship Financial Record grid for the relevant apprenticeship, where the financial date is within the date ranged selected on the export screen. E.g. If there is a TNP-1 on 01/08/2017 and a TNP-3 on 02/08/2017, the value for TNP-3 will be used for the base price.
The latest value for TNP-2 or TNP-4 within the selected date range is then added to get the total price.
The records included in the export are as follows:
- For a POT to be included, ALL the below criteria must be true:
- The main aim funding model is 36.
- The contractor’s UKPRN matches the UKPRN entered on the export screen (see the UKPRN section for details on which UKPRN field is used).
- An employment status record exists for the learner with a status of 10 (in paid employment), an employment date which is between the selected date range on the export screen and an EDRS ID which matches the one entered on the export screen (or for the branches of the selected employer).
- The programme start date is between the selected date range on the export screen.
- POTs are excluded if they are a continuation of an apprenticeship from an earlier POT (i.e. where the programme completion status is 6).
Usability Survey
As with previous major releases, Maytas users will be asked to complete a usability survey after the 5.14 upgrade (this will appear 30 days after the upgrade to allow for time using the updated system). The information gathered via the survey is anonymous and is used to improve the Maytas user experience. Only Tribal receives the results and we do not share the results with third parties. As always, we are very grateful for completed surveys as well as any additional feedback you have on Maytas.
Financial Planning Updates
Copy cohort groups
New cohort groups can now be created by copying an existing group and then editing it as required:
- Go to Management | Financial Plans and open the plan you wish to edit.
-
Go to the Cohort Groups tab.
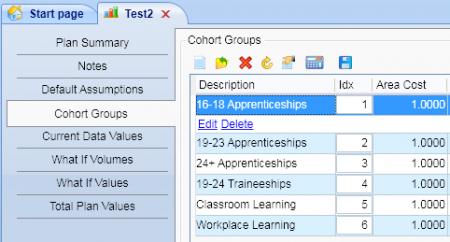
- Select the plan you wish to copy and click the
 button.
 -
Enter a name for the new group and click OK.
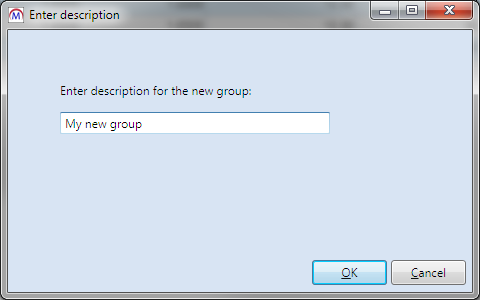
-
The new group will appear and the list and can be amended as normal. All details from the copied group will be present in the new one.
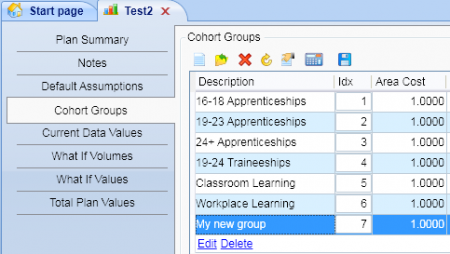
Manually sort cohort groups
Cohort groups can now be manually sorted by entering an index number against them:
- Go to Management | Financial Plans and open the plan you wish to edit.
-
Go to the Cohort Groups tab.
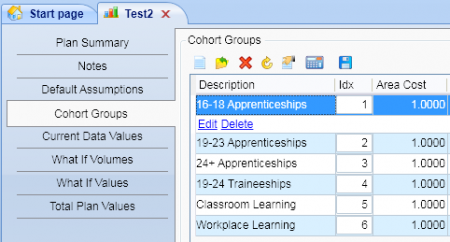
- The Idx column determines the order in which the groups appear (by default this will be alphabetical). Edit the Idx numbers as required to create the new order.
- Click Apply.
- Close and re-open the plan for the new ordering to be appear.
Make plans obsolete
Financial plans can now be made obsolete so that they no longer appear in the list of available plans. To do this:
- Go to Management | Financial Plans and open the plan you wish to make obsolete.
- On the Plan Summary tab, tick the Is Obsolete box.
- Click Apply.
-
When you go to Management | Financial Plans now, the plan will not appear in the list. Obsolete plans can be shown again by clicking Include Obsolete on the header.
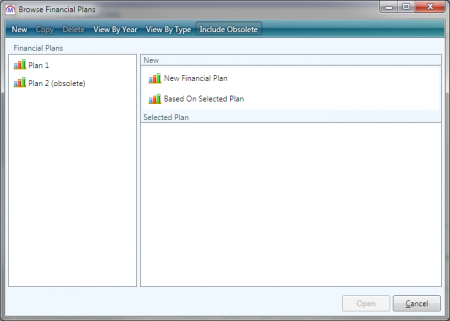
Reports Centre Auto-Communication
The Reports Centre now allows you to schedule a report which will automatically send an email or SMS to a list of learners, assessors or employers in the report. This is done by creating a mail merge report in Report Generator, configuring it for auto-contact and then deploying it in the Reports Centre.
Configure the mail merge report
A report must be set up for mail merge and configured for the auto-communication settings. The report must at minimum contain the following:
- A list of learners, assessors or employers
- Their ID fields (e.g. TRAINEEID, ASSESSORID or EMPLOYERID)
- Their email addresses and/or phone numbers (depending on whether you want to send them emails or SMS, or both).
Several standard reports have been provided for this which can be used or amended as required. These can be imported as follows:
- On the Home tab, click Edit on the Reports panel of the ribbon.
- Click Import.
- Browse to the Maytas 5\Extras\Auto-communications reports folder of the upgrade.
- Select the first report and click Open.
- Click OK on the message which appears.
- Repeat steps 2 to 5 to import the remaining reports.
-
The imported reports can be found in the Auto-communication folder of the Browse Reports screen:
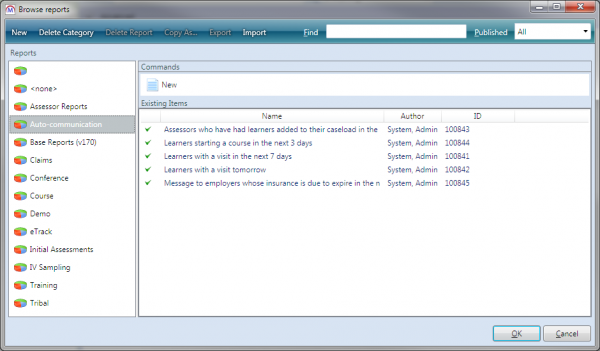
Once you have chosen a report, open it for editing in Report Generator:
- On the Home tab, click Edit on the Reports panel of the ribbon.
- Select the report and click OK.
- Click Run to run the report.
- To set up the report for email (this step is not required for SMS):
- Go to Mail Merge | Create new…
- The mail merge document will open. This will be used for the email body. At minimum, this requires the ID field and the email field, which can be added by clicking Insert Merge Field and selecting them.
- Save the document.
- When prompted, enter the mail merge name, select the action as Email, enter the email subject line and click OK.
- Sync and re-open the report editing screen.
-
Click Set up Auto Contact.
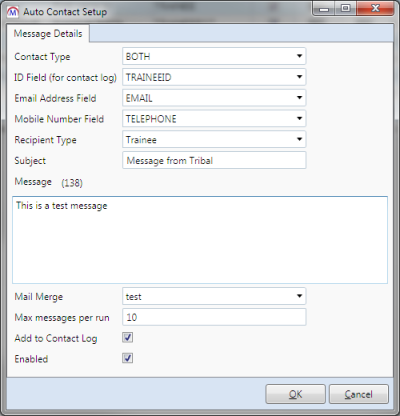
- The Contact Type lets you configure the report for sending SMS, email or both. You will not be able to select these options if the relevant system config options are not present:
- For email, the config can be found under Maytas 5 | Admin | Maintenance and is called The SMTP server for sending emails in Maytas.
For SMS, the configs under Maytas 5 | SMS Text Integration must be completed.
For this example, we will use BOTH.
- Set the ID field to the relevant ID (e.g. TRAINEEID, ASSESSORID or EMPLOYERID, although alternative ID fields can be selected if needed).
- Select the field to use for the email address and mobile number. Again, these do not necessarily need to be the standard EMAIL or TELEPHONE / MOBILE fields.
- Choose the recipient type (e.g. for a list of assessors, choose Assessor).
- Enter the subject, which is used as both the SMS and email subject.
- Enter the SMS message.
- Select the mail merge to use for the email body.
- Max messages per run determines the maximum number of messages that can be sent every time the schedule is run (if you choose BOTH rather than just email or just SMS, a max of 10 would mean a max of 10 emails and 10 SMS, not 5 of each). Amend this as required.
- If you want to add sent messages to the contact log, tick the Add to Contact Log box.
- To make the report available for scheduling, tick the Enabled box.
- Click OK, then click Apply.
Schedule the report in the Reports Centre
Once the report has been configured, it should be scheduled in the Reports Centre:
- Go to Home | Reports Centre.
- Click Auto Contact and select Create new…
-
Select the report to use and click Next.
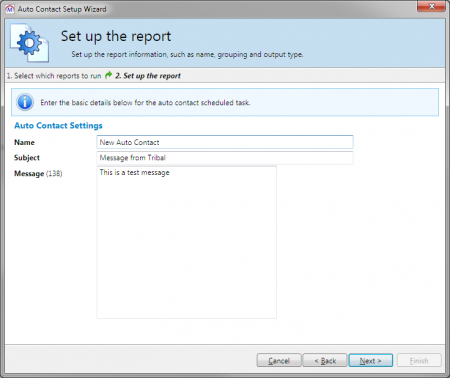
- On this screen, amend the subject and message as required (they will default to the values entered in the Auto Contact Setup window) and click Next.
-
If the report has any parameters, set them up as required and click Next.
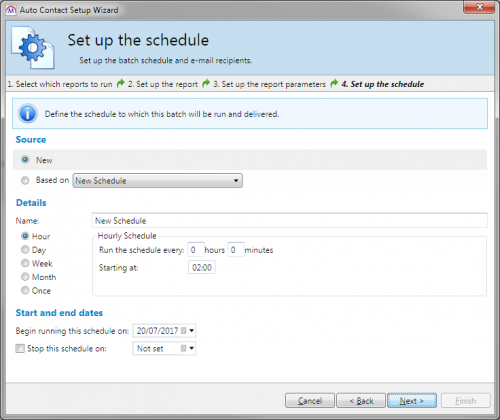
- On this screen, the schedule can be configured. If you have an existing schedule, you can choose it by clicking Based on and selecting it from the list. Otherwise select New.
- Set the schedule in the Details section. It can be set to run periodically (e.g. every hour, day, month, etc) or just once at a specified time. Please note that if you intend to start the schedule immediately, the start time should be at least 10 minutes in the future to ensure it is picked up by the system.
- Set the start date at the bottom of the window. The schedule will run indefinitely by default, but if you want the schedule to end on a particular date then tick the Stop this schedule on box and set the date.
- Click Next, then click Finish.
The schedule will now run as defined. To view or edit a schedule, click Auto Contact and click the  button next to the relevant schedule, which will take you to a screen containing the same details as the wizard.