5.16 SP1 Maytas Release Notes
Note regarding submissions
We would like to remind providers to create a submission early and check for any errors using reports from the appropriate software (i.e. the FIS or LLWR-Inform). Welsh providers should also remember to download their ULI file. After submission to the ESFA or DfES, providers should check that data has submitted correctly using the available reports. Providers should check that all their expected starts and completions are submitted correctly, and that start and outcome payments correctly match the PFR or ACE funding reports.
Our support desk gets extremely busy in the days prior to the submission deadlines, and although we try and prioritise submission-related queries, we cannot guarantee assistance if queries are sent late. If you do encounter any issues, please ensure that you contact Maytas Support as soon as possible, as we can only rectify issues of which we are aware. We also recommend checking Maytas.net regularly for information on any known issues and solutions. Tribal cannot be held responsible for any issues caused by your failure to comply with this advice.
Technical specification
The latest Maytas and e-track technical specification can be found here.
Once the upgrade has been completed, the version number should be checked to ensure it has been successful.
- Start Maytas and go to Support on the toolbar.
- Click About.
- The version numbers should read 181.20 / 5.16.6850.1. If you have any other version, please ensure you have followed the upgrade instructions correctly. If you require assistance, please contact Maytas Support.
It is the responsibility of customers to ensure that users carry out any required user acceptance testing and sign off on the upgrade.
Complete the Upgrade
Features Added in the Upgrade
These are the main updates in the upgrade:
- PFR reconcilers for funding models 35, 36 and 81
- QAR reconciler
- FIPS tab and import
- OneFile integration
- Fixes to a number of issues
Reports Library 1.0.3.0 is also included in the upgrade but must be installed separately. Please contact the service desk to request this to be installed.
Re-Import the FIS Data Sets
The FIS data sets must be re-imported for this upgrade, even if they were imported in a previous upgrade.
It is essential that the latest aim information is imported into Maytas for use by the ILR export. This should be done by importing the relevant information directly from the Data Service’s Funding Information System (FIS). To do this, you must have the FIS installed and correctly configured (please refer to the Data Service’s instructions for setting up the FIS).
Please ensure you have the latest version of the FIS with the 2018/19 components installed.
Once the FIS is installed and configured, the information can be imported as follows:
- Perform a sync in Maytas 5, then restart Maytas 5.
-
Go to Exports | Uploads | Upload FIS Data Sets.
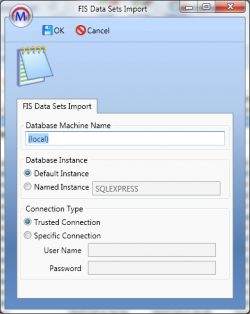
- There are three items to configure:
- Database Machine Name – If the FIS is installed on the same machine that you are using for Maytas 5, this can be left as (local). Otherwise, enter the machine name of the SQL server where the FIS database is held.
Database Instance – If the SQL server holding the FIS database has a named instance (e.g. MACHINENAME\INSTANCENAME), select Named Instance and enter the instance name. Otherwise leave this as Default Instance.
If you have no named instance and Default Instance does not work, you may need to select Named Instance and leave the instance name blank.
- Connection Type – This is the login for the SQL server holding the FIS database. Trusted Connection will use Windows authentication. If you wish to specify the login details, select Specific Connection and enter the credentials.
- Click OK. The FIS data will now be imported.
- If you have an Adult Skills budget contract and a transition factor, this must be entered on the contract:
- Go to Management on the toolbar and click Contracts on the ribbon.
- Select the relevant contractor, then select the Adult Skills contract on the right.
- Click the
 button.
 - Go to the Uplifts tab.
- Enter the ASB Transition Factor and click OK.
- Click Apply to save the change.
Import PFR Reports
The PFR reports for 2018/19 should be imported as follows:
- In Maytas, go to Home on the toolbar and click Import on the Reports panel of the ribbon.
- Click Add Files.
- Browse to the Maytas 5\Extras\Module Reports folder of the upgrade.
- Select PFR Reconcilers – 1819.m5rep and click Open.
- Click Finish.
- Once the reports have finished importing, click Finish.
Due to the size of the .rdl file for the FM36 PFR report, some report servers may produce the following error when importing:
Error: There was an exception running the extensions specified in the config file. —>
Maximum request length exceeded.
This means that the report server's MaxRequestLength property is configured to only allow uploads up to a certain size, and the configuration must be changed to allow larger files to be uploaded. Please contact your system administrator to do this. Please note that Maytas Support cannot offer support on how to configure a SQL Server Report Server, as these are Microsoft products.
Note on Postcode File
The ESFA have not released a postcode file for 2018/19. However, this file would not be required as the relevant data is now imported into Maytas via the FIS import.
Note on the Funding Cache
By default, the funding cache will update overnight so that funding information in Maytas uses the newly-imported FIS and postcode information. Please check with your system administrator if you are unsure if or when the funding cache is updated on your system. You can also manually set the funding cache to update by going to Management | Profiles and clicking the Funding Cache button, though please be aware that this may take a long time and may use a large amount of system resources, which could affect performance for other users on the system.
Maytas 5 Release Notes – Version 5.16.6850.1
2018/19 PFR Reconciler
New PFR reconciler reports are now available to work with the 2018/19 PFR files. This year there are separate reports for funding models 35, 36 and 81 to reflect the substantially different formats of each PFR. While the FM35 and FM81 reports are largely similar to how the PFR reconciler has worked in previous years, the FM36 reports have several key differences which are detailed below.
There are separate import options for each PFR file:
- Go to Management on the toolbar.
-
On the PFR section of the ribbon, click Upload and select the required 2018/19 PFR import option:
For FM35, go to PFR | Upload PFR (2018/19).
For FM81, go to PFR | Upload Trailblazer PFR (2018/19).
For FM36, go to FM36 Funding Reports and choose the file type to upload.

- Browse to and select the PFR file and click Open.
The file will now be imported. Click OK on the confirmation message which appears.
Funding Model 35 PFR Reconciler Reports
The FM35 PFR reconciler reports can be accessed as follows:
- On the Home tab, click Reports Library.
- Go to the Finance folder and select one of the new reports:
- PFR Reconciler FM35 – 1819 – This shows a summary of funding differences, as well as tables showing matched rows with funding differences, rows in Maytas but not the PFR and rows in the PFR but not in Maytas.
- PFR Reconciler FM35 – Non-Funding Differences – 1819 – This shows matched rows which have differences in the non-funding columns (i.e. all columns which are not the month-by-month funding columns).
-
The parameters window will appear:
PFR – Select the PFR file from the list.
ILR file – Select the corresponding ILR file from the list.
Measure up to end of – This tells the report to only reconcile funding differences up to the end of a specific month. This is because Maytas data is highly likely to be updated in the time between the PFR being produced and the report being run – for example, leavers may be entered in Maytas who were live when the PFR was produced. This can result in inaccurate comparisons. Comparing Maytas funding data up to the period in which the PFR was produced should give a more accurate comparison than comparing current Maytas data.
Note that the following two parameters do not appear on the Non-Funding Differences report.
Show Differences Threshold (pence) – This determines the threshold in pence for the funding differences to be shown in the report. For example, the default of 10 will only include rows where there is more than a 10p total difference between Maytas and the PFR.
Show missing rows with zero values – For the section at the end of the report showing rows in the PFR but not in the Maytas ILR export (and vice-versa), this allows you to hide rows which have no funding against them. By default, these rows are included.
- Click View to run the report.
The FM35 PFR reconciler is almost identical to the 2017/18 PFR reconciler, with the addition of the Campus Identifier column.
Funding Model 81 PFR Reconciler Reports
The FM81 PFR reconciler reports can be accessed as follows:
- On the Home tab, click Reports Library.
- Go to the Finance folder and select one of the new reports:
- PFR Reconciler FM81 – 1819 – This shows a summary of funding differences, as well as tables showing matched rows with funding differences, rows in Maytas but not the PFR and rows in the PFR but not in Maytas.
- PFR Reconciler FM81 – Non-Funding Differences – 1819 – This shows matched rows which have differences in the non-funding columns (i.e. all columns which are not the month-by-month funding columns).
- The parameters window will appear:
PFR – Select the PFR file from the list.
ILR file – Select the corresponding ILR file from the list.
Measure up to end of – This tells the report to only reconcile funding differences up to the end of a specific month. This is because Maytas data is highly likely to be updated in the time between the PFR being produced and the report being run – for example, leavers may be entered in Maytas who were live when the PFR was produced. This can result in inaccurate comparisons. Comparing Maytas funding data up to the period in which the PFR was produced should give a more accurate comparison than comparing current Maytas data.
Note that the following two parameters do not appear on the Non-Funding Differences report.
Show Differences Threshold (pence) – This determines the threshold in pence for the funding differences to be shown in the report. For example, the default of 10 will only include rows where there is more than a 10p total difference between Maytas and the PFR.
Show missing rows with zero values – For the section at the end of the report showing rows in the PFR but not in the Maytas ILR export (and vice-versa), this allows you to hide rows which have no funding against them. By default, these rows are included.
- Click View to run the report.
The FM81 reports are similar to the FM35 reports in terms of how they work, with the main difference being the columns which are included.
Funding Model 36 PFR Reconciler Reports
The FM36 PFR reconciler reports can be accessed as follows:
- On the Home tab, click Reports Library.
- Go to the Finance folder and select one of the new reports:
- PFR Reconciler FM36 – 1819 – This shows a summary of funding differences, as well as tables showing matched rows with funding differences, rows in Maytas but not the PFR and rows in the PFR but not in Maytas.
- PFR Reconciler FM36 – Non-Funding Differences – 1819 – This shows matched rows which have differences in the non-funding columns (i.e. all columns which are not the month-by-month funding columns).
-
The parameters window will appear:
Report type – This lets you choose whether to reconcile the indicative earnings report, the monthly payments report or the co-investment payments report. Each of these will determine the available PFR files to select from and the content displayed when the report is run.
PFR – Select the PFR file from the list.
ILR file – Select the corresponding ILR file from the list.
Measure up to end of – This tells the report to only reconcile funding differences up to the end of a specific month. This is because Maytas data is highly likely to be updated in the time between the PFR being produced and the report being run – for example, leavers may be entered in Maytas who were live when the PFR was produced. This can result in inaccurate comparisons. Comparing Maytas funding data up to the period in which the PFR was produced should give a more accurate comparison than comparing current Maytas data.
Note that the following two parameters do not appear on the Non-Funding Differences report.
Show Differences Threshold (pence) – This determines the threshold in pence for the funding differences to be shown in the report. For example, the default of 10 will only include rows where there is more than a 10p total difference between Maytas and the PFR.
Show missing rows with zero values – For the section at the end of the report showing rows in the PFR but not in the Maytas ILR export (and vice-versa), this allows you to hide rows which have no funding against them. By default, these rows are included.
- Click View to run the report.
The greatest difference between the FM36 PFR reconciler and previous PFR reconcilers is that it can be run against three different PFR datasets for FM36: indicative earnings, monthly payments and co-investment payments. This can be chosen in the Report type parameter.
Of the three options, we expect the indicative earnings report to match the Maytas figures the closest, as this PFR data does not depend on certain factors which must be assumed in Maytas (these factors are not available and cannot be derived before the PFR data is produced). The monthly and co-investment payments reports do depend on these factors and so are likely to match the Maytas figures less closely. In very broad terms, the indicative earnings are the 'expected' figures and the payment reports are the actual figures.
QAR Reconciler
In response to the increased complexity of the QAR calculation, we have produced a QAR reconciler report to help identify why differences occur between the published QAR and the Maytas achievement rates. Understanding the causes of differences can lead to better data quality and accuracy so that differences are reduced in the future.
To use the QAR reconciler you must first upload a QAR file:
- Extract the contents of your QAR zip file. The file that needs to be imported is the 1718 QAR InYear (or full year) Apps (not APPS_Excluded).
- Go to Management on the toolbar.
-
Go to Upload QAR | Upload QAR Apps file on the ribbon.

- Browse to and select the QAR file to be imported and click Open.
- The import will now take place.
Using the Report
The report is included in the 1.0.3.0 reports library. It is called QAR Reconciler and imports to the Quality folder of the reports library. Hosted customers should contact the Service Desk to request that reports library 1.0.3.0 is installed on their system. Customers who maintain their own database should follow the instructions in the Upgrade Guide for installing the reports library.
The report has two parameters:
- QAR file – This lets you choose the imported QAR file to reconcile.
-
Contract year – This lets you choose which contract year to reconcile. E.g. If you choose 2017/18, the report will attempt to reconcile overall cohorts from the QAR and Maytas which occur in 2017/18.
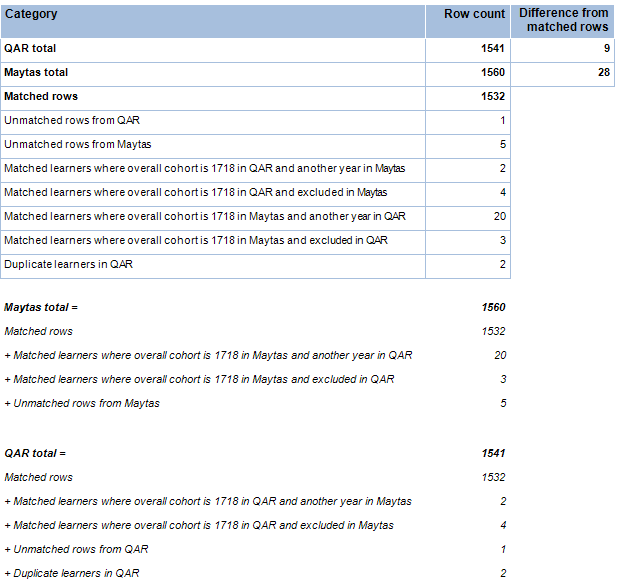
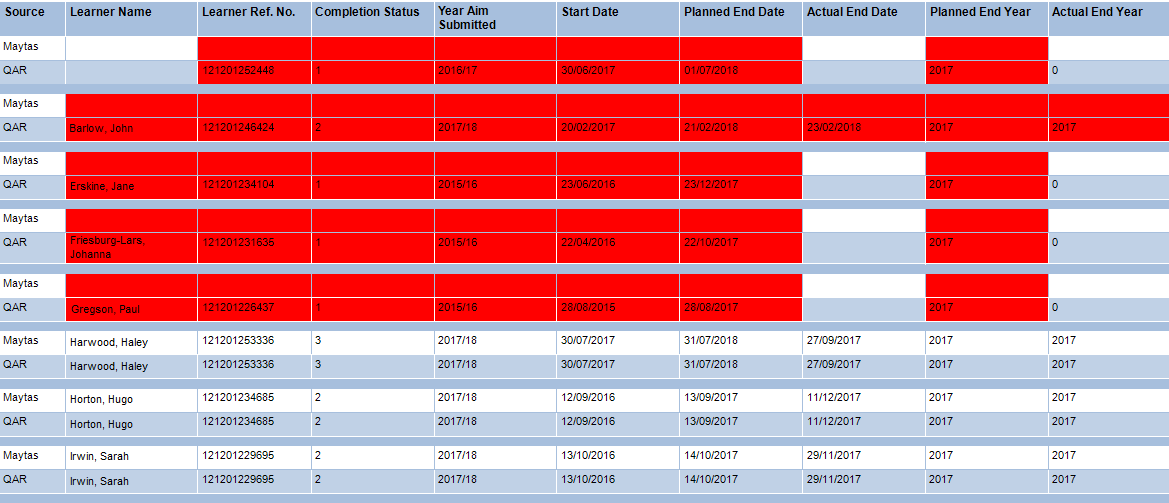
The report consists of three levels. The top level (shown above) shows a summary of the figures from Maytas and the QAR and their differences. Each of these figures drills down into the second level, which shows a list of the relevant learners and their data from Maytas and the QAR (note that there are more columns than shown on the screenshot below). Differences are highlighted red:
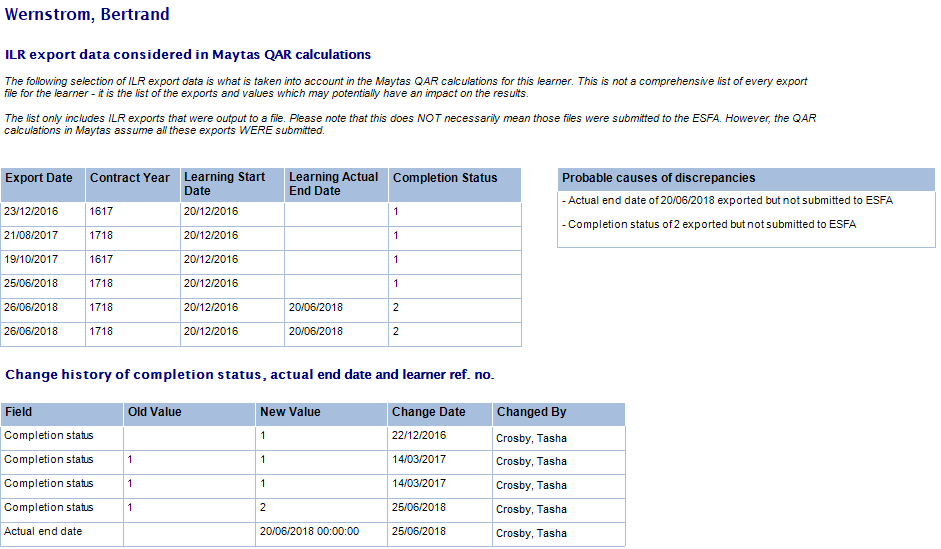
Clicking a learner name will go to the third level, which shows all relevant Maytas and QAR details for that learner, including a history of ILR export data, change history for important fields and a list of the probable causes of differences.
ILR Export History
The top-left table shows a selection of ILR export data that is relevant to the QAR calculation. This does not show ALL ILR export data for the learner – for example, if the completion status was changed from 1 to 2, the value of 2 may be included in 20 export files but the report may only show the earliest and latest exports with the completion status of 2. Essentially, the data in this table is what the Maytas achievement rates consider when calculating the results.
The export data can be used to show, for example, that a change of actual end date or completion status in the live data has never been exported, and therefore the ESFA cannot use it in their calculations meaning their results will be different.
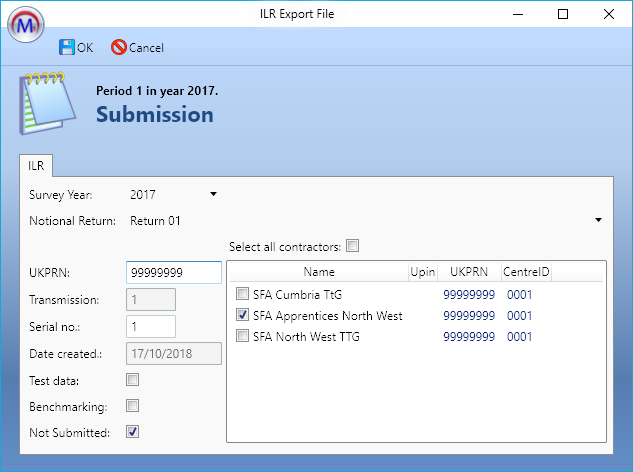
It can also show that a change of value WAS exported but is different to the value in the QAR, which would mean either the export file was never submitted to the ESFA or it was submitted too late to be counted in the published QAR. There is now a flag on the ILR export screen to indicate an export has not been submitted, which the Maytas achievement rates will then take into account, meaning the results will match closer to the QAR. Details of this can be found in section 2.2.
Change History
This table shows the history of when values for completion status, actual end date and learner reference number were changed for the learner. This can be useful for checking whether a value was changed after the R14 deadline for a contract year, or for investigating values that have changed back and forth, resulting in unusual differences between live data and exported data.
Probable Causes of Discrepancies
This lists probable reasons for why there are differences between the Maytas achievement rates and the QAR. It is important to note that the listed causes are indicative only, and should be used as a guide for what to investigate. It is possible that there may be additional reasons for differences that cannot be directly derived from the available data.
These are the possible causes that can be derived, along with suggested ways to investigate:
- Actual end date of [dd/mm/yyyy] exported but not submitted to ESFA – This is shown when there is an actual end date included in an ILR export (shown in the ILR export table) but the QAR has no actual end date. Check the export date to see if the actual end date was included before the R14 deadline for the relevant contract year. If it was, was the ILR export submitted to the ESFA? If yes, it suggests that the ESFA have not yet picked up the actual end date in their published results. If no, we recommend identifying the relevant export(s) and ticking the Not submitted checkbox against them (see Not Submitted Flag section).
- Completion status of [value] exported but not submitted to ESFA – This is shown when there is completion status included in an ILR export (shown in the ILR export table) that is different to the completion status in the QAR. Check the export date to see if the completion status was included before the R14 deadline for the relevant contract year. If it was, was the ILR export submitted to the ESFA? If yes, it suggests that the ESFA have not yet picked up the completion status in their published results. If no, we recommend identifying the relevant export(s) and ticking the Not submitted checkbox against them (see Not Submitted Flag section).
- Maytas data last exported for [contract year] but QAR year aim submitted is [different contract year] – This is shown when the learner was last included in an ILR export for a particular contract year, but the year aim submitted on the QAR is a different year. This indicates that the ILR export(s) for that year may not have been submitted to the ESFA or used by them yet in the QAR. If the exports were not submitted, we recommend identifying the relevant export(s) and ticking the Not submitted checkbox against them (see Not Submitted Flag section).
-
In-year QAR file does not count learner as an overdue planned break, but Maytas does as the learner has not restarted before end of [contract year] – This can occur when an in-year QAR for a contract year is being reconciled during the following contract year (e.g. if an in-year 2017/18 QAR is being reconciled in August 2018). This is because a planned break is time-sensitive and is considered overdue if the aim is not restarted by a certain point.
For example, if a learner is on a valid planned break during 17/18 that would become overdue in 18/19 if not restarted, the 17/18 in-year QAR would consider it not overdue but Maytas would report it as overdue as of 1st Aug 2018. The final QAR for 17/18 would not have this issue in theory as it should count the learner as overdue and match the result in Maytas.
- Learner cannot be found in Maytas – This occurs when a learner reference number in the QAR cannot be matched to a learner record in Maytas. The two likely explanations for this are that the learner reference number has been changed in Maytas (in which case it may appear in the change history table), or that the learner record has been deleted in Maytas (e.g. if a learner requests a GDPR deletion).
- Learner cannot be found in QAR – This occurs when a Maytas learner counted in the overall cohort for the selected year cannot be matched to any QAR record. The most likely explanation for this is that the learner has never been submitted in an ILR export. If export records are present for the learner, check whether those exports were submitted to the ESFA. If not, we recommend identifying the relevant export(s) and ticking the Not submitted checkbox against them (see Not Submitted Flag section). Another possibility is that the learner reference number was changed in Maytas after being submitted, in which case it may appear in the change history table.
While the above reasons cannot account for every possible scenario that could cause a difference, they are the most common reasons for discrepancies. Many of them can be addressed simply by flagging relevant ILR exports as not having been submitted, which removes those exports from consideration in the QAR calculation.
Reconciliation Data
The achievement rate reports offer two different views of data: expected future published QAR results (the default) and expected current published QAR results. The QAR reconciler uses the latter, as it is designed specifically to match the expected published results as closely as possible by using exported data rather than live data in certain circumstances.
Not Submitted Flag
The ILR export submission screen now has a Not submitted checkbox which can be ticked to indicate that an export was not sent to the ESFA. The achievement rates will then take this into account and ignore any data from that export. Making use of this can significantly improve accuracy when trying to reconcile the Maytas achievement rates with published QAR files.
FIPS
New FIPS features are available for providers with Scottish provision:
- FIPS 2018 tab, which replaces the CTS tab
- Ability to import FIPS assignments and payment claims via the standard import system
- MA Online 2018 tab and associated report
FIPS 2018 Tab
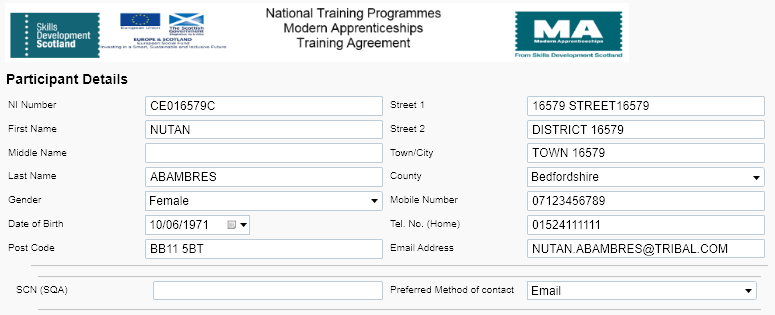
The FIPS 2018 tab includes the required fields for recording FIPS data, as per the appendix 12 Modern Apprenticeship Training Agreement document for 2018/19. This replaces the CTS tab.
The tab is imported as part of the upgrade but defaults to being unpublished. To publish the tab:
- Go to Tools on the toolbar and click New / Load on the Screens panel of the ribbon.
- Click Trainee on the left.
- On the right, double-click the screen FIPS 2018 to open it in the screen designer.
- Tick the Published box on the left and click Apply.
- Go to Home on the toolbar and click Sync.
FIPS Import
Spreadsheets for FIPS assignments and payment claims can be imported into Maytas using the standard import system. This works as follows:
Assignments
- The spreadsheet is imported to the table FIPS_ASSIGNMENT_IMPORT. If any rows already exist in the table, they will be updated with any changes from the spreadsheet. Existing rows are identified using the hidden columns A, B and C on the spreadsheet (assignment ID, row checksum and modified on).
- When a row is updated or inserted, Maytas checks if a matching learner record exists based on National Insurance number and expected end date (compared against TRAINEE.NINUMBER and TRAINEEPOT.EXPCOMPLETIONDATE). If a learner record does not exist, a new one is created using data from the import. If a learner record does exist, it is updated with any changes from the import.
Field mappings between FIPS assignments and learner records are as follows (any fields not listed are not relevant to the learner record, but they are imported to FIPS_ASSIGNMENT_IMPORT):
| FIPS_ASSIGNMENT_IMPORT Column | Maytas Table | Maytas Column | Details |
|---|---|---|---|
| PREFERRED_METHOD_CONTACT | TRAINEEFIPS | PREFERREDCONTACT | SMS = 1, Email = 2 |
| NI_NUMBER | TRAINEE | NINUMBER | |
| INDIVIDUAL | TRAINEE | FIRSTNAME and LASTNAME | Maytas will attempt to parse the full name in INDIVIDUAL into first and last names |
| TRAINEE | |||
| HOME_PHONE | TRAINEE | TELEPHONE | |
| MOBILE_PHONE | TRAINEE | MOBILE | |
| AGE_GROUP | TRAINEEPOT | ILR13_AGEGROUP | |
| EXPECTED_END_DATE | TRAINEEPOT | EXPCOMPLETIONDATE | |
| OCCUPATIONAL_GROUP | TRAINEEFIPS | OCCUPATIONALGROUP | |
| EMPLOYER | TRAINEEFIPS | EMPLOYERNAME | |
| EMPLOYER_CONTACT_NAME | TRAINEEFIPS | EMPCONTACTNAME | |
| EMP_PRIORITY_SECTOR | TRAINEEFIPS | EMPPRIORITYSECTOR | |
| EMPLOYER_CONTACT_EMAIL | TRAINEEFIPS | EMPCONTACTEMAIL | |
| EMPLOYER_CONTACT_MOBILE | TRAINEEFIPS | EMPCONTACTMOBILE | |
| EMPLOYER_CONTACT_PHONE | TRAINEEFIPS | EMPCONTACTTELEPHONE | |
| EMPLOYER_POSTCODE | TRAINEEFIPS | EMPPOSTCODE | |
| LOCAL_AUTHORITY_CODE | TRAINEEFIPS | LOCALAUTHORITY | |
| TRAINING_VENUE | TRAINEEFIPS | TRAININGVENUE | |
| EXPENSES | TRAINEEFIPS | EXPENSES | |
| AREA_OF_SCOTLAND | TRAINEEFIPS | AREAOFSCOTLAND | “Lowlands & Uplands” = 1, “Highlands & Islands” = 2 |
| ESF_AREA | TRAINEEFIPS | ESFAREA | |
| ESF_DOSSIER_NUMBER_TEXT | TRAINEEFIPS | ESFDOSSIERNUMBER | |
| ESF_PROJECT | TRAINEEFIPS | ESFPROJECTTITLE | |
| PROVIDER_REF_1 | TRAINEEFIPS | PROVIDERREF1 | |
| PROVIDER_REF_2 | TRAINEEFIPS | PROVIDERREF2 | |
| PROVIDER_REF_3 | TRAINEEFIPS | PROVIDERREF3 | |
| PROVIDER_REF_4 | TRAINEEFIPS | PROVIDERREF4 | |
| PROVIDER_REF_5 | TRAINEEFIPS | PROVIDERREF5 | |
| PROVIDER_REF_6 | TRAINEEFIPS | PROVIDERREF6 | |
| PROVIDER_REF_7 | TRAINEEFIPS | PROVIDERREF7 |
Payment Claims
- The spreadsheet is imported to the table FIPS_FUNDING_IMPORT. If any rows already exist in the table, they will be updated with any changes from the spreadsheet. Existing rows are identified using the hidden columns A, B and C on the spreadsheet (payment claim ID, row checksum and modified on).
- When a row is updated or inserted, Maytas checks if a matching learner record exists based on National Insurance number and expected end date (compared against TRAINEE.NINUMBER and TRAINEEPOT.EXPCOMPLETIONDATE). If a learner record does not exist, a new one is created using data from the import. If a learner record does exist, it is updated with any changes from the import. Details of field mappings can be found below.
- Maytas also checks if a claim details record exists for the payment claim. If a claim record exists, it is updated with changes from the import, otherwise a new claim record is created. Matching claim records are identified using the following fields:
| Maytas field | FIPS field |
|---|---|
| CLAIMDETAILS.TRAINEEID | Trainee ID from existing or newly-created learner record |
| CLAIMDETAILS.EVENTCODE |
Using claim type: If Milestone then MILESTONE If Outcome then OUTCOME If Start Payment then START If Sustained Outcome then OUTCOME If Course Attendance then GENERAL If SERI Optional Payment then GENERAL |
| CLAIMDETAILS.TARGETDATE | Expected claim date |
| CLAIMDETAILS.ACTIVITYDATE | Claimed on |
Field mappings between FIPS payment claims and learner/claim records are as follows (any fields not listed are not relevant to the learner record, but they are imported to FIPS_FUNDING_IMPORT):
| FIPS_FUNDING_IMPORT Column | Maytas Table | Maytas Column | Details |
|---|---|---|---|
| INDIVIDUAL | TRAINEE | LASTNAME and FIRSTNAME | Maytas will attempt to parse the full name in INDIVIDUAL into first and last names |
| PARTICIPANT_NI_NO | TRAINEE | NINUMBER | |
| AREA_OF_SCOTLAND | TRAINEEFIPS | AREAOFSCOTLAND | “Lowlands & Uplands” = 1, “Highlands & Islands” = 2 |
| OCCUPATIONAL_GROUP | TRAINEEFIPS | OCCUPATIONALGROUP | |
| STARTDATE | TRAINEEPOT | STARTDATE | |
| EXPECTED_END_DATE | TRAINEEPOT | EXPCOMPLETIONDATE | |
| ACTUAL_END_DATE | TRAINEEPOT | TERMINATIONDATE | |
| AGE_GROUP | TRAINEEPOT | ILR13_AGEGROUP | |
| CLAIM_TYPE | CLAIMDETAILS | EVENTCODE | See claim type mapping in table above |
| AMOUNT | CLAIMDETAILS | UNITVALUE and TOTALVALUE | |
| EXPECTED_CLAIM_DATE | CLAIMDETAILS | TARGETDATE | |
| CLAIMED_ON | CLAIMDETAILS | ACTIVITYDATE | |
| EMPLOYER | TRAINEEFIPS | EMPLOYERNAME | |
| PROVIDER_REF_1 | TRAINEEFIPS | PROVIDERREF1 | |
| PROVIDER_REF_2 | TRAINEEFIPS | PROVIDERREF2 | |
| PROVIDER_REF_3 | TRAINEEFIPS | PROVIDERREF3 | |
| PROVIDER_REF_4 | TRAINEEFIPS | PROVIDERREF4 | |
| PROVIDER_REF_5 | TRAINEEFIPS | PROVIDERREF5 | |
| PROVIDER_REF_6 | TRAINEEFIPS | PROVIDERREF6 | |
| PROVIDER_REF_7 | TRAINEEFIPS | PROVIDERREF7 |
Importing a FIPS Spreadsheet
To import a FIPS assignments or payment claims spreadsheet:
- Ensure standard imports are enabled in permissions:
- Go to Tools | Edit Permissions.
- Select the user or group that requires permission.
- On the Modules tab, ensure that Standard Imports is set to Visible.
- On the Commands tab, expand the Standard Import section and ensure the permission Show Standard Import is set to Visible.
- Click Apply and restart Maytas for the changes to take effect.
-
Go to Exports on the toolbar and click Standard Import on the ribbon.
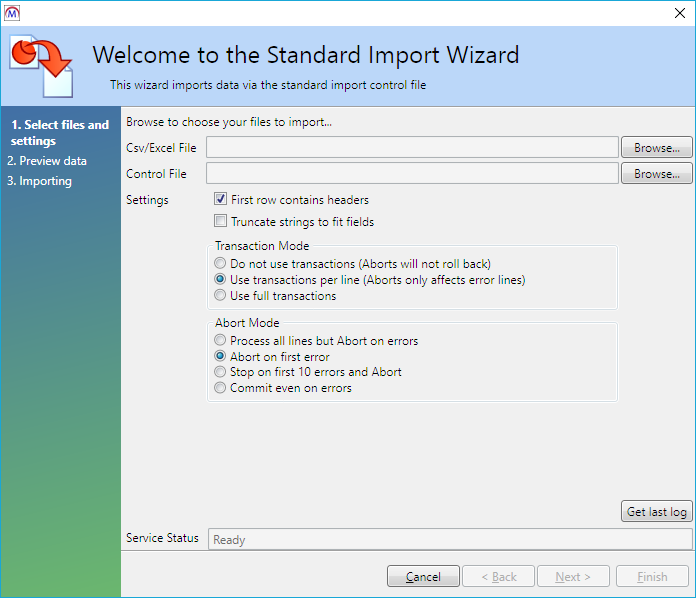
- Click Browse next to Csv/Excel File.
- Select the FIPS spreadsheet to import and click Open.
- Click Browse next to Control File.
-
Browse to the Maytas 5\Extras\FIPS folder of the upgrade.
If you are importing assignments, select FIPS Assignment Import.CON.
If you are importing payment claims, select FIPS Funding Import.CON.
- Click Open.
- Click Next.
- A preview of the data to be imported will be generated. Check that you are happy with the data to be imported and click Next.
- The data will now be imported. A successful import will display x records imported; 0 errors occurred. Click Finish.
MA Online Tab and Report
Tabs are available to enter MA Online learner and employer data into Maytas and then produce a report export which can be uploaded to MA Online.
The tab and report must be imported.
To import the tab:
- In Maytas go to Tools on the toolbar and click Import on the Screens panel of the ribbon.
- Click Browse.
- Browse to the Maytas 5\Extras\Tabs folder of the upgrade.
- Select MA Online 2018.m5tab and click Open.
- Click Next, then click Finish.
- Go to Home on the toolbar and click Sync.
To import the report:
- In Maytas, go to Home on the toolbar and click Import on the Reports panel of the ribbon.
- Click Add Files.
- Browse to the Maytas 5\Extras\Module Reports folder of the upgrade.
- Select MA Online.m5rep and click Open.
- Click Finish.
-
Once the reports have finished importing, click Finish.
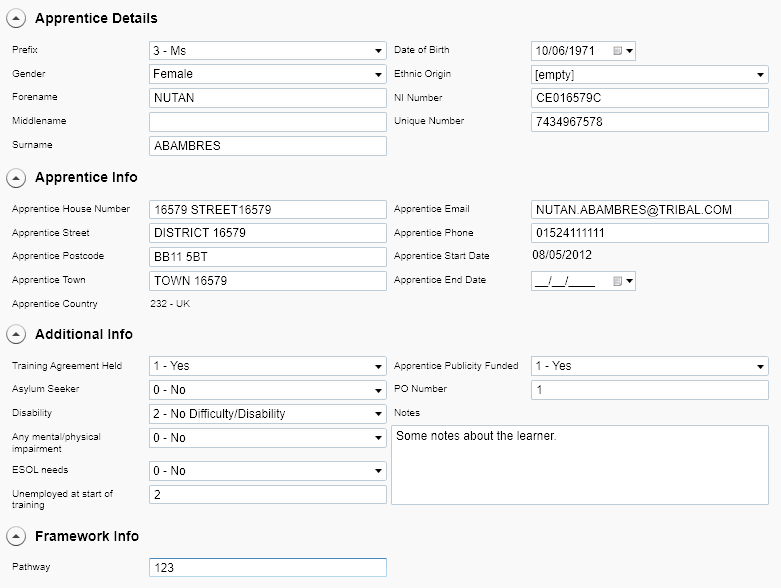
The learner tab is called MA Online 2018 and the employer tab is called MA Online Employer Info. The report is called MA Online and can be found in the Learner folder of the reports library. The report uses data from both tabs and is intended to be exported as an Excel file so that it can be uploaded to MA Online. Note that the report should be exported to Excel, not .csv, so that the correct column headers are produced.
The learners included in the report are those where the mandatory field Apprentice Publicity Funded (TRAINEEPOT.MAO_APP_FUNDING) has a value entered.
The employer record used for each learner in the report is the most recently started employer record of type E (employer) where the record is active at any point during the learner's POT.
Implementing more than 9 App Forms in the Screen Designer
We have received queries from providers who need to implement a large number of application forms published via the Maytas screen designer, as the app form ID appears to be limited to the numbers 1 to 9. However, the app form ID can take alphanumeric characters, not just numbers, and lowercase letters are counted separately from uppercase letters. Making use of letters for the ID therefore vastly increases the number of app forms which can be implemented in the system.
AS Export – Exclude POT Restarts
A configuration option can now be set to prevent POT restarts being included in the Apprenticeship Service (AS) export. To enable this:
- Click the M5 button at the top-left of the screen and select Options.
- Scroll down to the Maytas 5 section on the left and select Miscellaneous.
- On the right, locate the AS Export section and the config Show the “Exclude POT Restarts” option.
- Tick the box next to the config and ensure the toggle button is set to ON.
- Click OK.
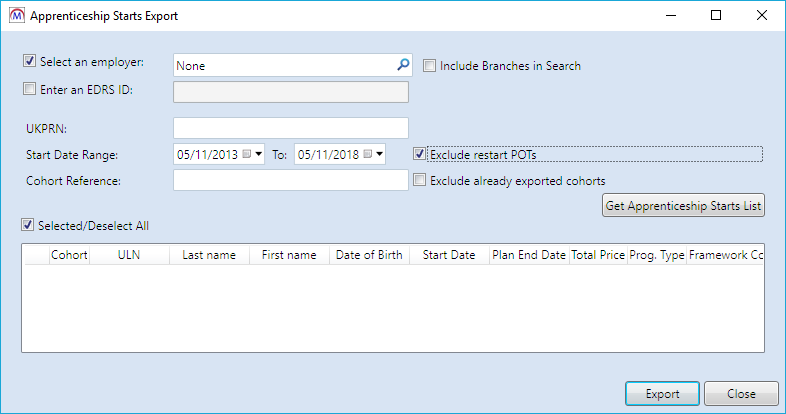
The option to exclude POT restarts will now appear on the Apprenticeship Starts Export screen. When this option is ticked, an apprenticeship will be excluded if the POT on which the apprenticeship starts has the restart indicator entered on the programme aim.
If the POT has been restarted and there is an employment record showing a change to a different employer after the POT start date, the apprenticeship will not be excluded.
This means that with the option ticked, changes in pathway (which the export treats as separate apprenticeships) will be excluded.
