IQA Planning
The IQA Planning module allows an IQA user to create plans for how they will sample evidence from their assessors.
Before using IQA planning, a user must be given permission:
- Go to Web User Editor on the toolbar.
- Search for and select the user to be given permission.
- Click Permissions.
-
Tick Internal Verifier.

- Click Save.
To create an IQA plan:
-
Go to IQA Planning on the toolbar.

- IQA planning is done per qualification. There can be separate plans for each qualification, which are listed in the Version dropdown box. First, a qualification must be added:
-
Click Add Qualification.
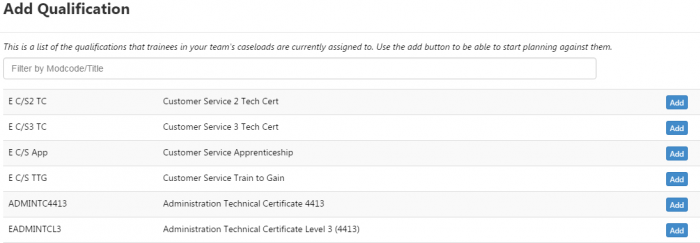
- Search for the qualification in your team’s caseloads you wish to plan for and click Add.
- Click Add Version.
- Enter a start date and any required notes for the version and click Save.
You will now see a table with your assessors down the side and the months of the plan across the top. Note that the start month is based on the plan version start date.

There are two main ways of planning: manually adding plans and auto-planning by rationale.
Manual Planning
To manually add a plan item:
-
Click a month for one of your assessors.

-
Click Add Plan Item.
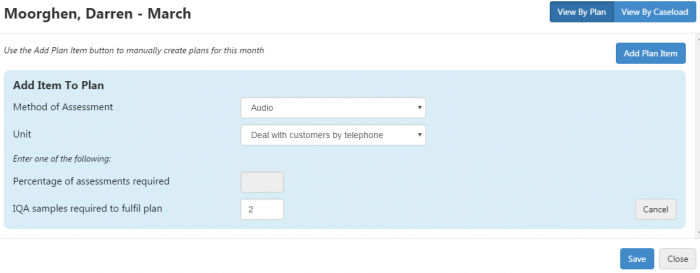
- Choose the method of assessment and the unit to be sampled (or leave them as Any).
- Enter either the percentage of assessments required or the number of IQA samples required to fulfil the plan.
- Click Save.
Auto-Plan by Rationale
To auto-plan by rationale, go to the IQA Planning screen, select a qualification and version and click Auto Plan by Rationale.
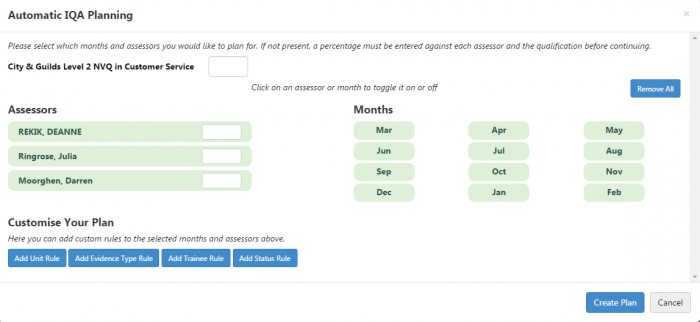
First, choose which assessors and months should be included in the plan – green means selected and red means not selected. By default, all assessors and months are selected. Click a month or assessor to de-select them, or you can de-select everything by clicking the Remove All button.
Next, enter a risk percentage for the qualification (in the box next to the qualification title). Then enter a risk percentage for each assessor included in the plan.
Finally, the buttons at the bottom left can be used to add criteria to the plan – i.e. what the IQA must do to complete the plan. There are four options:
Add Unit Rule

Use this for plans where you need to sample a percentage of evidence for all units in the qualification or a particular unit. Enter the percentage and, if required, select a unit, then click Add. The rule will then be added.

Add Evidence Type Rule

Use this for plans where you need to sample a percentage of assessments (optionally with a particular evidence type). Enter the percentage and, if required, select an evidence type, then click Add. The rule will then be added.

Add Trainee Rule

Use this for plans where you need to sample a percentage of learners that have been in learning for a minimum amount of time (in months). Enter the percentage and number of months and click Add. The rule will then be added.

Add Status Rule

Use this for plans where you need to sample a percentage of learners that have a particular status for the unit or module. Enter the percentage and select the status, then click Add.

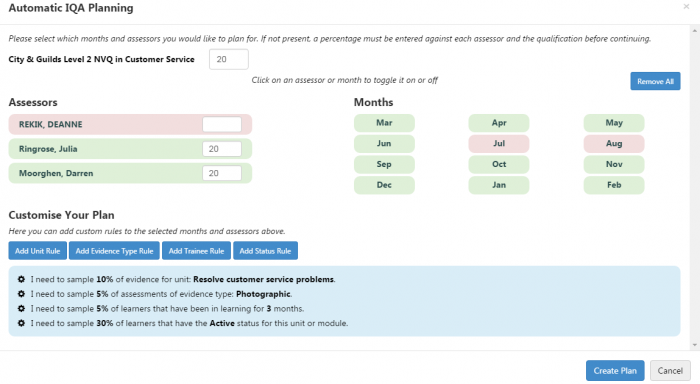
When you have finished adding criteria to the plan, click Create Plan. This will apply the plan to the relevant months and assessors.

Note that any criteria which has already been met will be reflected in the plan (e.g. in the screenshot above, the green cell indicates that all plan criteria for that month / assessor has been fulfilled, and the red cell indicates not all criteria has been met but there are eligible visits which can be sampled to fulfill the criteria).
How to Complete Plans
Once a plan has been created, the criteria for that plan must be fulfilled by the IQA user. Click a cell in the IQA planning grid to view the criteria for that month / assessor.

In this example, the IQA user plans to sample two audio evidence files for the unit Deal with customers by telephone that are attached to assessments by Darren Moorghen. As eligible evidence is unlikely to be present at this point, the IQA user would click Close, and could then view the plan item at a later date by clicking the  icon which appears on the plan table:

These icons can be one of several colours:
 Indicates a future month; i.e. plan items do not yet need to be completed.
 Indicates the current month or a past month where no plan items have enough eligible evidence yet to be completed.
 Indicates the current month or a past month where one or more plan items has enough eligible evidence to be completed but not all criteria has been fulfilled.
 Indicates that all planned items for the month have been completed.
Click the icon to open the plan item and click Show Eligible Evidence.

If you wish to associate an evidence row with the plan (e.g. if you intend to perform the IQA for it in the future), you can click the + button in the Tagged To Plan column. Note that this is an optional, indicative feature and does not impact on whether IQA’d evidence counts towards the plan.
After tagging a row to the plan, click Save and Close, then re-open the plan. The tagged row will be highlighted red if it hasn’t yet been IQA’d.

You can un-tag a row by clicking the – button at the end of the row.
Clicking a row will show a list of evidence for the relevant learner. The relevant evidence row will be selected and the accept/sample/defer table will be displayed under it.

Click the filename to download and view the evidence. To view the visit, click Visit at the end of the row. Once you have reviewed the evidence and visit, tick the Accept, Sample or Defer boxes as required and click Save (note that these will all count towards the plan item requirements). Accept will only be available if the unit has a completion date.
You will then be prompted to enter any notes regarding the action. When ready, click Save IQA. This will show the visits planner where you can complete the IQA visit details as required. Click Save on the Edit appointment tab when finished.
When all plan items against a month / assessor have been completed, the cell will turn green.

View by Caseload and Qualification View
An alternative view is available for plan items which lists learners in the selected assessor's caseload. To use this view, click the icon for a month / assessor in the IQA planning table and click View By Caseload at the top-right.

View by Plan
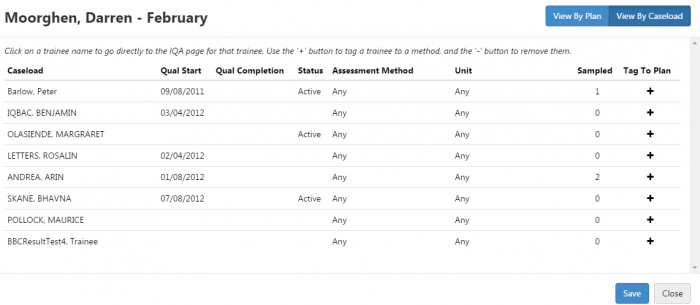
View by Caseload
In this view, you can tag specific learners to the plan and specify the assessment method and unit to be sampled for them.
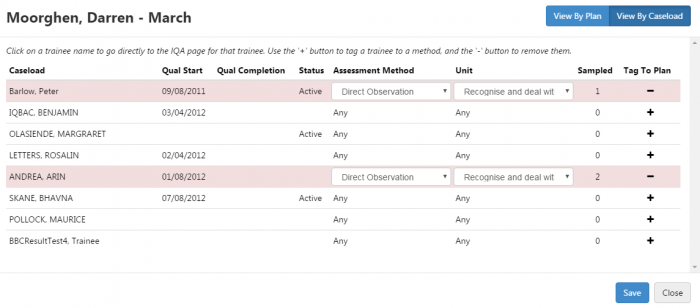
Clicking a learner will open their evidence list. Click the  button at the left of an evidence row to open the Accept / Sample / Deferred table for it.
Alternatively, from this screen you can click the Qualification View button at the top-right and select a qualification to view a table of which units for that qualification have been accepted, sampled or deferred.

Sample from Any Time in the Plan
A config option is available which allows you to sample evidence from any time in the plan, rather than for a specific month. To enable this:
- Go to Settings on the toolbar and click System configuration.
- Select Assessor Login on the left and scroll down to the IV Planning section on the right.
- Tick the box for the config Eligible evidence from the plan start date and set the toggle button to ON.
- Click Save.
With the config enabled, IQA plans will show eligible evidence from the start date of the plan up to the end of the selected month. For example, if the plan starts in January and you have selected May, eligible evidence from 1st January to 31st May is shown. All eligible evidence will still conform to the appropriate plan filters (i.e. the unit or evidence type).
IQA Visits Button on Files Tab
When an assessor views the Files tab for a learner, any files which have been sampled by an IQA user will have an IQA Visit button next to them.

Clicking the IQA Visit button will open the visit associated with the sample. If file was sampled in more than one visit, a dropdown will appear so you can choose which visit to view.