ebs-Link Release Notes
Maytas 5.17 Release Notes
Note regarding submissions
We would like to remind providers to create a submission early and check for any errors using reports from the appropriate software (i.e. the FIS or LLWR-Inform). Welsh providers should also remember to download their ULI file. After submission to the ESFA or DfES, providers should check that data has submitted correctly using the available reports. Providers should check that all their expected starts and completions are submitted correctly, and that start and outcome payments correctly match the PFR or ACE funding reports.
Our support desk gets extremely busy in the days prior to the submission deadlines, and although we try and prioritise submission-related queries, we cannot guarantee assistance if queries are sent late. If you do encounter any issues, please ensure that you contact Maytas Support as soon as possible, as we can only rectify issues of which we are aware. We also recommend checking Maytas Communities regularly for information on any known issues and solutions. Tribal cannot be held responsible for any issues caused by your failure to comply with this advice.
Technical specification
The latest Maytas and e-track technical specification can be found here.
Confirm the upgrade has been run
Once the upgrade has been completed, the version number should be checked to ensure it has been successful.
- Start Maytas and go to Support on the toolbar.
- Click About.
- The version numbers should read 181.20 / 5.17.7000.2. If you have any other version, please ensure you have followed the upgrade instructions correctly. If you require assistance, please contact Maytas Support.
It is the responsibility of customers to ensure that users carry out any required user acceptance testing and sign off on the upgrade.
Complete the Upgrade
Features Added in the Upgrade
These are the main updates in the upgrade:
- ILR export refactor
- New online documentation site
- Ability to export and import lookups
- Standard ILR and LLWR learner app form imports and accompanying tabs
- EPA / Gateway tab
- Fixes to a number of issues
Reports Library 1.0.3.1 is also included in the upgrade but must be installed separately. Please contact the service desk to request this to be installed.
Re-Import the FIS Data Sets
The FIS data sets must be re-imported for this upgrade, even if they were imported in a previous upgrade.
It is essential that the latest aim information is imported into Maytas for use by the ILR export. This should be done by importing the relevant information directly from the Data Service’s Funding Information System (FIS). To do this, you must have the FIS installed and correctly configured (please refer to the Data Service’s instructions for setting up the FIS).
Please ensure you have the latest version of the FIS with the 2018/19 components installed.
Once the FIS is installed and configured, the information can be imported as follows:
- Perform a sync in Maytas 5, then restart Maytas 5.
-
Go to Exports | Uploads | Upload FIS Data Sets.
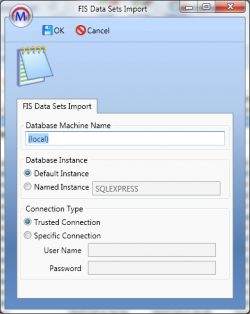
- There are three items to configure:
- Database Machine Name – If the FIS is installed on the same machine that you are using for Maytas 5, this can be left as (local). Otherwise, enter the machine name of the SQL server where the FIS database is held.
Database Instance – If the SQL server holding the FIS database has a named instance (e.g. MACHINENAME\INSTANCENAME), select Named Instance and enter the instance name. Otherwise leave this as Default Instance.
If you have no named instance and Default Instance does not work, you may need to select Named Instance and leave the instance name blank.
- Connection Type – This is the login for the SQL server holding the FIS database. Trusted Connection will use Windows authentication. If you wish to specify the login details, select Specific Connection and enter the credentials.
- Click OK. The FIS data will now be imported.
- If you have an Adult Skills budget contract and a transition factor, this must be entered on the contract:
- Go to Management on the toolbar and click Contracts on the ribbon.
- Select the relevant contractor, then select the Adult Skills contract on the right.
- Click the
 button.
 - Go to the Uplifts tab.
- Enter the ASB Transition Factor and click OK.
- Click Apply to save the change.
Note on Postcode File
The ESFA have not released a postcode file for 2018/19. However, this file would not be required as the relevant data is now imported into Maytas via the FIS import.
Note on the Funding Cache
By default, the funding cache will update overnight so that funding information in Maytas uses the newly-imported FIS and postcode information. Please check with your system administrator if you are unsure if or when the funding cache is updated on your system. You can also manually set the funding cache to update by going to Management | Profiles and clicking the Funding Cache button, though please be aware that this may take a long time and may use a large amount of system resources, which could affect performance for other users on the system.
Import Updated ILR 2018/19 Tab
The ILR 2018/19 tab has been updated to include Known As in the learner information section.
To import the tab in Maytas:
- Go to Tools on the toolbar.
- Click Import on the Screens panel of the ribbon.
- Click Browse.
- Browse to the ebs-Link\ebs Tabs folder of the upgrade, select ebs ILR 2018.m5tab and click Open.
- Click Next, then click Finish.
- Sync Maytas to apply the tabs to all clients.
Maytas 5 Release Notes – Version 5.17.7000.2
ILR and LLWR Export Refactor
The code behind the ILR and LLWR export systems has been rewritten in a more modern language. This section will explain why the change was necessary and the actions you need to take.
Throughout this section, the old export systems will be referred to as the Legacy systems and the new export systems will be referred to as the Refactor systems.
Why has this change been done?
The ILR and LLWR Legacy exports were written in an old programming language that no longer meets the requirements of our modern development standards. As the exports are a major and vital part of Maytas with a high level of complexity in how they work, this was not a change that was taken lightly or quickly, and we have spent a long time planning and developing the Refactor exports to provide a smooth transition.
How does this affect me?
In most cases, the main difference you will notice is that the new export systems run substantially faster. However, due to the scale of the change and the complexity of the exports, it is very important that for the first few periods you compare Refactor exports to Legacy exports to ensure there are no discrepancies. Until the 5.18 summer upgrade, you will be able to generate both Refactor and Legacy exports, after which our intention is to disable the Legacy system. There are details below on how to generate both types of export, and we have updated the ILR and LLWR Exports Comparison reports so that they can be used as a tool for highlighting any differences between Legacy and Refactor exports.
It is the responsibility of providers to ensure their export data is correct. Tribal cannot be held responsible for issues, incorrect submissions or loss of funding due to failure of a provider to check their export data is correct. As always, it is important to generate and check your exports as early as possible so that any questions or issues can be resolved in a timely fashion.
ESF Generated Aims
If you are an ILR provider who uses the Generate ZESF Aim checkbox when creating a learner record so that ZESF0001 aims are automatically generated in the ILR export, please be aware that the Refactor export will not include these aims. If ZESF0001 aims are required, they should be entered manually.
Please note that the Generate ZESF Aim option will only appear when scheme 47 (ESF) is selected in the new trainee wizard.
How to run ILR Refactor and Legacy exports
To create both a Refactor and a Legacy export for the same period:
- In Maytas, go to Exports | ILR Export.
- Click the
 to add a new export.
 -
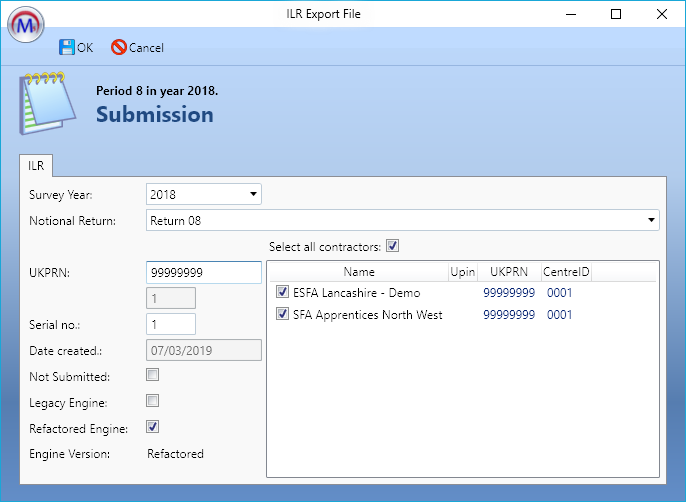
Complete the export screen as normal. There are two new options: Legacy Engine and Refactored Engine. Ensure Refactored Engine is ticked.
- Click OK.
- Repeat steps 2 to 4 but choose Legacy Engine instead.
-
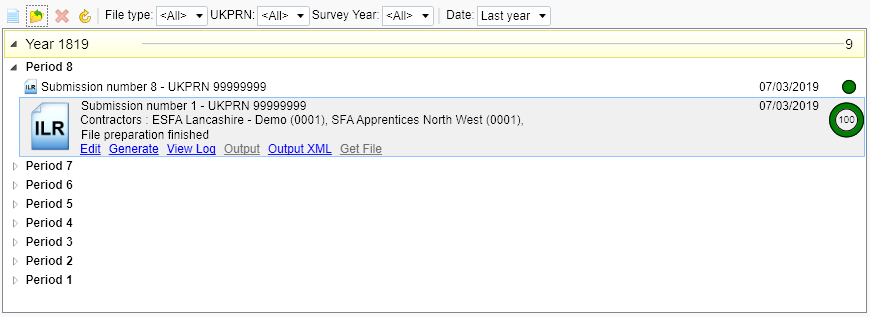
You should now have two exports for the same period, one a Refactor export and one a Legacy export. If you are unsure which is which, select a row and click the
 button to view the export details. Once each export has finished generating (when the progress wheel on the right shows 100), the exports will be available for comparison in the ILR Exports Comparison report.
How to use the ILR Exports Comparison Report
The ILR Exports Comparison report can be used to compare Legacy and Refactor exports to view any differences between them. The updated version included in Reports Library 1.0.3.1 includes all ILR fields except for:
- Learning aim reference
- Software supplier aim identifier
- Aim sequence number
It also now counts rows that have been added or removed between exports.
Ensure that Reports Library 1.0.3.1 has been installed before running the report.
- Select Home on the toolbar and go to Report Library | Audit | ILR Exports Comparison.
-
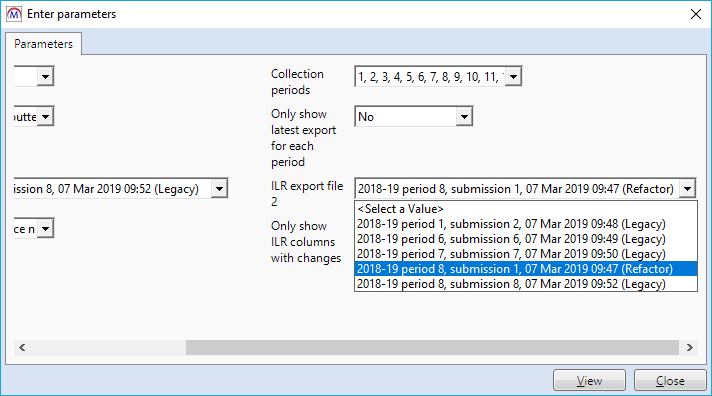
In the parameters window, change the parameter Only show latest export for each period to No. You will then be able to select both Legacy and Refactor exports for the same period from the ILR export file 1 and 2 parameters.
-
The Field changes to show parameter determines which fields appear on the bottom table of the report. All ILR fields selected by default, but you can select specific fields if required.
The Only show ILR columns with changes parameter is set to Yes by default, which means any ILR fields with no identified changes will be hidden on the bottom table. To show these fields, change the parameter to No.
-
Click View to run the report.

-
For the purposes of comparing Legacy and Refactor exports, we are primarily concerned with the bottom table on the report, Field Changes between File 1 and File 2. This lists each ILR field and the number of differences identified for them between export files.
For each ILR entity (e.g. learning delivery, employment status, destinations, etc), rows are matched between exports based on several fields and then changes are identified on a field-by-field basis within that entity. For example, rows in the employment status entity are matched on trainee ID and employer identifier, and then all the employment status fields on the matched rows are compared.
If a row cannot be matched between exports, all the fields on that row are counted as a difference except for fields that have no value. e.g. If an employment status row appears in file 1 but not in file 2, and the only field with nothing entered on that row was Length of unemployment, all the employment status fields would show as having a difference except for Length of unemployment.
-
Click a figure to view the field differences.

The relevant learners will be listed, along with (where relevant to the entity) the POT, aim reference number and row ID. Note that the row ID may contain background data you are unfamiliar with which is used in the database to identify and distinguish rows. The values for the field in files 1 and 2 are displayed on the right.
In the above example, Charlotte Robinson has a destination outcome code in file 2 but not file 1, which suggests a destination row was added between exports. Buddy Huntington has differing outcome codes between files, which means the row appears in both files but the outcome code has changed.
Matching rows within an ILR entity
Rows are matched within each ILR entity based on the following fields:
| ILR entity | Fields used to match rows |
| Learners | Trainee ID |
| Learning delivery | Trainee ID, POT, learning aim ref. and software supplier aim ID |
| Employment status | Trainee ID and employer identifier |
| HE | Trainee ID, POT and software supplier aim ID |
| Learning delivery FAM for LSF, ALB and ACT | Trainee ID, POT, FAM type and FAM type ID (internal field) |
| Work placement | Trainee ID, POT, work placement number (internal field) and software supplier aim ID |
| Apprenticeship financial record | Trainee ID, POT, financial type, financial code, financial record date and software supplier aim ID |
| Destinations | Trainee ID, learner ref. no. and destination no. (internal field) |
How to run LLWR Refactor and Legacy exports
To create both a Refactor and a Legacy export for the same period:
- In Maytas, go to Exports | LLWR Export.
- Click the
 to add a new export.
 -
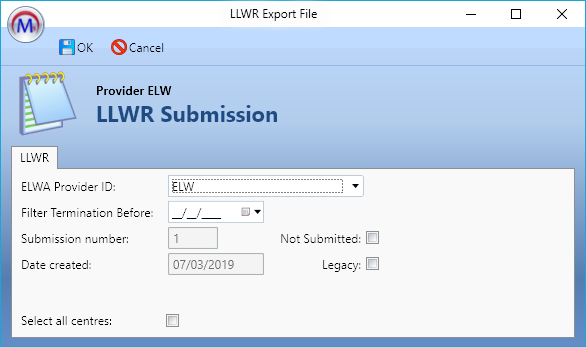
Complete the export screen as normal. The Refactor system will be used by default, but the new Legacy checkbox can be ticked to produce a Legacy export. Ensure Legacy is not ticked.
- Click OK.
- Repeat steps 2 to 4 but tick the Legacy box this time.
-
You should now have two exports for the same period, one a Refactor export and one a Legacy export. If you are unsure which is which, select a row and click the
 button to view the export details. Once each export has finished generating (when the progress wheel on the right shows 100), the exports will be available for comparison in the LLWR Exports Comparison report.
How to use the LLWR Exports Comparison Report
The LLWR Exports Comparison report can be used to compare Legacy and Refactor exports to view any differences between them. The updated version included in Reports Library 1.0.3.1 includes all LLWR fields except for:
- LP03 Provider identifier
- LA03 Provider identifier
- AW03 Provider identifier
- AW04 Learning programme identifier
It also now counts rows that have been added or removed between exports.
Ensure that Reports Library 1.0.3.1 has been installed before running the report.
- Select Home on the toolbar and go to Report Library | Audit | LLWR Exports Comparison.
- In the parameters window, select the Legacy and Refactor exports from the LLWR export file 1 and 2 parameters.
-
The Field changes to show parameter determines which fields appear on the bottom table of the report. All LLWR fields selected by default, but you can select specific fields if required.
The Only show LLWR columns with changes parameter is set to Yes by default, which means any LLWR fields with no identified changes will be hidden on the bottom table. To show these fields, change the parameter to No.
-
Click View to run the report.

-
For the purposes of comparing Legacy and Refactor exports, we are primarily concerned with the bottom table on the report, Field Changes between File 1 and File 2. This lists each LLWR field and the number of differences identified for them between export files.
For each LLWR entity (i.e. learners, programmes, activities and awards), rows are matched between exports based on several fields and then changes are identified on a field-by-field basis within that entity. For example, rows in the activity entity are matched on trainee ID, POT and learning activity identifier, and then all the activity fields on the matched rows are compared.
If a row cannot be matched between exports, all the fields on that row are counted as a difference except for fields that have no value. e.g. If an activity row appears in file 1 but not in file 2, and the only field with nothing entered on that row was LLDD Indicator, all the activity fields would show as having a difference except for LLDD Indicator.
-
Click a figure to view the field differences.
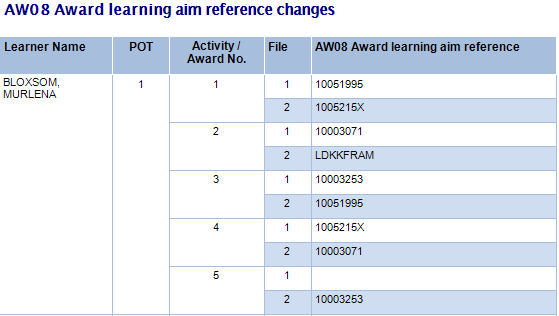
The relevant learners will be listed, along with (where relevant to the entity) the POT and activity or award number. The values for the field in files 1 and 2 are displayed on the right.
In the above example, awards 1 to 4 have differing learning aim references between files, which means the award rows appear in both files but the learning aim references have changed. Award 5 has a learning aim reference in file 2 but not file 1, which suggests an award row was added between exports.
Matching rows within a LLWR entity
Rows are matched within each LLWR entity based on the following fields:
| LLWR entity | Fields used to match rows |
| Learner | Trainee ID and POT |
| Programme | Trainee ID and POT |
| Activity | Trainee ID, POT and LA05 learning activity identifier |
| Award | Trainee ID, POT and AW06 award entry identifier |
Online Documentation
The documentation for Maytas and e-track has migrated to a new platform:
http://docs.maytas.tribalgroup.com
This replaces the existing wiki at https://www.maytas.net/dokuwiki/doku.php, which will be deactivated in the near future.
The new documentation site is easier to navigate, with a sidebar that lets you quickly view the site structure and find the page you're looking for. The site is fully responsive on tablet and mobile devices, where the sidebar is hidden to make better use of screen space. It can be accessed by clicking the  button.
Many pages have a View contents button at the top which can be clicked to show a table of contents for the page. Clicking on an item in the contents list will jump to that section on the page.

As of this release, full release documentation will be available on the site, as well as in PDF form in the release package.
PCR - Export / Import Lookups
Lookups can now be exported and imported into a different database. This is mainly intended for providers who enter and test lookups on a test system so that they can be easily migrated to their live system.
First, permission must be given to the relevant user or group:
- Go to Tools | Permissions.
- Select the user or group which requires permission.
- Go to the Commands tab and expand the Lookup Editor section.
- Tick the box for the Import/Export Lookups permission and set the dropdown box to Visible.
- Click Apply.
- Restart Maytas for the permission to take effect.
To export lookups:
- Go to Tools | DB Schema.
-
Click Export Lookups. Please be aware that it may take a short while to load the lookups, depending on how many are in the system.
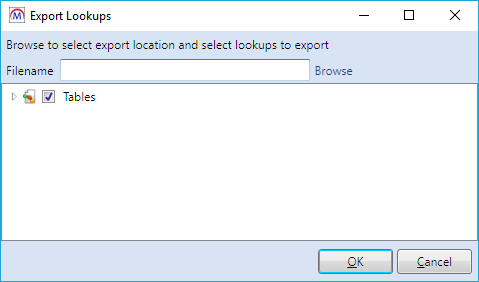
- Click Browse, browse to where you want to save the lookup file, enter a filename and click Save.
- Next we need to choose which lookups to export. By default, all lookups in the database are selected. To only select certain tables or fields, un-tick the Tables box and click the arrow to the left to expand the list of tables.
-
If you want to export all lookups in a table, tick the box for that table. If you only want to export lookups for specific fields, click the arrow next to the relevant table then tick the boxes for the required fields.
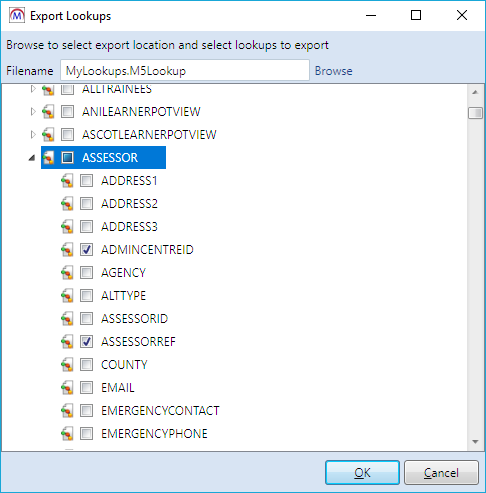
- Click OK to export the selected lookups.
- When the export has finished, a confirmation message will appear. Click OK to continue.
To import lookups:
- Go to Tools | DB Schema.
- Click Import Lookups.
- Browse to and select the lookup file and click Open.
- You will be asked if you wish to overwrite the longstring if a lookup already exists. Clicking Yes will check if the lookup shortstring already exists for the relevant field, and if it does then the longstring for that lookup will be overwritten with the one from the import. Clicking No will import any new lookups but will leave any existing lookups unchanged.
- When the import has finished, a confirmation message will appear. Click OK to continue.
Email Validation
e-track screens and app forms designed in the Maytas screen designer can now be used to validate email addresses. This works by designating two fields for the email address and confirmation box (for re-entering the address), which are then checked by e-track to ensure the entries match. The validation also checks that the email address contains at least one @ character and at least one dot after the @.
To implement this:
- In Maytas, go to Tools on the toolbar and click New/Load on the Screens panel of the ribbon.
- Select an existing tab or create a new tab.
- Go to Fields at the bottom-left and drag an email field onto the design area (e.g. TRAINEE.EMAIL). This will be the main field you wish to use to store the email address.
- Select the field in the design area and tick the Validate Email (e-track only) box on the right.
- The Email ID box will appear underneath it. Enter an ID, which can be any value you want (an integer is suitable in most cases). This will be used to link the email field to the confirmation field.
- Drag another email field onto the design area (e.g. TRAINEE.ILR_EMAIL). This will be used as the confirmation field.
- Select the confirmation field in the design area and tick the Validate Email (e-track only) box.
-
Enter the same ID as before in the Email ID box.
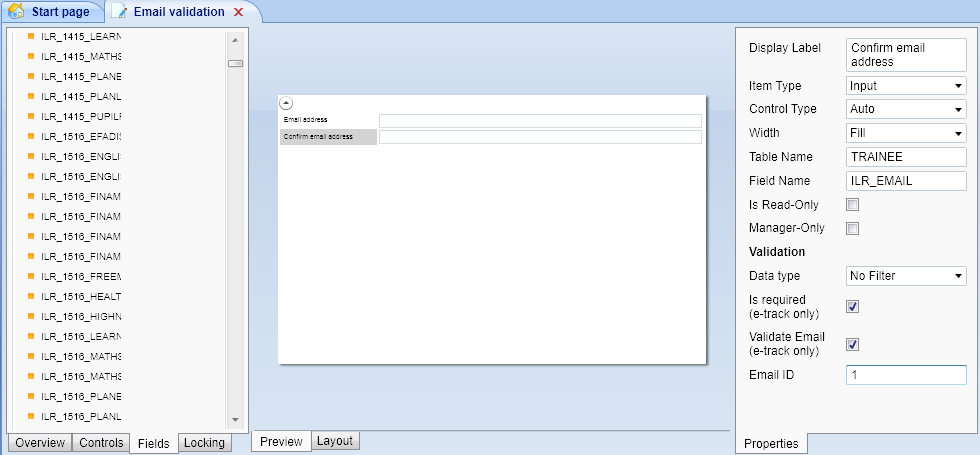
- Complete the rest of the tab as required and click Apply to save the changes.
- Go to Home on the toolbar and click Sync.
The email address validation will now work in e-track.
Maximum Trainees in a Centre
Maytas has been updated to make more efficient use of the number of trainees that can be included in a centre. The format of trainee IDs allows for 1,000,000 trainees per centre. The format of an ID is:
xxxx-yyyy-zzzzzz
where xxxx is the organisation ID, yyyy is the centre number and zzzzzz is the number assigned to a trainee, which ranges from 000000 to 999999.
Maytas has been updated so that if the automatically generated trainee number (zzzzzz) has reached 999999, a new number generator is created for each centre. Each of these attempts to fill in the gaps for any missing numbers in a centre - e.g. if a trainee is added to centre 0001 and that centre already has trainee IDs running from 000000 to 012345, but 012346 is not used, the new trainee's ID would be xxxx-0001-012346.
If all generated numbers are assigned to trainee IDs for a centre, that centre is automatically locked so that new trainees cannot be added to it. A centre can also be manually locked by entering Y in the field CENTRE.CENTRELOCK.
File Select in Screen Designer
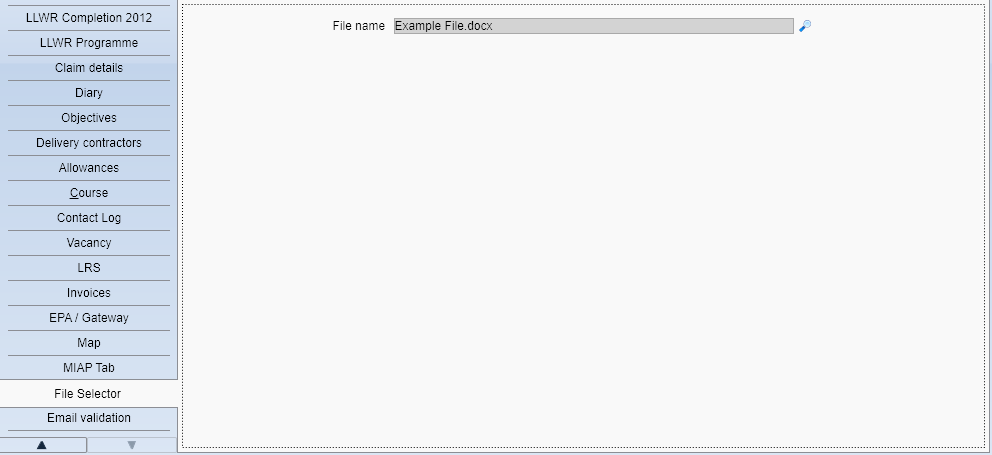
The Screen Designer has a new File Select control which allows you to upload a file to a trainee or employer's file store and save the filename to a field.
- In Maytas, go to Tools on the toolbar and click New/Load on the Screens panel of the ribbon.
- Select an existing tab or create a new tab.
- There are two ways to add the File Select control. You can either:
Go to the Controls tab and drag a File Select control from the Standard section onto the design area. Select the control in the design area and enter the Table Name and Field Name on the right (this should point to a varchar field large enough to store a filename).
or
- Go to the Fields tab and drag a field onto the design area (this should be a varchar field large enough to store a filename). Select the field in the design area and change the Control Type on the right to File Select.
- Click Apply to save the changes.
- Go to Home on the toolbar and click Sync.
- Open a learner or employer record and go to the tab with the File Select control.
- Click the
 button to browse to and select a file and click Open.
 -
Click Apply. The file will be uploaded to the file store and the filename will be saved in the field linked to the File Select control.
Standard Learner Imports and Tabs
Standard imports and accompanying tabs are now available for ILR and LLWR learners. These can be used to import learner data in a set format (e.g. data gathered in an app form from an external system such as IPEGS) which then populates the relevant ILR or LLWR fields.
This feature requires the Standard Import licence. Please contact your account manager for information on purchasing the licence.
Standard Import File Schema
An import file must be in a set format, as defined in the Standard ILR and LLWR Import Schema document in the Maytas 5\Extras\Standard ILR and LLWR Imports folder of the upgrade. An ILR import must only include the columns indicated, whereas a LLWR import must include all the columns. Examples of both import files can be found in the same folder.
Import files must be saved as a .csv file.
Import the Accompanying Tabs
To import the tabs:
- In Maytas go to Tools on the toolbar and click Import on the Screens panel of the ribbon.
- Click Browse.
- Browse to the Maytas 5\Extras\Standard ILR and LLWR Imports folder of the upgrade.
- Select ILR and LLWR App Forms.m5tab and click Open.
- Click Next, then click Finish.
- Go to Home on the toolbar and click Sync.
There are two trainee tabs which are populated by the imported data: App Form - England and App Form - Wales.
Performing a Standard Import
- Ensure standard imports are enabled in permissions:
- Go to Tools | Edit Permissions.
- Select the user or group that requires permission.
- On the Modules tab, ensure that Standard Imports is set to Visible.
- On the Commands tab, expand the Standard Import section and ensure the permission Show Standard Import is set to Visible.
- Click Apply and restart Maytas for the changes to take effect.
-
Go to Exports on the toolbar and click Standard Import on the ribbon.
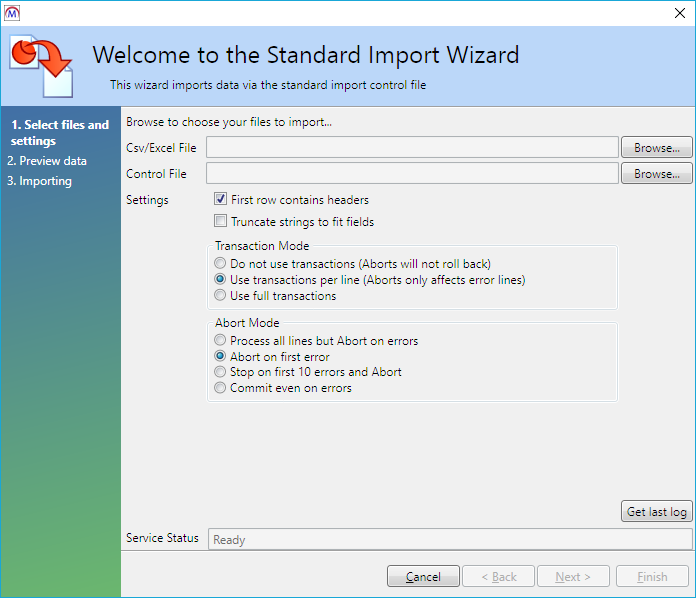
- Click Browse next to Csv/Excel File.
- Select the .csv file to import and click Open.
- Click Browse next to Control File.
- Browse to the .con file provided by Tribal when you purchased the licence and click Open.
- Click Next.
- A preview of the data to be imported will be generated. Check that you are happy with the data to be imported and click Next.
- The data will now be imported. A successful import will display x records imported; 0 errors occurred. Click Finish.
How the Import Works
When the ILR or LLWR data is imported, there are several steps which happen in the background:
- The data is first placed in the APPFORM_IMPORT table.
- Maytas then checks each row to see if a trainee record already exists in Maytas with the same NI number. If there is a match, that learner is updated with the import data for that row. It is important to understand that the imported fields will overwrite any existing data in those fields for the matched trainee record, and that this is irreversible.
- If no trainee can be matched, a new trainee record is created using the import data for that row.
- Once the data for a row has populated the relevant trainee fields, the row is deleted from APPFORM_IMPORT.
e-track Online Release Notes
Technical specification
The latest Maytas and e-track technical specification can be found here.
Online Documentation
The documentation for Maytas and e-track has migrated to a new platform:
http://docs.maytas.tribalgroup.com
This replaces the existing wiki at https://www.maytas.net/dokuwiki/doku.php, which will be deactivated in the near future.
The new documentation site is easier to navigate, with a sidebar that lets you quickly view the site structure and find the page you're looking for. The site is fully responsive on tablet and mobile devices, where the sidebar is hidden to make better use of screen space. It can be accessed by clicking the  button.
Many pages have a View contents button at the top which can be clicked to show a table of contents for the page. Clicking on an item in the contents list will jump to that section on the page.

As of this release, full release documentation will be available on the site, as well as in PDF form in the release package.
Accessibility Improvements for Learner Login
The accessibility features for the learner login in e-track have been overhauled so that they now meet the WCAG2.0 AA standard.
When a learner logs into e-track, they will now see an Accessibility Mode toggle button at the top, which is off by default.
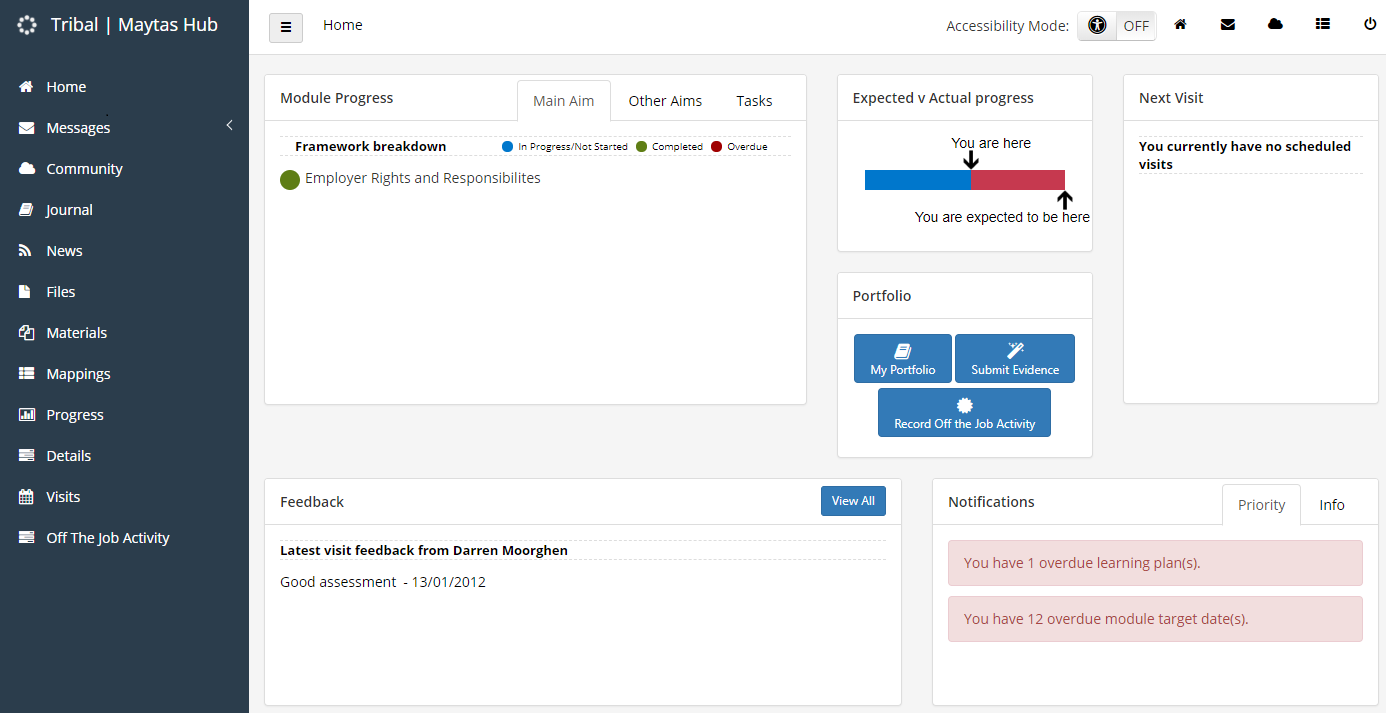
Above - The learner login with accessibility mode off.
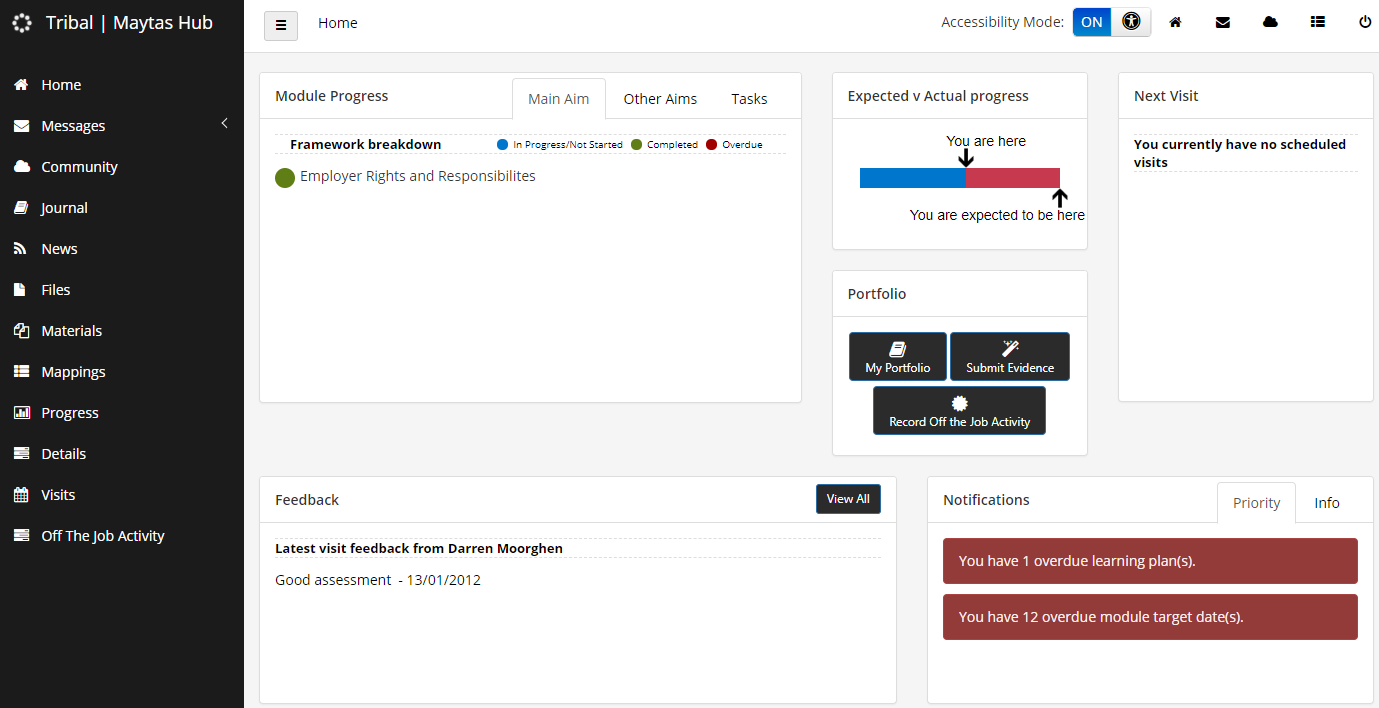
Above - The learner login with accessibility mode on.
With accessibility mode on, all screens have higher contrast colours to make them easier to view, and screens are tagged in the background so that they work with screen readers (software which dictates the screen content to the user).
The Accessibility button is visible at all times and can be toggled at any time. The learner's preference is remembered when they log out and back in again.
Some accessibility improvements have also been made in e-track even when accessibility mode is off, such as the general layout and colours on some screens.
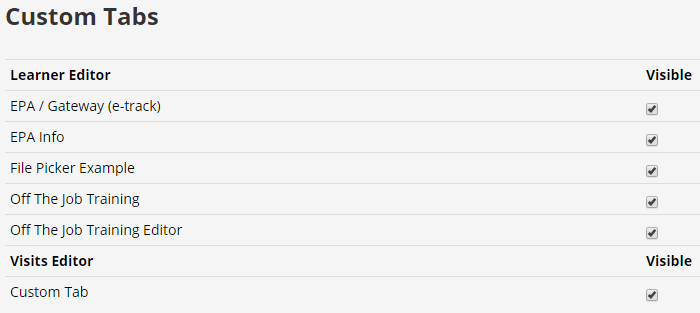
Web User Editor - Custom Tabs by Editor Type
The Web User Editor now organises the Custom Tabs section by the are of e-track that they apply to - i.e. the learner editor, assessor editor, employer editor or visits editor.
Community Resources - Text Alignment in Child Pages
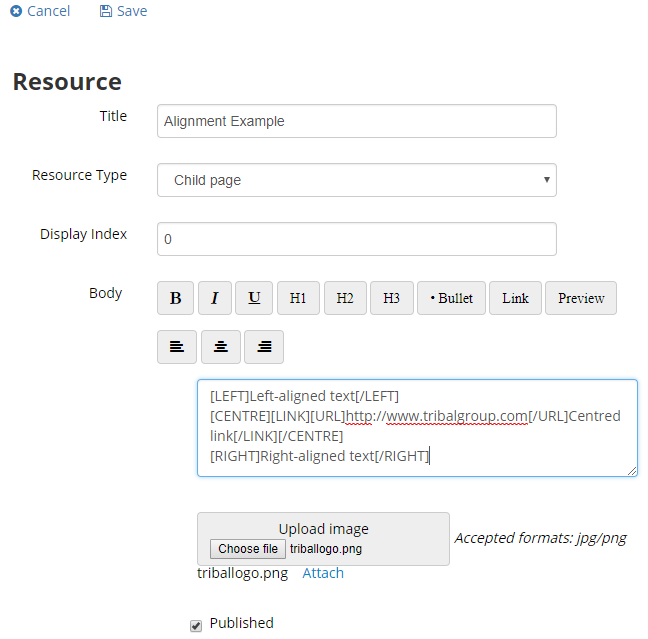
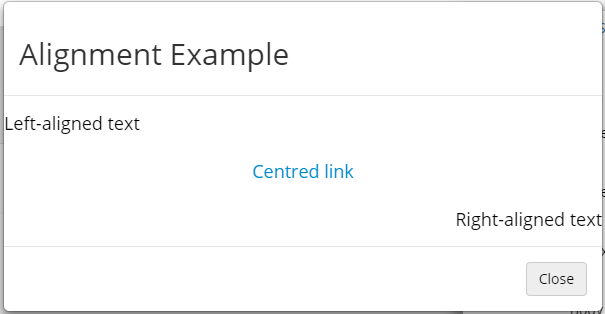
When creating a child page resource for a Community, the text, web links and images on it can be aligned to the left, right or centre.
- Go to Communities on the toolbar.
- Select a community and go to Actions | Edit community (at the top-right).
- Go to the Resources tab and add or edit a resource. Note that the resource type should be a Child page.
- The three
 buttons allow you to align text, links and images in the Body box. You can either:
Click one of the buttons first which will add LEFT, RIGHT or CENTRE tags in the body, and then you can enter your content between those tags;
or
Enter your content in the body first, then highlight the part you want to align and click the relevant button.
-
You can click the Preview button to see what the resource will look like.
- Click Save to save the resource.
- Click Save to save the community.
Custom Tabs - No New/Delete Options on Read-Only Grids
When a grid is included on a custom e-track tab created in the Maytas screen designer, if the grid is set to read-only then the options to add or delete a row will now be hidden on the grid in e-track. Existing rows in the grid can still be edited, however.
Employer Homepage
The homepage for employer users has been overhauled so that it displays similar information to the assessor homepage.
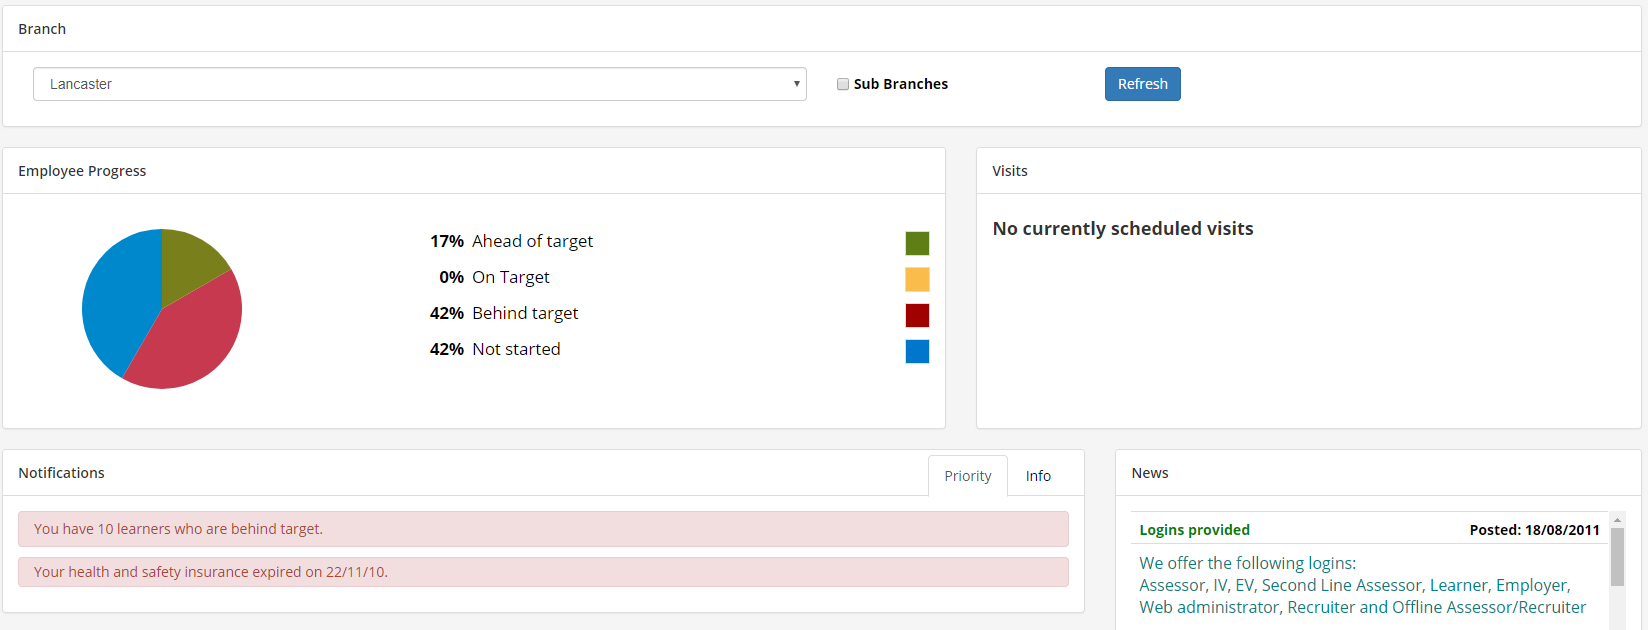
The Branch section allows you to specify which branch to filter the homepage information by. Select the branch you wish to view and click Refresh. You can also tick the Sub Branches box to include information from all sub-branches under the selected branch in the employer hierarchy.
The Employee Progress chart shows the percentage of learners at the employer who are ahead of target, on target, behind target or who have not yet made any progress. Clicking on each area of the pie chart will open a list of the relevant learners.
The Visits section shows up to three upcoming and three overdue visits at the employer. Clicking a visit will display its details (read-only). Clicking an assessor name will open a new message for you to send to them, and clicking a phone number allows you to call it (if possible on your device).
The Notifications section shows alerts which may require the employer's attention. The most important notifications are displayed on the Priority tab (e.g. learners behind target, which can be clicked to show a list of the learners), whereas the Info tab shows less urgent notifications (e.g. new unread messages). The possible notifications are:
- Priority
- Learners behind target
- Learner outstanding visits
- Outstanding visits (i.e. visits at the employer with no learner attached)
- Health and safety insurance expired
- Info
- Unread messages
- Upcoming learner visits
- Upcoming visits (i.e. visits at the employer with no learner attached)
The News section shows items added and configured on the News page for admin users.
Off-the-Job Training Tab for Employer Login
Off-the-job training can now be entered by employer users. To view the tab, open a learner record and go to the Off The Job Training tab.
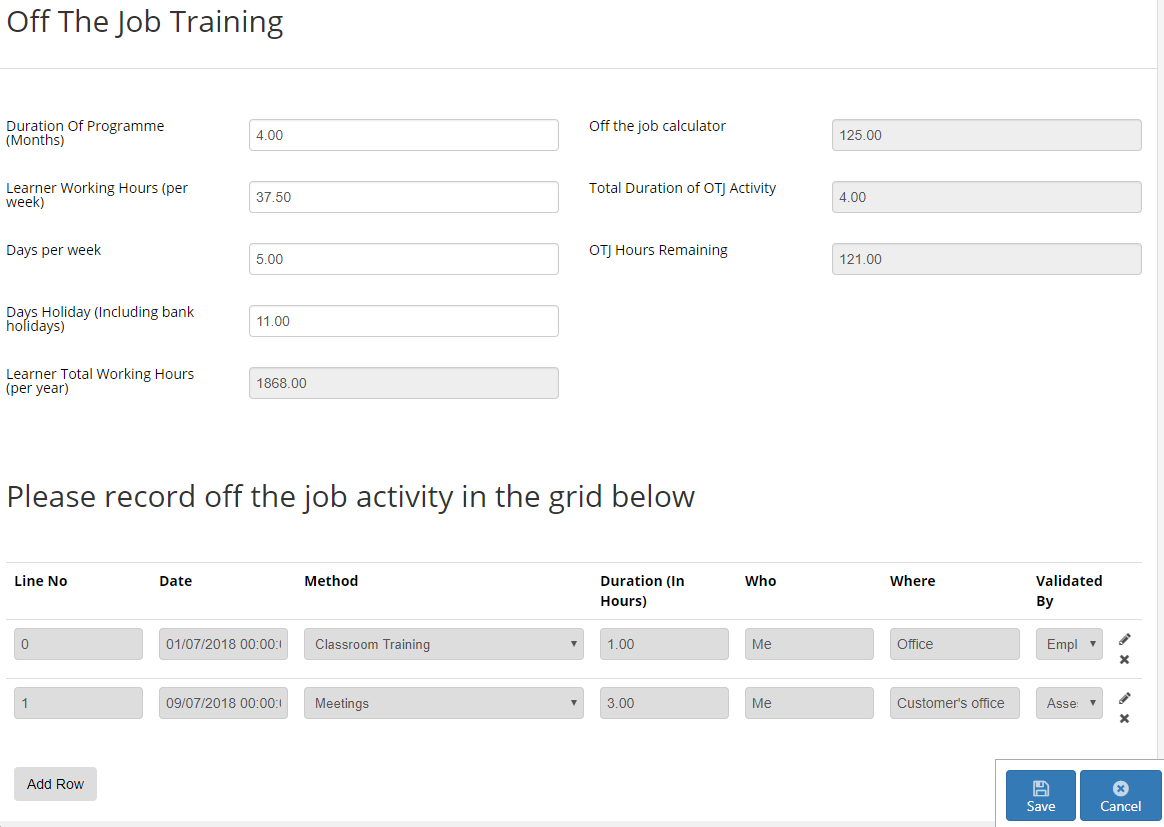
First, enter the programme duration, working hours per week, days per week and the learner’s total holiday allowance (including bank holidays) and click Save. This will populate the Learner Total Working Hours (per year) and Off the job calculator fields.
Learner Total Working Hours (per year) is derived using the following formula:
( (hours per week x 52) – (days holiday x (hours per week / days per week)) )
e.g. for the above example, the calculation would be:
( (37.5 x 52) – (33 x (37.5 / 5)) ) = 1950 – 247.5 = 1702.5 (rounded up to 1703)
Off the job calculator is derived using the following formula:
( Learner total working hours (per year) / (12 / duration of programme) ) x 0.2
e.g. for the above example, the calculation would be:
(1703 / (12 / 12) ) x 0.2 = 340.6 (rounded up to 341)
Next, click the Add Row button on the grid to add a new row. This is where off-the-job activity is recorded.
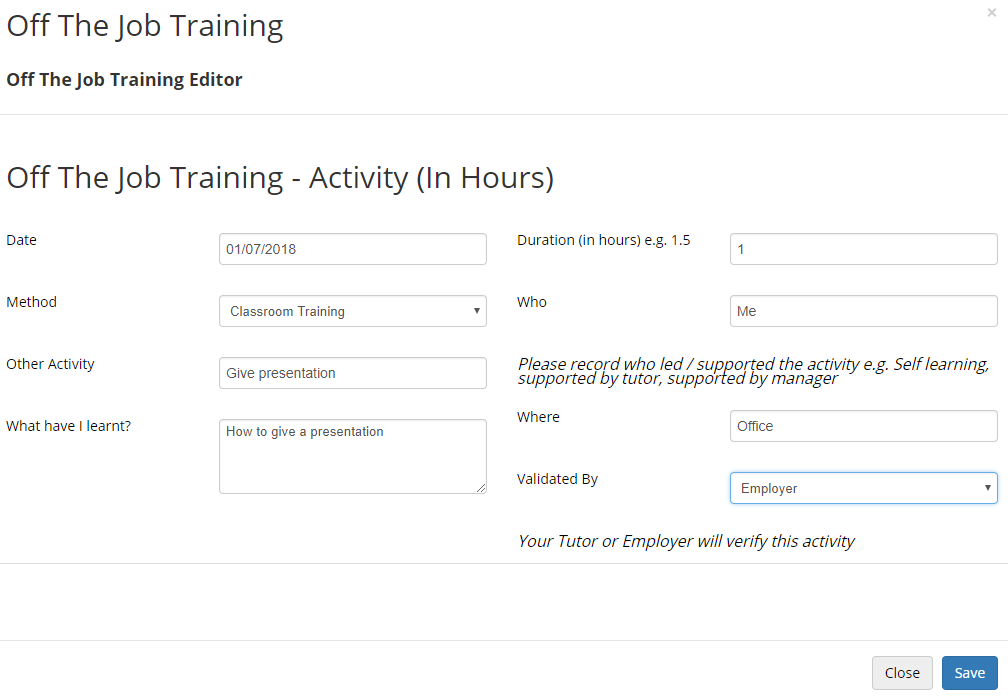
Complete the details as required and click Save. Click Save on the main screen to apply the changes. This will populate the Total Duration of OTJ Activity and OTJ Hours Remaining fields. The total duration adds together the durations entered on each row in the grid and then subtracts that figure from the Off the job calculator figure to get the hours remaining.
Application Form Improvements
Application forms created via the Maytas screen designer no longer display the Back/Next buttons to move between pages if the form only has one page.
Forms also now display radio buttons with correct alignment and with unnecessary blank space removed.
Email Validation
e-track screens and app forms designed in the Maytas screen designer can now be used to validate email addresses. This works by designating two fields for the email address and confirmation box (for re-entering the address), which are then checked by e-track to ensure the entries match. The validation also checks that the email address contains at least one @ character and at least one dot after the @.
To implement this:
- In Maytas, go to Tools on the toolbar and click New/Load on the Screens panel of the ribbon.
- Select an existing tab or create a new tab.
- Go to Fields at the bottom-left and drag an email field onto the design area (e.g. TRAINEE.EMAIL). This will be the main field you wish to use to store the email address.
- Select the field in the design area and tick the Validate Email (e-track only) box on the right.
- The Email ID box will appear underneath it. Enter an ID, which can be any value you want (an integer is suitable in most cases). This will be used to link the email field to the confirmation field.
- Drag another email field onto the design area (e.g. TRAINEE.ILR_EMAIL). This will be used as the confirmation field.
- Select the confirmation field in the design area and tick the Validate Email (e-track only) box.
-
Enter the same ID as before in the Email ID box.

- Complete the rest of the tab as required and click Apply to save the changes.
- Go to Home on the toolbar and click Sync.
The email address validation will now work in e-track.
Messages - Clear Trash
There is now the option to clear your Trash folder on the messages screen, which can improve performance in Messages if there are lots of items in the Trash. It is important to understand that doing this will permanently delete messages in the Trash folder.
- Go to Messages on the toolbar.
-
Go to the Trash folder. This is where messages deleted from the inbox go.

- Go to Actions | Clear Trash.
- You will be asked to confirm permanent deletion of the messages in the trash. Click OK to continue.
- The trash folder will now be cleared.
Employer Data Collection Forms
It is now possible to produce a data collection form that specified employer users must complete. This works as follows:
- A data collection form is created in the Maytas screen designer.
- The ID of the form is entered in the field EMPLOYER.DATACOLLECTIONFORM for every employer who must complete the form.
- If an employer should be prevented from using e-track until the form has been completed, the Lock employer out of regular e-track use permission is ticked in the Web User Editor.
- Configuration options can be set to determine whether locked accounts are unlocked automatically upon completion of the form.
- If an employer has a valid email address entered and they are flagged as needing to complete the form, an email is sent to them (this can also be configured) via the e-track Stats Service.
- The employer logs into e-track and is prompted to complete the form. If they are locked out until form completion, they will not be able to access other areas of e-track.
- The form is completed and the account is either automatically or manually unlocked.
Configuration Options
There are several configuration options which should be set first:
- Go to Settings on the toolbar and click the System configuration button.
- Select Employer Login on the left.
-
The required options are in the Data Collection section.
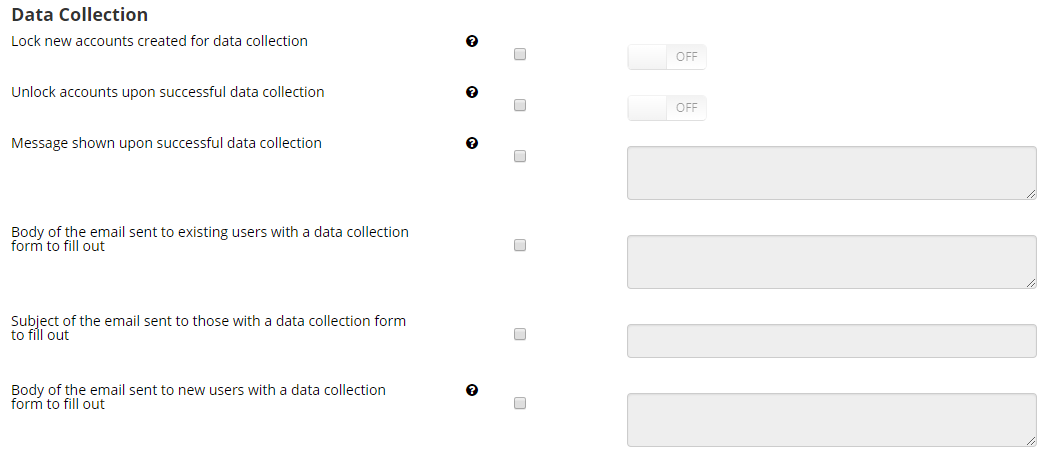
-
Complete the config options as required:
- Lock new accounts created for data collection - When enabled, this will prevent new employer users who have the Lock employer out of regular e-track use permission ticked in the Web User Editor from being able to log in to e-track.
- Unlock accounts upon successful data collection - When enabled, completing the data collection form will unlock the employer account. When disabled, accounts must be manually unlocked by un-ticking the permission mentioned above in the Web User Editor.
- Message shown upon successful data collection - Enter the message you wish to display when the form has been successfully completed.
- Body of the email sent to existing users with a data collection form to fill out - When the data collection form is made active, an email will be sent to existing employer users. Enter the body of that email here.
- Subject of the email sent to those with a data collection form to fill out - Enter the email subject.
- Body of the email sent to new users with a data collection form to fill out - Enter the body of the email for new users. Include {{user}} and {{pass}} to display the user's username and password.
- Click Save.
Create Data Collection Form
- In Maytas, go to Tools on the toolbar and click New/Load on the Screens panel of the ribbon.
- Select Employer on the left and double-click *(New Tab).
- Complete the content of the screen as required for the data collection form.
- On the Overview tab, tick the Authenticated Employer Form box and the Published box.
- Enter an App Form ID.
- Click Apply.
- Go to Home on the toolbar and click Sync.
The App Form ID entered above is what must be entered in the field EMPLOYER.DATACOLLECTIONFORM for all employers who must complete the form.
Report Generation on Form Completion
The data collection form can be linked to a report which is generated when the form is completed.
- In Maytas, go to Tools on the toolbar and click New / Load on the Screens panel of the ribbon.
- Browse to and open the screen for the application form.
-
Click the dropdown box next to Report and click Select Report. This will open a window where you can choose the report (this may take a while to load, depending on the number of reports in the system).
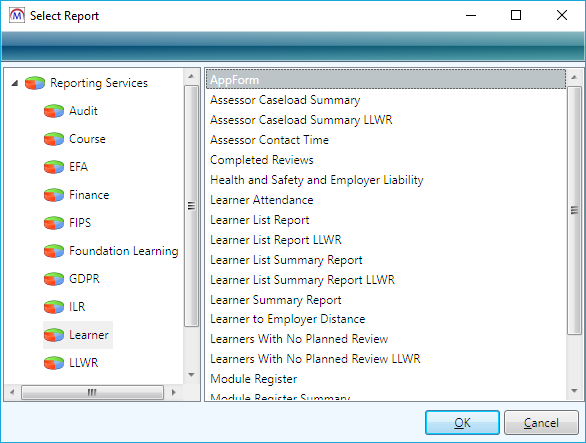
- Browse to and select the report and click OK.
-
If the report has parameters (e.g. an EMPLOYERID parameter to limit the report to the employer record created by the app form), these can be set by clicking <Parameters>. This will open the Set Parameter Mappings window.
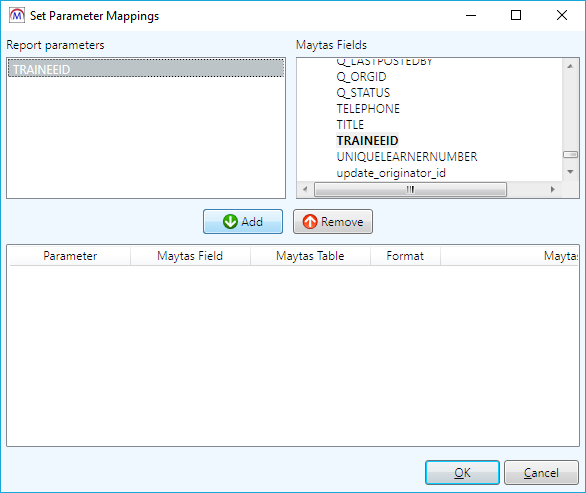
- Select the parameter in the top-left panel, then select the corresponding field to map to it from the list in the top-right panel.
- Click Add.
- Repeat steps 6 and 7 if there are additional parameters.
- Click OK.
- Click Apply to save the screen.
When the application form is completed, this will generate the linked report and place the output in the employer's file store.
Enter Learner Data on Learner's Behalf
Employers can set up a form that they complete on the learner's behalf. First, the employer types which can do this must be specified (if nothing is specified, the employer type short string of E is used):
- Go to Settings on the toolbar and click the System configuration button.
- Select Admin on the left (under e-track Online) and scroll down to the Online Applications section on the right.
- Locate the config Employer types that can complete data collection forms for learners.
- Tick the box for the config and select the employer types you want to be able to complete learner forms.
- Click Save.
Next, the form must be created and configured:
- Create a trainee form in the Maytas screen designer.
-
For each learner you wish to complete the form for, enter the form ID in the field TRAINEE.EMPLOYERDATACOLLECTIONFORM. For any employers each learner is currently active at (i.e. where the end date is not entered), this will automatically populate EMPLOYER.DATACOLLECTIONFORM with the form ID and EMPLOYER.DATACOLLECTIONTRID with the TRAINEEID.
If the employers don't already have web users associated with them, these will automatically be created and the employers will be emailed about the form.
- When an employer who has been notified about the form logs in, they will be prompted to complete the form along with the name of the learner in question. If an employer account is locked until form completion, they will immediately be redirected to the form.
-
Once the form has been submitted, all employers relating to the learner in question will have DATACOLLECTIONFORM and DATACOLLECTIONTRID cleared out, and if their accounts are locked for the purpose of completing the form then they will be unlocked.
If a learner has been assigned a form using the above method and a second learner at the same employer is then assigned a form before the employer has completed the form for the first learner, DATACOLLECTIONFORM and DATACOLLECTIONTRID will be overwritten with the IDs for the second learner. As such, it is recommended to complete a form for one learner at a time at each employer.
Employer Login - Upload Learner Evidence via Messages
Employer users can now upload learner evidence via e-track messages.
- Go to Messages on the toolbar and click New Message.
- Click the
 button next to Send To. You will see the list of possible recipients, which now includes your learners' assessors.
 - Select the appropriate assessor to submit evidence to.
- At the bottom of the message, tick the Submit Evidence box.
- A dropdown box will appear. Select the learner you wish to submit evidence for.
- Click the Suggested Mappings button.
-
Select the qualification you wish to submit evidence for, then select the mappings as required and click Add Mappings.
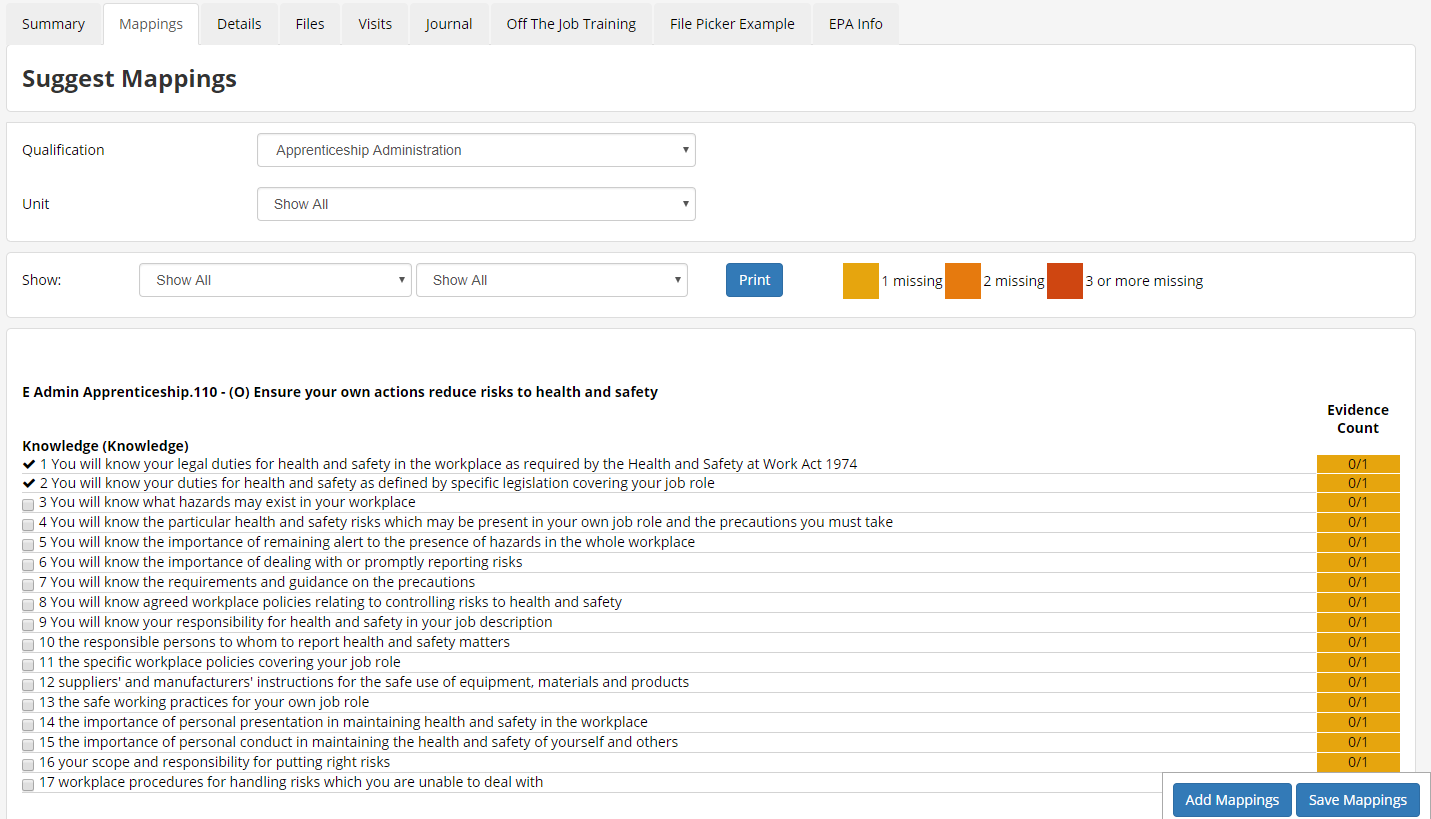
- When finished, click Save Mappings.
- You will return to the Message screen. Click Attach file. Repeat for additional files as required and then click Upload files.
- Browse to and select the evidence file and click Open.
- Complete any other required details on the message and click Send Message.
When the assessor views the message there will be options to view the evidence and suggested mappings and assess the files.

Click to download will download the evidence for inspection.
The Suggested Mappings button displays a list of the mappings suggested by the employer.
The Assess Files button lets you assign the files to a visit. First select an existing visit from the list or choose to add a new visit, then when prompted select the evidence file. Click Save. You will then be prompted to update or complete the visit as required.
Data Collection Forms on Mobile and Tablet Devices
Data collection forms designed in the Maytas screen designer for learners and employers are now fully responsive in e-track when used on mobile and tablet devices. Previously only data collection forms for assessors were responsive on mobiles and tablets.
Employer Login Improvements
General improvements have been made to the employer login based on customer and internal feedback:
- On the toolbar, Progress has been renamed to Employees.
- Comments can now be added to visits by employers.
- Visits with multiple learners attached can be viewed by employers.
- The Visits panel on the employer home screen now excludes completed visits (i.e. those with an actual date entered).
- The Visits screen now includes visits with no associated learner.
File Select in Screen Designer
The Maytas Screen Designer has a new File Select control which allows you on an e-track screen or form to upload a file to a user's file store and save the filename to a field.
- In Maytas, go to Tools on the toolbar and click New/Load on the Screens panel of the ribbon.
- Select an existing tab or create a new tab.
- There are two ways to add the File Select control. You can either:
Go to the Controls tab and drag a File Select control from the Standard section onto the design area. Select the control in the design area and enter the Table Name and Field Name on the right (this should point to a varchar field large enough to store a filename).
or
- Go to the Fields tab and drag a field onto the design area (this should be a varchar field large enough to store a filename). Select the field in the design area and change the Control Type on the right to File Select.
- Click Apply to save the changes.
- Go to Home on the toolbar and click Sync.
- Open a learner or employer record and go to the tab with the File Select control.
- Click the
 button to browse to and select a file and click Open.
 -
Click Apply. The file will be uploaded to the file store and the filename will be saved in the field linked to the File Select control.

Publish Tabs to Toolbar
It is now possible for assessor tabs to be published to the toolbar on the assessor login and employer tabs to be published to the toolbar on the employer login.
- Create a tab in the Maytas screen designer for either the personnel or employer entity.
-
For an employer tab, tick the Employer box in the e-track Publish section. For an assessor tab, tick the Assessor box instead.
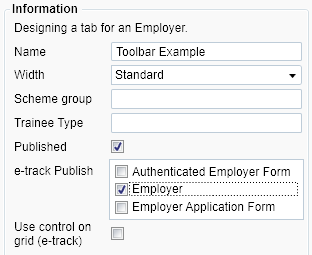
- Click Apply.
- Click Home on the toolbar and click the Sync button.
- In e-track, log in as an administrator and go to Web User Editor on the toolbar.
- Search for the user or group which requires permission to view the tab.
- Click Custom Tabs to expand the list of tabs, then tick the box for the new tab.
- Click Save.
-
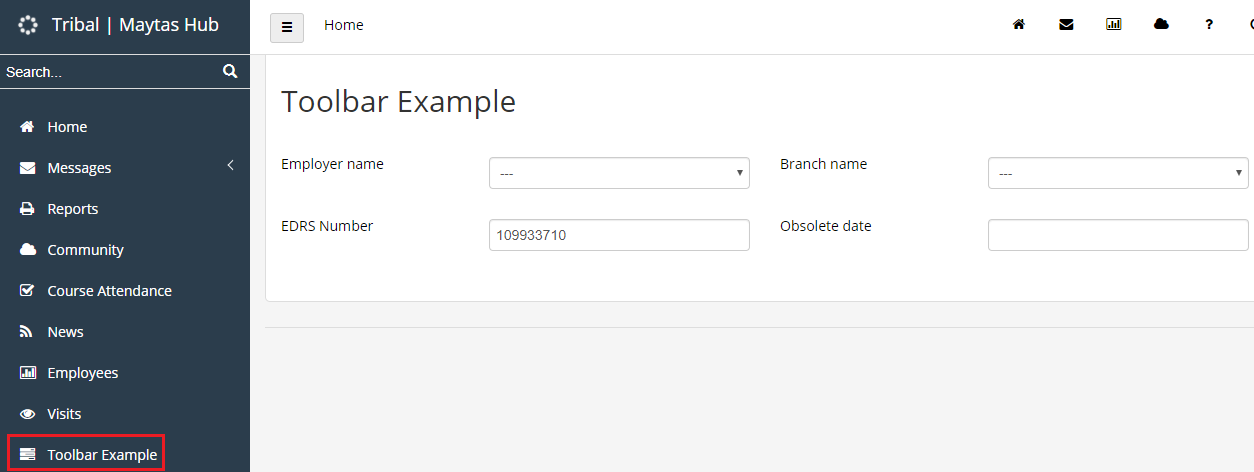
When the relevant users log in, they will now see the tab on the toolbar.
