5.18 SP1 Maytas LLWR Release Notes
Note regarding submissions
We would like to remind providers to create a submission early and check for any errors using reports from the appropriate software (i.e. the FIS or LLWR-Inform). Welsh providers should also remember to download their ULI file. After submission to the ESFA or DfES, providers should check that data has submitted correctly using the available reports. Providers should check that all their expected starts and completions are submitted correctly, and that start and outcome payments correctly match the PFR or ACE funding reports.
Our support desk gets extremely busy in the days prior to the submission deadlines, and although we try and prioritise submission-related queries, we cannot guarantee assistance if queries are sent late. If you do encounter any issues, please ensure that you contact Maytas Support as soon as possible, as we can only rectify issues of which we are aware. We also recommend checking Maytas Communities regularly for information on any known issues and solutions. Tribal cannot be held responsible for any issues caused by your failure to comply with this advice.
Technical specification
The latest Maytas and e-track technical specification can be found here.
Once the upgrade has been completed, the version number should be checked to ensure it has been successful.
- Start Maytas and go to Support on the toolbar.
- Click About.
- The version numbers should read 181.20 / 5.18.7201.2. If you have any other version, please ensure you have followed the upgrade instructions correctly. If you require assistance, please contact Maytas Support.
It is the responsibility of customers to ensure that users carry out any required user acceptance testing and sign off on the upgrade.
Complete the Upgrade
Features Added in the Upgrade
These are the main updates in the upgrade:
- Copy tabs PCR for 5.18
- Data collection queue
- Fixes to a number of issues
Reports Library 1.0.3.3 is also included in the upgrade but must be installed separately, which is detailed in the Upgrade Guide. The reports library can be downloaded here. If you are a hosted customer, please contact the Service Desk to arrange for the reports library update to be applied.
Maytas 5 Version 5.18.7201.2 Release Notes
LLWR Export and Validation Rule Updates
The LLWR export, lookups and validation rules for 2019/20 have been updated to conform with version 2 of the specification.
Screen Designer - Copy Tabs
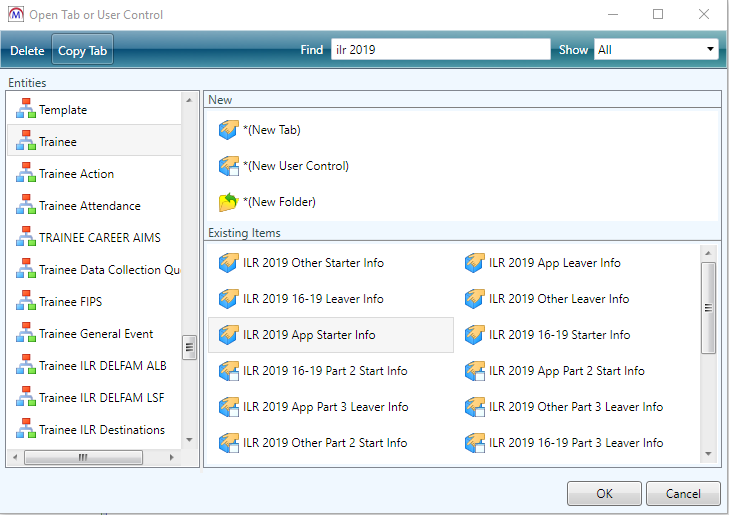
Tabs in the screen designer can now be copied. To do this:
- Go to Tools on the toolbar and click New / Load on the Screens panel of the ribbon.
- Browse to and single-click the tab you wish to copy.
-
Click the Copy Tab button (at the top-left).

-
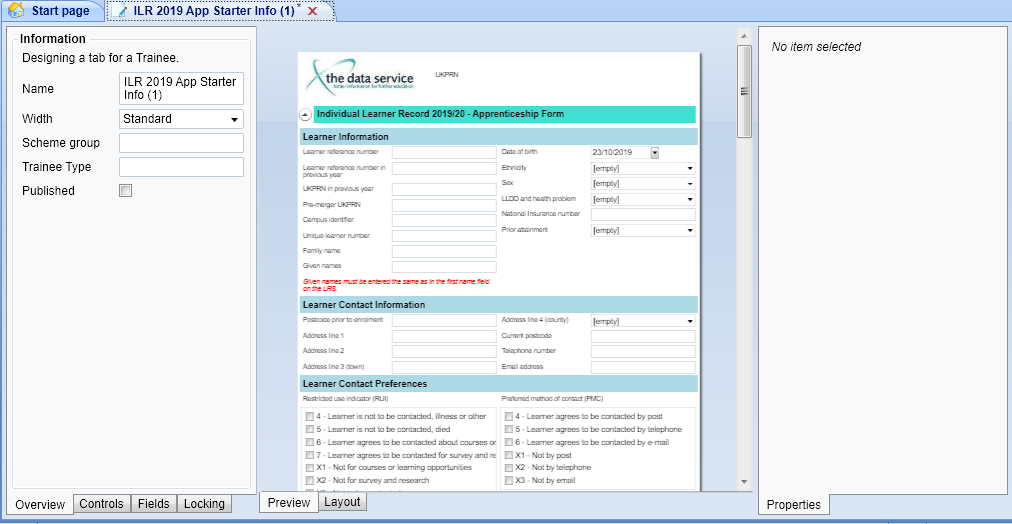
The screen designer will open a new tab based on the copied version, with the name appended with (1). Note that the new tab is unsaved and unpublished when initially created.

It is important to note that screen designer controls cannot be copied at present - only tabs can be copied. This means that if a tab with user controls is copied, ONLY the tab will be copied, and the controls on the new tab will be the original controls - i.e. changing the controls would affect both the old tab and the new tab.
Data Collection Queue
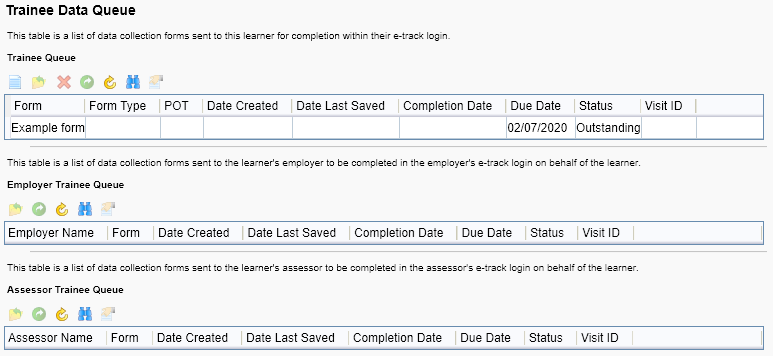
e-track allows you to send multiple data collection forms to an employer or learner for completion. This is done on the Data Queue tab on the relevant user's record, where a row can be added to the grid and configured for each form that needs to be completed.
As well as sending learner forms to a learner and employer forms to an employer, it is also possible to send an employer a learner form to complete on a learner's behalf. This is done by adding a row to the grid on the employer's Data Queue tab and then specifying which learner and form to use.
Requirements
On-line applications, data collection and data authentication require licences for e-track screen design and online applications, as well as licences for learners and employers. Please contact your account manager for the required licences, and consultancy will be required.
Import Data Queue Tabs
- In Maytas, go to Tools on the toolbar and click Import on the Screens panel of the ribbon.
- Click Browse.
- Browse to the e-track\Tabs folder of the upgrade, select the Data Queue tabs.m5rep package and click Open.
- Click Next, then click Finish.
- Go to Home on the toolbar and click Sync.
Form Setup
First, data collection forms should be created for learners, employers and visits as required (in the Trainee, Employer and Visit entities of the Maytas screen designer). The important points for a screen to work as a data collection form are on the screen designer Overview tab:
- Published - This should be ticked.
- e-track Publish - Application Form should be ticked.
- App Form ID - This should be a single-digit integer (i.e. 0 to 9) which is used to identify the form. Each learner form should have a different number, as should each employer form, but learner and employer forms can share a number. e.g. You could have a learner and an employer form both with an ID of 1, but not two learner forms with an ID of 1.
- Position - This essentially the page number of a form. For example, if you wanted a four page form, you would create a separate screen for each page, give them all the same App Form ID and then enter 1 to 4 for the position (i.e. 1 for page 1, 2 for page 2, etc).
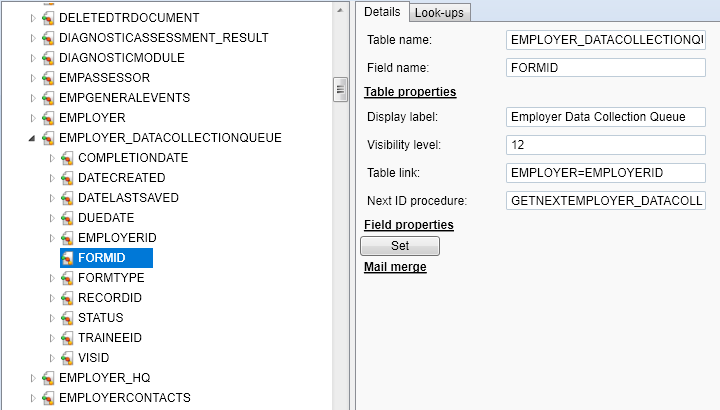
Once you have created a form, a lookup should be added for it so that it is available in the Data Queue grid:
- In Maytas, go to Tools | DB Schema.
- Expand Tables on the left to show a list of tables in the database.
- For a learner form, expand TRAINEE_DATACOLLECTIONQUEUE, and for an employer form (or a learner form being completed by an employer on their behalf), expand EMPLOYER_DATACOLLECTIONQUEUE.
- Select FORMID.
-
If the Set button appears on the right, click it.

- Select the Look-ups tab.
- Click the
 button to add a new lookup.
 - The Short string should be two-characters:
- The first character is A for a learner form, P for an employer form or X for a visit form. Note that for a learner form being completed by an employer on the learner's behalf, this should be A.
The second character is the App Form ID of the form.
e.g. For a learner form with an ID of 3, the short string would be A3.
- The Long string should be the name or title of the form which will be displayed on the Data Queue grid.
- Click Apply and add additional lookups for forms as required.
- Go to Home on the toolbar and click Sync, then restart Maytas.
Learner Data Queue
To add a form to a learner's queue:
-
In Maytas, open the learner's record and go to the Data Queue tab.

- You will see two grids. The top grid is for adding forms for a learner to complete. The bottom grid displays forms which have been sent to an employer to complete on behalf of the learner (this is covered below).
- Click the
 button on the top grid to add a new row.
 - In the pop-up window which appears, select a Form (this is populated by the lookups set above) and enter a Due Date.
- Click OK.
- Click Apply.
The row will be added to the grid. The Date Created field will be populated with the current date (the learner record may need to be closed and re-opened for this to show) and the Status will be set to Outstanding, which means the learner has not yet started the form.
The next time the learner logs into e-track, they will be given a prompt to choose which form to complete (they will be given the option of all outstanding or in-progress forms currently in their queue).
When a learner clicks Save on a form, the status in the queue for that form will change to In Progress. If a learner closes their browser and then returns to the form later on, they will be able to continue from where they left off.
When a learner clicks Submit, providing any and all form validation has been met, the form status will change to Completed and they will not be prompted to complete the form again.
Employer Data Queue
To add an employer form to an employer's queue:
-
In Maytas, open the employer's record and go to the Data Queue tab.

- Click the
 button on the grid to add a new row.
 - In the pop-up window which appears, select a Form (this is populated by the lookups set above) and enter a Due Date.
- Click OK.
- Click Apply.
The row will be added to the grid. The Date Created field will be populated with the current date (the employer record may need to be closed and re-opened for this to show) and the Status will be set to Outstanding, which means the employer has not yet started the form.
The next time the employer logs into e-track, they will be given a prompt to choose which form to complete (they will be given the option of all outstanding or in-progress forms currently in their queue).
When an employer clicks Save on a form, the status in the queue for that form will change to In Progress. If an employer closes their browser and then returns to the form later on, they will be able to continue from where they left off.
When an employer clicks Submit, providing any and all form validation has been met, the form status will change to Completed and they will not be prompted to complete the form again.
Forms Completed by an Employer on behalf of a Learner
An employer can be sent a form to complete on behalf of a learner. To do this:
-
In Maytas, open the employer's record and go to the Data Queue tab.

- Click the
 button on the grid to add a new row.
 -
In the pop-up window which appears, complete the following fields:
- Trainee ID - Use the
 button to search for an select the learner for whom the employer will be completing the form.
 - Form - Select the form to complete (this is populated by the lookups set above).
- Form Type - Select Employer on behalf of trainee.
- Due Date - Enter the date by which the form should be completed.
- Trainee ID - Use the
- Click OK.
- Click Apply.
The row will be added to the grid. The Date Created field will be populated with the current date (the employer record may need to be closed and re-opened for this to show) and the Status will be set to Outstanding, which means the employer has not yet started the form.
A row will also be added to the bottom grid on the learner's Data Queue tab to indicate their employer has an outstanding form to complete on their behalf.
The next time the employer logs into e-track, they will be given a prompt to choose which form to complete (they will be given the option of all outstanding or in-progress forms currently in their queue).
When an employer clicks Save on a form, the status in the queue for that form will change to In Progress. If an employer closes their browser and then returns to the form later on, they will be able to continue from where they left off.
When an employer clicks Submit, providing any and all form validation has been met, the form status will change to Completed and they will not be prompted to complete the form again.
Data Collection Queue Report
A report is available to show the current queues for learners and employers. To import the report:
- In Maytas, go to Home on the toolbar and click Import on the Reports panel of the ribbon.
- Click Add Files.
- Browse to the Maytas 5\Extras\Module Reports folder of the upgrade.
- Select Data Collection Queue.m5rep and click Open.
- Click Finish.
- Once the report has finished importing, click Finish.
The report is called Data Collection Queue and can be found in the Audit folder of the reports library.
Report Generator - Permissions for Custom Filters and Expressions
Custom filters and custom expression functions in Report Generator now require user permissions to be available. To give a user permission for these features:
- Go to Tools | Edit Permissions.
- Select the user or group which requires permission.
- Go to the Commands tab and expand the Reports section.
- Set the Edit Custom Filter and expressions permission to Visible.
- Click Apply.
- Go to Home on the toolbar and click the Sync button.
- Restart Maytas for the permissions to take effect.