5.24 Maytas LLWR Release Notes
Note regarding submissions
We would like to remind providers to create a submission early and check for any errors using reports from the appropriate software (i.e. the FIS or LLWR-Inform). Welsh providers should also remember to download their ULI file. After submission to the ESFA or DfE, providers should check that data has submitted correctly using the available reports. Providers should check that all their expected starts and completions are submitted correctly, and that start and outcome payments correctly match the PFR or ACE funding reports.
Our support desk gets extremely busy in the days prior to the submission deadlines, and although we try and prioritise submission-related queries, we cannot guarantee assistance if queries are sent late. If you do encounter any issues, please ensure that you contact Maytas Support as soon as possible, as we can only rectify issues of which we are aware. We also recommend checking Maytas Communities regularly for information on any known issues and solutions. Tribal cannot be held responsible for any issues caused by your failure to comply with this advice
Data migration
Please note that it is important to ensure that all 2021/22 learners have been entered before the upgrades are applied. This is because the upgrade migrates 2021 data to the 2022 fields, and any 2021 learners entered after the upgrades will not be migrated. As such, if any 2021 learners do need to be entered after the upgrade, both the 2021 and 2022 tabs must be completed to ensure all data is present and correct.
Technical specification
The latest Maytas and Maytas Hub technical specification can be found here.
Once the upgrade has been completed, the version number should be checked to ensure it has been successful.
- Start Maytas and go to Support on the toolbar.
- Click About.
- The version numbers should read 5.24.8100.2. If you have any other version, please ensure you have followed the upgrade instructions correctly. If you require assistance, please contact Maytas Support.
It is the responsibility of customers to ensure that users carry out any required user acceptance testing and sign off on the upgrade.
Complete the Upgrade
Features Added in the Upgrade
These are the main updates in the upgrade:
- LLWR tabs for 2022/23
- LLWR reports for 2022/23
- Updated LLWR validation rules
- LLWR batch export
- Lookup changes
- Skills Forward Integration
- Reports Library 1.0.4.2
- Fixes to a number of issues
The way in which the Reports Library is upgraded has changed and can now be performed entirely from within Maytas. Instructions for this can be found below.
Maytas 5 Version 5.24.8100.2 Release Notes
2022/23 Contract Year Updates
New Contract Year Tabs
New Maytas tabs for 2022/23 have been produced for the ILR and LLWR as per specifications from the Data Service and DfE. These will have been imported automatically in the upgrade. Please note that while both ILR and LLWR tabs are imported, the relevant tabs will only show for the relevant learners – i.e. ILR tabs will only show to learners on English schemes and LLWR tabs will only show to learners on Welsh schemes. Details of the tabs can be found below.
Please note that user permissions will need to be set for the new tabs, as by default they are available to all users. Also please note that if you have changed the field type for any ILR fields (e.g. to or from a lookup), these will need to be changed from the default field type in the screen designer.
LLWR Report for 2022/23
The 2022/23 Maytas 5 LLWR report has been produced based on a previous official form. Additional information not present on the official form has been included, such as employer and suspension data.
The LLWR report is automatically imported in the upgrade and can be found in the LLWR folder of the Reports Library.
There are two ways to run the report:
- On the Home tab, select Report Library | LLWR | LLWR 2022-23. This will let you search for a learner and select the sections to show.
- In a learner record, click Process and select LLWR 2022/23 Form. This will open a PDF export of the report for the learner / POT. It will use the default of showing all sections.
LLWR Export 2022/23
Generate Export
The LLWR export for 2022/23 is available in Maytas. The front-end functionality is the same as in 2021/22.
To view the LLWR export screen for 2022/23:
- Click Exports on the toolbar.
- Click LLWR Export on the ribbon.
-
Click the
 button.
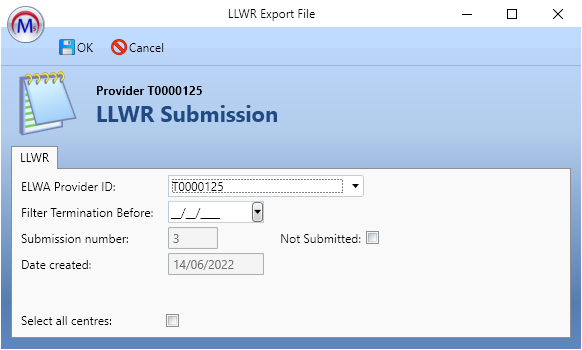
- Choose the ELWA Provider ID dropdown box.
- If you wish to only include learners who ended learning before a certain date, enter this date in the Filter Termination Before box.
-
Once ready, click OK.
-
Locate the submission by expanding the contract year and period using the arrows to the left. Click the submission to select it. The status will say GENERATE: Working on trainee… until the export data has been generated. It will then say Idle. Please note that this may take a while, depending on the amount of data being exported.

- Edit opens the export and allows you to view and edit the export settings. Please note that not all settings can be changed once an export has been created.
- Generate processes the export and produces a text file showing any errors for each learner. This allows you to correct any errors and re-generate before the batch file is created. The generation progress is shown with the circular progress bar to the right:
- View Log shows any errors in the export. These should be investigated and resolved and the data re-generated before outputting the XML.
- Output creates the actual batch file. The file will be created at C:\Temp on the Maytas server.
- Get File lets you download the batch file once it has been created.
LLWR XML Output
The LLWR export includes an option to create the submission file in XML format. This is much easier to read compared to the flat file, and it is also easier to locate information.
The ability to import the Overall Output file from the LLWR Data Collection site allows us to produce submission files consisting only of changes by default, as we can exclude records that have been accepted by the LLWR. At the beginning of each year a full file will be produced. Once the return Output file has been imported into the previous submission, only changes will be submitted.

The Output Changes XML link becomes active once the submission file has been generated. It will create an XML file on the server which can be retrieved by clicking Get File as normal. The file can be saved in XML format or as a zip file. The file can then be submitted to the Data Collection site. Please see the LLWR CSV User Tutorial from the Inform site for guidance on submission.
During the submission process, just after the Submit records to database step, you will have an opportunity to Download XML Output File (XML) from the Overview tab. It is important to do this as you will not get the option again after the Finalise Transaction process.
The XML Output file can be imported into Maytas on the submission by clicking Import XML Output File (this must be done on the same submission number that the export came from). This will indicate accepted records and provide error information. The Output file also contains ULI information which can be used to update the learner records in Maytas if required.
However, there are circumstances where the LLWR cannot provide the ULI at this stage, and consequently the ULI must be imported in the usual manner.
Once the XML Output file has been imported, subsequent XML files created will only include records that have not been accepted or where a change has occurred since the previous import. This can be overridden by ticking the Output Full XML checkbox near the top of the export screen.
Skills Forward Integration
Maytas can now integrate with Skills Forward via the Skills Forward API, which allows data for learner diagnostics, initial assessments and screener results to be retrieved from Skills Forward and recorded against a learner in Maytas.
A new licence is required for the Skills Forward integration - please contact your account manager for more information. Instructions for installing the licence can be found in the
The integration supports multiple ways of associating records between Maytas and Skills Forward, depending on your requirements:
- If you already have learner records in Skills Forward, these can be linked to learner records in Maytas.
- Maytas learner records can also be used to create new user accounts for learners in Skills Forward which are then linked to their Maytas records.
When a learner's Maytas record is linked to their Skills Forward record, this allows their downloaded results to be associated with them in Maytas and viewed on the Skills Forward tab. A selection of fields in Skills Forward can also be updated from Maytas when records are linked. These fields are:
- Username
- First name
- Last name
- Deleted
- Email address
- Student reference
Setup
An API Key and API Token must be obtained from Skills Forward, which are then entered in Maytas to allow it to communicate with Skills Forward. To obtain these:
- As a Skills Forward admin user, log in to Skills Forward.
- Click Admin.
- Click Webhooks & API.
- Select API.
- Create an API and ensure you make a note of the API Key and Token values.
- Check that the permissions are set to Allow.
- Click Webhooks & API.
- Select Webhooks.
- Within the Provider dropdown, select Skills Assessment API Key Assessment.
- Select Add New Provider.
- Switch Status to ON.
- Add the API Key obtained earlier.
If you have any issues obtaining the API Key and Token, please email skillsassessments@ncfe.org.uk
The API Key and Token must then be added to the Maytas configuration options:
- In Maytas, click the M5 button at the top left and select Options.
- Go to Other on the left (under the Maytas 5 header).
-
In the Skills Forward section, tick the boxes for each config option and enter the values as follows:
-
API Keyand API Token - Enter the values obtained earlier.
-
Url for API - https://www.myskillsforward.co.uk/api/
-
- Click OK.
Next, permissions must be set to access the system:
- Go to Tools | Edit Permissions.
- Select the user or group which requires permission.
- On the Modules tab, set the Skills Forward permission to Visible.
- Go to the Commands tab and expand the Skills Forward section.
- Set the permission to Visible.
- Click Apply to save changes, then restart Maytas for the permission to take effect.
Finally, the Skills Forward tab must be made available:
- Go to Tools on the toolbar and click New / Load on the Screens panel of the ribbon.
- Scroll down and select Trainee on the left.
- Select Skills forward on the right and click OK.
- Tick the Published box on the left.
- Click Apply on the ribbon.
- Go to Home on the toolbar and click the Sync button.
Linking a Maytas learner record to an existing Skills Forward learner record
When a learner's Maytas record is linked to their Skills Forward record, this allows their downloaded results to be associated with them in Maytas and viewed on the Skills Forward tab.
To link a learner's records:
- Open the learner record in Maytas.
-
On the Third Party panel of the ribbon, go to Skills Forward | Link User.
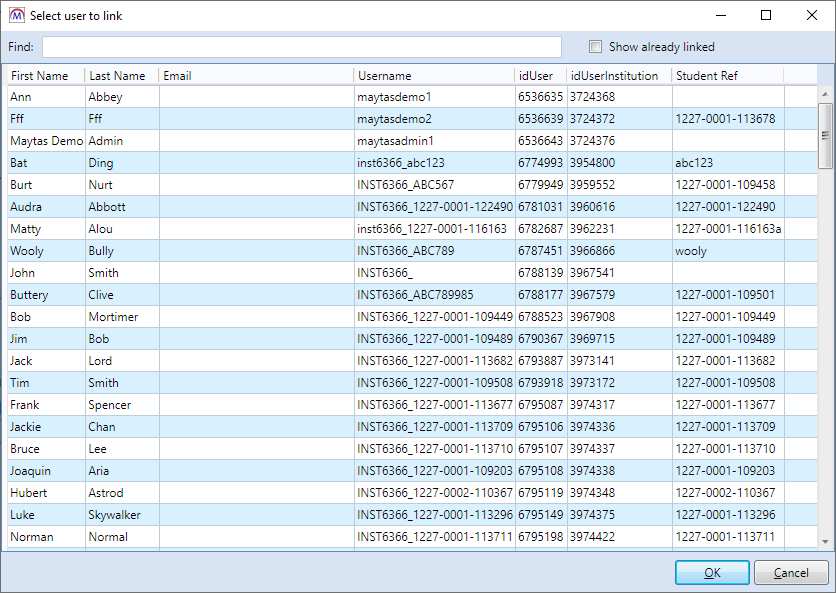
- You will see a list of available Skills Forward user records. Select the learner's record and click OK.
- A message will appear to confirm the records have been linked. Click OK.
While a Maytas learner record can only be linked to one Skills Forward record, you can view records that have already been linked to Maytas learners by ticking the Show already linked box at the top right. This can be useful if you are unsure whether a Skills Forward record has already been linked and need to check.
Once a learner's records have been linked, you will see the details of the linked record on the Skills Forward tab in Maytas:

Unlinking a Skills Forward record
If you need to unlink a Maytas learner record with a Skills Forward record (e.g. if they have been linked by mistake), this can be done as follows:
- Open the learner's record in Maytas.
- On the Third Party panel of the ribbon, go to Skills Forward | Unlink.
- You will be asked to confirm that you wish to unlink the records. Click Yes to continue.
- The records will now be unlinked.
Creating a Skills Forward user account from a Maytas record
If you have a Maytas learner who needs a Skills Forward user account and doesn't already have one, the account can be generated via Maytas:
- Ensure the learner has a valid email address entered in Maytas (TRAINEE.EMAIL). This will be used to send the learner a link to set their password.
- Open the learner's record in Maytas and go to the Skills Forward tab.
- Tick the Create User box.
- On the ribbon, go to Skills Forward | Create/Update User.
- A message will appear to confirm the user has been created. Click OK.
-
The User Institution, Student Ref. and Username fields will now be populated with values generated from Skills Forward. The username is what the learner will use to login to Skills Forward, though it can be changed within Skills Forward.

The Student Ref. will use a learner's Maytas Hub username if they are linked to a web user account, otherwise it will use their Trainee ID. This then forms part of the username generated by Skills Forward.
- The learner will receive an email from Skills Forward with a link to set their password. They can then login to Skills Forward using the username above (which is also included on the email) and their new password.
If you have multiple learners you wish to generate Skills Forward accounts for, this can be done in bulk by ticking the Create User box for each learner and then going to Management on the toolbar and selecting Skills Forward | Create Users. This will generate accounts in the same way as above for each of the learners with Create User ticked.
Downloading results for an individual learner
To download results for a learner:
- Open the learner's record in Maytas.
- On the ribbon, go to Skills Forward | Get Results.
-
The learner's available results will now be downloaded.
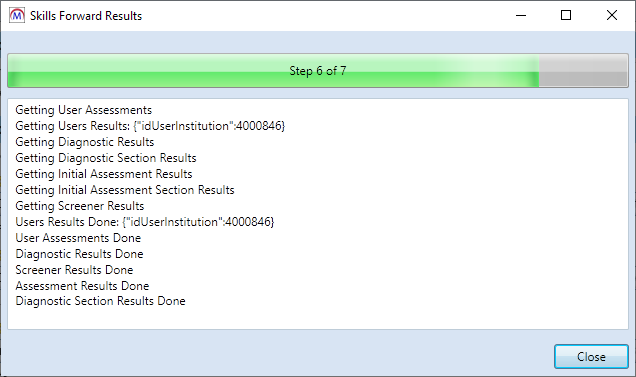
Clicking Close will continue the download in the background, and progress can be checked by going to Skills Forward | Get Results again.
-
The results will now show in the relevant grids on the Skills Forward tab (note that you may need to click Refresh on the ribbon for them to display after downloading).

Downloading results for an individual learner will not include diagnostic, initial assessment or screener results. These must be downloaded in bulk (i.e. for all learners) as per the instructions below.
Downloading all results from Skills Forward
To download all results from Skills Forward:
- In Maytas, go to Management on the toolbar.
- On the Third Party panel of the ribbon, go to Skills Forward | Get Results.
-
Available results will now be downloaded.
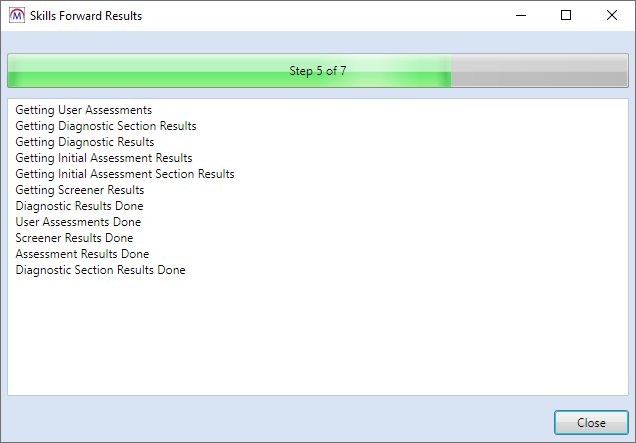
This may take a long time depending on the number of available records. Clicking Close will continue the download in the background, and progress can be checked by going to Skills Forward | Get Results again.
Scheduling Skills Forward downloads
The Scheduler can be used to schedule when results are downloaded from Skills Forward for all learners, rather than manually performing the download.
- Go to Tools | Scheduler.
-
On the ribbon, go to New | Skills Forward. A new Skills Forward schedule will be created.

- Enter a name and description for the schedule on the General tab.
-
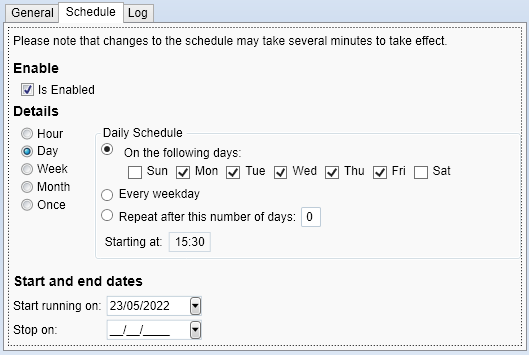
Go to the Schedule tab. This is where you can configure when (and how often) the schedule will run.
-
Set the schedule in the Details section. It can be set to run periodically (e.g. every day, week, etc) or just once at a specified time. Please note that if you intend to start the schedule immediately, the start time should be at least 10 minutes in the future to ensure it is picked up by the system.
- Set the start date at the bottom of the window. The schedule will run indefinitely by default, but if you want the schedule to end on a particular date then tick the Stop this schedule on box and set the date.
- When you have finished configuring the schedule and want to activate the schedule, tick the Is Enabled box at the top of the tab.
- Click Apply on the ribbon to save the schedule.
The Log tab shows a log of when the schedule has been run, which can be filtered between two dates.
Screen Designer - New / Load Improvements
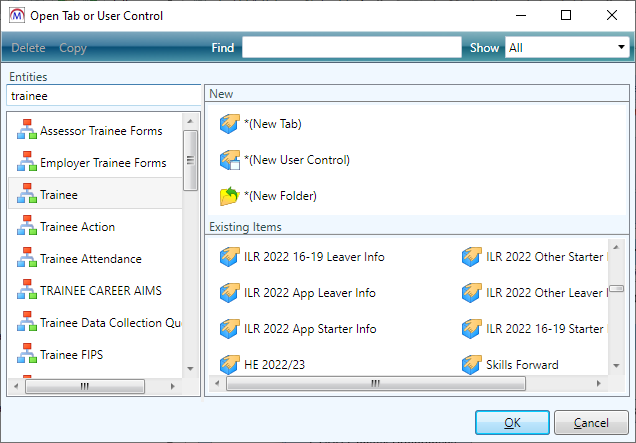
The Screen Designer's New / Load screen has been improved so that entities (on the left) can be filtered to access them faster and so that the Trainee entity is selected by default.
To filter entities:
- Go to Tools on the toolbar and select New / Load on the Screens panel of the ribbon.
-
Enter a search term in the Entities box (at the top-left of the window). This will filter the entities on the left by those that contain the search term.
-
You can then quickly select the required entity, rather than having to scroll down to locate it.
-
You can also now select multiple tabs and controls on the right to open them all at the same time (this is limited to 12 being opened at once). To do this, select a tab or control and then hold the CTRL key to click and select others.
Additionally, it is now possible to delete multiple tabs / controls at the same time, though this ability requires a permission to be set:
- Go to Tools | Edit Permissions.
- Select the user or group which requires permission.
- Go to the Commands tab and expand the Screen Designer section.
- Set the Delete Tabs permission to Visible.
- Click Apply to save changes, then restart Maytas for the permission to take effect.
You can then delete multiple tabs in the New / Load window by selecting them while holding the CTRL key and then clicking the Delete button.
Employer Contacts at Branch Level
A configuration option is available which allows employer contacts to be set at branch level as well as at parent employers. Additionally, the key contact for a branch can be set to a contact at the parent employer.
To set the config:
- Go to the M5 button at the top-left and select Options.
- Go to Employer Login on the left (under the Maytas Hub Online header).
- In the General section, tick the box for the Allow parent employer contacts at branches setting on the right and ensure the toggle button is set to ON.
- Click OK.
Reports Library 1.0.4.2
Upgrade the Reports Library
Changes to the Upgrade Process
Reports Library database updates are now included in the main Maytas upgrade, meaning the separate SQL script no longer has to be run. However, the Reports Library updates must be manually run from within Maytas via a button on the Support ribbon which is restricted by a permission.
The reason for this is that once the database updates have been applied, the latest reports package must be imported as usual to ensure there are no version differences between the database and the reports server (a version difference can result in reports not running correctly). As it can take a long time to import large report packages, we recognise that it is important to allow customers to choose when they perform the Reports Library update so that it can be scheduled at a convenient time.
How to Upgrade the Reports Library
The Reports Library upgrade should be performed by an admin user, which will upgrade the reports for all users.
To enable to the Upgrade reports button for an admin user:
- Go to Tools | Edit Permissions.
- Select the user or group which requires permission.
- Go to the Commands tab.
- Expand the Support section.
- Set the Report SQL Upgrade permission to Visible.
- Click Apply and restart Maytas for the change to take effect.
For customers who manage their own systems on-premise, it is strongly advised to take a database backup before performing the upgrade. This is not necessary for hosted customers as backups are taken regularly.
To upgrade the Reports Library:
- Go to Support on the toolbar.
-
Click Upgrade reports.

- You will asked to confirm that you wish to perform the reports upgrade SQL. Click OK to continue.
- A message will appear saying that a task has been created. Click OK.
-
You can check that the upgrade was successful by going to Home on the toolbar and then selecting Server Tasks | View Jobs.

If the Status indicates that the upgrade has failed, please do not continue with importing the reports package and raise an incident on the Self Support Portal for assistance.
- Next, the reports package must be imported. Go to Home on the toolbar and click Import on the Reports panel on the ribbon.
- This will display the Report Import wizard. Click +Add Files.
- Browse to the Maytas 5\Extras\Reports Library folder of the upgrade, select one of the following packages and click Open:
- For all reports, select Reports Library 1.0.4.2 (all reports).
- For LLWR and general reports only, select Reports Library 1.0.4.2 (LLWR and general reports).m5rep.
- Click Finish to import the reports. This process may take a long time (potentially upwards of 30 minutes) depending on the size of the reports package.
-
When the reports have finished importing, click Finish.
The import log may display various warning messages, which are generally a result of report formatting and other factors which do not impact how a report runs (e.g. The text box ‘textbox3’ extends beyond the bottom edge of its container.). Unless a message indicates that the import has failed, these warnings can safely be ignored.
Updates for 2022/23
The reports library has been updated to use fields from 2022/23 where appropriate and to include the 2022/23 report year on certain parameters.