Global Updater
The Global Updater is a tool which allows you to update data in bulk.
Before continuing it is extremely important to take a backup of the database and fully understand the implications of updating data in bulk. Once changes to data have been committed to the database, it is not possible to undo the changes.
There are two parts to the Global Updater:
- Definitions - This is where you define the fields you wish to update.
- Update - This is where you actually change the data for the defined fields.
To enable these features, permissions must be set:
- In Maytas, go to Tools | Edit Permissions.
- Select the user or group you wish to set permissions for.
- Select the Commands tab.
- Expand the Table Editor section.
- Set the two relevant permissions as required (Edit Global Update Definition for creating definitions and Global Updater for making the data changes).
- Click Apply.
- Sync and restart Maytas for the changes to take effect.
Overview
Definitions
Definitions lets you specify which fields you wish to update. The fields available for update are based on those in the learner views used in Report Generator (English Learner View, Welsh Learner View, etc) and are limited to fields from the trainee tables (i.e. TRAINEE, TRAINEEPOT, TRAINEEPOT2 and TRAINEEDETAILS). As of the 5.11 release, employer fields are also available.
To access the Definitions screen, go to Management on the toolbar and click Definitions.

The first time the Definitions screen is opened, you will need to click the Rebuild Views button. After this, you will only need to rebuild the views if the views have changed (e.g. if new fields have been added to them).
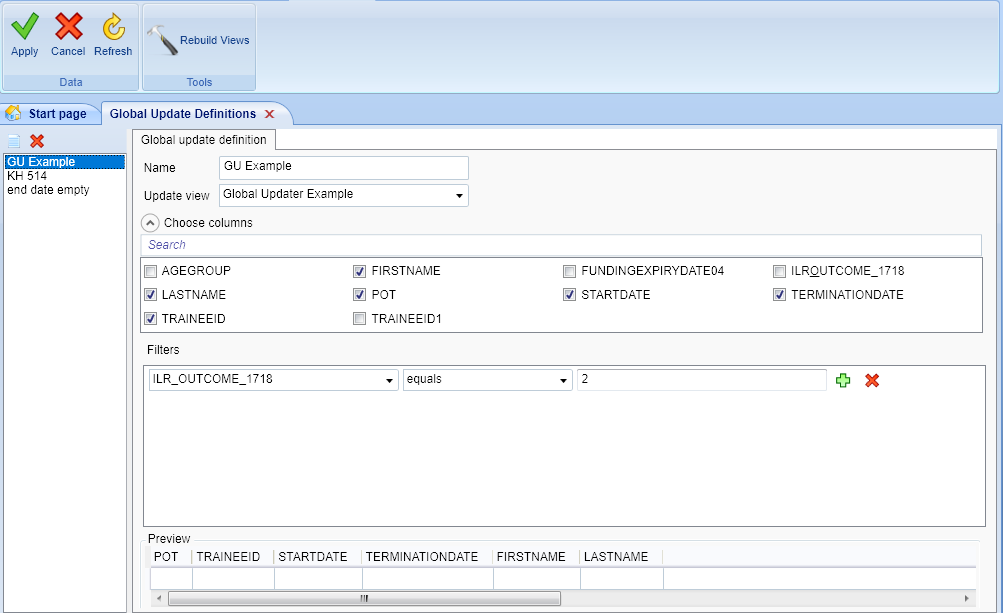
To create a new definition, click the  button. Enter a name for the definition and choose a view from the dropdown box. The available columns will appear.
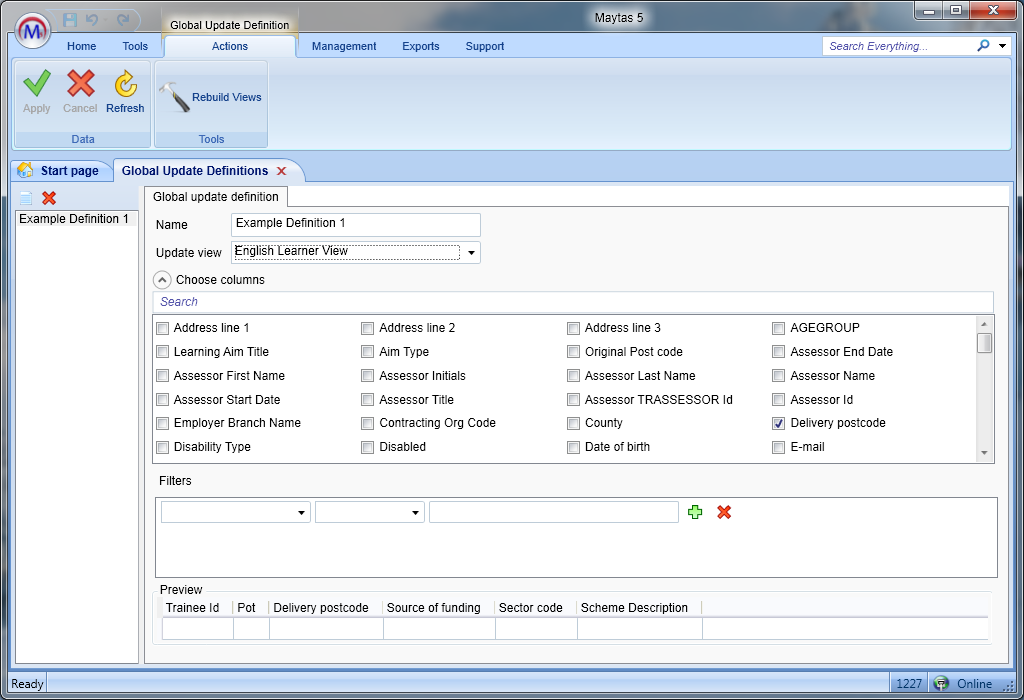
Tick the boxes for the columns you wish to include. Generally you should only include columns that you wish to update, but you can also include other fields for reference (TRAINEEID and POT are included by default). A preview at the bottom of the screen shows the columns currently included. The columns can be re-ordered by dragging and dropping them.
Click Apply to save the definition.
You can also apply filters to the data to only include certain rows, and the filters do not have to be for fields selected in the definition. For example, you may wish to update the delivery postcode for all learners assigned to a particular assessor, therefore you could filter by that assessor. In the filters section, complete the three dropdown boxes:
- In the left box, choose the field you wish to filter by.
- In the middle box, choose the operator (equals, greater than, etc).
- In the right box, enter the data to filter on (e.g. assessor name).
Click the  button to add additional filters and click the
  button to delete filters.
Update
Once a definition has been created, the data can be updated. Go to Management on the toolbar, click Update and select your definition from the list.
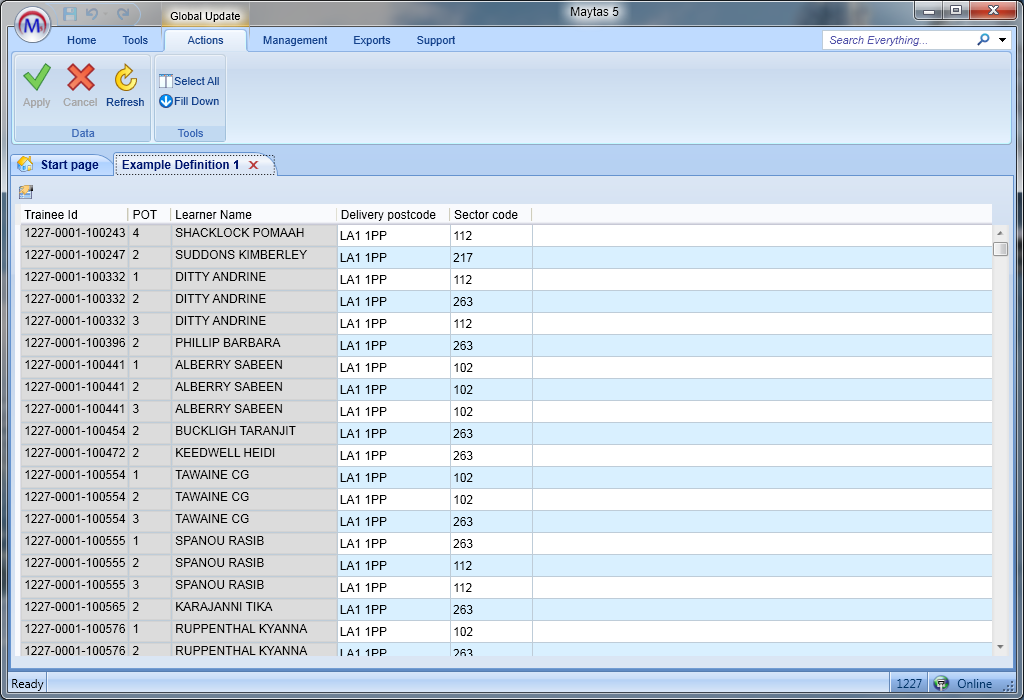
Some fields may be greyed-out, which indicates that the data in them cannot be altered in the Global Updater. This can be because they are calculated fields in the view (e.g. Learner Name in the above example, as it is defined in the view as FIRSTAME + ' ' + LASTNAME), from non-trainee tables (such as CONTRACTOR) or if the fields are primary keys (such as TRAINEEID and POT).
When updating data, you can either select all rows or a number of rows to update. You can also add extra filters to reduce the data to be updated (unlike filters in the definition, here you can only filter on data in the shown columns). To add filters, click the  button above the grid.
Again, it is critical to first take a backup and then understand exactly what will be updated before committing changes to the database. If you are in any doubt, do not apply changes until you have sought clarification. Updating data in bulk without precise consideration has the potential to cause severe and irrepairable data issues.
The way updating works is that all selected rows are updated to the value in the top selected row. For example, the delivery postcode for all the selected rows here will be updated to LA2 2AA, as that is the value of the top selected row:

Example 1 - Updating all rows
- Double-click the top row in the results and edit it to the new value you want to apply to all rows.
- Click Select All on the ribbon. This will select all rows.
- Click Fill Down on the ribbon. This will set all rows to the value of the top row.
- At this point it is still possible to undo changes by clicking Cancel. Once you are absolutely sure you wish to commit changes, click Apply. Once you have clicked Apply, it is not possible to revert the changes.
Example 2 - Updating a selection of rows
- Double-click the top row that you wish to update. Edit it to the new value you want to apply.
- Drag and select the rows in the column that you wish to update. You can also select the top row you wish to update then hold the shift key and click the bottom row you wish to update.
- Click Fill Down on the ribbon. This will update all selected rows to the value of the top selected row.
- At this point it is still possible to undo changes by clicking Cancel. Once you are absolutely sure you wish to commit changes, click Apply. Once you have clicked Apply, it is not possible to revert the changes.
Update based on a Report
Reports created in Report Generator can now be used to create views for use in the Global Updater. Please note that this functionality should currently be considered a beta version.
A report must meet several conditions to be usable as a view:
- It must be a manually created report (i.e. not via the report wizard).
- There must be no report parameters.
- It must be a list report, not a matrix report.
- No functions or expressions must be used in the field definitions.
- The report must include the primary keys from all the tables joined in the report (e.g. if the report joins to TRAINEEPOT then TRAINEEPOT.TRAINEEID and TRAINEEPOT.POT must be added to the report). If you save your report after creating a view and the required fields are not present, you will be prompted to add them.
- It is recommended to only use inner joins rather than left joins.
- If you need to join to grid tables (e.g. for ILR sub aims or employment status records), it is recommended to only join to one grid table per report.
If you have not rebuilt your existing Global Updater views since the 5.16 Maytas upgrade, they must be rebuilt for them to continue working. To rebuild the views:
- Go to Management on the toolbar.
- Click Definitions on the Global Updater panel of the ribbon.
- Click Rebuild Views.
- You will be prompted to confirm. Click Run to continue.
- When the views have finished rebuilding, a message will appear to confirm this. Click OK.
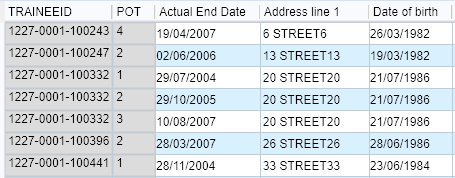
Please note that existing Global Updater definitions may have additional primary key fields included after the rebuild. Primary key fields are greyed-out and cannot be edited (e.g. TRAINEEID and POT in the screenshot below).
To create a view from a report:
- Create a new report as required in Report Generator, making sure to meet the conditions described above.
-
Go to the Design tab, then select Views | Create Update View on the ribbon.
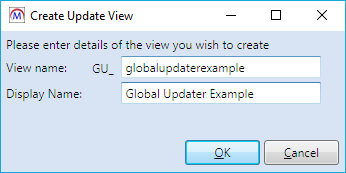
- Enter the display name. Click OK.
- Click Apply.
- You will be prompted to update the view associated with the report. Click Yes to proceed.
- Click OK on the confirmation message which appears.
- Sync and restart Maytas.
- Go to Management on the toolbar and click Definitions on the Global Updater panel of the ribbon.
- Click the
 button on the left to add a new definition.
 -
Your report view can now be selected from the Update view dropdown box. Complete the definition as required and click Apply.
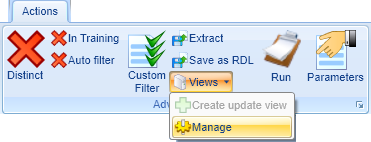
In Report Generator, you can manage report views by going to Views | Manage Views. This can be done from any report (not just reports with associated views).
This will open the Generated Views window.
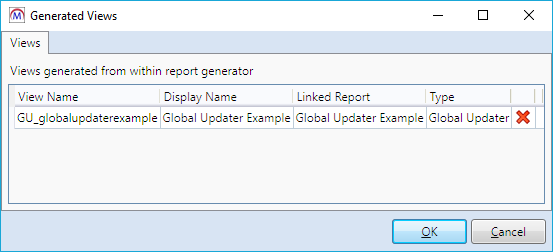
Each row tells you the view and display names of the view and which report it is linked to. To delete a view, select the row and click the red cross at the end of the row. Click Yes to confirm. Please note that if the view is used in any Global Updater definitions, it cannot be deleted until the definitions have been deleted (or changed to use a different view).
Click OK to close the window.