Imports and Exports
To access the Exports module, click Exports on the toolbar.
ILR Export
The ILR export lets you create a batch file of ILR submissions ready to be run through the FIS and sent to the ESFA.
To create a new export:
- Select ILR Export on the ribbon and click the
 button.
 -
Enter the following details:
- Survey Year – This is the contract year for the export.
- Notional Return - This is the notional return period.
- UKPRN - Enter the UKPRN value for the provider.
- Transmission - This is automatically populated when the export is created and incremented with each subsequent transmission.
- Serial no. – The serial number can be changed to separate a submission into a series of smaller files. Each file will be prefixed with the serial number.
- Date created – This is automatically populated.
- Not Submitted - Tick this if the data has been generated but not submitted to the ILR. This will remove it from consideration in the QAR calculations.
- Legacy / Refactored Engine – These determine whether the ILR export is created using the Legacy engine or Refactored engine. See here for details.
- On the right, select the required contracts.
- Click OK.
Once an export has been prepared it will appear in the export list. This is grouped by contract year and period. Click the  button to the left of a year or period to expand it. Each export appears in the period it was set to run for.
You can filter which exports are displayed using the File type, UKPRN, Survey Year and Date filters at the top of the screen.
Click an export to select it.
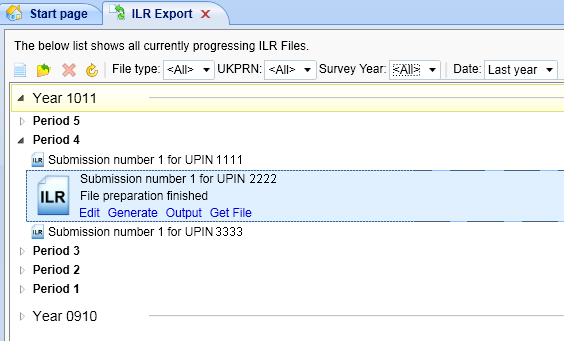
- Edit opens the export and allows you to view and edit the export settings. Please note that not all settings can be changed once an export has been created.
-
Generate processes the export and produces a text file showing any errors for each learner. This allows you to correct any errors and re-generate before the batch file is created. The generation progress is shown with the circular progress bar to the right:

- Output creates the actual batch file. This will be created at C:\Temp on the Maytas server.
- Get File lets you download the batch file once it has been created.
LLWR Export
The LLWR export lets you create a batch file of LLWR submissions ready to be sent to DfES.
To create a new export:
- Select LLWR Export on the ribbon and click the
 button.
 - Enter the following details:
- ELWA Provider ID – Select the appropriate provider from the list.
- Filter Termination Before – This excludes any learners who ended learning before the specified date.
- Submission no. – This is automatically populated when the export is created and incremented with each subsequent submission.
- Date created – This is automatically populated.
- Select all centres – Tick this to include all centres in the export rather than the user's centre.
- Not Submitted - Tick this if the export has been generated but not submitted to the DfES.
- Legacy - Tick this if you need to use the Legacy engine to create the export rather than the Refactored engine. See here for details.
- Click OK.
Once an export has been prepared it will appear in the export list. This is grouped by providers. Click the  button to the left of a provider to expand it. Each export appears under the provider it was set to run for.
You can filter which exports are displayed using the Date filter at the top of the screen.
Click an export to select it.
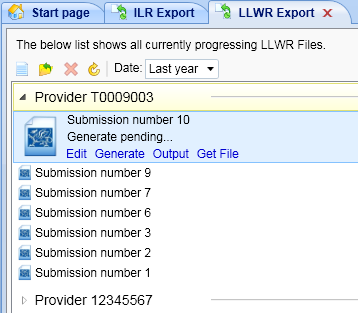
- Edit opens the export and allows you to view and edit the export settings. Please note that not all settings can be changed once an export has been created.
- Generate processes the export and produces a text file showing any errors for each learner. This allows you to correct any errors and re-generate before the batch file is created. The generation progress is shown with the circular progress bar to the right.
- Output creates the actual batch file. This will be created at C:\Temp on the Maytas server.
- Get File lets you download the batch file once it has been created.
LLWR XML Output
An option to create the submission file in XML format was added in Maytas version 5.08.5418.2. This is much easier to read compared to the flat file, and it is also easier to locate information.
The ability to import the Overall Output file from the LLWR Data Collection site allows us to produce submission files consisting only of changes by default, as we can exclude records that have been accepted by the LLWR. At the beginning of each year a full file will be produced. Once the return Output file has been imported into the previous submission, only changes will be submitted.

The Output Changes XML link becomes active once the submission file has been generated. It will create an XML file on the server which can be retrieved by clicking Get File as normal. The file can be saved in XML format or as a zip file. The file can then be submitted to the Data Collection site. Please see the LLWR CSV User Tutorial from the Inform site for guidance on submission.
During the submission process, just after the Submit records to database step, you will have an opportunity to Download XML Output File (XML) from the Overview tab. It is important to do this as you will not get the option again after the Finalise Transaction process.
The XML Output file can be imported into Maytas on the submission by clicking Import XML Output File (this must be done on the same submission number that the export came from). This will indicate accepted records and provide error information. The Output file also contains ULI information which can be used to update the learner records in Maytas if required.
However, there are circumstances where the LLWR cannot provide the ULI at this stage, and consequently the ULI must be imported in the usual manner.
Once the XML Output file has been imported, subsequent XML files created will only include records that have not been accepted or where a change has occurred since the previous import. This can be overridden by ticking the Output Full XML checkbox near the top of the export screen.
Block Activities and Awards from Exporting
Two flag fields are available to allow LLWR activities and awards to be manually blocked from the LLWR export. The two fields are
- Activities – TRAINEE_LLWR_ACT.BLOCK_ACT_EXPORT
- Awards – TRAINEE_LLWR_AWARD.BLOCK_AWARD_EXPORT
Setting these fields to a value of Y will block the activity or award from exporting. Alternatively, they can be added to a tab in the screen designer and will appear as checkboxes.
LRS Import / Export
The LRS screen allows you to export learners who require a Unique Learner Number to an XML file which can be submitted to the LRS. The file which is returned from the LRS containing the ULNs can then be imported back into Maytas.
LRS Export
To export a file to submit to the LRS:
-
Go to the Exports tab and click LRS Export.

- You will now see the LRS Import/Export screen. The appropriate centre can be selected from a drop-down box at the top of the screen. The Contractors to include section on the left allows you to choose specific contractors to export (leaving all boxes unchecked will export all contractors). The Schemes to include section on the right allows you to choose specific schemes to export. Again, leaving all boxes unchecked will export all schemes.
- There are three additional checkboxes at the bottom of the screen:
- Only learners without ULN – This is checked by default and will only export learners who do not have a ULN assigned to them.
- Ignore terminated learners – This is checked by default and will only export live learners. Un-checking it will export both live learners and terminated learners.
- Export learners terminated from [date] – This is greyed out by default, and becomes available when Ignore terminated learners is un-checked. It allows you to export learners who terminated after the specified date (as well as all relevant live learners).
- To export the learners, click Export to file at the bottom-right of the screen.
- Browse to the location where you wish to save the file and click OK. This will create an XML file which contains your learners’ data in a format ready to be sent to the LRS.
LRS Import
To import a return file from the LRS:
-
Go to the Exports tab and click LRS Export.

- Click Import at the bottom-right of the screen.
-
Browse to the location where the file is saved, select it and click Open. This will complete the ULN field in your database for each learner in the file.
For multiple POTs, the latest POT from the ILR export is sent to the LRS. The LRS import updates the Unique Learner Number field on ALL POTs but only updates the latest POT information with other data from the LRS (e.g. the Return Code). Please note that fields, excluding Unique Learner Number and Return Code, are only updated if they were blank in Maytas and the LRS returned information for these blank fields.
-
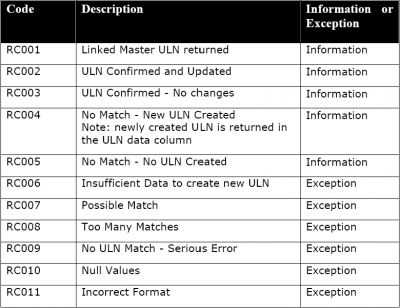
If the LRS found any errors in your data, this will be indicated in the Return Code field at the bottom of the MIAP tab. The return codes are as follows (taken from the MIAP document MIAPBatchInterface0809.pdf):
ACE Export
The ACE export allows you to create a bulk file of learners to be uploaded to the ACE website. To access the ACE export, go to Exports on the toolbar and click ACE Export.

To use the ACE export, first select the relevant centre and tick the boxes for the contractors and frameworks you wish to include (leaving all boxes un-ticked will include all contractors / frameworks).
If you want to re-export only learners who have already been exported, tick the learners already exported box at the bottom of the screen. Otherwise, leave it un-ticked.
Finally, choose the date range. This will export learners who achieved their framework between the two dates.
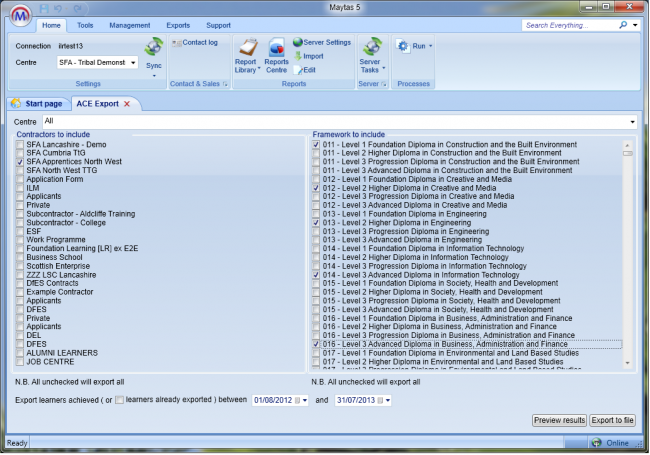
To preview the results to be exported, click the Preview results button at the bottom-right of the screen. This will show a report listing the learners to be exported.
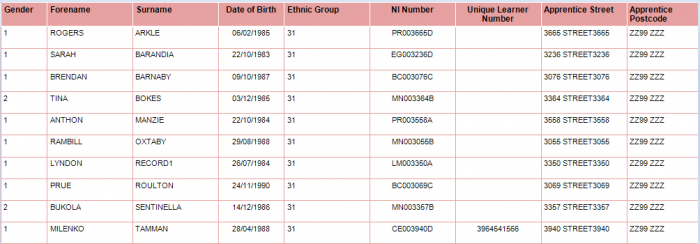
To create the export file (in CSV format), click the Export to file button and choose where to save it.
Import Funding Information
The process for importing the required funding information into Maytas is as follows:
- The latest LARS should be imported.
- The latest postcode data should be imported.
- Once all data has been imported, ensure that the funding cache is refreshed (either on a database schedule or a manual update out of working hours).
Import LARS
The LARS should be imported as follows:
- Download the latest LARS MDB file. At present, the latest version is the LARS MDB version 8.
- In Maytas, go to Exports on the toolbar.
- On the ILR Tools panel of the ribbon, go to Uploads | Upload Funding Information | Upload LARS (Version 8).
- Browse to and select the downloaded LARS file and click Open.
- The file will now be imported. Click OK on the message which appears.
Progress on the import can be checked by going to Home | Server Tasks | Server Jobs. Typically it will take several minutes.
Import Postcode File
- Obtain the postcode uplift factors file - Download the zip file under 2022 to 2023 uplift factors by postcode and LLSOA: CSV files.
- In Maytas, go to Exports on the toolbar.
- On the ILR Tools panel of the ribbon, go to Uploads | Upload Postcodes| Upload Post Code Data (2022/23).
- Browse to and select the postcode uplifts zip file and click Open.
- The file will now be imported. Click OK on the message which appears.
Progress on the import can be checked by going to Home | Server Tasks | Server Jobs. Typically this will take several minutes.
Note on the Funding Cache
By default, the funding cache will update overnight so that funding information in Maytas uses the newly-imported FIS and postcode information. Please check with your system administrator if you are unsure if or when the funding cache is updated on your system. You can also manually set the funding cache to update by going to Management | Profiles and clicking the Funding Cache button, though please be aware that this may take a long time and may use a large amount of system resources, which could affect performance for other users on the system.
Standard Import
A standard import can be used to import a set of data. This is usually arranged with Tribal so that the import files are produced and provided. For basic details on creating your own standard import files, please see the Standard Import Details guide.
The standard import tool must first be enabled in permissions:
- Go to Tools | Edit Permissions.
- Select the user or group which requires permission.
- Go to the Commands tab.
- Expand the Standard import section.
- Set the Show Standard Import permission to Visible.
- Click Apply and restart Maytas for the change to take effect.
Once you have set the permission and you have the import files, the files can be imported as follows:
It is recommended to import large import files out of working hours.
-
Go to Exports | Standard Import.
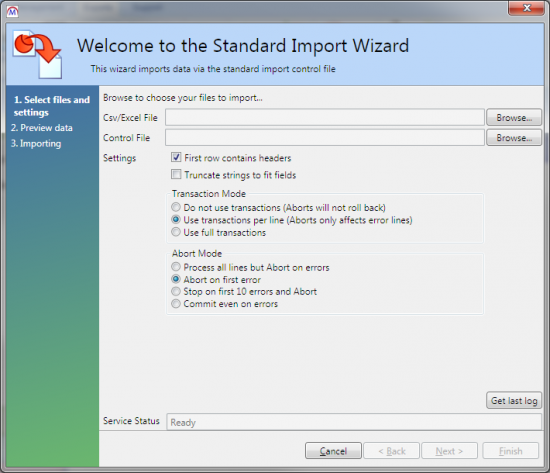
- Click the first Browse button and choose the provided .CSV/Excel file.
- Click the second Browse button and choose the provided .CON file.
- In most cases the other settings can be left as default unless otherwise advised by Tribal.
-
Click Next.
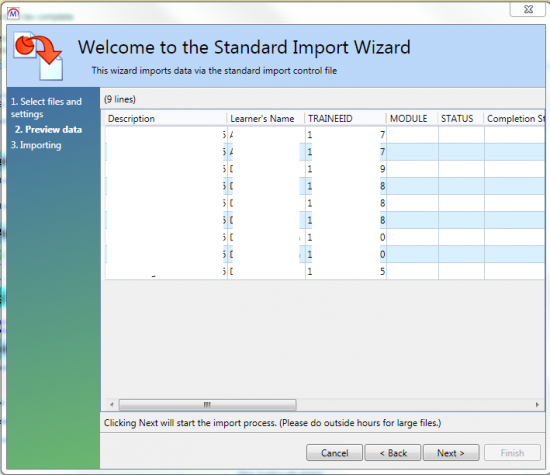
- You can now preview the data to be imported. Click Next when ready.
- If there are no errors, click Finish. If there are errors, please contact Tribal.
Standard Import Watchers
Standard imports into Maytas can be semi-automated through the use of watchers, which watch a folder and import data from documents placed in that folder. The basic process for this is as follows:
- A watcher is configured in Maytas. This is much like performing a manual standard import, where a .con file is used to define the format and destination of the data to be imported. The folder to watch is also specified, along with how frequently the watcher should check the folder for new documents.
- Users place correctly-formatted documents in the folder.
- When the watcher next checks the folder, any new documents in the correct format (as per the .con file) will be moved to a Processing folder within the watcher folder and the import will begin.
- When processing has completed, the imported files will be moved to a Completed folder (unless the option to retain copies of imported files is disabled - see below for details).
Before using watchers, they must be enabled in permissions:
- Go to Tools | Edit Permissions.
- Select the user or group which requires permission.
- Go to the Commands tab and expand the Standard Import section.
- Tick the checkbox next to the Standard Import Watcher permission and ensure the dropdown box is set to Visible.
- Click Apply and restart Maytas for the changes to take effect.
The base directory to be used for watchers must also be specified:
- Click the M5 button at the top-left and click Options.
- Select Standard Import on the left.
- Tick the checkbox next to the Base path for standard import watchers config.
- Enter the base directory to be used (e.g. C:\watchers). Each watcher must have its own folder within this directory (this is specified on the watcher).
- Click OK.
Create a watcher
-
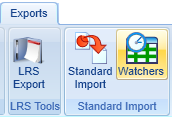
Go to Exports on the toolbar and click Watchers.
-
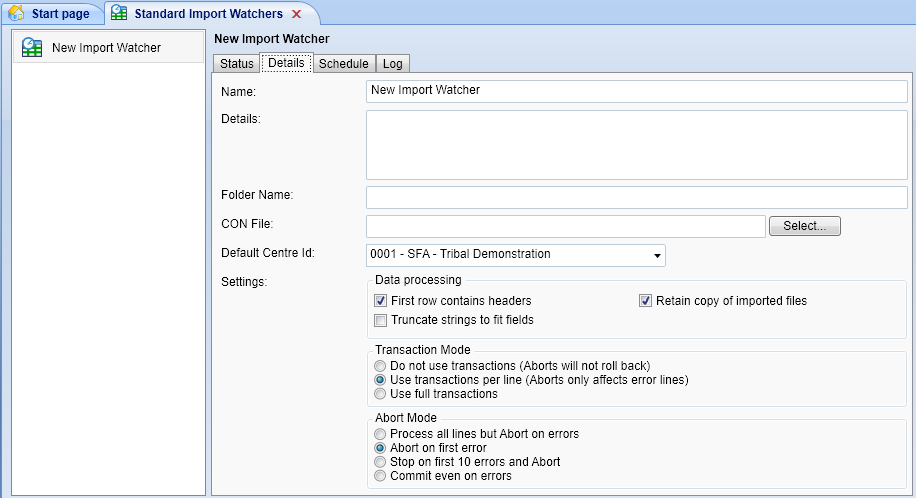
The watchers screen will be displayed. Click New and go to the Details tab.
-
Complete the details as required:
- Name - Enter a name for the watcher.
- Details - Enter any notes about the watcher.
- Folder Name - Enter the name of the folder which will be watched for documents. The folder will be automatically created within the base watchers directory specified in the configuration above. Only the folder name should be entered here, not the full directory path. Note that the folder name must be entered before selecting the CON file below.Sub folders can be specified by using a backslash (e.g. Watchers\Folder1 and Watchers\Folder2).
- CON File - Click the Select button, browse to and select the .con file to use and click Open. This will place the .con file in the watcher folder.
- Default Centre Id - Select the default centre to use for new learners created from imports via this watcher.
- First row contains headers - Ensure this box is ticked if your import files for this watcher will have headers in the first row.
- Truncate strings to fit fields - By default (un-ticked), imports will error if data exceeds the maximum length of a target column. Tick the box if you want the import to shorten data to fit the target columns instead.
-
Retain copy of imported files - By default (ticked), files placed in the watcher folder will not be automatically deleted after being imported. With this option, it is recommended that the Completed folder (within the watcher folder) is periodically cleared out manually (e.g. for data security / GDPR purposes).
If the box is not ticked, files in the watcher folder will be automatically deleted after being imported.
- Transaction Mode - In most cases, this can be left as the default.
- Do not use transactions - If an error occurs on import, all changes up to that point will not roll back, including the current line (e.g. if 5 out of 10 columns have been changed on a line and an error occurs on column 6, columns 1 to 5 will not roll back).
- Use transactions per line (default) - If an error occurs, only changes on the current line will roll back. Changes on lines already committed will not roll back.
- Use full transactions - If an error occurs, all changes will be rolled back.
- Abort Mode - In most cases, this can be left as the default.
- Process all lines but Abort on errors - All lines will be processed, but lines with errors will not be committed.
- Abort on first error (default) - The import will abort upon encountering the first error.
- Stop on first 10 errors an Abort - The import will pause after the first 10 errors and will abort on additional errors.
- Commit even on errors - All lines will be processed and all lines will be committed, even if there are errors.
-
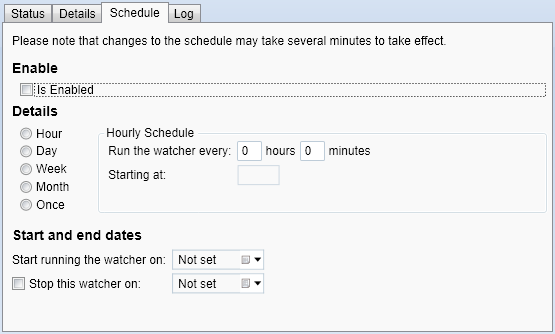
Go to the Schedule tab.
-
Here you can configure the schedule for when the watcher will run and how often it should check for new files to import:
- Is Enabled - When this is ticked, the watcher will begin looking for files to import as per the schedule.
-
Details - First, choose whether the watcher should check for new files to import every hour, day, week or month (or once). This will display additional settings on the right which should be set as required. Note that a starting time must be entered, and the frequency cannot be less than 1 minute.
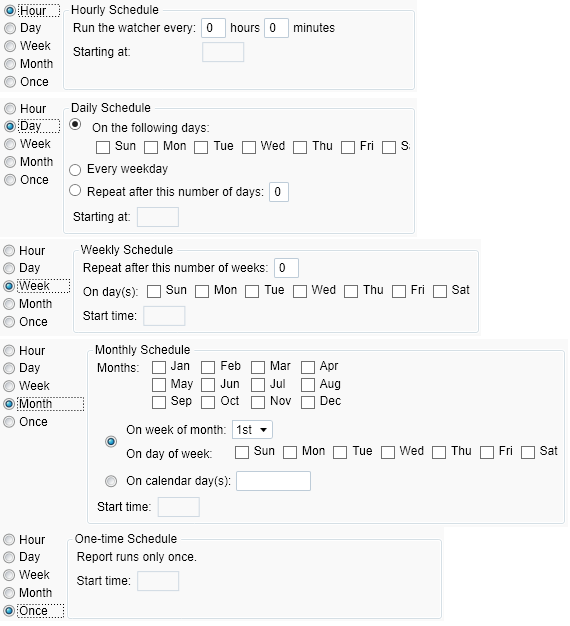
- Start and end dates - The watcher will only run between the dates entered here. If no dates are entered, the watcher will run on the schedule indefinitely.
- Click Apply to save changes.
- Once the watcher is configured and enabled, import files can be placed in the watcher's folder. When the watcher detects a new file to import, it will be moved to a folder called Processing. When processing has finished, the file will be moved to a Completed folder.
Watchers ribbon

- New - This creates a new watcher, which will be listed on the left side of the screen.
- Run - This will manually run the selected watcher, so that it immediately checks the watcher's folder for any new files, rather than waiting until the next scheduled check.
- Reset - This resets the watcher on the server, which will refresh any watcher configuration settings and may help if a watcher has stopped running for any reason.
- Delete - This will delete the selected watcher.
Logging
Each watcher produces a log of each import, including any errors encountered. These can be viewed by opening a watcher and going to the Log tab.

If a log file is available, click View Log File to view the full details.
By default, logs will only be recorded when an event takes place (e.g. when a new import file is detected). However, it is possible to enable logging for every time a watcher checks for files, even if none are found. To do this:
- Click the M5 button at the top-left and click Options.
- Select Standard Import on the left.
- Tick the checkbox next to the Verbose Logging config and ensure the toggle button is set to ON.
- Click OK.
It is not recommended to use verbose logging if you have watchers with high frequencies (e.g. more than once an hour), as the log will quickly fill up with entries of the watcher performing scheduled checks.