Trainee Editor
Add a Learner to the System
To add a learner to the system:
- Click the M5 logo in the top-left corner of the screen.
- Click or hover over New and click Trainee.
- Enter the learner’s details on the Personal Details screen and click Next.
- Assign the learner to a contractor and scheme and set the learning start date and expected completion date. Click Next when finished.
- Click Finish to complete the process, or click Back to return and alter details.
- You will now see the learner’s details screen. Click Apply on the ribbon to save the learner.
Create New Trainee Wizard - Multiple Options
If you have multiple processes for different types of trainee, these will appear in a list at the start of the New Trainee wizard so that you can choose which type of trainee to add.
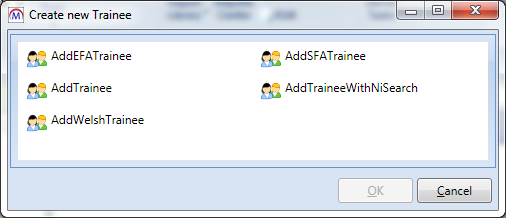
This view will automatically appear if you have multiple trainee processes with the CanCreateEntity property set to true. To check or set this:
- Go to Tools on the toolbar and click Process Browser.
- Select Trainee on the left.
- Double-click the process you wish to check or set the value for.
-
Scroll down the list of properties in the bottom-right window and locate Can CreateEntity. If you wish to include this process in the Create New Trainee screen, set the property to True.
The ProcessType must be SY for the process to be included in the new learner wizard.
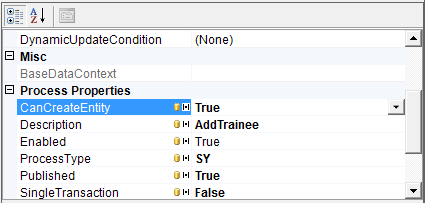
- Click Apply to save the change, then sync and restart Maytas 5.
Edit Learner Details
The Summary screen for a learner allows you to enter and edit basic learner details.
- The Personal section contains details which were entered in the learner wizard. These can be edited as necessary.
- The Contact section contains the learner’s address and contact details. Enter these as required.
- The Programme Details section contains details which were entered in the learner wizard. It also includes the termination date field, which should be completed when the learner ends learning.
-
The Employer / Personnel section contains a grid which allows you to assign the learner to an employer and/or personnel member (e.g. an assessor).
To add an employer:
-
Click the
 button on the grid and choose Employer to add a new row.
 - Click the
 button at the end of the Employer row to search for an employer.
 - Enter a search term and click
 to search. Select an employer from the list and click OK.
 - Select a start date for the learner-employer association to begin. Enter an end date if required (the default date of 31/12/2199 indicates that the association is open-ended).
- Select the appropriate type(s) by checking each relevant box.
- On the Job Info tab, additional details about the learner-employer association can be entered.
- When finished, click Save.
-
- The employer row will now be added to the grid. To edit a row, select it and click Edit.
- To add an assessor:
- Click the
 button on the grid and choose Assessor to add a new row.
 - Click the
 button at the end of the Assessor row to search for an assessor.
 - Enter a search term and click
 to search. Select an assessor from the list and click OK.
 - Select a start date for the learner-assessor association to begin. Enter an end date if required (the default date of 31/12/2199 indicates that the association is open-ended).
- Select the appropriate type(s) by checking each relevant box.
- When finished, click Save.
- Click the
- The assessor row will now be added to the grid. To edit a row, select it and click Edit.
Ofsted Panel
Please note that the Ofsted panel is only relevant to ESFA apprenticeship learners.
The Ofsted panel is located on the right-hand side of a learner’s summary screen. It displays four flags which show the learner’s achievement rate status:
-
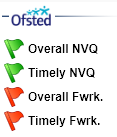 Overall NVQ – Whether the NVQ was achieved.
 - Timely NVQ – Whether the NVQ was achieved timely.
- Overall Fwrk. – Whether the framework was achieved.
- Timely Fwrk. – Whether the framework was achieved timely.
Each of the four flags can have one of four states:
- Green – Successful
- Red – Failed
- Blue – Pending
- Yellow – Not part of the cohort
Change a Learner's POT
The current period of training (POT) for a learner is shown on the ribbon when a learner account is open. You can view previous POTs using the POT dropdown box. The Version dropdown box lets you view previous values for trackable changes within a POT (e.g. changes to a learner's disability status).

To add a new POT:
- Click the
 button.
 - In the Add POT wizard, select a contractor and scheme, and set the start date and expected completion date, then click Next.
- Click Finish to add the new POT.
Learner Diary
The diary allows a variety of events to be planned and recorded for a learner (e.g. assessor visits).
Add a diary entry
To add an entry:
- Click the
 button at the top of the Diary screen.
 - Select the entry type from the drop-down list. There are five options:
- Visit – This adds a planned visit from an assessor.
- Plan Event – This takes a similar format to a visit, but is more generic (it does not imply a visit will take place).
- General Event – This is a simple event record.
- Document – This can be used to record the creation and transfer of important documents.
- Trainee Attendance – This can be used to record a learner’s attendance.
- Click OK once you have chosen an entry type.
- Enter details as required. Some fields allow you to search for a value (such as an assessor or employer). Click the
 button to open the search dialogue. If you wish to clear an option that has already been selected, click the
  button next to the appropriate box.
 - When finished, click Save. The entry will now be added to the diary.
- If you select a diary entry, its key details will be shown (they can also be edited here). To open the entry to see and edit all details, click Edit. To remove an entry, click Delete.
Diary views
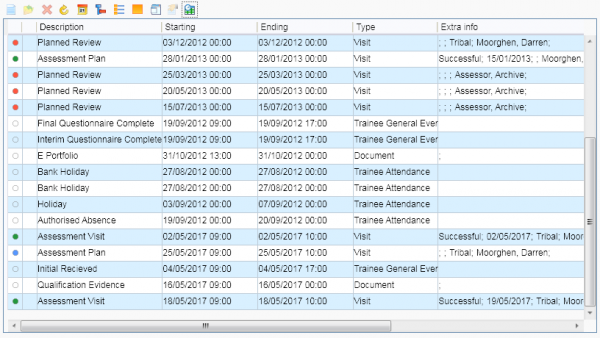
There are two ways of viewing the diary, which can be toggled by clicking the  button:
The calendar view
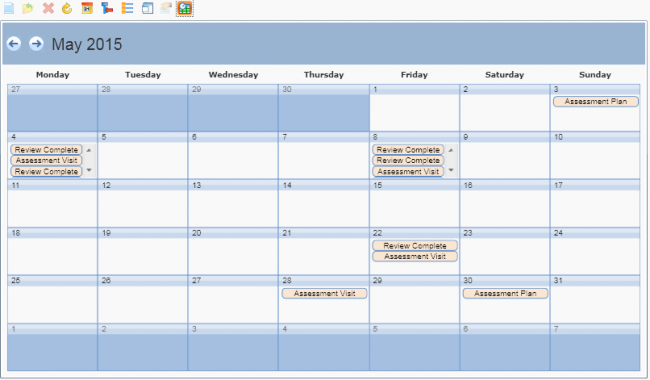
The list view
Extra info
In the diary list view, the Extra Info column can be configured to include several items:
-
Click the
 button, which will open the extra info configuration window.
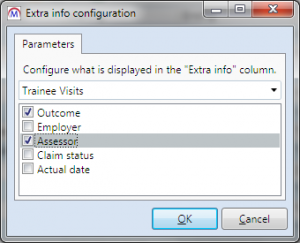
- The included items can be configured by the type of diary entry (trainee visits, documents or trainee plan events). Choose the type from the dropdown list.
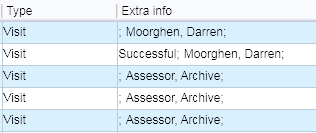
- Tick the boxes for the items you want to include and click OK.
-
The items will now appear in the extra info column if they are available.
Visits File Upload
Files can be uploaded against visits in Maytas. See the Visits File Upload page for details on how to configure this.
Claim Details
The claim details tab shows a range of financial information for a learner. It consists of several sub-tabs (dependent on the type of learner):
Claim Details

This shows the history of claims for a learner, as generated by running profile measurements.
- Additional claim lines can be added manually by clicking the
 button.
 - To open a claim, select it and click the
 button.
 - To contra a line, select it and click the Contra button. Click Yes to confirm.
- To view the history of a claim line, select it and click the History button.
SFA/Levy/Employer Funding Summary

This tab will only appear for ESFA learners.
This shows funding information per learning aim, payment type, contract year and period. The figures are calculated from the Maytas funding views and are completely separate from profiling. The contract year, learning aim and payment type to show can be chosen from the dropdown boxes above the table.
Some of the most commonly used payment types are as follows:
- OPP - On-programme payment.
- ALN - Additional learning/social needs
- ACH - Achievement
- BAL - Balancing payment (also referred to as roll-up OPPs).
- LSF - Learner support funding
- DIS - Disadvantage uplifts
Calculations (ER,FM35,FM36,FM81,FM99)
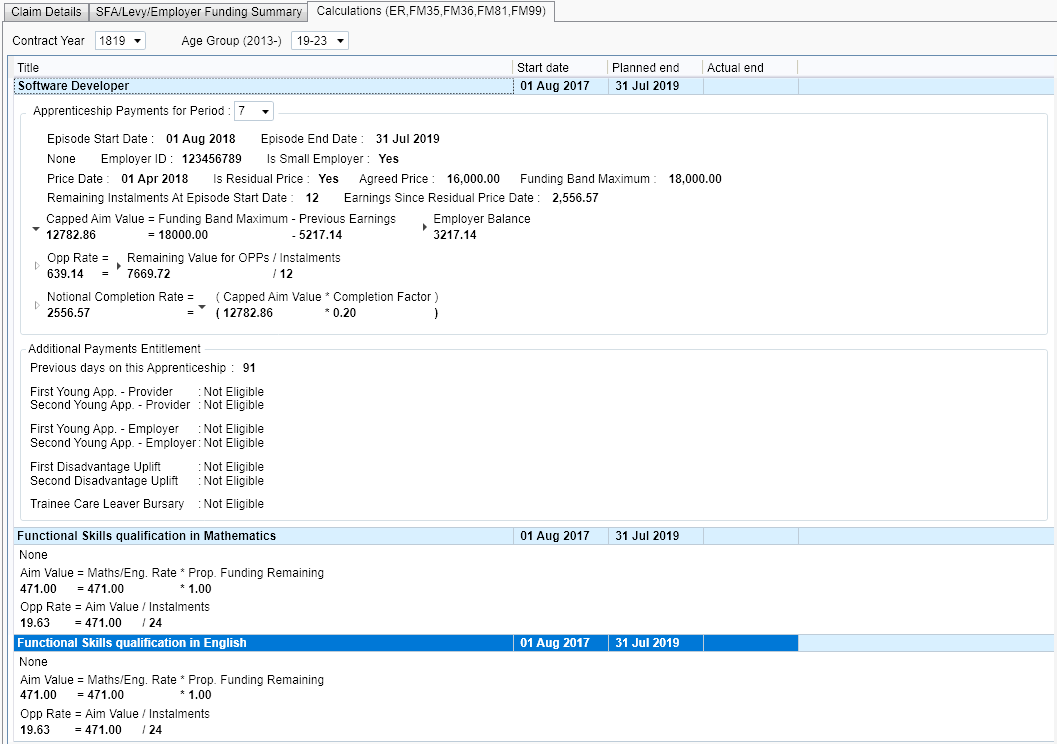
This tab will only appear for ESFA learners.
This shows the calculations used to produce the funding values on the previous tab. The contract year and age group can be selected from the dropdown box above the calculations.
Objectives
The objectives tab shows progress for the modules, units and elements that a learner is taking. In the default view (when the  button is selected), the objectives are shown hierarchically on the left, and these can be expanded to show the units/elements within. When an objective is selected, its details are shown on the right. Clicking the
  button will display all the objectives in a list.
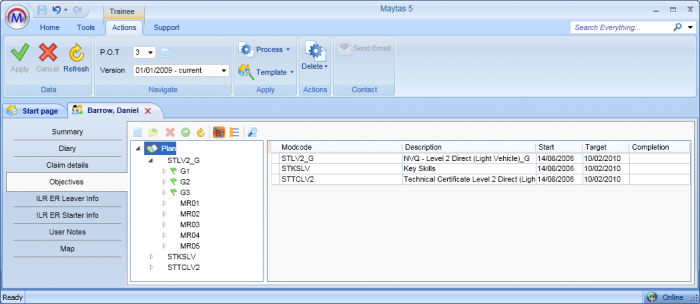
Objectives can be added by clicking the  button. In the window that appears, enter a search term to find modules (e.g. searching for NVQ would find all modules with NVQ in the title). Select the modules as required (holding ctrl on the keyboard as you click allows you to select multiple modules). If you require units, tick the Select Units box and the units can then be individually selected / de-selected. There is also the option to show obsolete modules if necessary. When finished, click OK.
Auto-Populate Objective Dates from ILR/LLWR/CTS Data
When adding objectives to a learner, there is an option to auto-populate the start and target dates based on ILR, LLWR or CTS dates. This is done by matching the aim, activity or VQ reference with the VQ reference entered on the base module (MODULE.NVQREF). The details of this are as follows:
-
For ILR learners, sub-aims are checked first to see if the aim reference matches the module VQ ref, and if so then the aim start and planned end dates are applied to the module and its child objectives. If no sub-aims match and the main aim does match, the main aim start and planned end dates are used.
The ILR planned end date used is not the same as the expected completion date on the learner summary screen (the ILR main aim planned end date is TRAINEEPOT.FUNDINGEXPIRYDATE04; the summary screen expected completion date is TRAINEEPOT.EXPCOMPLETIONDATE).
- For LLWR learners, activities are checked to see if the LA06 learning aim reference matches the module VQ ref, and if so then the activity start and expected end dates (LA09 and LA10) are applied to the module and its child objectives.
- For CTS learners, if the CTS VQ ref matches the module VQ ref then the CTS start and expected end dates are applied to the module and its child objectives.
A config option must be enabled for this feature to work:
- Click the M5 button at the top-left and click Options.
- Scroll down to the Maytas 5 section on the left and select Trainee Editor.
- Scroll down to the Objectives section on the right.
- Tick the box for the config Auto Populate Dates and ensure the toggle button is set to ON.
- Click OK.
- Sync and restart Maytas for the change to take effect.
To check or update the VQ ref entered against a module:
- Go to Tools | Module Editor.
-
Search for and select the module.
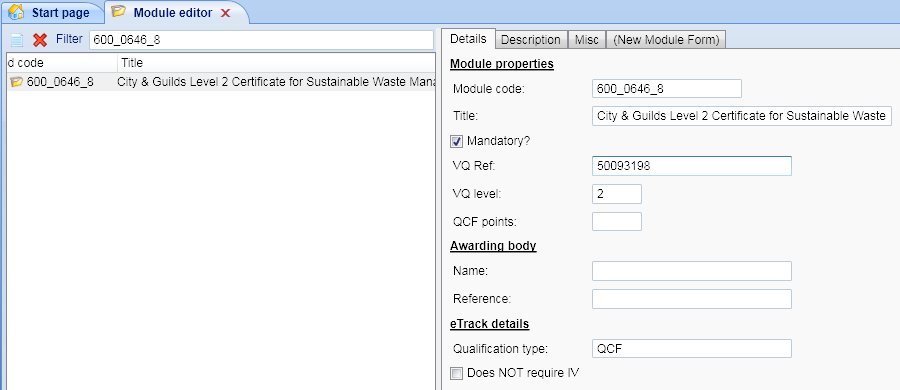
- The VQ Ref will be displayed on the right. Enter or amend the value if required.
- Click Apply, sync and restart Maytas for the new value to take effect.
Vacancy Tab
The Vacancy tab lets you add and edit vacancies. This tab is not enabled by default. To enable the Vacancy tab:
- Select Tools | Edit Permissions.
- Select the appropriate user from the left.
- Select Tabs at the bottom of the screen.
- Scroll down and find the Vacancy tab (at the bottom of the Trainee module section).
- Click the dropdown list next to Vacancy and select Visible.
- Click Apply at the top of the screen.
The Vacancy tab will now be visible when you open a learner.
Vacancies
This screen shows a list of all vacancies to which the learner is attached. To add a vacancy to a learner:
- Click the
 button.
 - Click the
 button to search for a vacancy.
 - Enter the search term and click
 to search.
 - Select the required vacancy and click OK.
- Enter the start date, the end date (optional) and the progress status of the vacancy. You can also enter any other details in the box at the bottom of the window.
- You can also add events to the vacancy by clicking the Events tab. Click
 to add a new event.
 - Enter the vacancy event details as required. You can add assessors to the event by clicking the
 button. Click OK when finished.
 - Click OK to add the vacancy to the learner.
To view or edit a vacancy attached to a learner, select the vacancy and click the  button.
Attributes
This screen lets you specify which skill attributes a learner has. To add a skill to a learner:
- Click the
 button.
 - Click the arrows to expand the list of attributes.
- Tick the boxes next to the required attributes and click OK.
To view or edit an attribute attached to a learner, select the attribute and click the  button.
Search
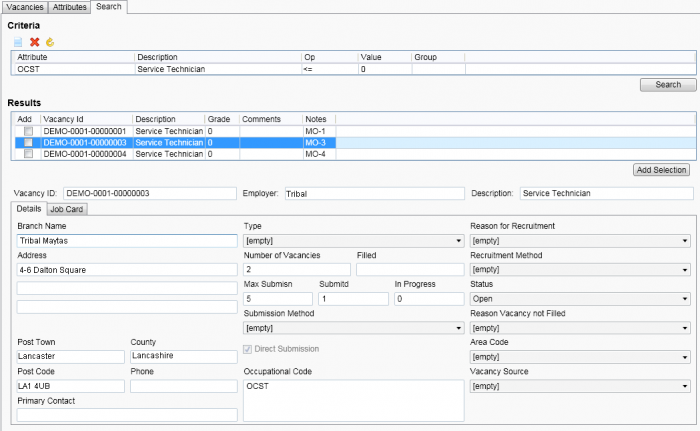
This lets you search for vacancies with a specific set of attributes, and then add vacancies from the results to the learner. To specify the attributes to search for:
- Click the
 button under Criteria.
 - Click the arrows to expand the list of attributes.
- Tick the boxes next to the required attributes and click OK.
Click Search. The results will appear at the bottom of the screen. To add a vacancy to a learner:
- Tick the box next to relevant vacancy or vacancies.
- Click Add Selection.
Selecting a result from the list will display the full details for that vacancy at the bottom of the screen. You can also click the Job Card tab to display the job information.
Other Learner Screens
Any screens created and published in the Trainee area will appear on the left of the trainee editor. These include the ILR and LLWR screens, as well as any user-created screens.
Mail Merge
The mail merge feature can be accessed from a number of useful locations, such as the trainee / personnel / employer editors, the diary wizard and sales pipeline items. This can be accessed either on the ribbon (i.e. when accessing from one of the editors) or in the top-right corner of a wizard:
Mail merge on the ribbon (via the Actions tab on the toolbar).

Mail merge in the top-right corner of a wizard.

Mail Merge Basics
To create a mail merge template:
- Click Mail Merge and select Create new.
- Click OK to the message that appears.
- Microsoft Word will open a blank mail merge document. To add a mail merge field, click Insert Merge Field on the Word ribbon (on the Mailings tab) and select the appropriate field. The field list will vary depending on the area of the system you are creating the mail merge for, and fields from ancillary tables are appropriately prefixed (for example, TRAINEEPOT fields are prefixed with POT_).
- When finished, save and close the Word document.
- A window will appear for you to finalise the mail merge. Enter a name for the template.
- Optionally select Email from the Action dropdown box. This will create an email when the template is selected.
- If you chose Email as the action, enter the email subject.
- Click OK.
Mail Merge Example Tutorial
In the following tutorial, we will create a simple mail merge template which will allow you to send an email to a learner asking them to confirm their address is correct.
- Open a learner and ensure their address details are completed.
- Click Mail Merge on the ribbon and choose Create new.
- Click OK to the message that appears.
-
In the Word document which opens, enter a message similar to the one below (do not enter the bold words – these are placeholders for where the mail merge fields will go):
Dear LEARNER
Please could you confirm that your address details below are correct? :
ADDRESS DETAILS
Many thanks,
ASSESSOR
-
For each placeholder, click Insert Merge Field on the Word ribbon (on the Mailings tab) and select the fields as detailed below:
LEARNER – FIRSTNAME
ADDRESS DETAILS – ADDRESS1, ADDRESS2, POSTTOWN and POSTCODE
It is recommended that each of these should go on a new line.
ASSESSOR – TRASSESSOR_ASS_FIRSTNAME and TRASSESSOR_ASS_LASTNAME
- The document should now look as follows:
Dear «FIRSTNAME»,
Please could you confirm that your address details below are correct? :
«ADDRESS1»
«ADDRESS2»
«POSTTOWN»
«POSTCODE»
Many thanks,
«TRASSESSOR_ASS_FIRSTNAME» «TRASSESSOR_ASS_LASTNAME»
- Save and close the Word document.
- Enter a name for the template (e.g. Address confirmation).
- Select Email from the Action dropdown list.
- Enter Address confirmation as the subject.
- Click OK.
The template can now be accessed by clicking Mail Merge on the ribbon and selecting it from the list of available templates. You can also delete the template by clicking the red cross next to it, or edit the template by clicking the Word icon next to it.
When the template is launched for a learner, an email will be created with the subject and body filled in with the learner’s name and address, with the assessor’s name at the bottom. If the learner has an email address entered, this will be entered into the To field.
Mail Merge Folders
Mail merges can be organised into folders. To do this:
- Open a learner, employer, assessor, etc, then click Mail Merge and click the
 button next to the mail merge you wish to put in a folder (or create a new mail merge).
 - Amend the mail merge if required and save the Word document.
-
You will see the window below. If you have created a new mail merge, enter a name for the mail merge and choose the action as required (no action or email).
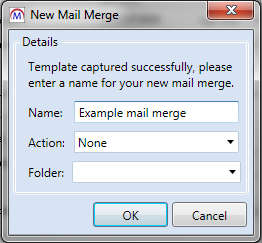
- Enter the folder name you wish to put the mail merge under. When creating mail merges in the future you will then be able to select that folder from the dropdown list.
- Repeat the process of editing mail merges and entering / selecting folders as required.
Mail Merge Available Fields
Additional fields can be made available for use in mail merges via the Schema and Lookup Editor:
- Go to Tools | DB Schema.
- Expand Tables on the left.
- Expand the table containing the field you wish to make available, then select the field.
- If no properties have been set for the field, you will see a Set button on the right. Click the button if it is there.
- Tick the Allow on mail merge box (near the bottom of the properties).
- Click Apply.
- Go to Home on the toolbar and click Sync. The field will be available on mail merges once Maytas has been restarted.
Termination Wizard
The termination wizard allows you to easily close off personnel links, placements and events for terminated learners.
To run the termination wizard:
- Open a learner.
-
On the Actions toolbar, click Tools | Termination Wizard on the ribbon.

If the learner is still in learning, you will receive a message informing you of this.
- At the top of the termination wizard you can specify the date from which the selected items will be terminated. This defaults to the POT termination date.
- The filter list lets you choose the type of items to terminate.
- The bottom of the wizard lists specific items which can be terminated. Tick or un-tick these as required.
- When finished, click OK to apply the changes.
Visit Planner
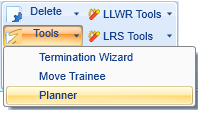
The Visit Planner wizard allows you to plan a series of visits for a learner. To start the wizard, open a learner record and go to Tools | Planner.
-
Select the type of event to plan for at the top of the screen and click Next.
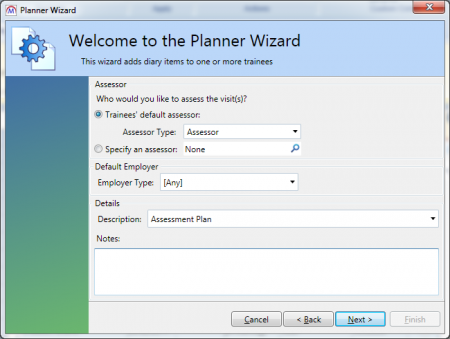
- There are two options for choosing the assessor to assign to the visits:
- Trainee's default assessor – This will assign the learner’s assessor of the specified type (from the dropdown box). The default option of [Any] will assign the visits to all the learner's active assessors.
- Specify an assessor – Use this option to specify the assessor to assign to the visits. The default of None will not assign any assessor to the visits.
- Choose the employer type to assign to the visits.
-
Choose the type of visits from the Description dropdown box and enter any notes about the visits. Click Next.
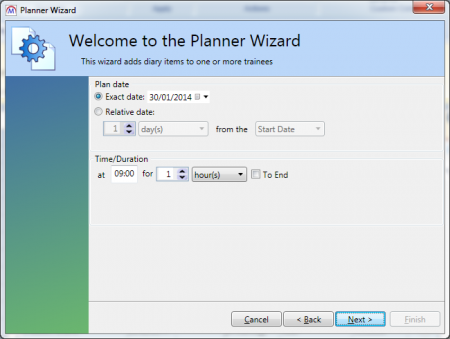
- This screen determines the planned date of the initial visit.
- Exact date lets you specify the initial planned date.
- Relative date will set the planned date a specified time period (i.e. days, weeks, months or years) after either the learner's start date or the current date.
- The Time/Duration section determines the start and end times of the initial visit. First enter the start time, then either specify the duration in minutes/hours/days/weeks or tick the To End box (which sets the visit duration to last up to the learner's planned end date).
-
Click Next.
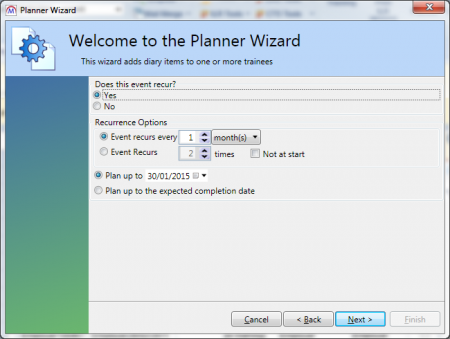
- If you wish the visits to recur, select Yes. Otherwise skip to step 10.
-
You can choose to have the visits recur every x days/weeks/months, or simply to recur a particular number of times. The Plan up to options at the bottom let you specify the date to recur visits up to, or you can choose to plan up to the learner's expected completion date.
For example, if you chose to recur every two months up to a year from now, the result would be seven visits – one at the start and six more spaced two months apart.
If instead you chose to recur three times up to a year from now, the result would be three visits – one at the start and two more spaced six months apart.
You can also tick the Not at start box to not include the initial visit in the recurrence. For the last example, that would instead create an initial visit and then three more visits spaced four months apart.
- Click Next.
- If you wish to include additional learners on the visit plan, click the + button to search for and select the learners. Click OK to add them to the list.
- Select the learners to use on the plan and click Next.
- You will see a summary of the plan. Click Back if you need to amend anything, otherwise click Next. The wizard will automatically close when finished.
A config can be enabled which allows a series of visits to be automatically re-planned if the planned date of the initial visit is changed. Please see section 1 above for information on giving access to the new system config editor.
To enable the config:
- In Maytas 5, click the M5 button at the top left of the window and select Options.
- Under the Maytas 5 section, select Miscellaneous.
- The config is under the Visits section, with the text Allow automatic re-planning of visits from the Visit Planner.
- If the checkbox for the config is not ticked, tick it to activate the config. Ensure the switch is set to ON.
- Click OK when finished.
Preferred Gender Pronouns
A learner's preferred gender pronouns can be specified on the learner Summary tab.
If you have a custom version of the Summary tab, the fields will need to be manually added using the Screen Designer. The main field is TRAINEE.GENDER_PRONOUNS, and TRAINEE.GENDER_PRONOUN_1 to 5 allow custom pronouns to be specified for a learner.
-
Open the learner's record and go to the Summary tab.
-
Select a value from the Gender Pronouns dropdown box.
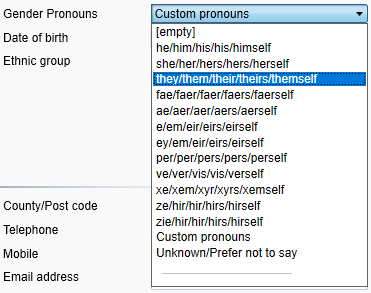
-
If the learner's preferred pronouns are not in the available lookups, you can enter them manually by selecting the Custom pronouns value. This will display the Gender Pronouns section.

Enter the pronouns as required. If the gender is set as male or female, the pronouns will be pre-populated with he/him or she/her pronouns respectively. These can be changed as required.
-
Click Apply.