Configuring Report Fields
There are many configurable options for fields which allow you to tailor reports to your needs.
To configure a field in the report designer, simply select it in the design list. You will then see a number of options:

- Show – This toggles whether or not the field is shown on the report. For example, you may wish to group by a field but not actually display it.
- H. Align / D. Align – The header and data alignments. Click these to cycle through left, centre and right alignments.
- Output type – This lets you choose the output type of the field (e.g. lookup, custom, etc). Please note that we do not recommend using the Rich Text output type going forwards, as this is only present for legacy purposes.
- Width in Pixels – The default is 96. Change this to increase or decrease the display width.
- Visible – This toggles whether or not the field is shown on the report.
- Suppress duplicates – This will prevent any duplicate rows from being displayed.
- Multi-line string – If this is ticked, text fields will show over multiple lines if they cannot fit on one line.
- Sorted – Tick this if you wish to sort by the selected field. Once ticked, you can enter a number for the sort order. For example, if Field X has a sort number of 1, and Field Y has a sort number of 2, the report will sort by Field X first and then sort by Field Y. Please note that the sort number must be 1 or greater. The report will not sort by a field if the sort number is 0.
- Total – For numerical fields, this will create a total for the column at the end of the report.
- Grouping – Tick this if you wish to group by the selected field. Similar to the Sorted option, you can enter a number for the group order (this must also be 1 or greater).
- Format – The format box can be used to format data in a particular way. For example, date fields can be formatted in UK format by entering dd/MM/yyyy in the Format box.
-
Function - This lets you apply custom functions to the field. For example, setting the Output type to Custom allows you to enter SQL into the function box, essentially replacing the field with a SQL sub-select. e.g. The following SQL would show a learner's lastname and firstname, separated by a comma:
(TRAINEE.LASTNAME + ', ' + TRAINEE.FIRSTNAME)
Further examples can be found on the Custom Report SQL Functions page.
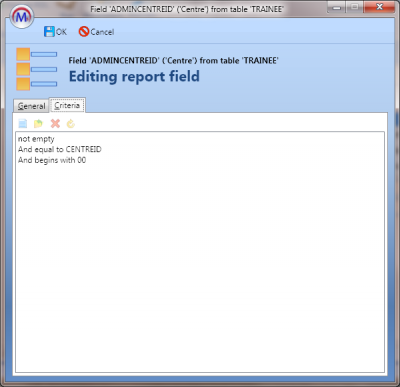
You can also configure most of these options by clicking Edit. This will open a window with two tabs: the General tab contains the options listed above, and the Criteria tab lets you add custom criteria to filter data.

To add a new criteria entry:
- Click the
 button and select the entry that is added.
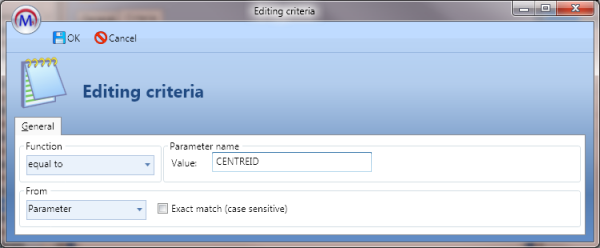
 - Select the required type of criteria from the Function dropdown box.
- Choose the comparison source from the From dropdown box. There are four options:
- None – This is intended for types of criteria which do not require the field to be compared with another value. For example, Empty simply checks whether or not the field is empty.
- Criteria – This is used when you wish to compare the field to a fixed value. Once selected, a box will appear for you to enter the fixed value.
- Parameter – This is used when you wish to compare the field to a value specified in a parameter when the report is run. Once selected, a box will appear for you to enter the name of the parameter. You will then see the parameter when the report is run.
- Field – This is used to compare the field to another field.
- The Exact match (case sensitive) box is ticked by default. If you wish the comparison to be non-case sensitive, untick the box.
- Click OK when finished.

Certain parameters are automatically recognised by Report Generator and have inbuilt functionality. These are activated by adding a parameter for the field and entering the field name as shown below:
| Field Name | Parameter Description |
|---|---|
| TRAINEEID | Lets you search for and select a learner |
| CENTREID | Lets you choose the centre from a list |
| CONTRACTORID | Lets you choose the contractor from a list |