Courses
The Course Management module allows you to record detailed course information, complete with prospectuses, timetables, venues and personnel.
Course Module Structure
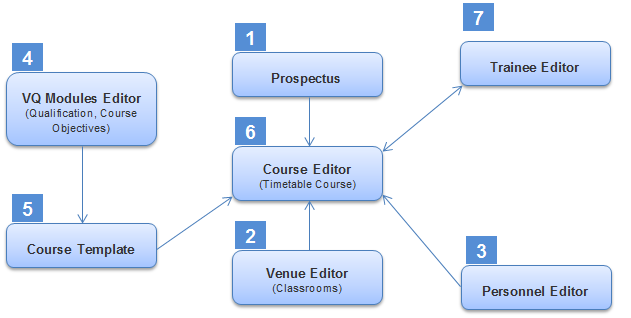
| 1. Prospectus Editor | The first step in setting up a course structure is to create a prospectus for which timetabled courses can be attached. |
| 2. Venue Editor | The Venue Editor allows you to define the locations where courses can be held (e.g. classrooms or workshops). |
| 3. Personnel Editor | The Personnel Editor is used to record personnel details in your organisation. The personnel can then be linked to timetabled courses. |
| 4. VQ Module Editor | The VQ Module Editor is used to record the qualifications which learners could achieve upon completion of a course. Please note that this feature is only available if you have purchased an A-Track licence. |
| 5. Course Templates | The Course Template editor is used to create generic course templates. Qualifications from the VQ Module Editor can also be attached to course templates. |
| 6. Course Editor | The Course Editor allows you to create a scheduled course from a course template. A timetable can be assigned to it, as well as resources such as venues or personnel. |
| 7. Trainee Editor | Learners can be assigned to courses in the Trainee Editor (via the Course tab). A learner’s course history can also be viewed here. |
Prospectus Editor
The first step in setting up a course structure is to create a prospectus. To start the Prospectus Editor, go to Management on the toolbar and click the Prospectus button on the ribbon.

The Prospectus Editor allows you to define the prospectus start date, end date and location. Multiple prospectuses can be created if you deliver courses through more than one college or training provider.
To create a new prospectus:
- Click the New button.
- Enter the prospectus title, start date and end date.
- If you wish to specify an employer for the prospectus:
- Click the
 button.
 - Enter a search term for the employer and click the
 button.
 - Select the employer from the results and click OK.
- Click the
- Click Apply when finished.
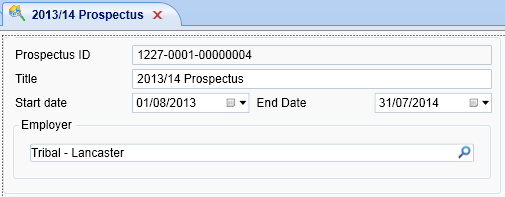
To edit a prospectus, open the Prospectus Editor, select the prospectus and click Edit.
To delete a prospectus, open the Prospectus Editor, select the prospectus and click Delete.
Venue Editor
The Venue Editor allows you to define the locations where courses can be held (e.g. classrooms, workshops, etc.). Once venues have been allocated to a scheduled course, the system can highlight any conflicts of scheduling.
To start the Venue Editor, go to Management on the toolbar and click the Venues button on the ribbon.
To create a new venue:
- Click the New button.
- Enter the venue name.
-
Select the site, status and type from the dropdown boxes.
The options available for the site, status and type are lookups. These can be modified in the Lookup Editor by selecting the VENUE table.
- Enter the venue capacity.
- Click Apply when finished.
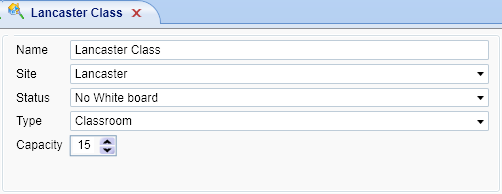
To edit a venue, open the Venue Editor, select the venue and click Edit.
To delete a venue, open the Venue Editor, select the venue and click Delete.
Course Templates
A course template is effectively a course which has been defined but has not been scheduled to take place.
To start the Course Template Editor, go to Management on the toolbar and click the Course Templates button on the ribbon.
To create a new course template:
- Click the New button.
- Enter the following details:
- Name – A name for the template.
- Code – The course code or an abbreviation of the course title.
- Duration – The duration of the course. This can be entered as hours, days, weeks, fortnights, months or years by selecting the appropriate period from the dropdown box.
- Department – The available values for this are lookups. They can be modified in the Lookup Editor by selecting table name COURSE and field name DEPARTMENT.
- Category – The available values for this are lookups. They can be modified in the Lookup Editor by selecting table name COURSE and field name CATEGORY.
- Part/Full – This specifies whether the course is part time or full time.
- Min No and Max No – These determine the minimum and maximum number of learners for which the course can be run.
- Relative Weeks – If this box is ticked, a timetable will be created automatically based on the duration and the start / end dates of the course. If it is not ticked, the timetable must be configured manually.
- Click the Description tab on the left and enter a description for the template.
- Click Apply when finished.
To assign objectives to a course template:
- Click the Objectives tab on the left.
- Click the
 button.
 -
You will see the objectives search window. Enter a search term for the module you wish to add – the system will automatically search on both the modcode and the module title and display the results.
Ticking the Show Obsolete box will display obsolete modules.
- Select the appropriate module. If you wish to choose the specific units to add, tick the Select Units box at the bottom-right of the window. You can then tick the required mandatory and optional units.
-
Click OK to add the module to the course.
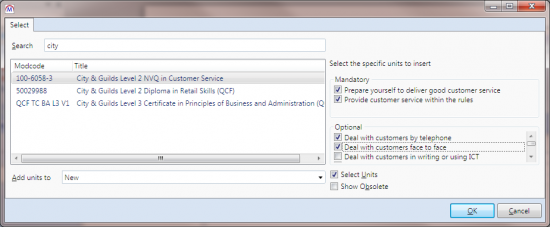
- Repeat the above steps for any additional modules you wish to add.
- Click Apply to save the changes.
Course Editor
The Course Editor allows you to create a scheduled course from a course template. A timetable can be assigned to the course, as well as resources such as a venue or personnel.
Create a New Course
- Click the M5 button at the top-left of the screen and select New | Course.
-
Select the Start Year (i.e. the prospectus), Department and Course Template and enter the Stream Title. The stream could define the start date of the course, a group name, the course code or a delivery mode (such as distance learning), etc.
Please note that each of these is optional.
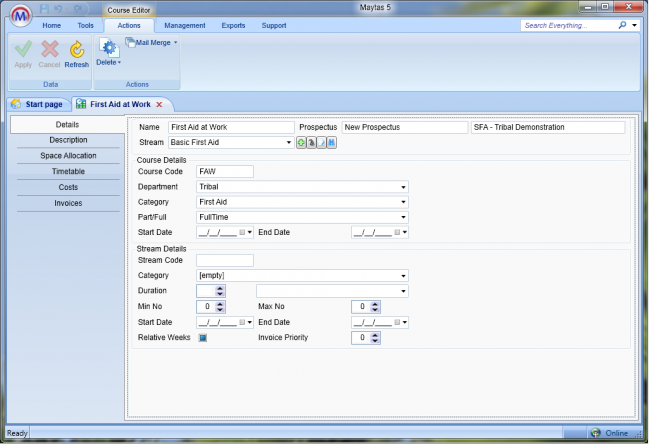
- Click Next, then Finish. You will then see the details screen for the course, where basic information about the course, including start and end dates, can be entered.
Course Streams
Add a New Stream
To add a new blank stream to the course and manually enter the details:
- On the Details screen of the Course Editor, click the
 button next to the stream dropdown box.
 - Enter a title for the stream and click OK.
-
Select the new stream from the Stream dropdown box.

- Complete the Stream Details section at the bottom of the course details tab (see below for more information on Stream Details).
To add a new stream (or a series of streams) using the stream wizard:
- Click the
 button next to the stream dropdown box.
 - The stream title can be formulated based on the start date or on a numerical index:
- The Root is the root name of every stream that will be created by the wizard.
- Selecting Date will include the start date in the title. The Format of the date can be selected (e.g. MMMdd will display as Aug01 for August 1st, dd MMM yy will display as 01 Aug 13, etc).
Selecting Index will simply add an incrementing number to the end of each stream. The format of %2d will use a 2-digit number (e.g. 01, 02, etc) whereas %d will use a 1-digit number (e.g. 1, 2, etc).
As an example, if the wizard was set to create 2 streams starting on 05/08/2013 and 2/09/2013, the root title was set to ExampleStream and a date format of MMMdd was selected, the titles would be ExampleStreamAug05 and ExampleStreamSep02.
- Select a Category (the available values are determined by lookups for table COURSESTREAM and field CCATEGORY). If the Use Relative Weeks box is ticked, a timetable will be created automatically based on the duration and the start / end dates of the stream. If it is not ticked, the timetable must be configured manually.
- Click Next.
-
Here you can either select a fixed number of streams to create with a specified interval, or enter a specific set of stream start dates.
To select a fixed number of streams:
- Select No of Streams and enter the number of streams to create.
- Click Next and select the start date of the first stream (this can be the same as the parent course date, a specific date, or the current date).
-
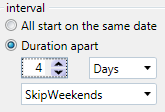
Click Next. Here you can choose to have all the steams start on the same date, or have them start a particular number of days or weeks apart. If the interval is in days, you can also choose not to count weekends.
- Click Next and move to step 6.
- To enter a specific set of stream start dates:
- Select From List and click Next.
Choose a date and click the + button. This will add the date to the list.
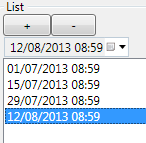
- Repeat step b to add additional stream start dates. You can remove dates from the list by selecting them and clicking the – button.
- Click Next.
- On the Stream Lengths screen, you can either set them all to end on the same date as the parent course, or to last a fixed duration (in days or weeks). Click Next when ready.
- The classes screen has several methods of adding classes to the stream. See the course stream wizard classes page for details.
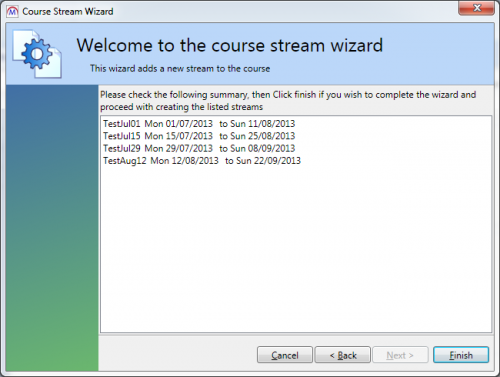
- On the final screen of the wizard you will see a summary of the streams to be created. Click Finish to create them.
Stream Details
The bottom section of the Details screen of the Course Editor displays the stream details of the currently selected stream:
- Stream Code – The reference code for the stream.
- Category – The stream category (the available values are determined by lookups for table COURSESTREAM and field CATEGORY).
- Duration – The duration of the stream in hours, days, weeks, fortnights, months or years.
- Min / Max No – These determine the minimum and maximum number of people required for the stream to be run.
- Start / End Date – The start and end dates of the stream.
- Relative Weeks – If this box is ticked, a timetable will be created automatically based on the duration and the start / end dates of the course. If it is not ticked, the timetable must be configured manually.
Additional Stream Tools
To edit the title of a stream:
- Select the stream from the dropdown list on the Details screen of the Course Editor.
- Click the
 button to the right of the dropdown box.
 - Amend the title as required and click OK.
To search for and add a stream from another course:
- Click the
 button to the right of the Stream dropdown list.
 - Enter the search term and click the magnifying glass.
- Select the stream from the results and click OK.
Space Allocation
The Space Allocation screen of the Course Editor allows you to record applicants against a course, and then transfer them to being active on a stream. You can also record employers against a course stream and specify how many spaces they have available for the stream. If a learner is then transferred to the stream and they are also linked to the employer, they will be counted against the number of available spaces for that employer / stream.
Add Applicants to a Stream
- Click the
 button in the Applicants section.
 - Search for and select a learner, and click OK to add them as an applicant to the course.
- Continue to add applicants as required.
-
To add an applicant to a stream, first the stream must be selected. Go to the Details tab and select the stream from the dropdown box near the top of the screen.

- Go back to the Space Allocation tab and select the learner to transfer to the stream.
- Click the
 button to move the selected learner. Alternatively, you can click the
  button to transfer all applicants to the stream.
 - To transfer a learner (or learners) back from the stream to the applicants list, use the
 and
and  buttons.
 - Click Apply to save the changes.
You can use the dropdown box above the stream list to filter between showing all learners on the stream, learners active on the stream, learners who have completed the stream and learners who have withdrawn from the stream.
Add Employers to a Stream
- On the Details tab of the Course Editor, select the stream from the dropdown box near the top of the screen.
- Go to the Space Allocation tab and click the
 button in the Employers section.
 - Click the magnifying glass to search for and select an employer.
- Enter the number of spaces available at this employer for the selected stream. This is constrained by the minimum and maximum spaces entered against the stream on the Details tab.
- Click OK.
The employer will now appear in the list. If a learner on the stream is linked to the employer, they will be counted in the Used Spaces column for the employer, and the available spaces will decrease by one.
Additional Space Allocation Tools
To copy an applicant to another course:
- Select the applicant and click the
 button (in the middle of the screen).
 - Click the magnifying glass to search for and select the course to move the learner to.
- Click OK.
To copy a learner on a stream to another stream:
- Select the learner and click the
 button (in the middle of the screen).
 - Click the magnifying glass to search for and select the stream to move the learner to.
- Enter the start and end dates for the new stream.
- Enter the status and result of the new stream (if applicable yet).
- Click OK.
You can also move rather than copy a learner by following the above steps and using the  button instead.
New Learner from Course
It is possible to add a new learner directly from the Space Allocation screen. To do this, click the  button on either grid and select Create new. You will then be taken to the new learner wizard.
Timetable
The Timetable screen allows you to schedule course streams. This can be done via a wizard to create a set of timetabled periods, or periods can be added manually.
An alternative timetable view can be found on the Timetable Grid screen.
Add a New Timetable
- Click the
 button at the top right of the screen.
 -
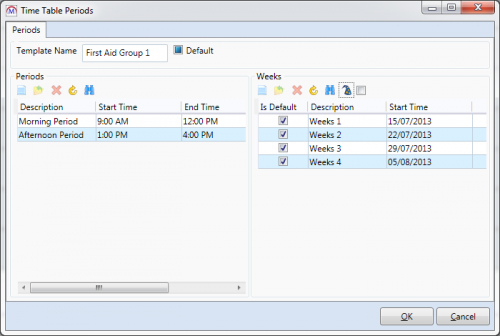
The Timetable Periods window allows you to define a set of periods over a number of weeks.
- Click the
 button in the Periods section. This allows you to specify the default daily periods for the course. Please note that this defines the possible periods for the course, not the actual occurrences of each period.
 - Enter the period title (e.g. Morning Period).
- Set the start and end times for the period.
- Click OK and add additional daily periods as required.
-
Next, the weeks on which the course will occur must be specified. This can be done manually (i.e. adding individual weeks) or through a wizard to add a particular occurrence of weeks.
To manually add a week:
- Click the
 button in the Weeks section.
 - Enter the name for the week (e.g. Week 1).
- Enter the start date of the week (please note that the Monday of the week you select will be used).
- Click OK.
- Click the
- To add weeks via the wizard:
- Click the
 button.
 - Enter the root name for the weeks (e.g. if you enter Week, the names of the weeks will be Week 1, Week 2, Week 3, etc).
- Select the amount of weeks to generate (i.e. how many weeks the course will run).
- Select the start week (in most cases this will be week 1).
- Enter the start date (please note that the Monday of the week you select will be used).
- If the course will not run on consecutive weeks, change the Duration Apart value as required (e.g. setting it to 2 will make it fortnightly).
- Click OK.
- Click the
- Click OK when finished.
- Select the new timetable from the dropdown list at the top-right of the screen.
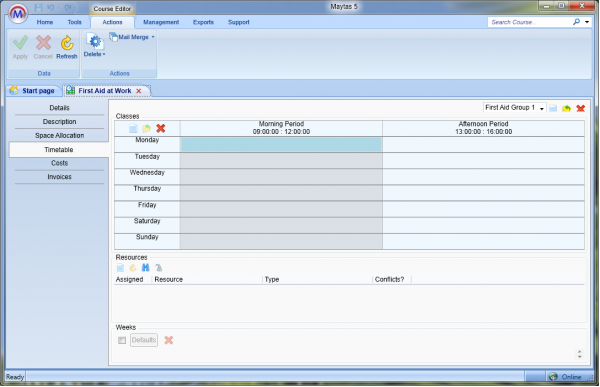
You will now see the weekly layout of the timetable. This consists of the days of the week on the left and the specified periods across the top.
Configure a Timetable
- Select the timetable you wish to use from the dropdown list at the top-right of the Timetable tab.
- First, classes must be assigned to a timetable. Click the
 button at the top-left corner of the timetable.
 -
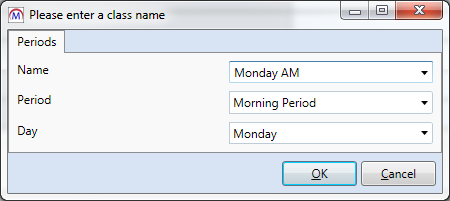
Enter a name for the class and select the period and day of the week it applies to.
- Click OK.
-
Next, the weeks on which the class occurs must be specified. Select the class on the timetable. This will display a visual representation of the weeks of the course at the bottom of the screen (in this example, the course timetable has four weeks):

The red boxes indicate that the selected class does not take place on those weeks. Click a box to turn it green, which means the class does take place that week (in this example, weeks 1 and 3):

You can also tick the box to select all weeks. Clicking the Defaults button will set all the weeks to their default value.
Hovering the mouse over a particular week will show the week number and its start date.
- Add additional classes as required.
If a class on a timetable is green, that means it is scheduled on the selected timetable and can be edited. If a class is light orange, that means it is not scheduled on the selected timetable and cannot be edited.
If you do not specify any weeks for a class, it will not be saved once the editor is closed or another class is added. Once you have specified the weeks for a class, it will be saved automatically – you do not need to click Apply.
Resources
Assessors and venues can be assigned as resources to a class. To do this:
- Select a class on the timetable and click the
 button under Resources.
 - Select the type of resource (assessor or venue).
- Search for and select the assessor or venue.
- Click OK.
The assessor or venue will now be listed in the Resources section. You can un-assign a resource by un-ticking the Assigned box next to the resource.
If a resource is double-booked on another course at the same time, a red flag will appear in the Conflicts column. You can see the details of the conflict by selecting the resource and clicking the  button.
Timetable Grid
The timetable grid offers a list view of classes, as opposed to the timeline view of classes on the existing timetable screen.

The grid lists the classes per week, with the week description in the grid header along with the date the week commences. Each week has its own separate grid. You can view the details of a class by selecting it and clicking the  button.
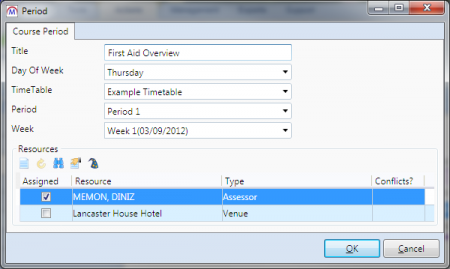
To add a new class, click the  button. You can then complete the class details and assign resources as required.
To delete a class, select it and click the  button. Click Yes to confirm deletion.
Costs
The Costs screen allows you to assign costs against a course.
To add a cost:
- Click the
 button.
 - Enter the following details:
- Type – The type of cost.
- Description – A description of the cost.
- Rate – The cost per item.
- Quantity – The number of items.
- VAT Code – The VAT code to use.
- VAT rate – This can be used to specify a VAT rate instead of using a VAT code.
- Click OK.
Learners on the course will have these costs allocated to them, and any associated invoices will be displayed on the Invoices tab.