MailMergeActivity
MailMergeActivity is an an activity which can be added to a process. It inserts Maytas data into a Word template (e.g. inserting a learner’s name into a letter). The following properties need to be set for the activity:
WordTemplate
This is the Word document which will be used. Please note that only documents setup with valid mail merge placeholders will work. To import a document:
- Click the
 button at the end of the WordTemplate row.
 - Click Import.
- Browse to and select the Word document to import and click Open.
- Click OK to the message that appears.
- Select the template from the list on the left and click OK.
MailMergeType
This specifies the area of the system to which the mail merge relates. In the context of the process, if the mail merge is being used within a trainee process or activity, the type would be TraineeBusinessObject, whereas a mail merge used within a visit activity would be TrVisitBusinessObject.
FieldMappings
This maps the placeholders in the Word document to Maytas fields. To do this:
- Click the
 button at the end of the FieldMappings row.
 -
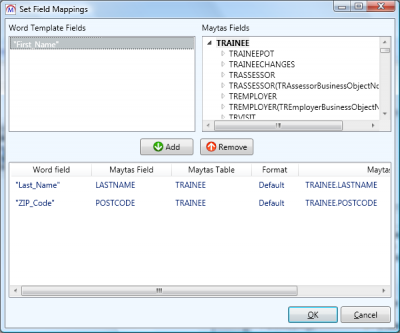
The Set Field Mappings screen will appear:

The top-left box lists the placeholders in the Word document, and the top-right box lists the Maytas tables and fields which can be mapped to the placeholders. Once a mapping has been added, it is listed in the bottom box.
- Select a placeholder and use the arrows in the top-right box to expand the list of tables and fields. Select the field to map to the placeholder and click Add.
- Continue to add fields to the placeholders until they have all been set.
-
The Maytas Field Path for each mapping in the bottom box can be manually edited by double-clicking the text. This allows you to map to tables and fields which are not listed in the top-right box. For example, to use the name of a contractor from the CONTRACTOR table, use TRAINEE.TRAINEEPOT.CONTRACTOR.NAME. Please contact Maytas Support if you require assistance with mapping to custom fields.
For lookup fields, the field path should be prefixed with LOOKUP: to use the longstring instead of the shortstring (e.g. LOOKUP:TRAINEE.ETHNICGROUP).
If a field is in a child table (such as TRAINEE_ILR_AIMS, which can have multiple rows per learner), an index value can be specified to tell the mail merge which row to use (0 being the first row for each learner). The index (in this case [0]) goes at the end of the table name; for example: TRAINEE.TRAINEEPOT.TRAINEE_ILR_AIMS[0].NVQREF. If no index is specified, 0 is assumed. If the TRAINEEPOT or TRAINEEDETAILS table is being used and no index is specified, the most recent POT is used.
- Click OK when finished.
Action
This can optionally be set to specify whether the document should open, print or do nothing once created.
TargetFileName
This specifies the name of the file which will be created (again, this is optional).
CreatedFile
This is where the file will be sent to when the process is run. This can be a file path or a link to another activity. For example, the file can be sent to a SendEmailActivity to attach it to an email by clicking the  button at the end of the row, expanding the SendEmailActivity and selecting FileAttachment.