Processes
The Maytas 5 process designer allows you to create your own wizards in a flowchart-style environment. While the basics of the process designer are relatively straightforward to learn, it is intended for advanced users due to its complex nature.
Process Designer

-
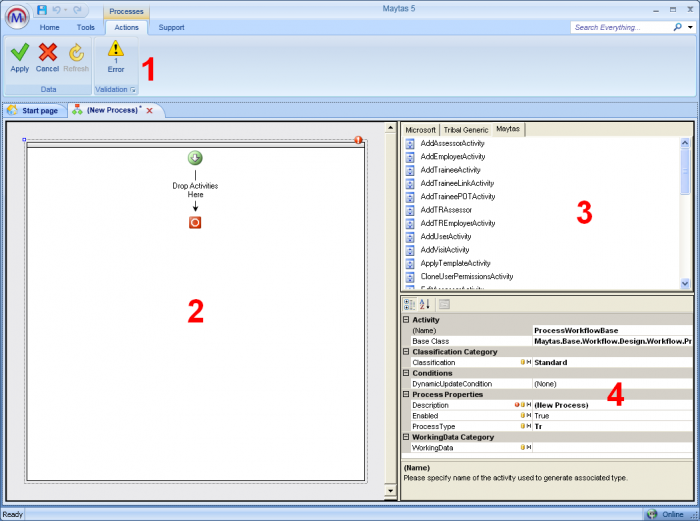
Validation Alerts
This shows any errors with the process. Click the warning triangle to display details of each error. Please note that you will not be able to save a process until all errors have been rectified.
-
Flowchart Area
A visual flowchart of the process is displayed in this area. Activities can be dragged onto and rearranged in this area.
-
Activity List
Processes consist of a number of activities. Please see below for a full explanation of activities.
-
Activity Properties
The properties of each activity are displayed here. These can be edited as required.
An activity is a ‘step’ in the process. There are three activity groups: Microsoft, which is the base set of activities; Tribal Generic, which is a set of simple, commonly used activities; and Maytas, which is a set of activities specifically relevant to Maytas systems. The Maytas activities are the ones you are most likely to use.
The majority of the Maytas activities fall into one of three types:
- Add – These allow you to add new data.
- Edit – These allow you to edit existing data.
- Locate – These allow you to find data in a table/area other than the one the process is being designed in. For example, to edit a visit from a trainee process you would place an EditVisitActivity inside a LocateVisitActivity. However, to edit a trainee from within a trainee process you would only need an EditTraineeActivity (you would not need to locate the trainee, as it is a trainee process).
These activities can be linked to controls created in the screen designer (please note that only controls, not tabs, can be used in processes). The controls then become the screens you see for each step.
Create a Process
Please see the Create a Process tutorial.
Once you have created a process, it needs to be made accessible in the system by creating a new ribbon button. The Create a New Button tutorial follows on from the above tutorial.
Advanced Process Concepts and Features
Data Contexts
Every process and activity has a data context. The base context is determined by the area it is created under; e.g. a process created in the Trainee module area would be in the context of a specific trainee when it is used. Each activity within the process has its own self-contained context. For example, a LocateTraineePOTActivity has the context of a specific POT. Activities also inherit the parent context, which means the LocateTraineePOTActivity would have the context of a specific POT within the context of a specific trainee.
Nested Activities
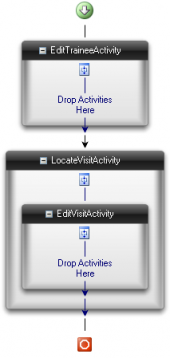
 Certain types of activity can be nested, such as Edit activities within Locate activities. In the same way that activities placed directly on a process inherit the base context of the process, nested activities inherit the context of their parent activities.
The below example shows a Trainee process:
- EditTraineeActivity - This un-nested activity inherits the base trainee context from the process and allows you to edit trainee data using a trainee control.
- LocateVisitActivity - This inherits the base trainee context and locates a specific visit for that trainee. The visit to be found can be set via the LocatorMethod in the activity properties.
- EditVisitActivity - This is nested within LocateVisitActivity. It allows you to edit visit data in the context of the visit found by the LocateVisitActivity.
Default Settings
Activities can be given default values. To do this, click an activity in your process tree and locate the DefaultSettings option in the Default section of the properties list on the right. Click DefaultSettings to select it and click the  button that appears to the right. This will open the Default Browser. Please note that you must select a control name before the default browser will open.
There are two tabs on the default browser: Defaults and Advanced.
The Defaults tab shows a visual preview of what will be displayed in this stage of the process. This allows you to enter the default values for each field so that you can see what users will see in the finished version of the process.
The Advanced tab shows a list of all the fields in the activity when the Controls section is expanded. Selecting each field lets you set specific properties. Each field can be set to be read only or a required field. Additionally, fields with lookups let you choose which lookup options to exclude from the list in the activity by ticking the relevant checkbox.
When you have finished setting the default values, click OK.
List of Maytas Activities
Please see List of Maytas Activities.