Module Registers
The module registers feature allows attendance registers for a group of learners on a qualification to be recorded.
Overview
Set permissions
Before using module registers, several user permissions should be set:
- Select Web User Editor on the toolbar.
- Enter search terms for the user you wish to give permissions and click Locate.
- Select the user from the results.
- Click Permissions.
- There are three new permissions:
- Enable Registers – This allows the user to view and modify registers.
- Edit Submitted Registers – This allows the user to modify registers after they have been submitted.
- View Registration Details – This allows the user to access a learner’s module registration details.
- Select the permissions as required and click Save.
Configure modules and learner groups
To enter a register against a module, the module must have registers enabled and the group of learners to be marked on the register must have the same occurrence code set on that module.
To enable registers on a module:
- Select Browse Modules on the toolbar.
- Enter search terms for the module for which you wish to enable registers and click Search.
- Locate the module from the results and click edit at the right end of the row.
- Select the base module and click Edit. Please note that registers only apply to base modules, not units or elements.
- Tick Enable Register at the bottom right.
- Click Save.
- Repeat the above steps for additional modules as required.
To create a group of learners for a register:
- Select Browse Trainees on the toolbar.
- Select a trainee to be included on the register.
- Locate the relevant base module and click the Reg Details button (at the bottom of the module). This button will only appear if the user has the View Registration Details permission set (see Set Permissions above).
-
On the Registration Details screen, enter an Occurrence Code. This can be any alphanumeric value, and is used to identify a group of learners on a qualification for the purposes of the register (e.g. a class of learners). Any occurrence codes which have already been entered can be selected here from the dropdown rather than having to enter them again.
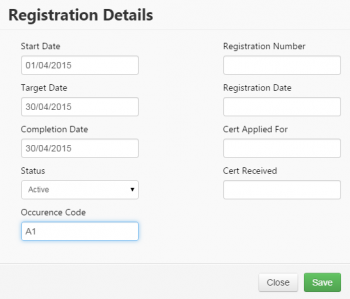
- Click Save.
- Repeat the above steps for the other learners in the register group.
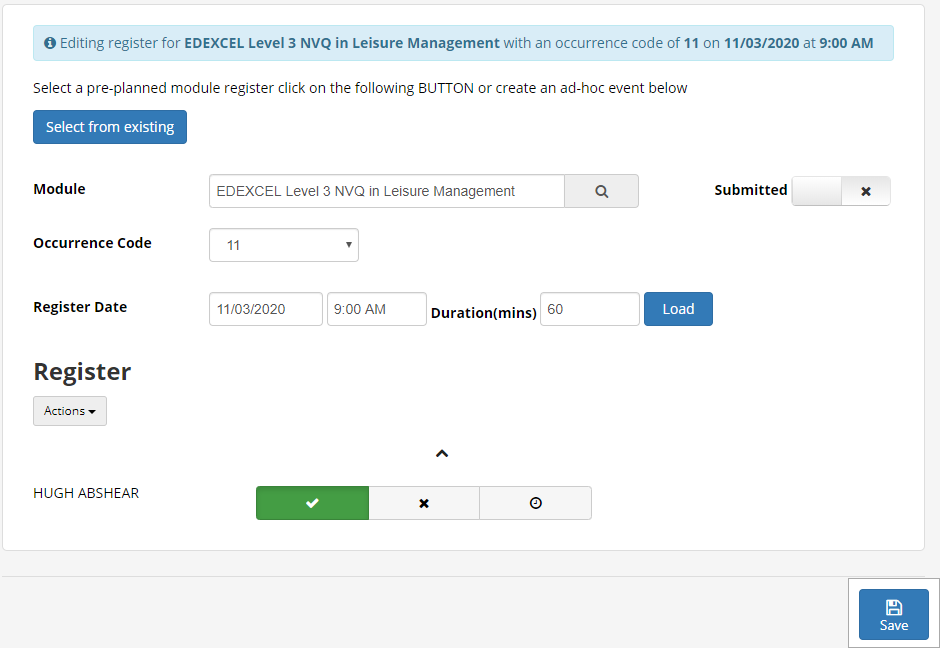
Enter a register
To enter a register:
-
Select Registers on the toolbar.
-
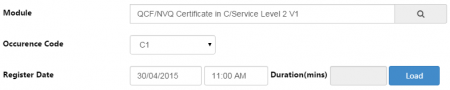
Search for and select the module for the register (you can search on either the module code or title).
-
Select the occurrence code. This will determine the group of learners on the module to be included on the register.
-
Enter the date and time of the register and click Load.
-
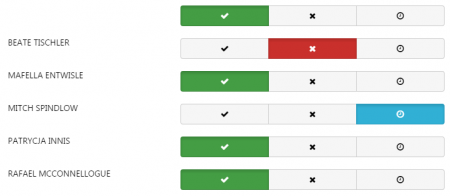
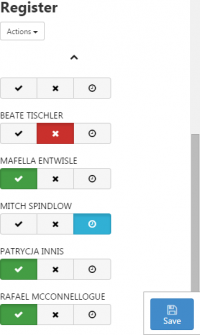
You will see the list of learners to be marked on the register. For each learner you can either select the tick (present), the cross (absent) or the clock (late). The tick/cross/clock row at the very top can be used to set the attendance for all learners on the register. For example, selecting the tick on the top row will select the tick for all learners. You can then amend the attendance for individuals who are absent or late.
-
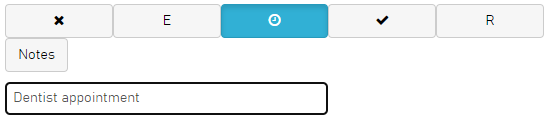
If you wish to add a note to the entry, click the Notes button and enter text in the box that appears.
-
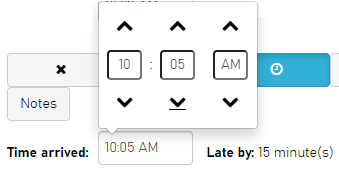
When a learner is marked as late, an option to enter the time of arrival will appear.

Click the time to enter the time of arrival. This will automatically calculate how long the learner is late by.
-
Enter the class duration in minutes (next to the load button).
-
If you wish to clear the register, this can be done by selecting Actions | Clear register.
-
When the register is complete, click Save.
 The register can be viewed in future by searching for the relevant module, occurrence code and register date. The Submitted toggle button at the top-right is defaulted to off, which means the register can still be amended. Once it is toggled to on and the change is saved, only a user with the Edit Submitted Registers permission can amend the register (see Set Permissions).
The register is fully responsive, which means the buttons, fields and text will resize and reposition appropriately to the size of the screen. This makes it simple and convenient to use on tablet and mobile devices.
Custom Attendance Codes
It is possible to use your own attendance codes (e.g. holiday, sickness, etc). The available codes are taken from the lookups for the field ATTSTATUS on the TRREGISTER table. To add new codes:
- Select Lookup Editor on the toolbar.
- Select TRREGISTER from the table dropdown box and ATTSTATUS from the field box.
- You will see the existing lookups for Present, Late and Absent. Click the Add button to add a new lookup.
- Enter the short string for the lookup. This should be one character (e.g. for Holiday, you could use H as the short string).
- Enter the long string for the lookup (e.g. Holiday).
- The other fields can be left as default. Click Save.
The lookup will now appear in the list and can be used when entering attendance codes.

Custom attendance codes will display the short string on registers. The exception to this is short strings of P, A and L which are reserved for the tick, cross and clock icons.
By default, custom codes are considered neutral and so will display as blue. They can be configured to show as positive (green) or negative (red) as follows:
- Select Settings on the toolbar and click System configuration.
- Scroll down to the Register section.
- There are three options:
- Limit register results – This determines the number of learners that can appear on a register at once.
- Set negative register mark(s) – The attendance codes ticked here will display as red.
Set positive register mark(s) – The attendance codes ticked here will display as green.
If a code is not ticked as either positive or negative it is considered neutral (blue).
- Click Save.
Creating Registers in Advance
Module registers can be created in advance (see the Maytas Module Editor page for details on how to do this). These registers can then be accessed and completed in Maytas Hub, rather than having to create an ad-hoc register each time.
This feature requires a licence for Module Registers. Please contact your account manager for more information.
- Create registers for a module in Maytas using the wizard, as per the instructions in the Maytas Module Editor page.
-
Go to Registers on the sidebar.
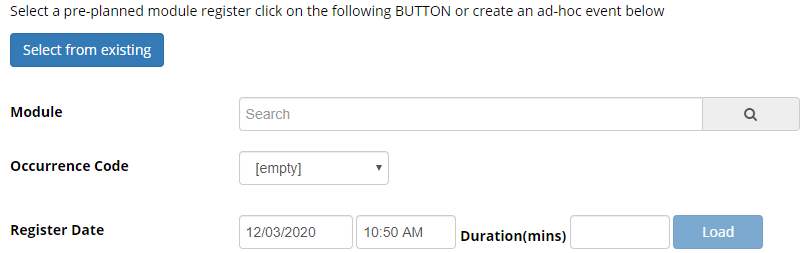
- Click Select from existing.
-
You will be prompted to choose the register to complete. Select the module and occurrence code, then choose the register from the dropdown box at the bottom. You can also filter the registers for that occurrence code using the date parameters.
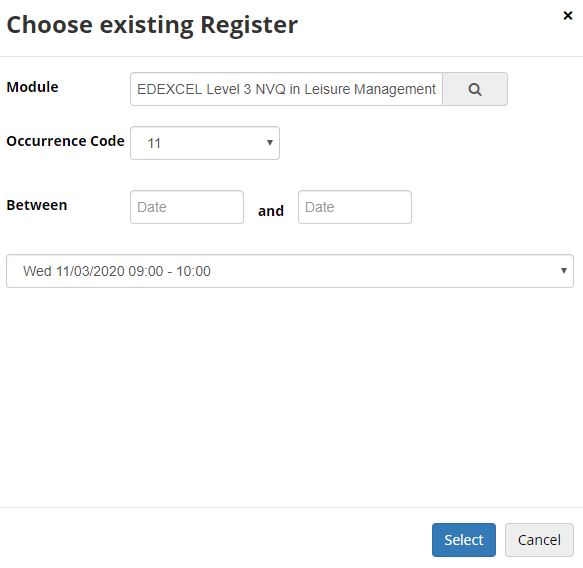
- Click Select.
-
The register can then be completed as normal. Click Save when finished.