Screen Design
Screens designed in Maytas can be published to and used in Maytas Hub. Before using the Screen Designer features for Maytas Hub, a licence must be purchased and installed in Maytas Server Manager and permissions must be set in Maytas. Please see the Maytas Hub upgrade guide for details on installing the licence.
To enable the Maytas Hub Screen Designer features in Maytas:
- In Maytas, go to Tools | Edit Permissions.
- Select the user or group you wish to set permissions for.
- On the Modules tab, set e-track Screen Designer to Visible.
- Click Apply.
- Restart Maytas for the changes to take effect.
Publishing Screens
To publish a Maytas screen in Maytas Hub:
- In Maytas, go to Tools on the toolbar and click New / Load on the Screens panel of the ribbon.
- Select Trainee on the left and open the screen you wish to publish in Maytas Hub.
-
Select Trainee from the e-track Publish field.
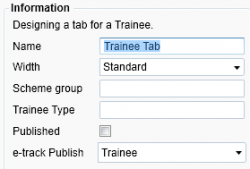
- Click Apply and perform a sync. The screen will now appear as a tab when a trainee record is opened in Maytas Hub:
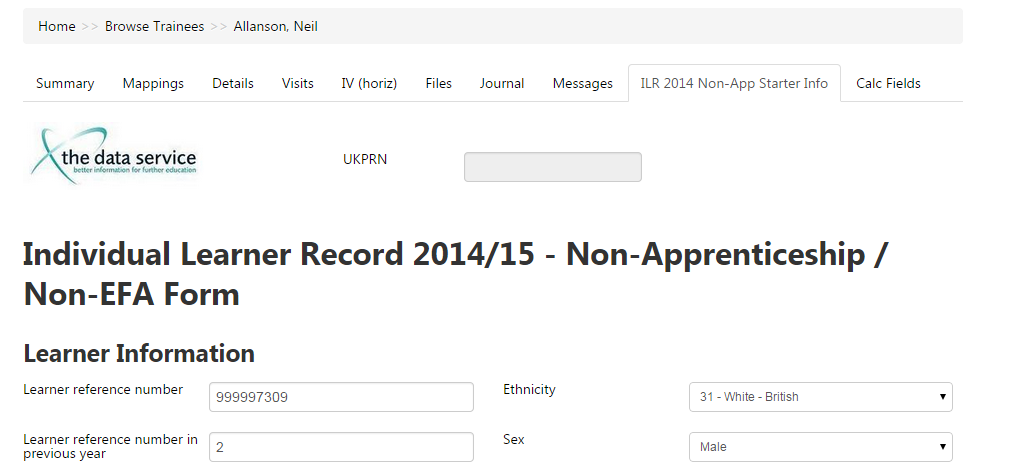
User access to custom tabs can be controlled in the Web User Editor. By default, custom tabs are available to all assessors. To edit permissions:
- Go to Web User Editor on the toolbar.
- Search for and open the user account.
- Click Custom Tabs at the bottom of the screen. You will see a list of custom tabs published in Maytas Hub.
- Ensure only the tabs you wish the user to see are ticked.
- Click Save.
Application Forms
Application Forms in Maytas Hub can be created from screens designed in Maytas. This requires the Screen Designer licence to be installed and the Screen Designer permissions to be set in Maytas (see above for information on this).
To create an Online application form:
- In Maytas 5, got to Tools on the toolbar and click New/Load on the Screens panel of the ribbon.
-
Either create a new tab or open an existing tab which you would like to be the first page of the online application form.
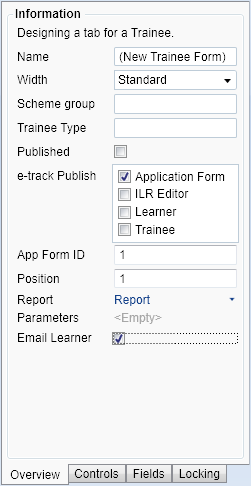
- On the Overview tab on the left, select one of the form options from the e-track Publish dropdown list. The available options depend on the screen designer entity the form is being created for:
Trainee entity - Application Form
Employer entity - Employer Application Form
The employer entity also has an Authenticated Employer Form option, which was originally intended for updating existing employer records, whereas the Employer Application Form option is intended for adding new employer records. While both options may still be used, it is now recommended to use the Data Collection system for updating existing records rather than the Authenticated Employer Form option.
- Enter a single alphanumeric character in the App Form ID box. This ID will form part of the URL used to access the app form. The value can be a number or a letter, and uppercase and lowercase letters are treated as separate values which means it is possible to have up to 62 app forms on your database.
- Enter a value between 0 and 9 in the Position. This value will be used to order the app form pages.
- If you want the form to send a confirmation message to the learner upon completing the form, tick the Email Learner box. Note that the learner must have a valid email address entered against them for this to work. See here for information on configuring the email body that is sent.
- If you have any fields on the tab which will require validation on the app form, select the field and tick the Is required (e-track only) box on the right. This means users will have to complete that field before being able to continue to the next page of the app form.
To access the app form you will need to put together a URL like below. Please note that the Moduleid must start with the relevant letter as indicated on the first row in the table below (e.g. A for a trainee form) and contain the App Form ID assigned in the Maytas screen designer.
-
For learner and assessor app forms, the URL must be in the following format:
www.examplewebsite.com/MaytasHub/CustomTab/ApplicationForm?formid=A1
Replace www.examplewebsite.com/MaytasHub with your website and A1 with your App Form ID.
-
For employer app forms, the App Form ID must begin with a P, e.g.:
www.examplewebsite.com/MaytasHub/CustomTab/EmployerApplicationForm?formid=P1
The following URL parameters can be used to configure the URL:
| Parameter | Action |
|---|---|
| Moduleid=A1 |
The app form which is being loaded A=Trainee Application Form, P=Employer Application Form, S=Authenticated Employer Form; followed by the App Form ID |
| th=n | Whether the trail holder is visible |
| lp=n | Whether the navigation section is visible |
| tt=n | Whether the side panel is visible |
| CreateU=Y | Creates a web user for the new trainee / employer |
| rurl=http://www.google.com | Return URL for after the app form has been completed |
| AppF=n | Don't show the finish page |
| App0=n | Don't show the page with index 0 |
| set=tablename.fieldname:value | Sets a field to the specified value. e.g. set=TRAINEEPOT.CONTRACTORID:1227-0001-111111 |
The process is the same for employer app forms. Authenticated employer app forms will show a login box before showing the first page. The existing employer data is the used (and loaded into controls) instead of a new employer being created.
If a tab configured for app forms is exported, the App Form ID and Position fields will not be retained and must be re-entered after importing into another system.
Default contractor, scheme and organisation ID
Default values for contractor, scheme and organisation ID can be specified for new applications. To set these:
- Go to Settings on the toolbar and click System configuration.
- Scroll down to the Online Applications section.
-
The three relevant config options are:
- Default contractor for new application
- Default organisation ID for new application
- Default scheme ID for new application
Tick the box next to the options you wish to use and enter the default values to use. These should be the short string values - e.g. for contractor, you should enter the contractor ID.
- Click Save when finished.
Employer Data Collection Forms
It is now possible to produce a data collection form that specified employer users must complete. This works as follows:
- A data collection form is created in the Maytas screen designer.
- The ID of the form is entered in the field EMPLOYER.DATACOLLECTIONFORM for every employer who must complete the form.
- If an employer should be prevented from using Maytas Hub until the form has been completed, the Lock employer out of regular Maytas Hub use permission is ticked in the Web User Editor.
- Configuration options can be set to determine whether locked accounts are unlocked automatically upon completion of the form.
- If an employer has a valid email address entered and they are flagged as needing to complete the form, an email is sent to them (this can also be configured) via the Maytas Hub Stats Service.
- The employer logs into Maytas Hub and is prompted to complete the form. If they are locked out until form completion, they will not be able to access other areas of Maytas Hub.
- The form is completed and the account is either automatically or manually unlocked.
Configuration Options
There are several configuration options which should be set first:
- Go to Settings on the toolbar and click the System configuration button.
- Select Employer Login on the left.
-
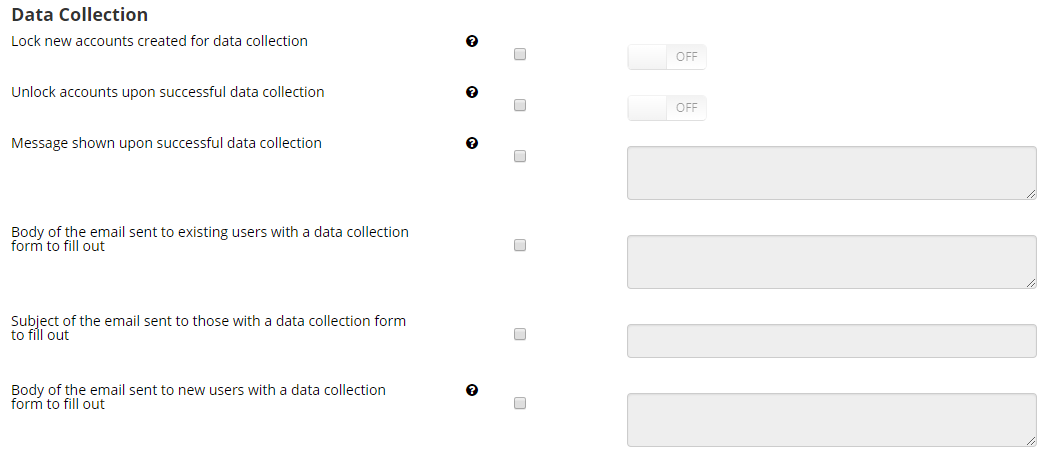
The required options are in the Data Collection section.
-
Complete the config options as required:
- Lock new accounts created for data collection - When enabled, this will prevent new employer users who have the Lock employer out of regular Maytas Hub use permission ticked in the Web User Editor from being able to log in to Maytas Hub.
- Unlock accounts upon successful data collection - When enabled, completing the data collection form will unlock the employer account. When disabled, accounts must be manually unlocked by un-ticking the permission mentioned above in the Web User Editor.
- Message shown upon successful data collection - Enter the message you wish to display when the form has been successfully completed.
- Body of the email sent to existing users with a data collection form to fill out - When the data collection form is made active, an email will be sent to existing employer users. Enter the body of that email here.
- Subject of the email sent to those with a data collection form to fill out - Enter the email subject.
- Body of the email sent to new users with a data collection form to fill out - Enter the body of the email for new users. Include {{user}} and {{pass}} to display the user's username and password.
- Click Save.
Create Data Collection Form
- In Maytas, go to Tools on the toolbar and click New/Load on the Screens panel of the ribbon.
- Select Employer on the left and double-click *(New Tab).
- Complete the content of the screen as required for the data collection form.
- On the Overview tab, tick the Authenticated Employer Form box and the Published box.
- Enter an App Form ID.
- Click Apply.
- Go to Home on the toolbar and click Sync.
The App Form ID entered above is what must be entered in the field EMPLOYER.DATACOLLECTIONFORM for all employers who must complete the form.
Report Generation on Form Completion
The data collection form can be linked to a report which is generated when the form is completed.
- In Maytas, go to Tools on the toolbar and click New / Load on the Screens panel of the ribbon.
- Browse to and open the screen for the application form.
-
Click the dropdown box next to Report and click Select Report. This will open a window where you can choose the report (this may take a while to load, depending on the number of reports in the system).
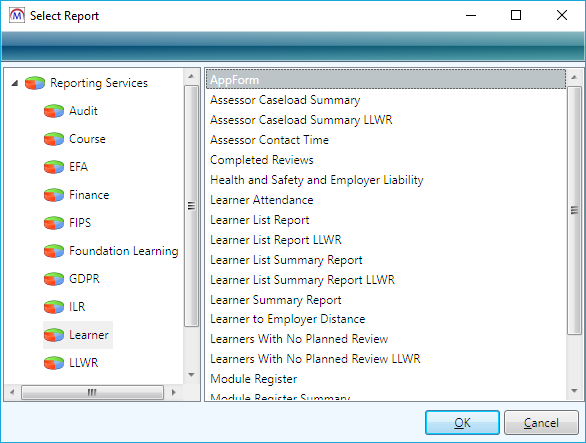
- Browse to and select the report and click OK.
-
If the report has parameters (e.g. an EMPLOYERID parameter to limit the report to the employer record created by the app form), these can be set by clicking <Parameters>. This will open the Set Parameter Mappings window.
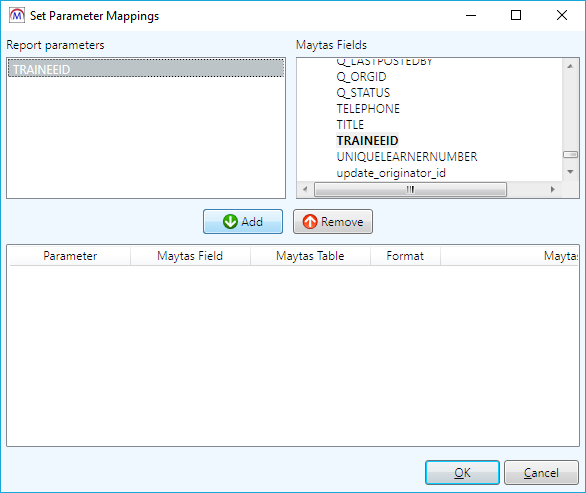
- Select the parameter in the top-left panel, then select the corresponding field to map to it from the list in the top-right panel.
- Click Add.
- Repeat steps 6 and 7 if there are additional parameters.
- Click OK.
- Click Apply to save the screen.
When the application form is completed, this will generate the linked report and place the output in the employer's file store.
Enter Learner Data on Learner's Behalf
Employers can set up a form that they complete on the learner's behalf. First, the employer types which can do this must be specified (if nothing is specified, the employer type short string of E is used):
- Go to Settings on the toolbar and click the System configuration button.
- Select Admin on the left (under Maytas Hub) and scroll down to the Online Applications section on the right.
- Locate the config Employer types that can complete data collection forms for learners.
- Tick the box for the config and select the employer types you want to be able to complete learner forms.
- Click Save.
Next, the form must be created and configured:
- Create a trainee form in the Maytas screen designer.
-
For each learner you wish to complete the form for, enter the form ID in the field TRAINEE.EMPLOYERDATACOLLECTIONFORM. For any employers each learner is currently active at (i.e. where the end date is not entered), this will automatically populate EMPLOYER.DATACOLLECTIONFORM with the form ID and EMPLOYER.DATACOLLECTIONTRID with the TRAINEEID.
If the employers don't already have web users associated with them, these will automatically be created and the employers will be emailed about the form.
- When an employer who has been notified about the form logs in, they will be prompted to complete the form along with the name of the learner in question. If an employer account is locked until form completion, they will immediately be redirected to the form.
-
Once the form has been submitted, all employers relating to the learner in question will have DATACOLLECTIONFORM and DATACOLLECTIONTRID cleared out, and if their accounts are locked for the purpose of completing the form then they will be unlocked.
If a learner has been assigned a form using the above method and a second learner at the same employer is then assigned a form before the employer has completed the form for the first learner, DATACOLLECTIONFORM and DATACOLLECTIONTRID will be overwritten with the IDs for the second learner. As such, it is recommended to complete a form for one learner at a time at each employer.
Publish Tabs to Toolbar
It is possible for assessor tabs to be published to the toolbar on the assessor login and employer tabs to be published to the toolbar on the employer login.
- Create a tab in the Maytas screen designer for either the personnel or employer entity.
-
For an employer tab, tick the Employer box in the e-track Publish section. For an assessor tab, tick the Assessor box instead.
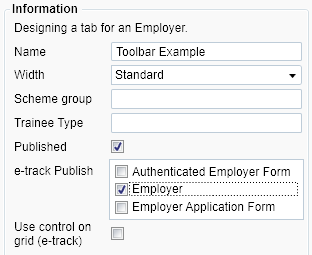
- Click Apply.
- Click Home on the toolbar and click the Sync button.
- In Maytas Hub, log in as an administrator and go to Web User Editor on the toolbar.
- Search for the user or group which requires permission to view the tab.
- Click Custom Tabs to expand the list of tabs, then tick the box for the new tab.
- Click Save.
-
When the relevant users log in, they will now see the tab on the toolbar.
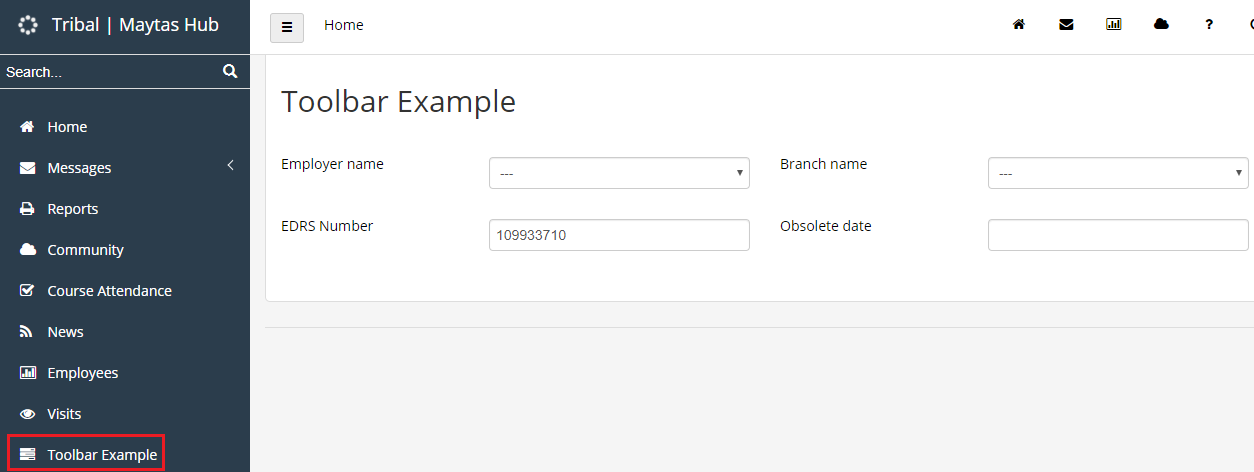
National Insurance Number Validation
A field on a custom Maytas Hub tab created in the Screen Designer can be designated as a National Insurance number field so that only valid NI numbers can be entered in it. To do this:
- In Maytas, go to Tools on the toolbar and click New / Load on the Screens panel of the ribbon.
-
Open or create the tab you wish to use.
The tab must be configured for use in Maytas Hub - see the Maytas Hub Screen Design page for details.
- Drag the field you wish to use for the NI number onto the design area (typically this would be TRAINEE.NINUMBER).
- Select the field in the design area.
-
On the right, click the dropdown for Data type and choose NI Number. This designates the field as requiring NI Number validation.
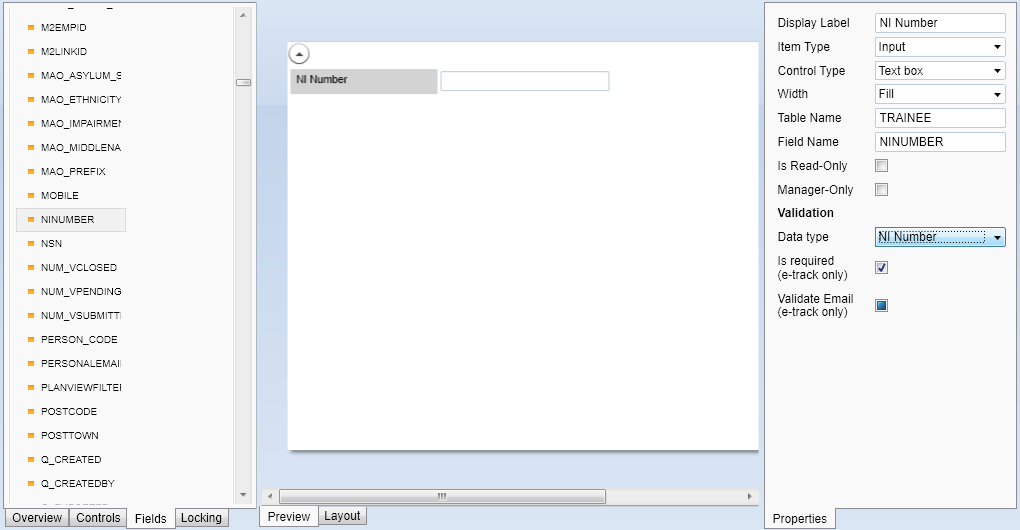
- Click Apply.
- Go to Home on the toolbar and click Sync.
When the tab is accessed in Maytas Hub, only valid NI numbers will be able to be saved in the designated field.
Regular Expressions on Custom Maytas Hub Screens
It is possible to apply a Regular Expression (or regex) to fields on custom Maytas Hub screens via the Screen Designer so that data is validated to a particular format.
Regular Expressions can be complex and the details of how to form them are beyond the scope of this document. Various regex examples can be found here (please note that this is not a Tribal site).
To apply a regex to a field:
- In Maytas, go to Tools on the toolbar and click New / Load on the Screens panel of the ribbon.
-
Open or create the tab you wish to use.
The tab must be configured for use in Maytas Hub - see the Maytas Hub Screen Design page for details.
- Drag the field you wish to apply a regex to onto the design area. For this example we will apply a regex to the mobile phone field (TRAINEE.MOBILE) so that only valid mobile numbers can be saved to that field on this screen.
- Select the field in the design area.
- On the right, click the dropdown for Data type and choose Regular expression. A separate Regular expression box will appear underneath the dropdown.
-
Enter your regex in the Regular expression box. For this example, enter:
07\d{9}$
This will require any value entered in the field to begin with the digits 07, followed by exactly 9 other digits.
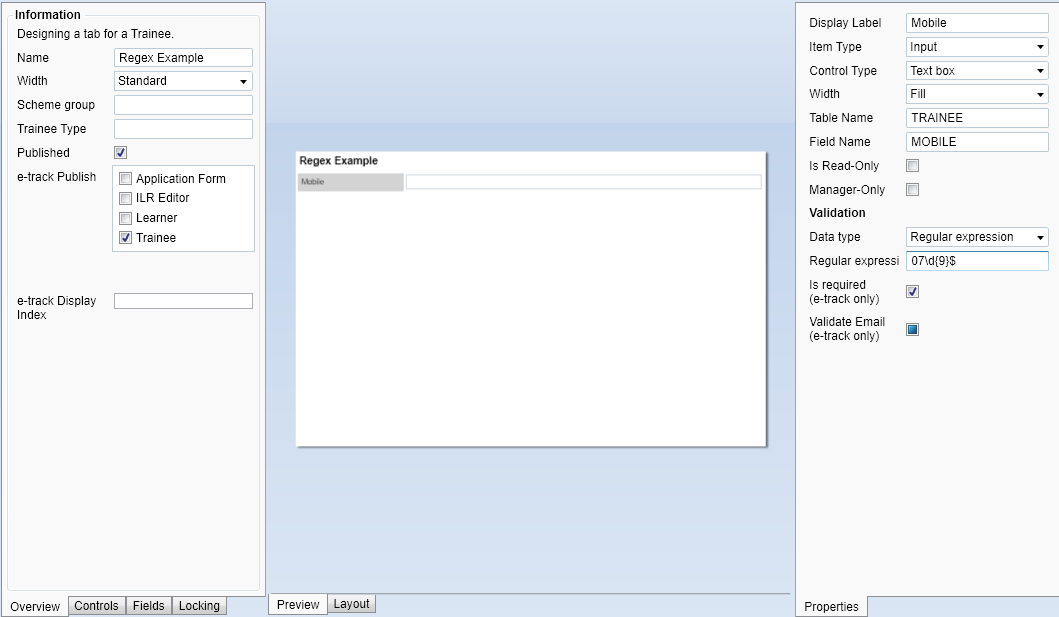
- Click Apply, the go to Home on the toolbar and click Sync.
When a value is entered in the field on this screen in Maytas Hub, only valid values as per the regex will be able to be saved.
It is important to note that regular expressions are screen-specific - i.e. if you apply a regex to a field on a screen, the regex will not apply to the same field if it appears on other screens.
Ordering of Custom Tabs
Maytas Hub trainee tabs created in the screen designer can be manually ordered using an index field.
To set the index on a tab in the Maytas screen designer:
- Go to Tools on the toolbar.
- Click New / Load on the Screens panel of the ribbon.
- Select Trainee on the left and open the tab that requires the index.
-
Enter the e-track Display Index, which should be a number that will determine the order of custom tabs in Maytas Hub. The index field is only visible when the Trainee box is ticked in the e-track Publish section.
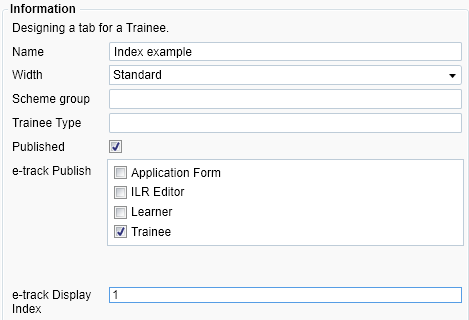
- Click Apply.
- Repeat for additional Maytas Hub trainee tabs as required so that each has an index number.
- Go to Home on the toolbar and click Sync.
Email Validation
Maytas Hub screens and app forms designed in the Maytas screen designer can be used to validate email addresses. This works by designating two fields for the email address and confirmation box (for re-entering the address), which are then checked by Maytas Hub to ensure the entries match. The validation also checks that the email address contains at least one @ character and at least one dot after the @.
To implement this:
- In Maytas, go to Tools on the toolbar and click New/Load on the Screens panel of the ribbon.
- Select an existing tab or create a new tab.
- Go to Fields at the bottom-left and drag an email field onto the design area (e.g. TRAINEE.EMAIL). This will be the main field you wish to use to store the email address.
- Select the field in the design area and tick the Validate Email (e-track only) box on the right.
- The Email ID box will appear underneath it. Enter an ID, which can be any value you want (an integer is suitable in most cases). This will be used to link the email field to the confirmation field.
- Drag another email field onto the design area (e.g. TRAINEE.ILR_EMAIL). This will be used as the confirmation field.
- Select the confirmation field in the design area and tick the Validate Email (e-track only) box.
-
Enter the same ID as before in the Email ID box.
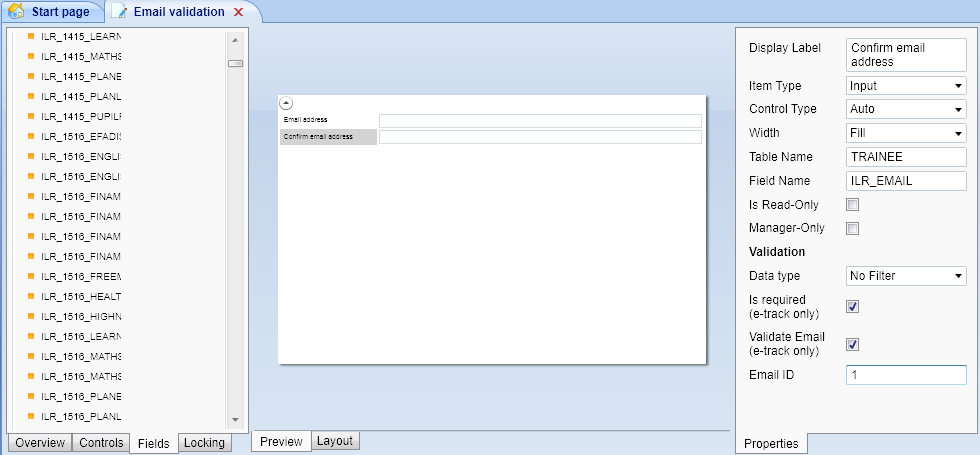
- Complete the rest of the tab as required and click Apply to save the changes.
- Go to Home on the toolbar and click Sync.
The email address validation will now work in Maytas Hub.
Dynamic Forms and Screens
Application forms and screens created in the Screen Designer and used in Maytas Hub can dynamically show controls based on field values. For example, if a learner application form has a set of fields that are only relevant if the learner selects a particular option, the form could be designed so that those fields only display when the option is selected. Similarly, a form could have a set of fields that are conditionally hidden.
The process for making a control display or hide dynamically is as follows:
- The control is created in the Screen Designer, containing the fields that should be shown or hidden dynamically (note that a control is different to a tab - see here for details).
- The control is assigned a parent field. This is the field which will determine whether the control is shown or hidden.
- The Visibility On Value or Off Value is set on the control. This is the value in the parent field which will determine whether the control is shown or hidden. For example, if the On value is set to 1, the control will only display when the parent field has a value of 1. If the Off value is set to 1 instead, the control will only display when the parent field has a value that is NOT 1.
- The control is then added to a tab, along with the parent field. Additional dynamic controls and parent fields can be added to the tab as required.
Considerations and constraints
There are several factors that are important to consider when designing a dynamic form or screen:
- A dynamic control can only have one parent field and value to determine whether it is shown or hidden. Multiple fields and values are not currently supported.
- The parent field can either have an On value or an Off value, not both.
- If a field requires validation, the validation will still apply when a control is hidden. Therefore it is strongly advised not to include fields which required mandatory completion on dynamic controls, as this could lead to a user not being able to save or progress if a field they need to enter is not visible.
Example Dynamic Screen
In this example, we will create a learner screen where choosing a funding model of 36 will show a control with apprenticeship fields and any other funding model value will show a control with non-apprenticeship fields. Funding model (TRAINEEPOT.ILR13_FUNDMODEL) will therefore act as the parent field for both controls.
- In Maytas 5, go to Tools on the toolbar and select New / Load on the Screens panel of the ribbon.
- Select Trainee on the left, then double-click *(New User Control).
-
This will be the control that shows when funding model 36 is selected. Give the control a name (for this example we will call it Dynamic form control 1) and drag a selection of fields into the design area (the fields used are not important for the example).
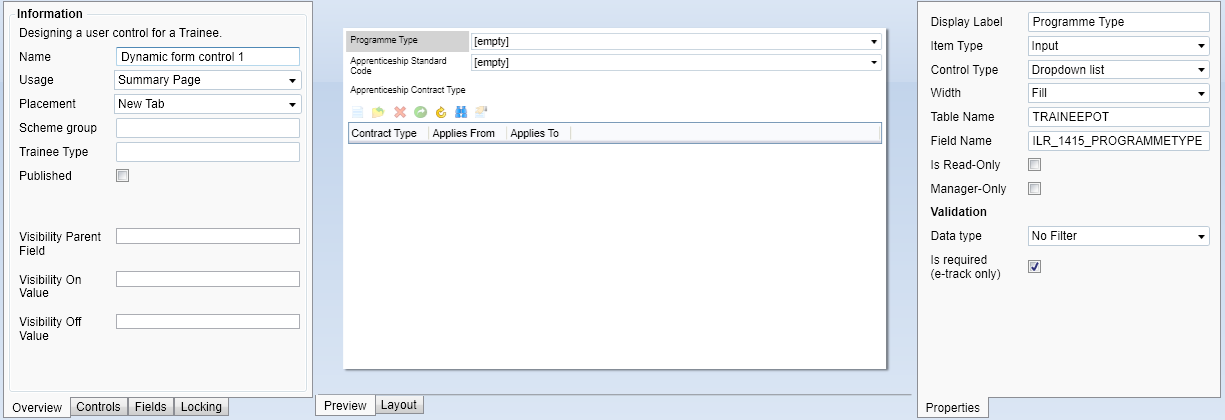
- In the Visibility Parent Field box, enter TRAINEEPOT.ILR13_FUNDMODEL.
-
In the Visibility On Value box, enter 36. This means that when the funding model field has a value of 36, the control will display.
If the parent field has lookups, the Visibility On or Off Value must be the shortstring value, not the longstring value. e.g. Enter 36 rather than 36 - Apprenticeships ( from 1 May 2017 ).

- Tick the Published box.
- Click Apply to save the control.
- Repeat steps 1 to 4 to create a second control (Dynamic form control 2) with a different selection of fields. Ensure the Visibility Parent Field is also set to TRAINEEPOT.ILR13_FUNDMODEL.
-
In the Visibility Off Value box, enter 36. This means that when the funding model field has a value of 36, the control will be hidden, otherwise it will display.

- Tick the Published box and click Apply to save the control.
- Finally, the controls must be added to a tab along with Funding Model. Go to Tools on the toolbar and select New / Load on the Screens panel of the ribbon.
- Select Trainee on the left, then double-click *(New Tab).
- Give the tab a name (for this example we will call it Dynamic Form Example).
- Go the Fields tab at the bottom-left, go to the Trainee POT section and drag the field ILR13_FUNDMODEL onto the design area.
- Go to the Controls tab at the bottom-left and expand the User section.
-
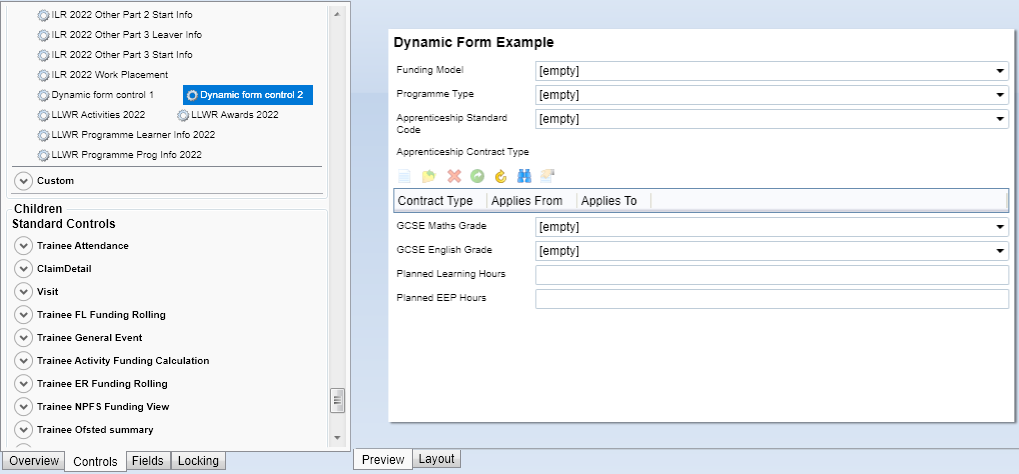
Locate the controls created above and drag them onto the design area.
- Go to the Overview tab at the bottom-left and tick the Published box and the Trainee box (in the e-track Publish section).
- Click Apply, then go to Home on the toolbar and click the Sync button.
The screen will now appear in Maytas Hub on learner records. When Funding Model is set to 36, Dynamic form control 1 will show, otherwise Dynamic form control 2 will show.

Custom Validation in Screen Designer
The Screen Designer allows you to add custom validation to a field that will apply when the screen is used in Maytas Hub. The validation uses basic SQL in the format of an operator and a value which is then checked against the data in the field.
This feature is intended for use by users with a basic knowledge of SQL. Please be aware that while Tribal Support may be able to assist with some SQL statements for use in validation, more complex SQL requests may require bespoke work or training in SQL.
Some common examples include:
| Validation expression | Use |
|---|---|
| = 'Y' | Checks that the field has a value of Y |
| > 0 | Checks that the field has a value greater than zero |
| >= 1 | Checks that the field has a value greater than or equal to 1 |
| < 2 | Checks that the field has a value less than 2 |
| IN ('A','B','C') | Checks that the field has a value of A, B or C |
| LIKE 'ABC%' |
Checks that the field has a value that begins with ABC |
| LIKE '%ABC' |
Checks that the field has a value that ends with ABC |
| LIKE '%ABC%' | Checks that the field value contains ABC (e.g. a value of XABCX would be valid, but XABXC would not) |
| >= '01-AUG-2022' |
Checks that a date field has a date on or after 01/08/2022 (any valid SQL date format can be used; e.g. '20220801', '01/08/2022' or '2022-08-01') |
| > GETDATE() | Checks that a date field has a date after the current date and time |
How to add custom validation to a field
- In Maytas 5, go to Tools on the toolbar and select New / Load on the Screens panel of the ribbon.
- Open or create a screen.
- Go to the Fields tab (at the bottom-left) and drag the field you wish to validate onto the design area. For this example, we will add validation to the learner postcode field (TRAINEE.POSTCODE).
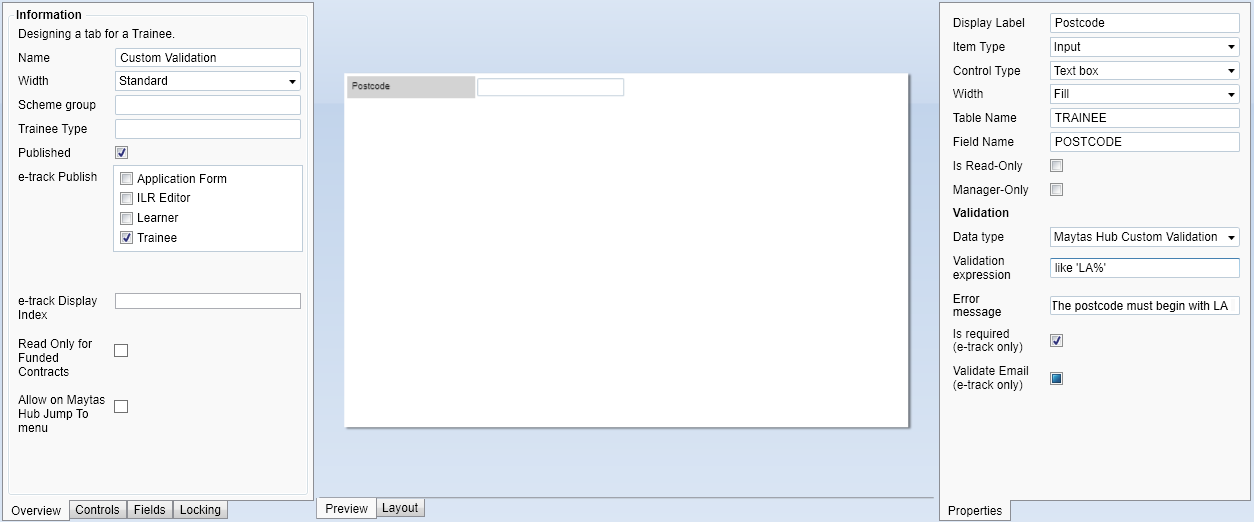
- Select the field in the design area and from the Data type box on the right, choose Maytas Hub Custom Validation.
-
Enter the required validation SQL in the Validation expression box. For this example, we will enter like 'LA%' so that entered postcodes must begin with LA.
-
You can optionally also enter a custom Error message to replace the default message which appears when invalid data is entered in the field.
- Complete the rest of the screen as required, then click Apply. Note that the screen must be configured on the Overview tab for use in Maytas Hub, using the e-track Publish panel.
- Go to Home on the toolbar and click the Sync button.
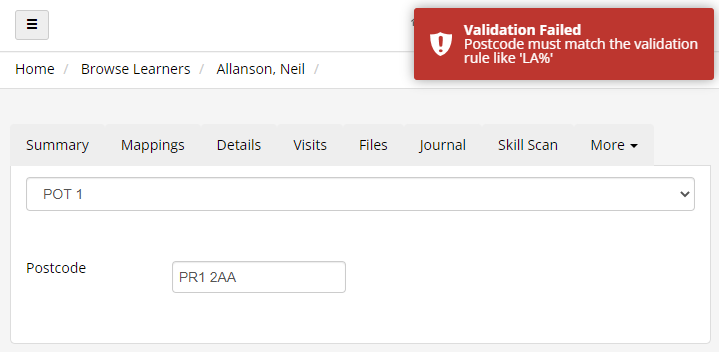
When the screen is used in Maytas Hub, the configured field will now be validated.
Advanced explanation of how the validation works
The validation is executed as the following SQL statement:
SELECT CASE WHEN VALUE RULE THEN 'Y' ELSE 'N' END
where VALUE is the value entered in the field and RULE is the SQL entered in the Validation expression box in the Screen Designer.
Using the previous postcode example where the validation expression was like 'LA%' and the value entered was PR1 2AA (causing the validation to fail), the SQL would be executed as:
SELECT CASE WHEN 'PR1 2AA' like 'LA%' THEN 'Y' ELSE 'N' END
This returns a result of N, which tells Maytas Hub that the entered value is not valid, as it does not begin with LA. If the entered value had been LA1 2BB, the SQL would have returned Y to indicate that the value is valid.
Custom Visit Screens for Learner and Employer Users
Custom visit screens created in the Screen Designer can be viewed by learner and employer users. Visit screens are hidden by default from learners and employers but can be set to read-only or editable.
To set permissions for a custom visits screen:
- Go to Web User Editor on the sidebar.
- Search for and select the learner or employer user.
- Click Custom Tabs to expand that section.
- Scroll down to the Visits Editor section.
- Set the Visible dropdown box to one of the following values:
- Visible - This will make the screen editable by the user
- Read Only - This will make the screen viewable by the user but not editable.
- Hidden - This will hide the screen from the user.
- Click Save.

Miscellaneous Grid Features
Grids on custom screens in Maytas Hub can display a specified maximum number of rows at a time, with buttons to move between the next and previous set of rows. This is intended for use with grids where there may be a high number of rows that could impact performance.
Grids can also be sorted by a column by clicking the column header. Clicking it once will sort it in ascending order and two clicks will sort it in descending order.
To set a grid's maximum displayed rows in the Screen Designer:
- In Maytas 5, go to Tools on the toolbar and click New / Load on the Screens panel of the ribbon.
- Open the tab containing the grid you wish to edit.
- Select the grid in the design area and click Edit Grid on the right.
-
In the Max height (rows) box, enter the maximum number of rows to show at a time.
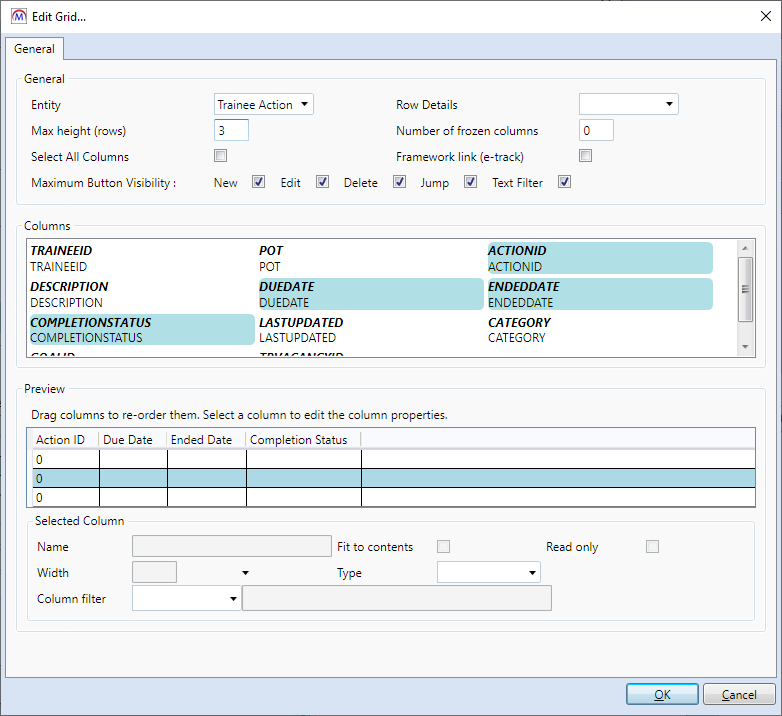
- Click OK, then click Apply.
- Go to Home on the toolbar and click the Sync button.
The grid will now be limited to showing the entered maximum number of rows at a time. The Next and Previous buttons can be used to show additional rows.

Mandatory Option for File Select Control
The File Select control in the screen designer can be set to be mandatory on application forms so that a file must be uploaded to successfully submit the form:
-
Go to Tools on the toolbar and click New / Load on the Screens panel of the ribbon.
-
Open the app form screen that you wish to edit.
-
Select the Controls tab at the bottom-left.
-
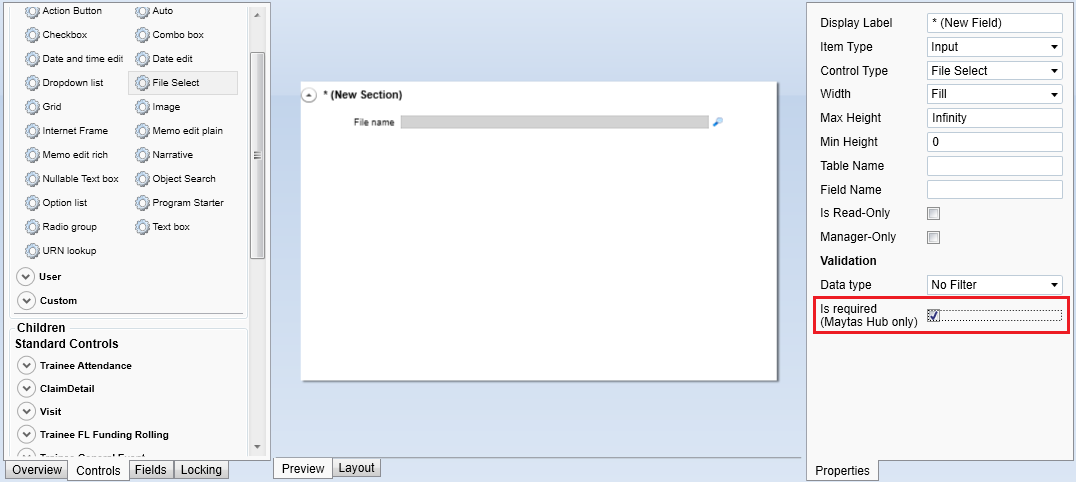
Drag a File Select control onto the design area (or select an existing File Select control on the screen).
-
Click the File Select control in the design area.
-
In the properties on the right, tick the Is required (Maytas Hub only) checkbox.
-
Click Apply.
-
Go to Home on the toolbar and click the Sync button.