Screen Designer
Overview
Note on Terminology
This document describes the design and use of controls and tabs. While controls and tabs are two distinct items, they are both created and edited in the same environment, which will be referred to as the screen designer.
Controls
A Maytas 5 control is a reusable item such as a field or textbox which is created in the screen designer and can be placed on a tab. The key difference between a tab and a control is that tabs are the ‘final product’ to be used in the editors, and controls are the components which make up the contents of a tab.
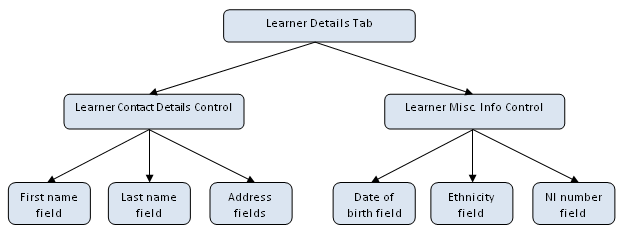
A control can consist of a collection of other controls, in a hierarchical fashion. For example, a learner's name, address and telephone number fields could be placed on a control called 'Learner Contact Details'. All the fields placed on the control are then grouped within it. The Learner Contact Details control could then be placed onto a larger control called 'Learner Profile', which also contains a control consisting of date of birth, ethnicity, etc. The principal of controls is that tabs often have common collections of the same data, and so this data can be grouped together into single, larger controls to make it easier to create tabs.
The diagram below demonstrates the hierarchy of a simple tab and the controls within it:
Creating, Importing and Exporting Controls / Tabs
Creating Screens
Tutorials on how to create controls and tabs can be found here:
Please note that the tab tutorial continues directly from the control tutorial.
Importing Screens
Tabs and controls can be exported and imported in the form of a package (file type .m5tab). To import a package:
- Go to Tools on the toolbar.
- On the Screens panel of the ribbon, click Import.
- Click Browse.
- Browse to and select the package and click Open.
- The tabs and controls within the package will be listed. At the end of each row, the Present tickbox indicates whether or not a previous version of the tab or control is already in the system.
- The Select All box above the list is ticked by default, which means all the tabs and controls listed will be imported. To import only specific items, untick the Select All box and select the required items.
- Click Next to import the tabs and controls.
- Click Finish.
Exporting Screens
To export tabs and controls to an .m5rep package:
- Go to Tools on the toolbar.
- On the Screens panel of the ribbon, click Export.
- Click Browse.
- Choose the location you wish to save the package, enter a name for the package and click Save.
- The Select All box is ticked by default, which means all tabs and controls in the system will be exported. To export specific items, untick the Select All box and select the required items from the list.
- Click Next to export the package.
- Click Finish.
Add a field to an existing screen
To add a field to an existing screen:
- Open a record for a learner, employer or assessor, etc.
- Go to the tab you wish to edit.
-
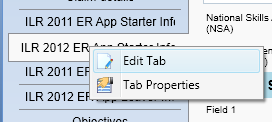
Right-click the tab on the tab list to the left and select Edit Tab.
- Select the Fields tab at the bottom-left.
-
Click the Filter box at the top-left, enter the field you wish to search for and press enter.
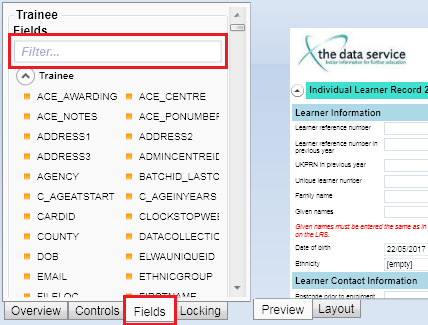
- Drag the field from the left to the required area on the right.
- Click Apply.
Advanced Screen Designer Features
Control Types
Details of specific control types can be found on the List of Control Types page.
Grids
A grid is a unique control type which allows you to add rows of data (e.g. aims or activities). When you add a row, it may open a separate screen where the data can be entered, depending on whether a tab has been created for that grid (see Grid Tabs). Data can also be entered directly into each row.
To add a grid to a screen:
-
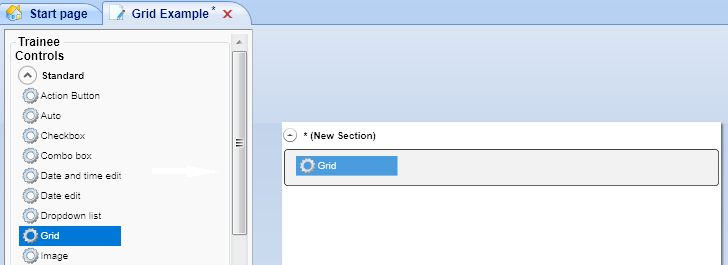
In the screen designer, add a grid to your control or tab.
-
The Edit Grid window will appear.
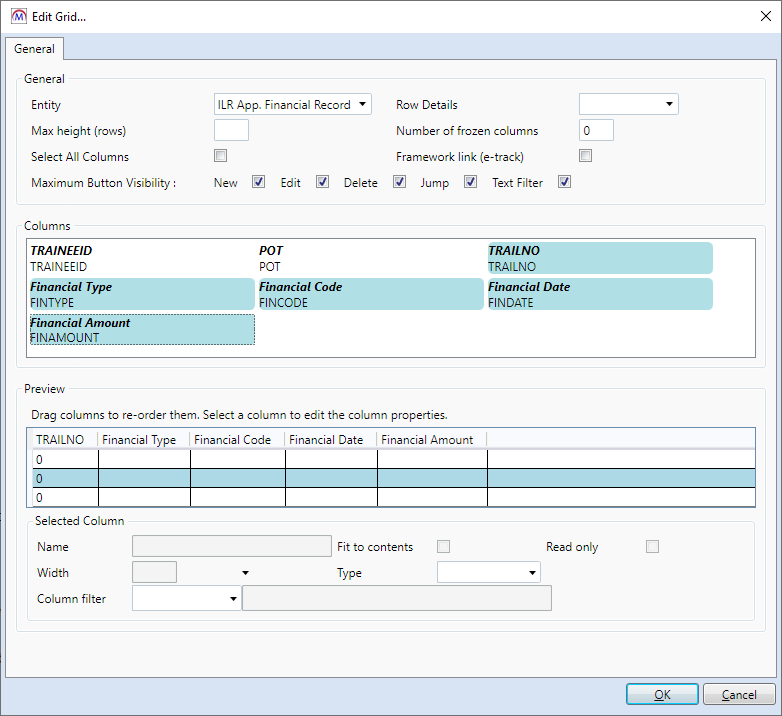
- Select an Entity. This is the table which the grid will be linked to. In this example we are using the ILR apprenticeship financial record.
- Set the Max height (rows) to 4. This is the maximum number of rows to be displayed on the grid at once.
- Set the Number of frozen columns to 1. This the number of columns that will remain fixed at the left when scrolling horizontally.
- Leave the Select All box unchecked. Checking this will select all columns to go on the grid.
- Maximum Button Visibility lets you choose which buttons to include on the grid.
- Underneath this you will see a list of fields in the table selected in step 3. Click the fields you require. This will highlight them and they will appear on the grid preview in the lower half of the screen.
- Click and drag fields along the preview grid to change the field order as required.
- Click a field to view its properties at the bottom of the screen. Here you can change the display name, the control type, whether a field is read-only, the width, and whether the field should stretch to display contents.
-
When finished, click OK to create the grid.

The grid will now appear on your tab / control. Please note that rows cannot be added to a grid in the screen designer – this can only be done once the tab has been published.
To edit the grid, click the grid in the screen designer and click Edit Grid on the properties panel.
Grid Tabs
When you add or edit a row for a grid, a separate pop-up tab can be made to appear so that the data can be entered on a tab rather than directly into the grid itself. This requires a tab to be created for the entity that the grid was created for (see the example in the previous section, step 3).
For example, a Trainee General Event grid would require a tab to be created in the Trainee General Event area when you click New/Load. The tab will then be displayed automatically when a new row is added to the grid.
If an entity has no tab created for it, data can only be entered directly into a grid for that entity.
Internet Frames
An internet frame (also known as an iFrame) is a basic web browser which resides within a screen. Certain levels of functionality can be set when adding a frame to a screen, or by selecting the frame once added and clicking Edit on the properties panel:
- URL – This is the web site address which the frame will begin on.
- Allow Back/Forward – These checkboxes let you choose whether or not the back and forward navigation buttons are included in the frame.
- Allow URL – This lets you choose whether or not to show the address bar (i.e. hiding the address bar will prevent users from entering a different address).
- Allow Refresh – This lets you choose whether or not the refresh button is included.
- Debug Scripts – This lets you choose whether or not debug scripts can be run on the browser (unless you are advised otherwise, this would usually be left on).
There is also the option to specify URL parameters using the Add Substitution button. Please see the iFrame Example tutorial for information on how database fields can be passed to Google Maps to produce a map with directions.
Program Starter
A program starter control is a button which runs an external program when clicked. You will see the following window when a program starter is added to a screen:
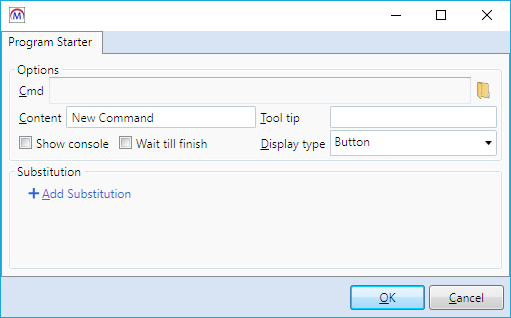
- Cmd – This is the program which will be run. It must point to an executable file, which is usually a file with the extension .exe. Click the
 button to browse to and select an executable file.
 - Content – This is the text which will be displayed on the button.
- Tool tip – This is the text which will be displayed if the mouse is hovered over the button.
- Wait till finish – Enabling this will make Maytas 5 pause until the external program is closed.
- Display type – This lets you choose whether to show the program starter as a button or a hyperlink.
URN Lookup via EDS Service
The URN lookup control type lets you search for and store an employer’s unique reference number (URN) using the Employer Data Service (EDS). To use this feature, first you must obtain a username and password for the EDS from the Information Authority. Once this has been obtained, a system config entry must be added to the database to enable the feature. The following instructions should be performed by a technical user with access to SQL Server Management Studio:
Please note – If your database is hosted on Tribal servers, please contact Maytas support to enable this feature.
- In Management Studio, connect to your SQL Server as the Maytas3 user and open a new query on the Maytas database.
-
Enter the following query:
INSERT INTO M32$_SYSTEMCONFIG (SECTION, ITEM, STRINGVALUE)
VALUES ('EDSService', 'url', 'http://services.edrs.lsc.gov.uk/lookup17.asmx')
INSERT INTO M32$_SYSTEMCONFIG (SECTION, ITEM, STRINGVALUE)
VALUES ('EDSService', 'ssoToken', 'username.password')
where username.password is the username and password provided by the IA (with the full stop separating them).
- Execute the query.
- In Maytas 5, go to Home on the toolbar and click the Sync button.
The control can then be added to a tab in the screen designer in the following way:
- In Maytas 5, click Tools on the toolbar and click New / Load on the Screens panel.
- Open an existing tab or create a new tab.
- Select Controls at the bottom left of the designer and expand the Standard list of controls.
- Drag the URN lookup control onto the design area.
- Select the control on the design area. The properties to the right include the Table name and Field name which the URN will be stored to.
-
Enter the table and field name you wish to store the URN to.
Please note that if you create a new field for this, you will need to sync Maytas 5 again for it to receive the new field.
- Save the tab.
When the tab is used, the URN control will have a button at the end of it. Click this button to open the URN search tool:

Enter an employer name in the top-left box and click the magnifying glass at the top-right to search. You can optionally also search by town or postcode. This will return a list of possible matches. Click Select for the correct employer and this will populate the field specified in step 5 with the employer’s URN.
Export Options
There are two advanced options for exporting screens in the Screen Designer: Export to ASCX and Export to Offline XML.

These are only intended to be used for the purposes described below. The usual method of exporting tabs and controls is to use the Export button on the Screens panel of the ribbon (see here for details).
Export to ASCX
This allows developers to export the screen as an ASCX control and modify it in a development environment.
Export to Offline XML
This allows you to export the screen as an XML file so that it can be used as a tab in e-track Offline:
- Click Export to Offline XML.
- Browse to where you wish to save the file, enter a name for the file and click Save.
-
A message will appear. Click the arrow next to Generate SQL.
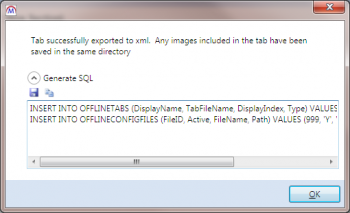
- This will generate the required SQL for e-track Offline to import the XML file as a tab.
- Click
 to save the SQL to a script file for later use.
 - Click
 to copy the SQL to the clipboard.
- Click
- Click OK to export the XML file.
- Run the SQL against the Maytas database by following the instructions on how to run SQL scripts in SQL Server Management Studio. Please note that if you copied the SQL to clipboard, simply paste the SQL into a new query rather than opening the script file.
- Place the XML file in the C:\m3files\Config folder on the server where Maytas Hub runs.
- In e-track Offline, download the latest config. The tab will then be available in e-track Offline.
Edit Calculated Fields
This allows you to create and update calculated fields (i.e. fields which are derived via SQL). For example, the Aim Type field on the ILR is a calculated field, as the value is derived from the Funding Model, EFA Core Aim flag and Programme Type. It is important to note that calculated fields cannot be directly edited; instead they simply display the value produced by the SQL.
To access the calculated field editor in the Screen Designer, click Edit Calculated Fields on the ribbon.
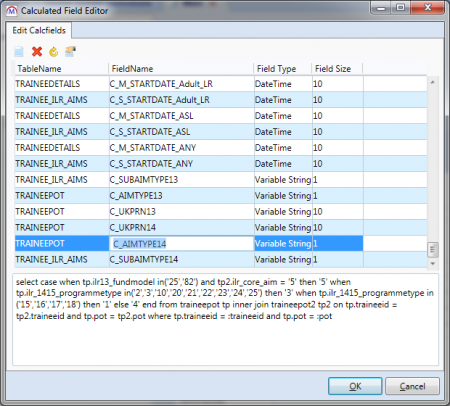
Select a field to view the SQL for it at the bottom of the editor.
To add a new field, click the  button. This will create a blank row at the bottom of the list. Complete the following columns:
- TableName - Select the table that the field should be stored under.
- FieldName - Enter a name for the field. Note that all calculated fields should be prefixed with C_ to distinguish them from other fields (e.g. C_EXAMPLEFIELD).
- Field Type - Select the data type for the field.
- Field Size - Enter the maximum field length (this is only required for a field type of Variable String).
Next, enter the SQL for the field in the box at the bottom of the editor. It is important that the SQL used for a calculated field should produce only ONE result, as multiple results will cause an error on tabs where the field is used. A simple way of doing this which will work in many cases is to specify top 1 in the select statement, as it will only select the first result (e.g. select top 1 TRAINEEID from TRAINEE).
For many calculated fields you may wish to use parameters to retrieve context-relevant data, such as getting data for the currently open trainee and POT. Any field which exists in the TableName selected for the calculated field can be checked against a parameter. For example, if you select TRAINEEPOT, you can add TRAINEEID = :TRAINEEID to the where clause of the SQL to limit the results to currently open trainee. In basic terms, the parameter is just the field name prefixed with a colon (e.g. :CONTRACTORID). Some commonly used parameters are:
- :TRAINEEID
- :POT
- :AIMNO
- :NVQREF
The following example uses the :traineeid and :pot parameters to get the contractor description for the currently open trainee:
select top 1 c.description from traineepot tp
inner join contractor c on tp.contractorid = c.contractorid
where tp.traineeid = :traineeid and tp.pot = :pot
Click OK to save changes.
Make a Tab Scheme-Specific
Tabs can be made to only appear for certain schemes. This works by giving a scheme a group type and then specifying on a tab which group types it should appear for. If no group types are entered on a tab, the tab will appear for all schemes.
To make a tab scheme-specific:
- Go to Management | Contracts.
- Click Browse schemes.
- Select the first scheme that you want the tab to appear for and click OK.
- Enter a Group Type. If a group type is already present, please first ensure that it is not going to affect any other tabs before changing it.
- Click Apply and close the scheme details window.
- Enter group types for additional schemes as required.
- Go to Tools and click New / Load on the Screens panel of the ribbon.
- Browse to and open the tab you wish to set the scheme group for.
- Enter the Scheme group, which should match the group type on the scheme. Multiple group types can be entered, comma-separated (e.g. group1,group2,group3). Again, if scheme groups are already present, ensure that any changes will not have an unintended effect.
- Click Apply.
Email Validation
Maytas Hub screens and app forms designed in the Maytas screen designer can be used to validate email addresses. This works by designating two fields for the email address and confirmation box (for re-entering the address), which are then checked by Maytas Hub to ensure the entries match. The validation also checks that the email address contains at least one @ character and at least one dot after the @.
To implement this:
- In Maytas, go to Tools on the toolbar and click New/Load on the Screens panel of the ribbon.
- Select an existing tab or create a new tab.
- Go to Fields at the bottom-left and drag an email field onto the design area (e.g. TRAINEE.EMAIL). This will be the main field you wish to use to store the email address.
- Select the field in the design area and tick the Validate Email (e-track only) box on the right.
- The Email ID box will appear underneath it. Enter an ID, which can be any value you want (an integer is suitable in most cases). This will be used to link the email field to the confirmation field.
- Drag another email field onto the design area (e.g. TRAINEE.ILR_EMAIL). This will be used as the confirmation field.
- Select the confirmation field in the design area and tick the Validate Email (e-track only) box.
-
Enter the same ID as before in the Email ID box.
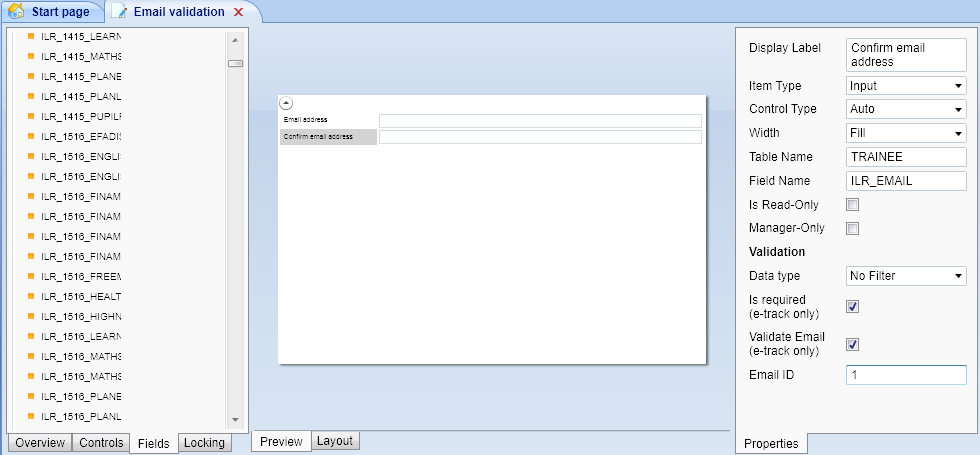
- Complete the rest of the tab as required and click Apply to save the changes.
- Go to Home on the toolbar and click Sync.
The email address validation will now work in Maytas Hub.
File Select
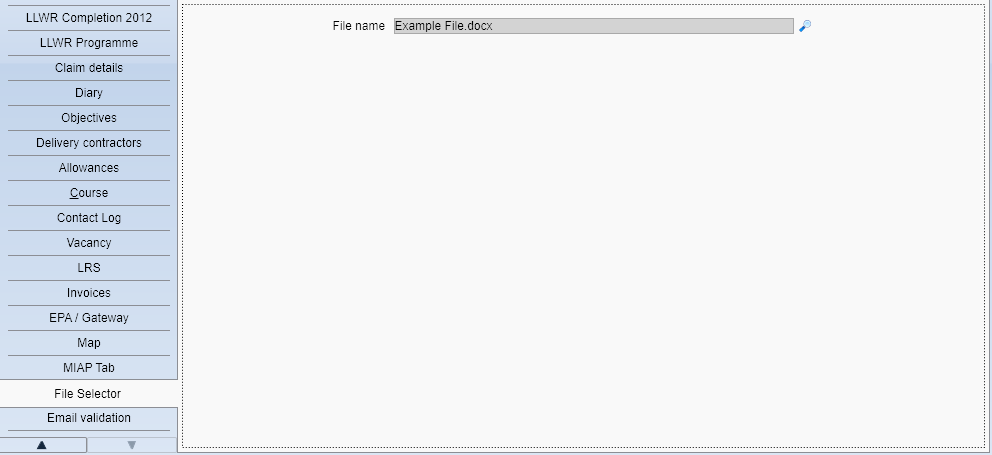
The Screen Designer has a File Select control which allows you to upload a file to a trainee or employer's file store and save the filename to a field.
- In Maytas, go to Tools on the toolbar and click New/Load on the Screens panel of the ribbon.
- Select an existing tab or create a new tab.
- There are two ways to add the File Select control. You can either:
Go to the Controls tab and drag a File Select control from the Standard section onto the design area. Select the control in the design area and enter the Table Name and Field Name on the right (this should point to a varchar field large enough to store a filename).
or
- Go to the Fields tab and drag a field onto the design area (this should be a varchar field large enough to store a filename). Select the field in the design area and change the Control Type on the right to File Select.
- Click Apply to save the changes.
- Go to Home on the toolbar and click Sync.
- Open a learner or employer record and go to the tab with the File Select control.
- Click the
 button to browse to and select a file and click Open.
 -
Click Apply. The file will be uploaded to the file store and the filename will be saved in the field linked to the File Select control.
Copy Tabs
Tabs in the screen designer can be copied. To do this:
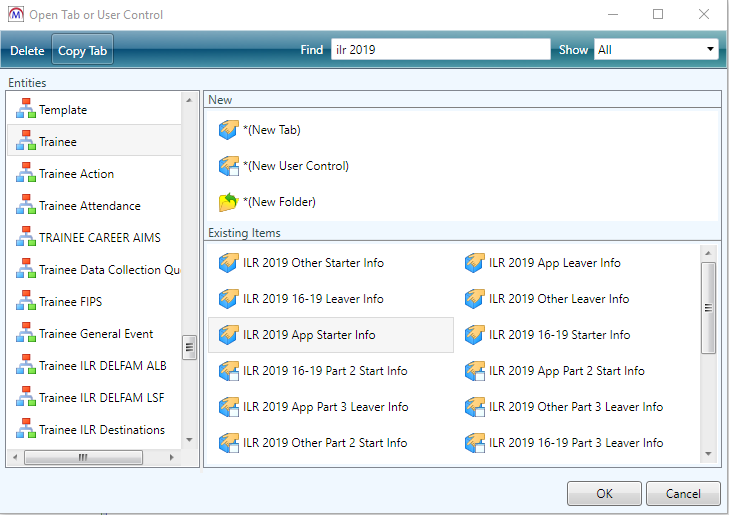
- Go to Tools on the toolbar and click New / Load on the Screens panel of the ribbon.
- Browse to and single-click the tab you wish to copy.
-
Click the Copy Tab button (at the top-left).
-
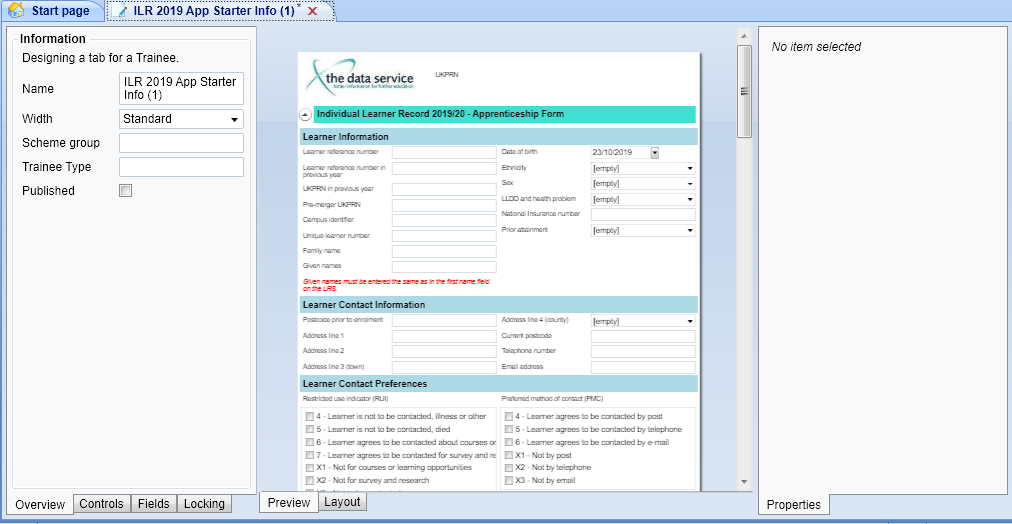
The screen designer will open a new tab based on the copied version, with the name appended with (1). Note that the new tab is unsaved and unpublished when initially created.
It is important to note that screen designer controls cannot be copied at present - only tabs can be copied. This means that if a tab with user controls is copied, ONLY the tab will be copied, and the controls on the new tab will be the original controls - i.e. changing the controls would affect both the old tab and the new tab.
New / Load Miscellaneous Features
The Screen Designer's New / Load screen has several features intended to make it more efficient to use:
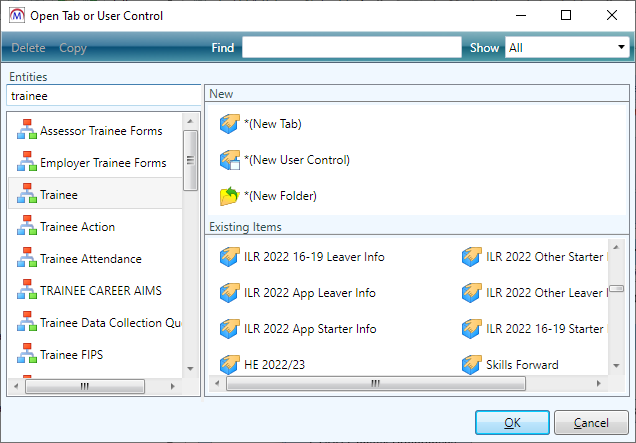
Entity Filtering
Entities (on the left) can be filtered to access them faster. The Trainee entity is selected by default.
To filter entities:
- Go to Tools on the toolbar and select New / Load on the Screens panel of the ribbon.
-
Enter a search term in the Entities box (at the top-left of the window). This will filter the entities on the left by those that contain the search term.
-
You can then quickly select the required entity, rather than having to scroll down to locate it.
Open Multiple Tabs / Controls at Once
Multiple tabs and controls can be selected on the right to open them all at the same time (this is limited to 12 being opened at once):
- Go to Tools on the toolbar and select New / Load on the Screens panel of the ribbon.
- Select a tab or control and then hold the CTRL key to click and select others.
- Click OK. All the selected items will now open (up to a maximum of 12).
Delete Multiple Tabs / Controls at Once
It is possible to delete multiple tabs / controls at the same time, though this ability requires a permission to be set:
- Go to Tools | Edit Permissions.
- Select the user or group which requires permission.
- Go to the Commands tab and expand the Screen Designer section.
- Set the Delete Tabs permission to Visible.
- Click Apply to save changes, then restart Maytas for the permission to take effect.
You can then delete multiple tabs in the New / Load window by selecting them while holding the CTRL key and then clicking the Delete button.