Skill Scans
Maytas Hub supports skill scans as part of the Module Editor for recording and measuring learner progression and distance travelled. Skill scans can be added to new or existing objectives so that learners and employers can assess a learner's understanding of their qualification at various stages throughout their learning. Assessors can view completed skill scans to determine progress and identify any gaps in knowledge.
When a module is configured to include skill scans, any learners who are then newly assigned that module will be sent skill scans on an automatic schedule which is configured on the module. You can also choose for a learner not to be sent skill scans when the module is assigned to them. Note that learners who were already on a module before it was configured for skill scans will not be included in a schedule, but skill scans can still be manually added to their record.
Videos
Overview
5.20 SP2 Improvements
Adding Skill Scans to an Objective
Adding and configuring skill scans to an objective requires an assessor user with access to the Module Editor.
- On the sidebar, click Browse Modules.
-
Search for the base module you wish to add skill scans to and click edit at the far-right of the row.

- Select the base module (the top row) and click the Edit button.
- Select the Skill Scan tab on the sidebar which appears on the right.
-
Tick the Include in Skill Scan checkbox. Further details will appear.
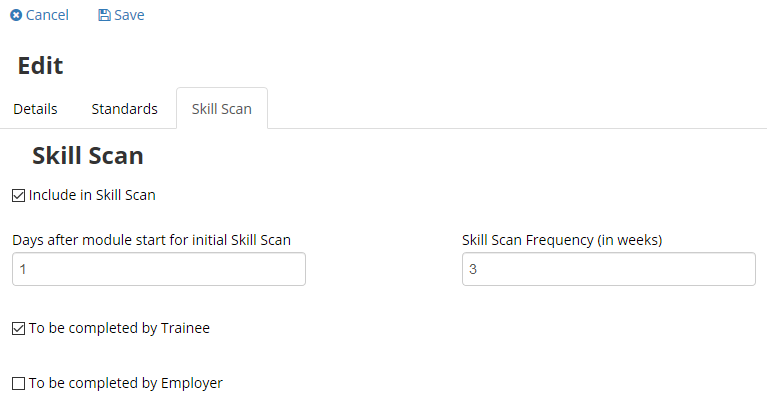
At this point, we are simply enabling skill scans for objectives within this base module.
- Enter the number of days after the base module start date that the initial skill scan should be sent to the relevant learner or employer.
- Enter the frequency (in weeks) of skill scans after the initial scan.
- Choose whether the skill scans for this module should be completed by trainees, employers or both.
- Click Save.
You can now select the criteria from each objective which should be included in a skill scan:
-
Click the down-arrow at the end of an objective and select Edit Criteria.
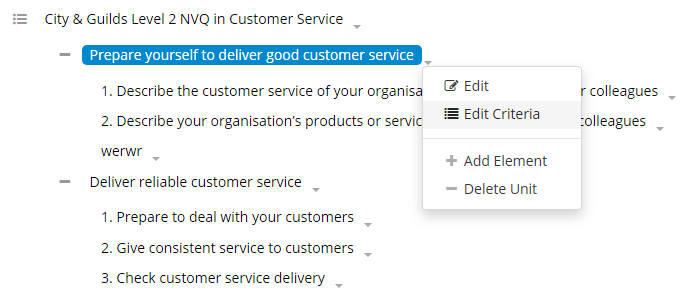
-
You will see the objective's criteria (if the objective has any). Tick the boxes in the column highlighted below to choose which criteria should be included in a skill scan. You can click the checkbox at the top of the column to select them all.

- Click Save.
- Repeat as required for additional objectives.
Non-Scoring Module Criteria for Standalone Headers
Module criteria which is marked as a standalone header does not require a score to be entered when included in skill scans, though the header will still display for informative purposes.
To set criteria as a standalone header:
- Go to Browse Modules on the sidebar.
- Search for the required module and click edit at the far right of the module's row in the results.
- Select the required objective and click Edit Criteria.
-
The far left column on the Edit Criteria screen (
 criteria grouping) lets you set headers. Click the box in this column next for the criteria row you want to set as a standalone header.
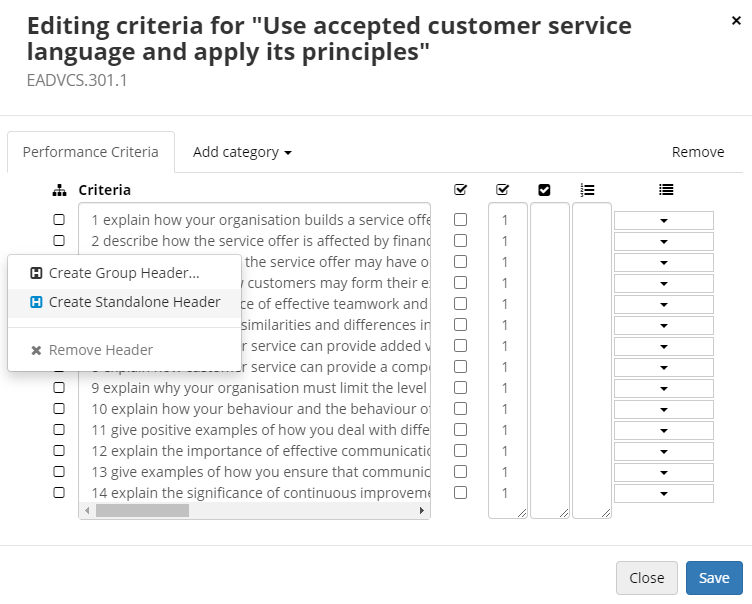
-
Select Create Standalone Header. The box will now show as
 .
.
-
When this is included in a skill scan, the header will still show but will not require a score to be entered.

If the Force scoring for all Skill Scan criteria option is ticked on a module, standalone headers will still not require a score to be entered. The option simply means that if a score can be entered, it must be entered.
Completing a Skill Scan
When a module with skill scans is assigned to a learner, the date on which the first skill scans will be sent out is determined as per the module configuration. Note that the skill scan date is not derived until the learner has a start date for the module. On the derived date, the users who need to complete the skill scans will receive a notification when they login to Maytas Hub (this can include both learner and employer users):
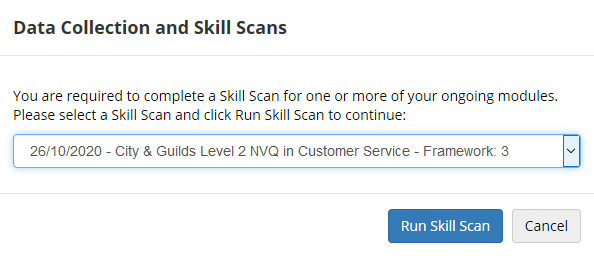
Choose the skill scan to complete and click Run Skill Scan.
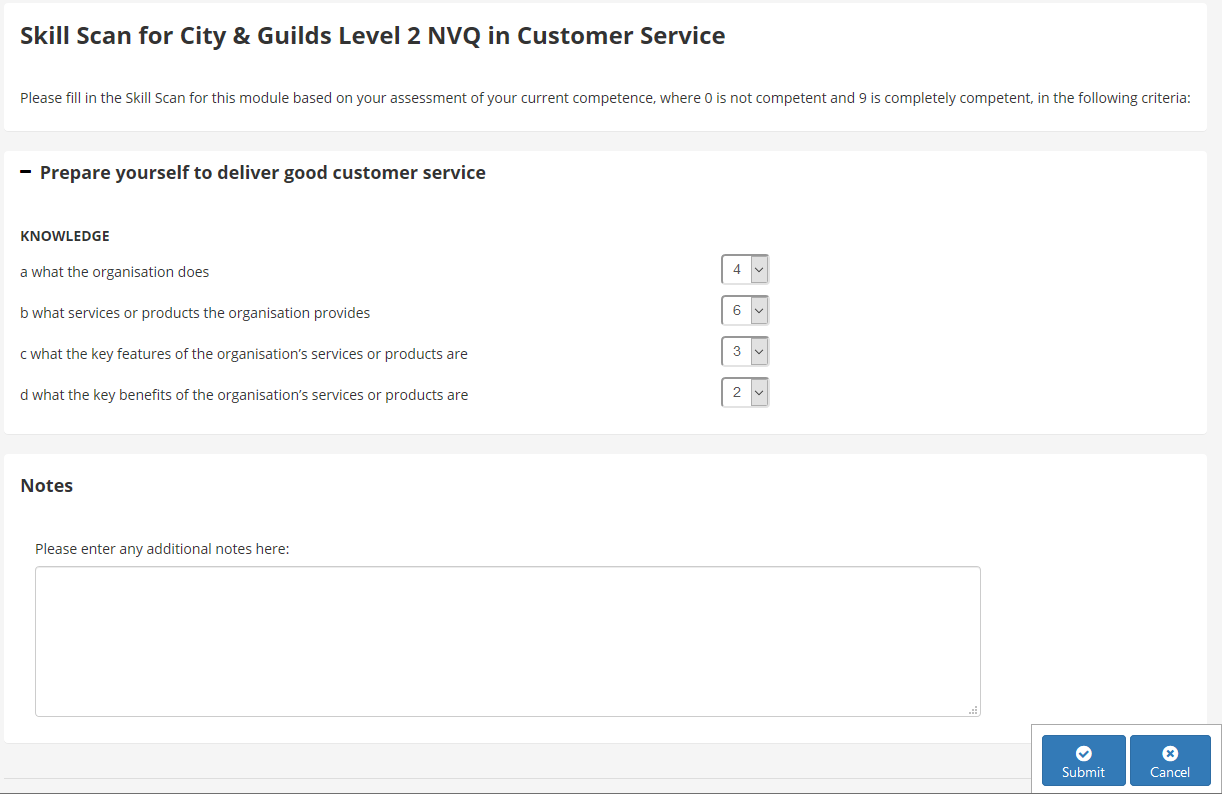
Choose the level of competence for each criteria and enter any notes as required. When finished, click Submit. The next planned skill scan will then be added to their queue.
The learner's assessor can then view the learner's completed and upcoming skill scans by opening their record and going to the Skill Scan tab. Click the + and - buttons to expand and collapse the details of each scan.
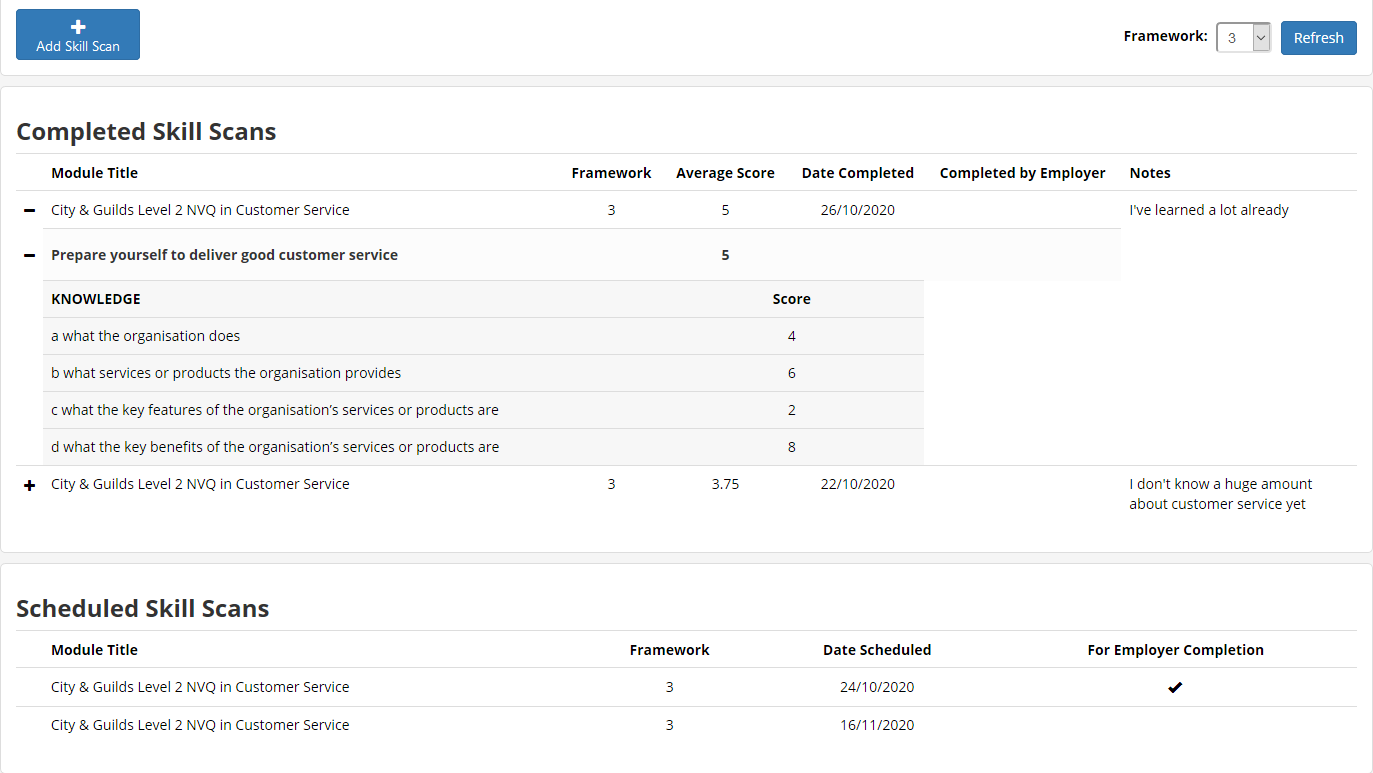
When a scheduled skill scan is completed, the next skill scan in the schedule is added to the queue.
Manually Adding a Skill Scan
It is possible to manually add a one-off skill scan for a learner, separate to the regular scans configured for a module:
- Open a learner's record and go to the Skill Scan tab.
-
Click the Add Skill Scan button.
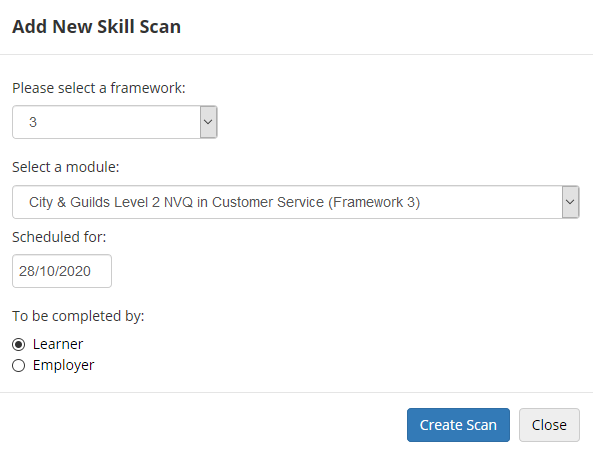
- Select the framework and module to use for the skill scan (note that only modules which have been configured for skill scans will be available).
- Enter the date to schedule the scan for.
- Choose whether the scan should be completed by a learner or employer.
- Click Create Scan.
The skill scan will be added to the list of scheduled scans for the learner.
Changing the Date of a Skill Scan
If you wish to change the date on which a skill scan is scheduled to take place (e.g. if the module start date changes after the module has been added to a learner), this can be done in Maytas. First, a tab must be imported in Maytas:
- In Maytas, go to Tools on the toolbar and click Import on the Screens panel of the ribbon.
- Click Browse.
- Browse to the Maytas\Extras\Tabs folder of the upgrade.
- Select the Skill Scan Queue.m5tab package and click Open.
- Click Next, then click Finish.
- Go to Home on the toolbar and click Sync.
To change a skill scan date on the tab:
-
In Maytas, open the learner record and go to the Skill Scan Queue tab.

-
Select the scan to edit and click the
 button.
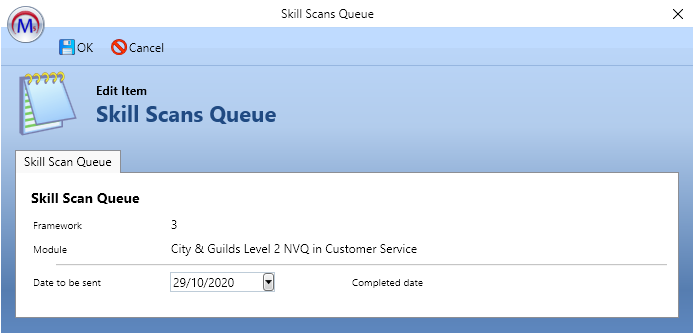
- Edit the Date to be sent as required and click OK.
- Click Apply.
Excluding a Module from Skill Scans
If you want to assign a module to a learner, but don't want that learner to be sent any skill scans that have been configured for that module, this can be done as follows:
- Open the learner's record and click Add Objectives on the Summary tab.
- Search for and select the module you wish to add.
- Choose the objectives you wish to include and click Next.
- Choose the qualification and framework to add the module to.
-
If the module has been configured for skill scans, you will also see the option Exclude module from Skill Scans. Tick this box and click Next.

- Click Save.
Edit and Delete Skill Scans
Scheduled skill scans can be edited and deleted. Completed skill scans cannot be edited or deleted.
This requires a permission to be set:
- Go to Web User Editor on the sidebar.
- Search for and open the required user or group.
- Click Permissions to expand the list of permissions.
- In the Assessor section, tick Edit and Delete Skill Scans.
- Click Save.
On the Skill Scan tab, the Scheduled Skill Scans section will now have a Delete button at the end of every row.
Progress Chart
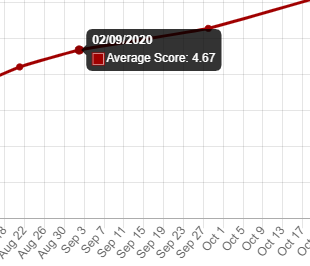
The Skill Scan tab includes a progress chart that shows a learner's average skill scan scores over time for a particular module.
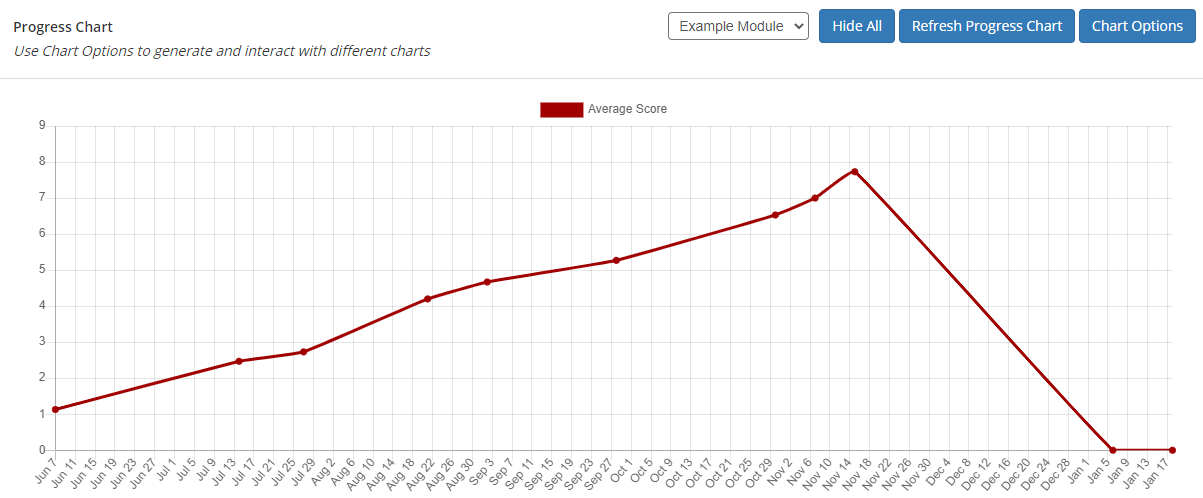
There are various options above the chart which let you configure it:
- Module dropdown box - This lets you choose which module to display skill scan progress for. The modules shown in the list are limited by the selected framework (at the top-right of the Skill Scan tab) and whether a module is configured for skill scans.
- Hide All - This button will hide all chart data. The button will change to Show All, which will show the chart data again.
- Refresh Progress Chart - Click this button after selecting a different module or changing chart options to refresh the chart data.
-
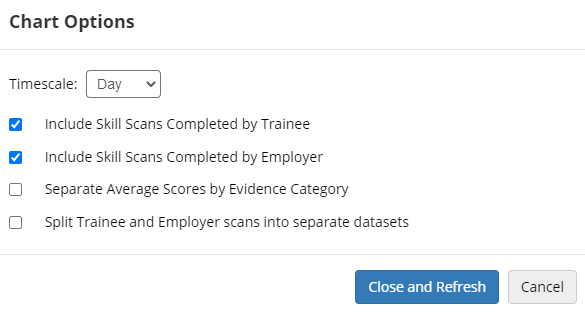
Chart Options - This button will open the following pop-up window:
-
Timescale - This sets the chart's horizontal scale to days, weeks, months or years.
-
Include Skill Scans Completed by Trainee / Employer - These determine whether the chart data includes skill scans completed by trainees, employers or both.
-
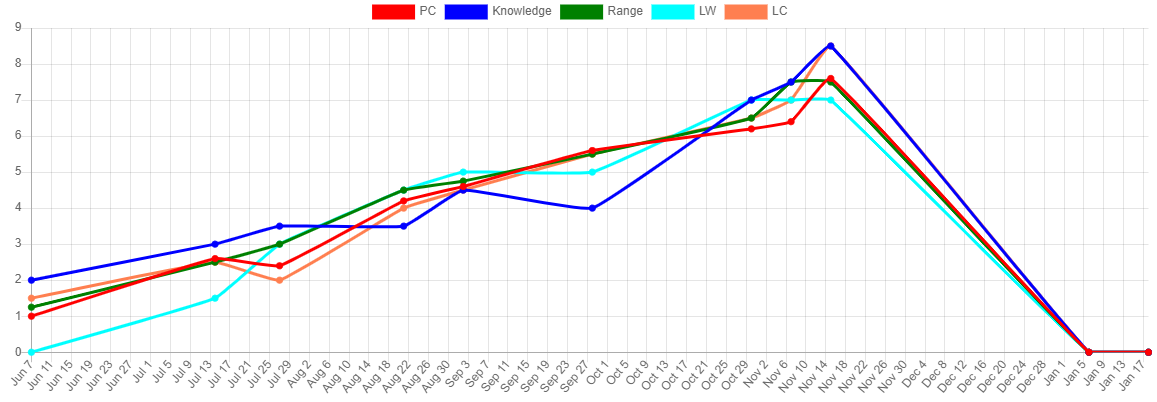
Separate Average Scores by Evidence Category - If completed skill scans are configured for evidence categories, this will split the results on the chart by each category.
-
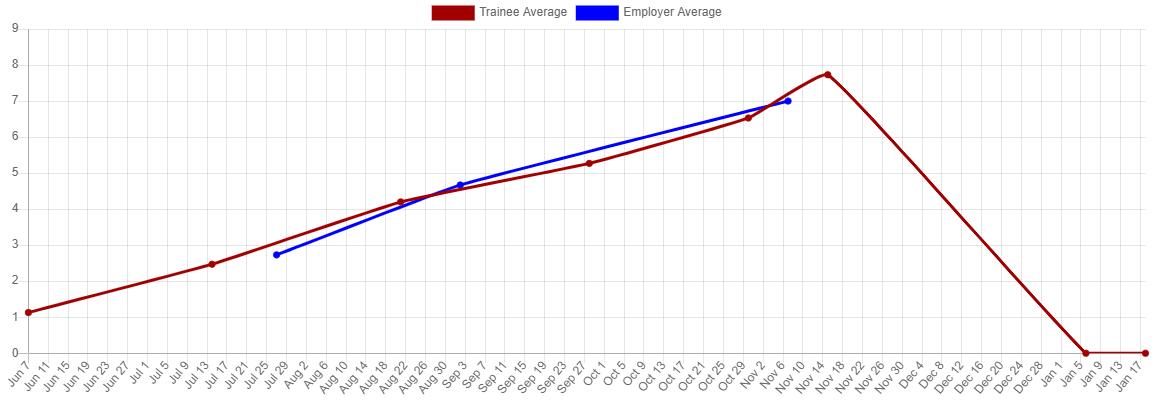
Split Trainee and Employer scans into separate datasets - When this is not ticked, results from trainee and employer scans are merged. When it is ticked, trainee and employer results are shown separately.
-
Each node in the chart represents one or more skill scans used to produce an average. Hovering over a node shows the date of the scan(s) and the average score.
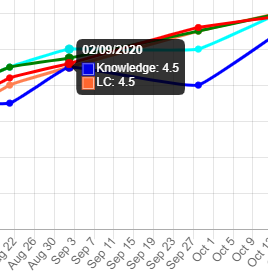
If there are multiple categories with the same score on the same date, these are separated out.

Each row will also allow you to edit to the scheduled date and whether or not it needs to be completed by an employer. The module title and framework cannot be edited.
Partial Completion of Skill Scans
Skill scans can be configured to determine whether partial completion is permitted or whether a scan must be fully completed to be submitted. To configure this:
- On the sidebar, click Browse Modules.
- Search for the base module you wish to configure skill scans for and click edit at the far-right of the row.
- Select the base module (the top row) and click the Edit button.
-
Select the Skill Scan tab on the sidebar which appears on the right.

-
If a skill scan should be fully completed before submitting, ensure the Force scoring for all Skill Scan criteria checkbox is ticked.
If you want to allow partially-completed skill scans to be submitted, ensure the checkbox is not ticked.
- Click Save.
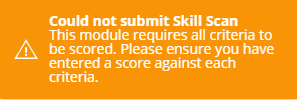
When the option is ticked, an error is displayed if a user attempts to submit a partially completed skill scan for the configured module.
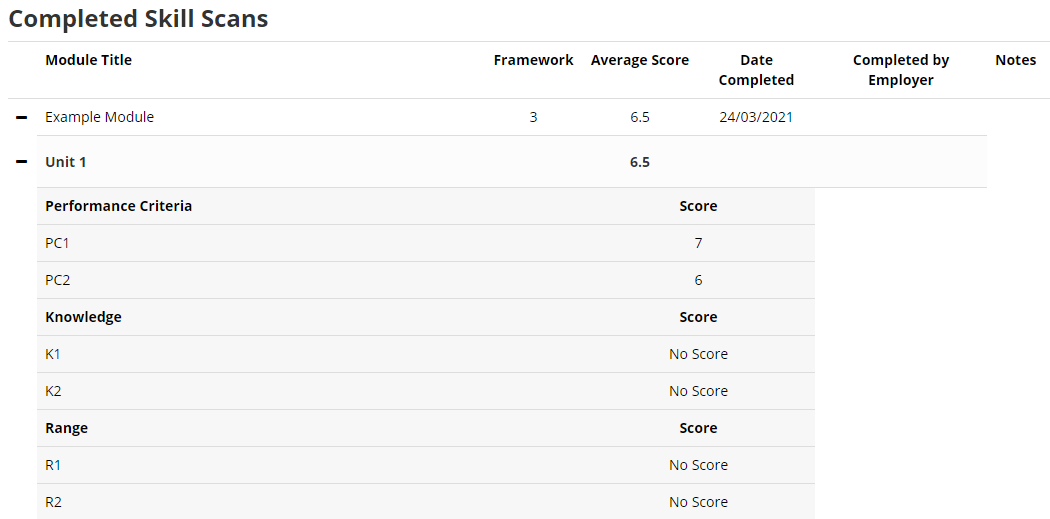
When the option is not ticked, users can submit partially completed skill scans. The missing scores from the scan are indicated on the Skill Scan tab with an entry of No Score.
Configurable Narrative Text
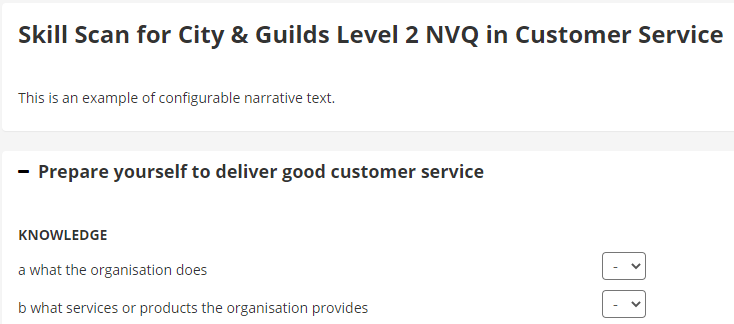
The narrative text displayed for learners and employers when completing a skill scan can be configured.
For learner skill scans:
- In Maytas Hub, go to Settings on the sidebar.
- Click the System configuration button.
- Go to Learner Login on the left (under the Maytas Hub Online header).
- Tick the box for the Set the narrative text for learners filling out a Skill Scan setting on the right (in the Skill Scan section).
- Enter the narrative text you wish to use in the textbox to the right of the config.
- Click Save.
For employer skill scans:
- In Maytas Hub, go to Settings on the sidebar.
- Click the System configuration button.
- Go to Employer Login on the left (under the Maytas Hub Online header).
- Tick the box for the Set the narrative text for employers filling out a Skill Scan setting on the right (in the General section).
- Enter the narrative text you wish to use in the textbox to the right of the config.
- Click Save.
When a skill scan is started, the configured narrative text will now appear under the header:
Learners Viewing Previous Skill Scans
Learners can be given permission in the Web User Editor to view their previously-submitted skill scan scores on a Skill Scan tab for learner logins.
To enable the tab for a learner:
- Go to Web User Editor on the sidebar.
- Search for and open the required user or group.
- Click Permissions to expand the list of permissions.
- In the Trainees section, tick Access Skill Scan tab.
- Click Save.
The learner can then access the Skill Scan tab from the sidebar.
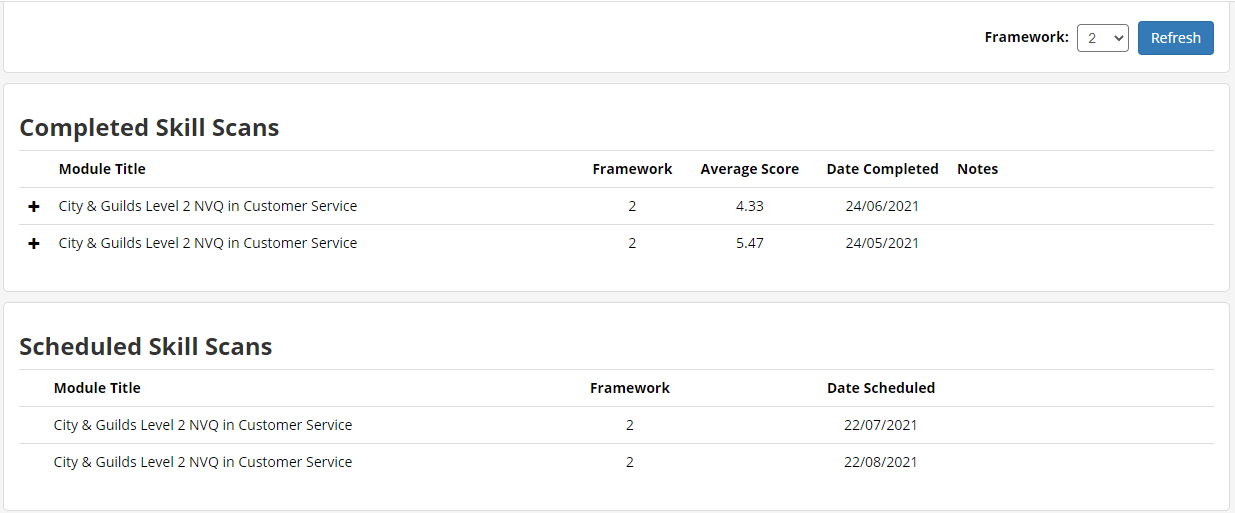
The + buttons can be clicked to expand the skill scans and view the submitted scores.
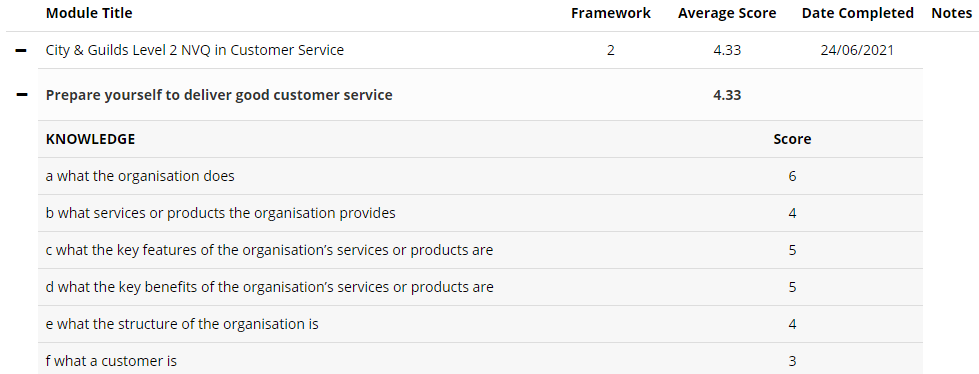
A config option is also available to enable charts on the learner's skill scan tab:
- In Maytas Hub, go to Settings on the sidebar.
- Click the System configuration button.
- Go to Learner Login on the left (under the Maytas Hub Online header).
- Tick the box for the Allow learners to see Skill Scan chart analytics setting on the right (in the Skill Scan section).
- Ensure the toggle button is set to ON.
- Click Save.
The chart works in the same way as on the assessor login, except that learners cannot view scores from employer skill scans.

Employer Skill Scans
Employer Skill Scan View
Employer users can view Skill Scans for their employees by opening a learner record and going to the Skill Scan tab. The tab is read-only for employer users and new Skill Scans cannot be created from it.
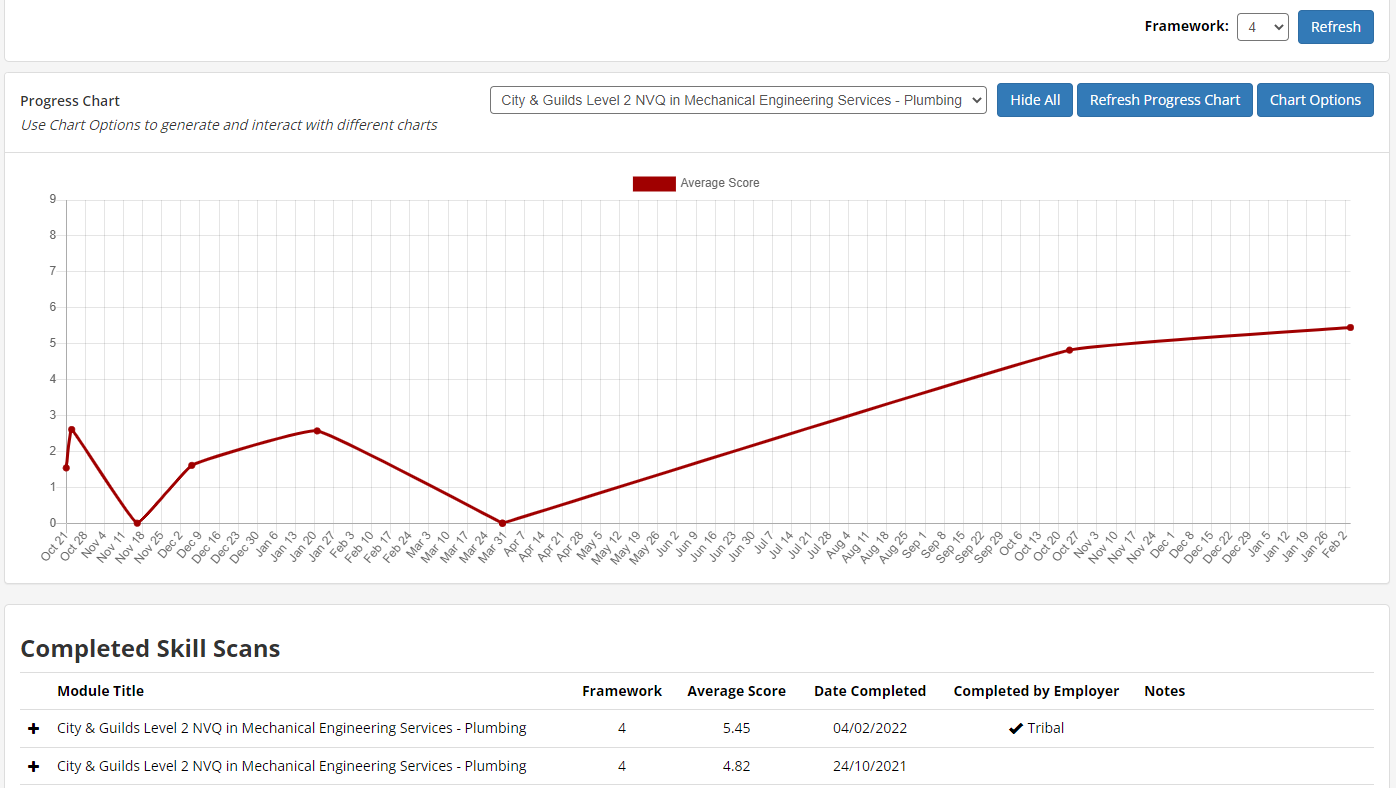
The tab is controlled by user permissions and is enabled by default. To remove access to the Skill Scan tab for an employer user:
- Go to Web User Editor on the sidebar.
- Search for and select the employer user.
- Click Custom Tabs to expand that section.
- Under the Learner Editor header, untick the Skill Scan permission.
- Click Save.
Assigning a Skill Scan to an Employer
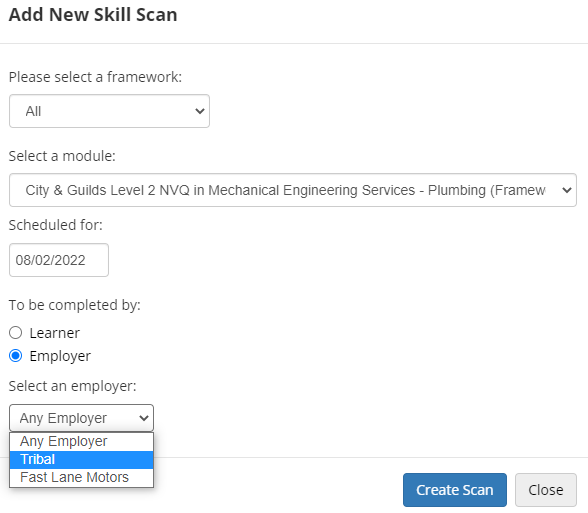
When a Skill Scan is created for an employer to complete for a learner, if the learner has previous employer records that are now closed, the Skill Scan will only be sent to employers they are currently active with.
It is also possible when setting up a Skill Scan to manually select a specific employer from the Select an employer dropdown box.
Viewing Skill Scans from Other Employers
A config option is available which allows employer users to view Skill Scans for their learners that are not specifically associated with that employer (e.g. Skill Scans completed at a previous employer). To enable this:
- In Maytas Hub, go to Settings on the sidebar.
- Click the System configuration button.
- Go to Employer Login on the left (under the Maytas Hub Online header).
- In the General section, tick the box for the See Skill Scan data from other employers setting on the right and ensure the toggle button is set to ON.
- Click Save.
When an employer views a learner's Skill Scan tab, they will now see a Completed by Employer column which will show if a Skill Scan was completed by a specific employer. If the column is empty, that means the Skill Scan has not been associated with a specific employer.

Assessor users also have a column showing which employer completed a Skill Scan, although this only applies to Skill Scans created as of this upgrade as it is not possible for Maytas Hub to determine which employers completed historical Skill Scans.
View Previous Scores when Completing Skill Scan
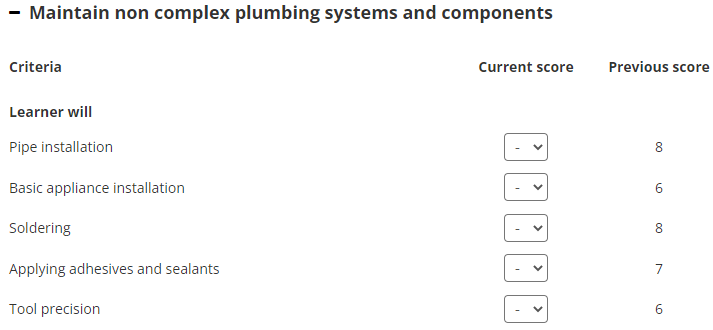
Previous scores can be viewed when completing a Skill Scan. To enable this feature:
- In Maytas Hub, go to Settings on the sidebar.
- Click the System configuration button.
- Go to Learner Login on the left (under the Maytas Hub Online header).
- In the Skill Scan section, tick the box for the Show previous Skill Scan scores setting on the right and ensure the toggle button is set to ON.
- Click Save.
The previous scores will now be displayed when completing a Skill Scan.
HTML in Skill Scan Narrative Text
The narrative text displayed at the top of Skill Scans can incorporate HTML to provide a wider array of options and formatting. This is handled via the two configuration options which relate to it (one for learner Skill Scans and one for employer Skill Scans):
-
In Maytas Hub, go to Settings on the sidebar.
-
Click the System configuration button.
-
For the learner narrative text, go to Learner Login on the left and locate the option Set the narrative text for learners filling out a Skill Scan on the right (in the Skill Scan section).
For the employer narrative text, go to Employer Login on the left and locate the option Set the narrative text for employers filling out a Skill Scan on the right (in the General section).
-
Edit the narrative text using HTML as required.

-
Click Save.
Skill Scans will now display the text at the top, interpreting the HTML where applicable.
