ebs-Link Release Notes
Maytas 5.18 SP1 Release Notes
Note regarding submissions
We would like to remind providers to create a submission early and check for any errors using reports from the appropriate software (i.e. the FIS or LLWR-Inform). Welsh providers should also remember to download their ULI file. After submission to the ESFA or DfES, providers should check that data has submitted correctly using the available reports. Providers should check that all their expected starts and completions are submitted correctly, and that start and outcome payments correctly match the PFR or ACE funding reports.
Our support desk gets extremely busy in the days prior to the submission deadlines, and although we try and prioritise submission-related queries, we cannot guarantee assistance if queries are sent late. If you do encounter any issues, please ensure that you contact Maytas Support as soon as possible, as we can only rectify issues of which we are aware. We also recommend checking Maytas Communities regularly for information on any known issues and solutions. Tribal cannot be held responsible for any issues caused by your failure to comply with this advice.
Technical specification
The latest Maytas and e-track technical specification can be found here.
Confirm the upgrade has been run
Once the upgrade has been completed, the version number should be checked to ensure it has been successful.
- Start Maytas and go to Support on the toolbar.
- Click About.
- The version numbers should read 181.20 / 5.18.7201.2. If you have any other version, please ensure you have followed the upgrade instructions correctly. If you require assistance, please contact Maytas Support.
It is the responsibility of customers to ensure that users carry out any required user acceptance testing and sign off on the upgrade.
Complete the Upgrade
Features Added in the Upgrade
These are the main updates in the upgrade:
- Financial Planning 2019/20 rollover
- Copy tabs PCR for 5.18
- Data collection queue
- Fixes to a number of issues
Import Funding Information
Due to the major changes to the FIS for 2019/20, the process for importing the required funding information into Maytas is now as follows:
- The old FIS 2018/19 application should be used to import data sets for 2018/19 and earlier, as per previous releases. This only needs to be performed once more after the upgrade and then it will no longer be required in future releases.
- The LARS for 2019/20 should be imported.
- Postcode data for 2019/20 should be imported.
- Once all data has been imported, ensure that the funding cache is refreshed (either on a database schedule or a manual update out of working hours).
Re-Import the FIS Data Sets
It is essential that the FIS data sets for 2018/19 and earlier are imported into Maytas one final time for use by the funding cache. This should be done by importing the relevant information directly from the Data Service’s Funding Information System (FIS). To do this, you must have the FIS installed and correctly configured (please refer to the Data Service’s instructions for setting up the FIS).
Please ensure you have the latest version of the 2018/19 FIS application with the latest components installed.
Once the FIS is installed and configured, the information can be imported as follows:
- Perform a sync in Maytas 5, then restart Maytas 5.
-
Go to Exports | Uploads | Upload FIS Data Sets.
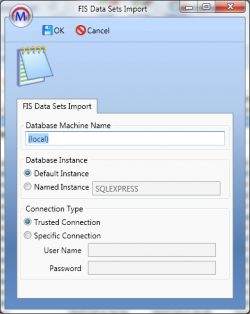
- There are three items to configure:
- Database Machine Name – If the FIS is installed on the same machine that you are using for Maytas 5, this can be left as (local). Otherwise, enter the machine name of the SQL server where the FIS database is held.
Database Instance – If the SQL server holding the FIS database has a named instance (e.g. MACHINENAME\INSTANCENAME), select Named Instance and enter the instance name. Otherwise leave this as Default Instance.
If you have no named instance and Default Instance does not work, you may need to select Named Instance and leave the instance name blank.
- Connection Type – This is the login for the SQL server holding the FIS database. Trusted Connection will use Windows authentication. If you wish to specify the login details, select Specific Connection and enter the credentials.
- Click OK. The FIS data will now be imported.
- If you have an Adult Skills budget contract and a transition factor, this must be entered on the contract:
- Go to Management on the toolbar and click Contracts on the ribbon.
- Select the relevant contractor, then select the Adult Skills contract on the right.
- Click the
 button.
 - Go to the Uplifts tab.
- Enter the ASB Transition Factor and click OK.
- Click Apply to save the change.
Import LARS
The LARS for 2019/20 should be imported as follows:
- Download the LARS MDB file for 2019/20. At the time of this release, the latest version is the LARS MDB version 7.
- In Maytas, go to Exports on the toolbar.
- On the ILR Tools panel of the ribbon, go to Uploads | Upload Funding Information | Upload LARS (Version 7).
- Browse to and select the downloaded LARS file and click Open.
- The file will now be imported. Click OK on the message which appears.
Progress on the import can be checked by going to Home | Server Tasks | Server Jobs. Typically it will take several minutes.
Import Postcode File
Postcode data for 2019/20 should be imported as follows:
- Obtain the postcode uplift factors file - Download the zip file under 2019 to 2020 uplift factors by postcode and LLSOA: CSV files.
- In Maytas, go to Exports on the toolbar.
- On the ILR Tools panel of the ribbon, go to Uploads | Postcode Uploads | Upload Post Code Data (2019/20).
- Browse to and select the postcode uplifts zip file and click Open.
- The file will now be imported. Click OK on the message which appears.
Progress on the import can be checked by going to Home | Server Tasks | Server Jobs. Typically this will take several minutes.
Devolved AEB postcode data is also available for importing, but it is not currently used in Maytas and so there is no need to import it. Future upgrades may require it to be imported, depending on whether the data is used in the funding calculations.
Large employer factor data sets do not need to be imported for 2019/20. LEF data for 2018/19 and earlier is included in the FIS import.
Note on the Funding Cache
By default, the funding cache will update overnight so that funding information in Maytas uses the newly-imported FIS and postcode information. Please check with your system administrator if you are unsure if or when the funding cache is updated on your system. You can also manually set the funding cache to update by going to Management | Profiles and clicking the Funding Cache button, though please be aware that this may take a long time and may use a large amount of system resources, which could affect performance for other users on the system.
Maytas 5 Release Notes – Version 5.18.7201.2
Report Views and Funding Rollover for 2019/20
The ebs-Link report views have been updated to include ILR fields for 2019/20. Additionally, the funding information for 2019/20 is now available, based on 2018/19 rules.
Financial Planning 2019/20 Rollover
The Financial Planning module now supports plans for 2019/20. After the upgrade, it is important to ensure the funding cache has been updated. In most cases this should be done automatically on a schedule (check with your system administrator), but it can also be done manually by going to Management | Profiles and clicking the Funding Cache button. This may take a long time and may use a lot of system resources, so it is strongly recommended to only update the funding cache outside of normal working hours.
To create a 2019/20 plan:
- Go to Management | Financial Plans.
- Double-click New Financial Plan.
- Select a 2019/20 contract to base the plan on and click Next.
- Enter a name for the plan and click Next.
- Select the funding models and funding line types you wish to use for the plan and click Next.
- Select the years and periods you wish to use for the plan and click Next.
- Click Finish.
The plan will now be created.
Before using any existing plans from 2018/19 and earlier, you should refresh their current data values and what if values. This can be done on each required plan by going to the Current Data Values and What If Values tabs and clicking the  button.
Screen Designer - Copy Tabs
Tabs in the screen designer can now be copied. To do this:
- Go to Tools on the toolbar and click New / Load on the Screens panel of the ribbon.
- Browse to and single-click the tab you wish to copy.
-
Click the Copy Tab button (at the top-left).
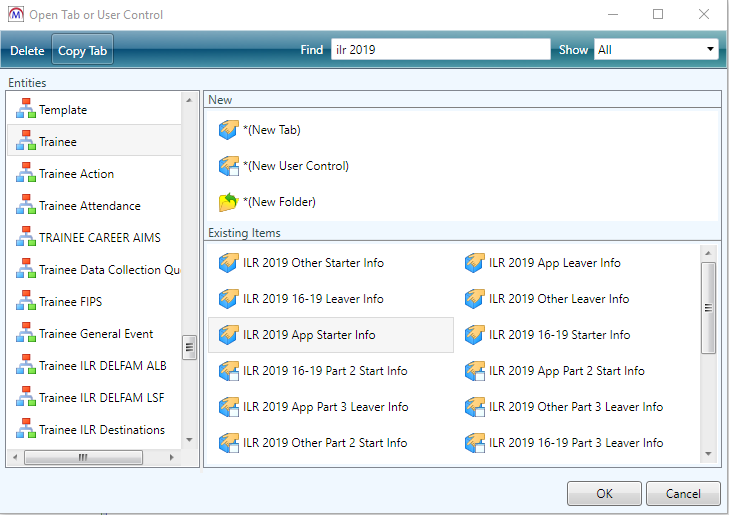
-
The screen designer will open a new tab based on the copied version, with the name appended with (1). Note that the new tab is unsaved and unpublished when initially created.
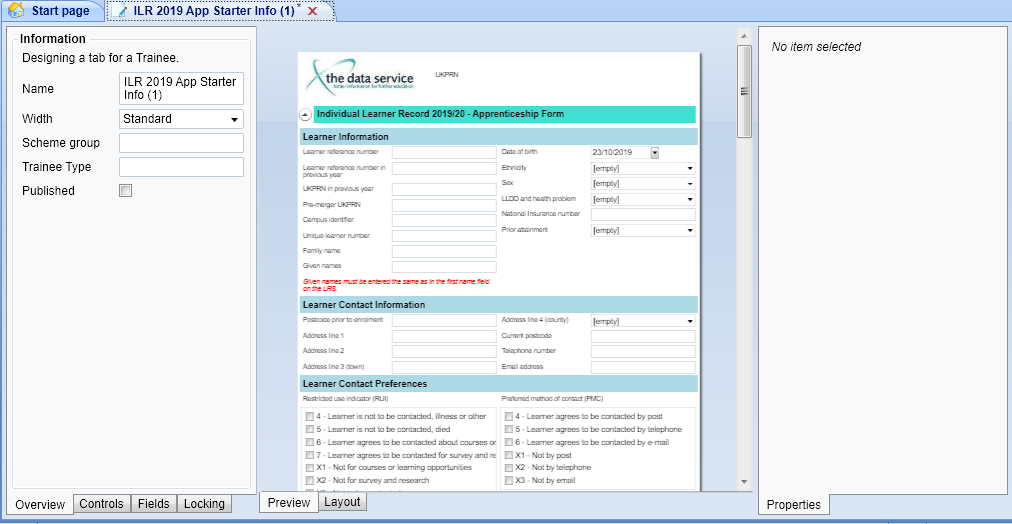
It is important to note that screen designer controls cannot be copied at present - only tabs can be copied. This means that if a tab with user controls is copied, ONLY the tab will be copied, and the controls on the new tab will be the original controls - i.e. changing the controls would affect both the old tab and the new tab.
Data Collection Queue
e-track allows you to send multiple data collection forms to an employer or learner for completion. This is done on the Data Queue tab on the relevant user's record, where a row can be added to the grid and configured for each form that needs to be completed.
As well as sending learner forms to a learner and employer forms to an employer, it is also possible to send an employer a learner form to complete on a learner's behalf. This is done by adding a row to the grid on the employer's Data Queue tab and then specifying which learner and form to use.
Requirements
On-line applications, data collection and data authentication require licences for e-track screen design and online applications, as well as licences for learners and employers. Please contact your account manager for the required licences, and consultancy will be required.
Import Data Queue Tabs
- In Maytas, go to Tools on the toolbar and click Import on the Screens panel of the ribbon.
- Click Browse.
- Browse to the e-track\Tabs folder of the upgrade, select the Data Queue tabs.m5rep package and click Open.
- Click Next, then click Finish.
- Go to Home on the toolbar and click Sync.
Form Setup
First, data collection forms should be created for learners, employers and visits as required (in the Trainee, Employer and Visit entities of the Maytas screen designer). The important points for a screen to work as a data collection form are on the screen designer Overview tab:
- Published - This should be ticked.
- e-track Publish - Application Form should be ticked.
- App Form ID - This should be a single-digit integer (i.e. 0 to 9) which is used to identify the form. Each learner form should have a different number, as should each employer form, but learner and employer forms can share a number. e.g. You could have a learner and an employer form both with an ID of 1, but not two learner forms with an ID of 1.
- Position - This essentially the page number of a form. For example, if you wanted a four page form, you would create a separate screen for each page, give them all the same App Form ID and then enter 1 to 4 for the position (i.e. 1 for page 1, 2 for page 2, etc).
Once you have created a form, a lookup should be added for it so that it is available in the Data Queue grid:
- In Maytas, go to Tools | DB Schema.
- Expand Tables on the left to show a list of tables in the database.
- For a learner form, expand TRAINEE_DATACOLLECTIONQUEUE, and for an employer form (or a learner form being completed by an employer on their behalf), expand EMPLOYER_DATACOLLECTIONQUEUE.
- Select FORMID.
-
If the Set button appears on the right, click it.
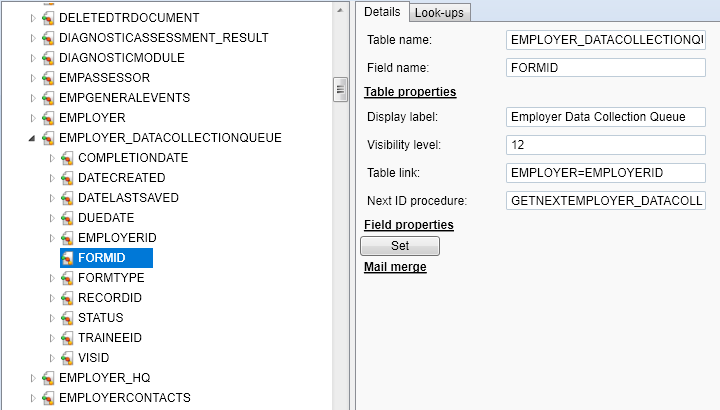
- Select the Look-ups tab.
- Click the
 button to add a new lookup.
 - The Short string should be two-characters:
- The first character is A for a learner form, P for an employer form or X for a visit form. Note that for a learner form being completed by an employer on the learner's behalf, this should be A.
The second character is the App Form ID of the form.
e.g. For a learner form with an ID of 3, the short string would be A3.
- The Long string should be the name or title of the form which will be displayed on the Data Queue grid.
- Click Apply and add additional lookups for forms as required.
- Go to Home on the toolbar and click Sync, then restart Maytas.
Learner Data Queue
To add a form to a learner's queue:
-
In Maytas, open the learner's record and go to the Data Queue tab.
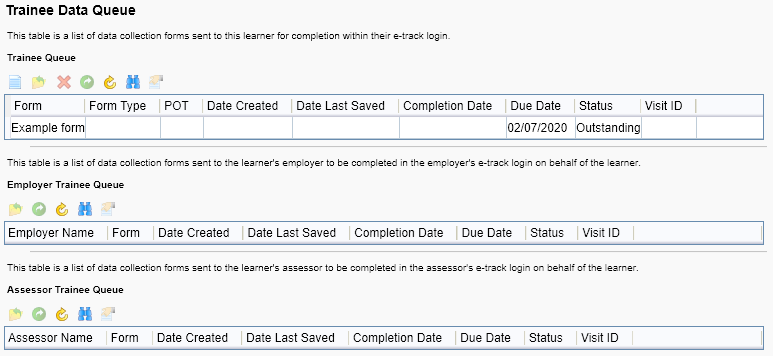
- You will see two grids. The top grid is for adding forms for a learner to complete. The bottom grid displays forms which have been sent to an employer to complete on behalf of the learner (this is covered below).
- Click the
 button on the top grid to add a new row.
 - In the pop-up window which appears, select a Form (this is populated by the lookups set above) and enter a Due Date.
- Click OK.
- Click Apply.
The row will be added to the grid. The Date Created field will be populated with the current date (the learner record may need to be closed and re-opened for this to show) and the Status will be set to Outstanding, which means the learner has not yet started the form.
The next time the learner logs into e-track, they will be given a prompt to choose which form to complete (they will be given the option of all outstanding or in-progress forms currently in their queue).
When a learner clicks Save on a form, the status in the queue for that form will change to In Progress. If a learner closes their browser and then returns to the form later on, they will be able to continue from where they left off.
When a learner clicks Submit, providing any and all form validation has been met, the form status will change to Completed and they will not be prompted to complete the form again.
Employer Data Queue
To add an employer form to an employer's queue:
-
In Maytas, open the employer's record and go to the Data Queue tab.

- Click the
 button on the grid to add a new row.
 - In the pop-up window which appears, select a Form (this is populated by the lookups set above) and enter a Due Date.
- Click OK.
- Click Apply.
The row will be added to the grid. The Date Created field will be populated with the current date (the employer record may need to be closed and re-opened for this to show) and the Status will be set to Outstanding, which means the employer has not yet started the form.
The next time the employer logs into e-track, they will be given a prompt to choose which form to complete (they will be given the option of all outstanding or in-progress forms currently in their queue).
When an employer clicks Save on a form, the status in the queue for that form will change to In Progress. If an employer closes their browser and then returns to the form later on, they will be able to continue from where they left off.
When an employer clicks Submit, providing any and all form validation has been met, the form status will change to Completed and they will not be prompted to complete the form again.
Forms Completed by an Employer on behalf of a Learner
An employer can be sent a form to complete on behalf of a learner. To do this:
-
In Maytas, open the employer's record and go to the Data Queue tab.

- Click the
 button on the grid to add a new row.
 -
In the pop-up window which appears, complete the following fields:
- Trainee ID - Use the
 button to search for an select the learner for whom the employer will be completing the form.
 - Form - Select the form to complete (this is populated by the lookups set above).
- Form Type - Select Employer on behalf of trainee.
- Due Date - Enter the date by which the form should be completed.
- Trainee ID - Use the
- Click OK.
- Click Apply.
The row will be added to the grid. The Date Created field will be populated with the current date (the employer record may need to be closed and re-opened for this to show) and the Status will be set to Outstanding, which means the employer has not yet started the form.
A row will also be added to the bottom grid on the learner's Data Queue tab to indicate their employer has an outstanding form to complete on their behalf.
The next time the employer logs into e-track, they will be given a prompt to choose which form to complete (they will be given the option of all outstanding or in-progress forms currently in their queue).
When an employer clicks Save on a form, the status in the queue for that form will change to In Progress. If an employer closes their browser and then returns to the form later on, they will be able to continue from where they left off.
When an employer clicks Submit, providing any and all form validation has been met, the form status will change to Completed and they will not be prompted to complete the form again.
Report Generator - Permissions for Custom Filters and Expressions
Custom filters and custom expression functions in Report Generator now require user permissions to be available. To give a user permission for these features:
- Go to Tools | Edit Permissions.
- Select the user or group which requires permission.
- Go to the Commands tab and expand the Reports section.
- Set the Edit Custom Filter and expressions permission to Visible.
- Click Apply.
- Go to Home on the toolbar and click the Sync button.
- Restart Maytas for the permissions to take effect.
e-track Online Release Notes – Version 5.18.7201.2
Copying Communities
New communities can now be created based on an existing community, which copies across the community structure, including groups, resources, modules, courses, tasks and forums (minus the actual forum posts). Users can also optionally be copied across. Please note that tasks which have been completed by a user in a community will also show as completed for that user in a copy of that community.
To copy a community:
- As a community admin user, select Communities on the sidebar.
- Open the community you wish to copy.
-
Select Actions | Copy this community.

- A pop-up window will appear. Enter a title for the new community and choose whether you wish to copy the community with or without its associated users.
- The new community will now be created. Note that copied communities are unpublished and must be manually published to be visible to other users.
Community Notices
Communities can now be given a notification which appears for all users of that community. Only a user who is an admin of a community can create a notice for it. To do this:
- Select Communities on the sidebar and open the community you wish to set a notice for.
-
Click the Add community notice button (only admins of that community will see the button).

-
A pop-up window will appear. Complete the title and body of the notice.
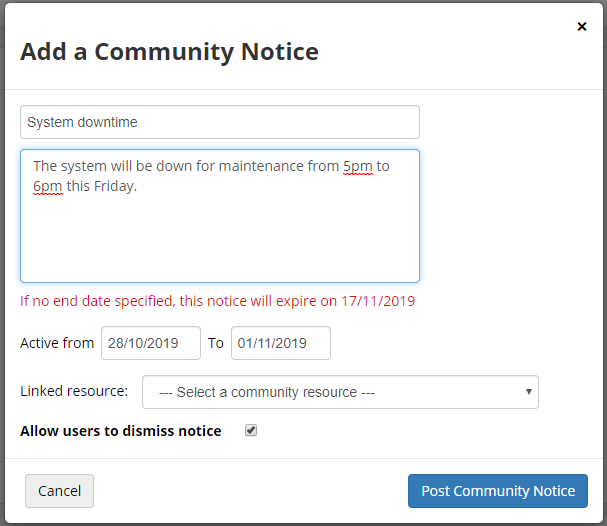
- If you want the notice to only appear between certain dates, enter the dates as required. If the dates are left empty, the notice will take immediate effect and expire after one month.
- If you wish to link the notice to a particular resource, select the resource from the list. This will allow users to navigate directly to the resource from the notice, and e-track will flag when a user has viewed the resource.
- By default, users will be able to dismiss the notice. If you wish the notice to display each time users login until the expiry date, untick the Allow users to dismiss notice checkbox.
- When finished, click Post Community Notice.
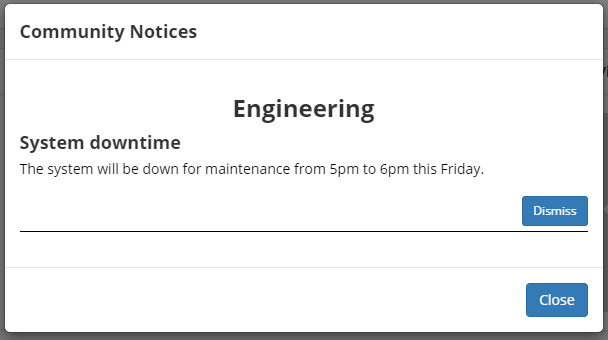
The message will be displayed to users in the community the next time they login to e-track. The Dismiss button (if enabled) will prevent the message from displaying to the user again, whereas the Close button will hide this instance of the message, and the user will be displayed the message each time they login until either the expiry date or until they dismiss it.
Employer Tab Permissions
Permissions can now be set to determine which tabs an employer user can see in the learner editor. To set these permissions:
- As an admin user, select the Web User Editor on the sidebar.
- Search for and open the user or group which requires the permissions to be set.
-
Click Custom Tabs to expand that section.
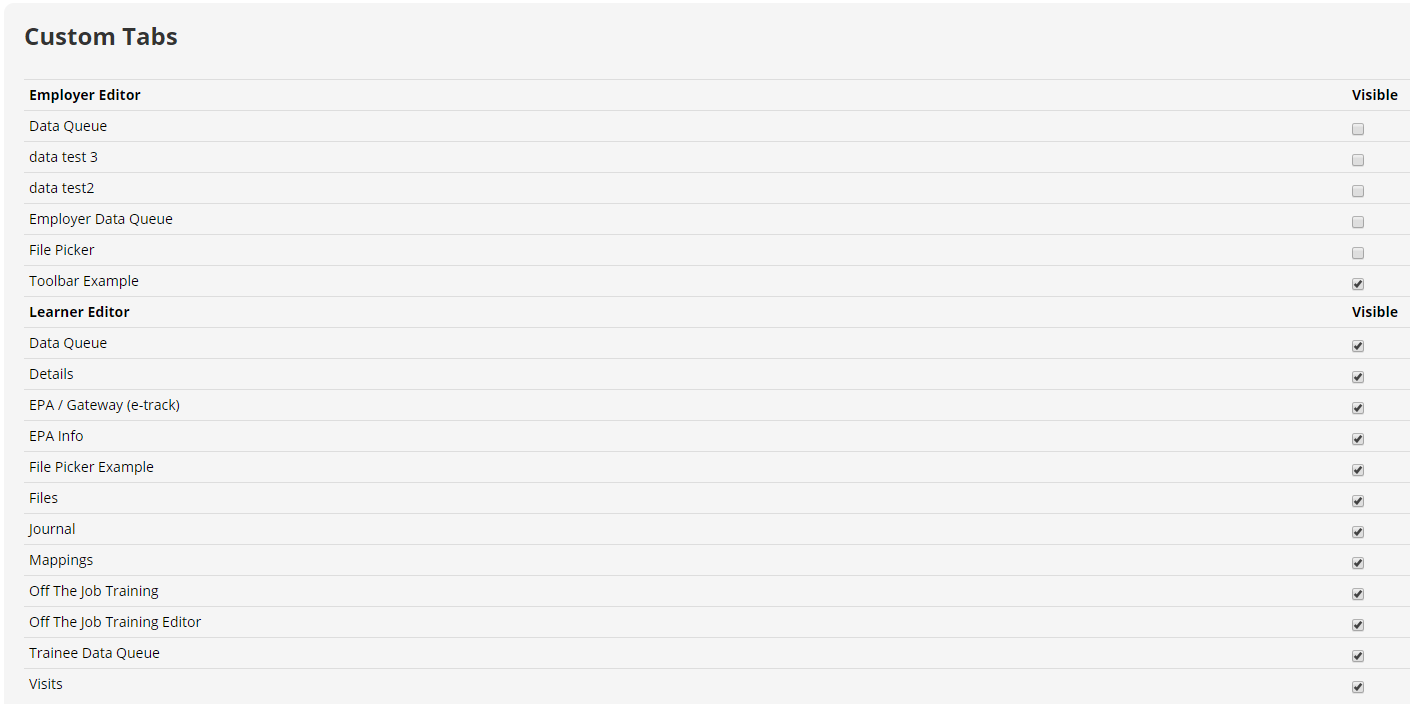
- The Learner Editor section now includes the Mappings, Details, Files, Visits and Journal tabs, which default to visible for employer users. Set the visibility as required and click Save.
User Details on Visit Notes
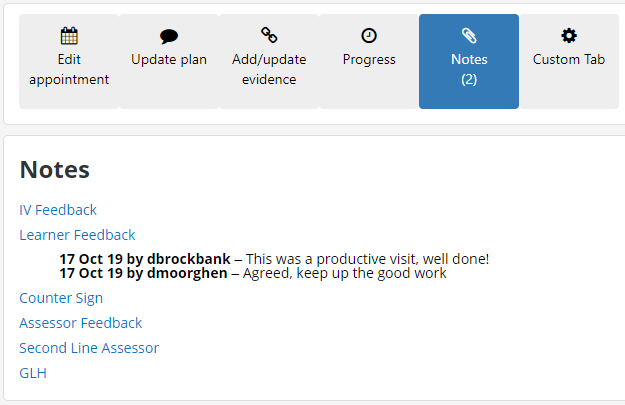
When logged in as an assessor user, visit notes now display the username and date for each comment to make them easier to distinguish.
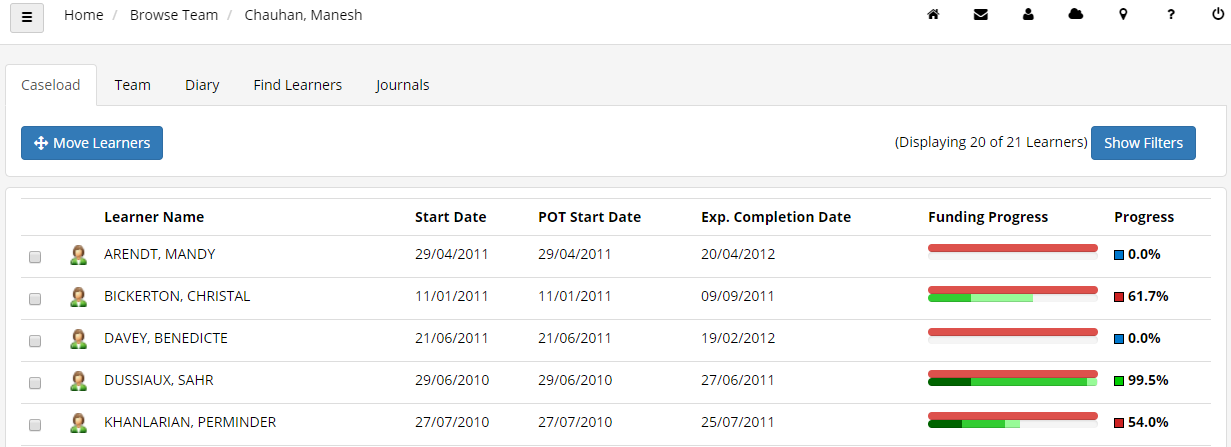
Additional Dates on Browse Caseload Screen
Assessor managers now have the option of displaying the POT start date and expected completion date on the Browse Caseload screen. To enable these:
- Select Settings on the sidebar and click System configuration.
- Select Assessor Login on the left and scroll down to the General section on the right.
-
There are two configs to choose from (one of these should be set, not both):
-
Use POT start date and ILR planned end date in the assessor caseload grid - This will display the POT start date and the planned end date from the ILR main aim (which uses TRAINEEPOT.FUNDINGEXPIRYDATE04). If the planned end date is not entered, the POT expected completion date is used instead (TRAINEEPOT.EXPCOMPLETIONDATE).
-
Use POT start and expected completion dates in the assessor caseload grid - This will display the POT start date and expected completion date (TRAINEEPOT.EXPCOMPLETIONDATE).
-
- Tick the box next to the config you wish to use and set the toggle button to ON.
- Click Save.
- Select Settings on the sidebar and click Reload (in the Tools section).
The dates will now be visible on the Browse Caseload screen.
Cascading Lookups
e-track screen design now supports cascading lookups (where the value of one lookup determines the available values in another lookup). This is available on learner, assessor, employer and visit tabs, as well as on data collection forms for learners, employers and visits.
Information on setting up cascading lookups can be found here.
File Picker on Custom Visit Tabs
The file picker control now works on custom tabs for visits, allowing you to upload files via those tabs.
Data Collection Queue
e-track allows you to send multiple data collection forms to an employer or learner for completion. This is done on the Data Queue tab on the relevant user's record, where a row can be added to the grid and configured for each form that needs to be completed.
As well as sending learner forms to a learner and employer forms to an employer, it is also possible to send an employer a learner form to complete on a learner's behalf. This is done by adding a row to the grid on the employer's Data Queue tab and then specifying which learner and form to use.
Requirements
On-line applications, data collection and data authentication require licences for e-track screen design and online applications, as well as licences for learners and employers. Please contact your account manager for the required licences, and consultancy will be required.
Import Data Queue Tabs
- In Maytas, go to Tools on the toolbar and click Import on the Screens panel of the ribbon.
- Click Browse.
- Browse to the e-track\Tabs folder of the upgrade, select the Data Queue tabs.m5rep package and click Open.
- Click Next, then click Finish.
- Go to Home on the toolbar and click Sync.
Form Setup
First, data collection forms should be created for learners, employers and visits as required (in the Trainee, Employer and Visit entities of the Maytas screen designer). The important points for a screen to work as a data collection form are on the screen designer Overview tab:
- Published - This should be ticked.
- e-track Publish - Application Form should be ticked.
- App Form ID - This should be a single-digit integer (i.e. 0 to 9) which is used to identify the form. Each learner form should have a different number, as should each employer form, but learner and employer forms can share a number. e.g. You could have a learner and an employer form both with an ID of 1, but not two learner forms with an ID of 1.
- Position - This essentially the page number of a form. For example, if you wanted a four page form, you would create a separate screen for each page, give them all the same App Form ID and then enter 1 to 4 for the position (i.e. 1 for page 1, 2 for page 2, etc).
Once you have created a form, a lookup should be added for it so that it is available in the Data Queue grid:
- In Maytas, go to Tools | DB Schema.
- Expand Tables on the left to show a list of tables in the database.
- For a learner form, expand TRAINEE_DATACOLLECTIONQUEUE, and for an employer form (or a learner form being completed by an employer on their behalf), expand EMPLOYER_DATACOLLECTIONQUEUE.
- Select FORMID.
-
If the Set button appears on the right, click it.

- Select the Look-ups tab.
- Click the
 button to add a new lookup.
 - The Short string should be two-characters:
- The first character is A for a learner form, P for an employer form or X for a visit form. Note that for a learner form being completed by an employer on the learner's behalf, this should be A.
The second character is the App Form ID of the form.
e.g. For a learner form with an ID of 3, the short string would be A3.
- The Long string should be the name or title of the form which will be displayed on the Data Queue grid.
- Click Apply and add additional lookups for forms as required.
- Go to Home on the toolbar and click Sync, then restart Maytas.
Learner Data Queue
To add a form to a learner's queue:
-
In Maytas, open the learner's record and go to the Data Queue tab.

- You will see two grids. The top grid is for adding forms for a learner to complete. The bottom grid displays forms which have been sent to an employer to complete on behalf of the learner (this is covered below).
- Click the
 button on the top grid to add a new row.
 - In the pop-up window which appears, select a Form (this is populated by the lookups set above) and enter a Due Date.
- Click OK.
- Click Apply.
The row will be added to the grid. The Date Created field will be populated with the current date (the learner record may need to be closed and re-opened for this to show) and the Status will be set to Outstanding, which means the learner has not yet started the form.
The next time the learner logs into e-track, they will be given a prompt to choose which form to complete (they will be given the option of all outstanding or in-progress forms currently in their queue).
When a learner clicks Save on a form, the status in the queue for that form will change to In Progress. If a learner closes their browser and then returns to the form later on, they will be able to continue from where they left off.
When a learner clicks Submit, providing any and all form validation has been met, the form status will change to Completed and they will not be prompted to complete the form again.
Employer Data Queue
To add an employer form to an employer's queue:
-
In Maytas, open the employer's record and go to the Data Queue tab.

- Click the
 button on the grid to add a new row.
 - In the pop-up window which appears, select a Form (this is populated by the lookups set above) and enter a Due Date.
- Click OK.
- Click Apply.
The row will be added to the grid. The Date Created field will be populated with the current date (the employer record may need to be closed and re-opened for this to show) and the Status will be set to Outstanding, which means the employer has not yet started the form.
The next time the employer logs into e-track, they will be given a prompt to choose which form to complete (they will be given the option of all outstanding or in-progress forms currently in their queue).
When an employer clicks Save on a form, the status in the queue for that form will change to In Progress. If an employer closes their browser and then returns to the form later on, they will be able to continue from where they left off.
When an employer clicks Submit, providing any and all form validation has been met, the form status will change to Completed and they will not be prompted to complete the form again.
Forms Completed by an Employer on behalf of a Learner
An employer can be sent a form to complete on behalf of a learner. To do this:
-
In Maytas, open the employer's record and go to the Data Queue tab.

- Click the
 button on the grid to add a new row.
 -
In the pop-up window which appears, complete the following fields:
- Trainee ID - Use the
 button to search for an select the learner for whom the employer will be completing the form.
 - Form - Select the form to complete (this is populated by the lookups set above).
- Form Type - Select Employer on behalf of trainee.
- Due Date - Enter the date by which the form should be completed.
- Trainee ID - Use the
- Click OK.
- Click Apply.
The row will be added to the grid. The Date Created field will be populated with the current date (the employer record may need to be closed and re-opened for this to show) and the Status will be set to Outstanding, which means the employer has not yet started the form.
A row will also be added to the bottom grid on the learner's Data Queue tab to indicate their employer has an outstanding form to complete on their behalf.
The next time the employer logs into e-track, they will be given a prompt to choose which form to complete (they will be given the option of all outstanding or in-progress forms currently in their queue).
When an employer clicks Save on a form, the status in the queue for that form will change to In Progress. If an employer closes their browser and then returns to the form later on, they will be able to continue from where they left off.
When an employer clicks Submit, providing any and all form validation has been met, the form status will change to Completed and they will not be prompted to complete the form again.
Data Collection Queue Report
A report is available to show the current queues for learners and employers. To import the report:
- In Maytas, go to Home on the toolbar and click Import on the Reports panel of the ribbon.
- Click Add Files.
- Browse to the Maytas 5\Extras\Module Reports folder of the upgrade.
- Select Data Collection Queue.m5rep and click Open.
- Click Finish.
- Once the report has finished importing, click Finish.
The report is called Data Collection Queue and can be found in the Audit folder of the reports library.