Schema and Lookup Editor
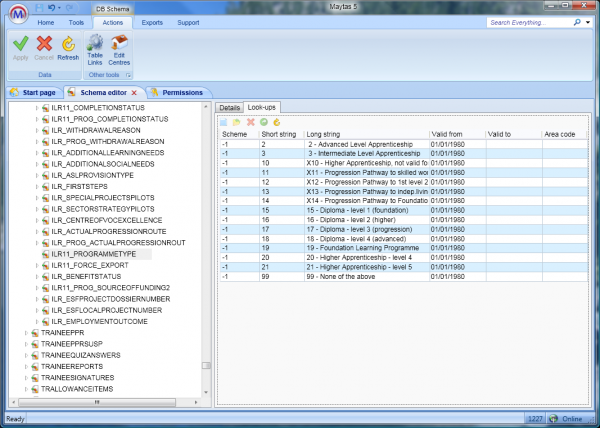
The Schema Editor allows you to view and edit table and field properties in the database, as well as maintaining lookup values, table links and centres. To open the Schema Editor, click Tools on the toolbar and click DB Schema on the General panel of the ribbon.

Overview
Edit Field Properties
Modifying table and field properties can have significant effects on Maytas functionality. As such, it is recommended that the schema editor is restricted to system administrators in the Permissions module.
The left-hand side of the screen shows the list of tables, and clicking the arrow to the left of a table will display its fields. Select a table or a field to view its properties on the right-hand side.
The Details tab shows table properties and, if a field is selected, field properties:
If no properties have been set for a table or field, a Set button will be displayed instead. Click this to set the properties.
Table properties
- Display label – This is the name which will be displayed for the table in Report Generator.
- Visibility Level / Table link / Next ID procedure – These are internal database functions which should only be modified if you are advised to do so.
Field properties
- Display label – This is the name which will be displayed for the field in Report Generator.
- Visibility level – This is an internal database function which should only be modified if you are advised to do so.
- Default data – This is the data which will be stored in the field by default.
- Default control – This sets the field type (e.g. text box, dropdown list, date field, etc). The type can be selected from a dropdown list, which will display the type code to the right.
- Allow on mail merge – Tick this box to allow the field to be used in Maytas 5 mail merges.
- Default format – For date fields, this can be used to specify the date format used in mail merge. The UK date format should be entered with capital Ms – i.e. dd/MM/yyyy.
- Audit Type - This is used with Signature Fields.
- Data Type - The SQL Server data type (e.g. integer, varchar, datetime, etc). This field is read-only.
- Is Nullable - Whether the column is permitted to have a null value (note that this is not the same as a blank value). This field is read-only.
- Character Maximum Length - The maximum length of values in the column (if applicable, e.g. for a varchar). This field is read-only.
Lookup Editor
Add and edit lookups
To maintain field lookups, select a field in the schema editor and click the Lookups tab. This will display the current lookup values (if any) on the right.
To add a new lookup:
- Click the
 button. This will add a new blank row.
 - Enter the details in the new row:
- Scheme – This will default to -1, which means it applies to all schemes. If you wish the lookup to apply to a specific scheme, enter the scheme number here.
- Short string – This is the value, or code, which is actually stored for the field. Ideally it should be as short as possible (e.g. 1 or 2 characters, although the limit is 10 characters). It is also important that each short string for a field is the same length. For example, if you create a lookup for a field with a 2 character short string, all the lookups for that field should be 2 characters long. Differing length short strings on the same field can cause issues with matching data.
- Long string – This is the text which is associated with the short string value. For example, if the short strings for gender were M and F, the long strings would be Male and Female.
- Valid from – This is the date from which the lookup is valid. This defaults to 01/01/1980, effectively making it valid for any data which will be in the database.
- Valid to – This is the date on which the lookup becomes invalid. By default it is left blank, making the lookup indefinitely valid.
- Area Code – This can be used to filter lookups based on area codes assigned to centres. Please contact Maytas Support for more information.
- Click Apply on the ribbon when finished.
Cascading lookups
Cascading lookups are when the value selected in a dropdown box determines the available lookups in another dropdown box. An example of this in practice is the ILR Apprenticeship Financial Details grid, where the chosen Financial Type determines which lookups are available for the Financial Code.
Cascading lookups have a parent-child relationship, where the parent table and field determines the top-level lookups and the child table and field determines the lower-level lookups. It is important that either the parent and child fields are on the same table or that the relationship between the parent and child tables is one-to-many. For example, a parent field on the TRAINEE table linked to a child field on the TRAINEEPOT table is valid, as each row in TRAINEEPOT relates to a single row in TRAINEE. However, if these were reversed then the relationship would be invalid, as a row in TRAINEE could relate to multiple rows in TRAINEEPOT.
To set up cascading lookups in the lookup editor:
- Expand the tables and fields on the left and select the field you wish to be dependent on another field (e.g. in the Financial Details example you would choose Financial Code).
-
Go to the Cascading Look-ups tab and tick the Enable cascading lookups box.

- Choose the parent table and field which will determine the available lookups.
- Select each parent value on the left and then tick the boxes which apply to it on the right.
- Click Apply.
Export / Import Lookups
Lookups can be exported and imported into a different database. This is mainly intended for providers who enter and test lookups on a test system so that they can be easily migrated to their live system.
First, permission must be given to the relevant user or group:
- Go to Tools | Permissions.
- Select the user or group which requires permission.
- Go to the Commands tab and expand the Lookup Editor section.
- Tick the box for the Import/Export Lookups permission and set the dropdown box to Visible.
- Click Apply.
- Restart Maytas for the permission to take effect.
To export lookups:
- Go to Tools | DB Schema.
-
Click Export Lookups. Please be aware that it may take a short while to load the lookups, depending on how many are in the system.
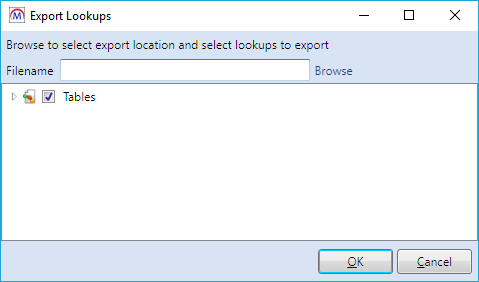
- Click Browse, browse to where you want to save the lookup file, enter a filename and click Save.
- Next we need to choose which lookups to export. By default, all lookups in the database are selected. To only select certain tables or fields, un-tick the Tables box and click the arrow to the left to expand the list of tables.
-
If you want to export all lookups in a table, tick the box for that table. If you only want to export lookups for specific fields, click the arrow next to the relevant table then tick the boxes for the required fields.
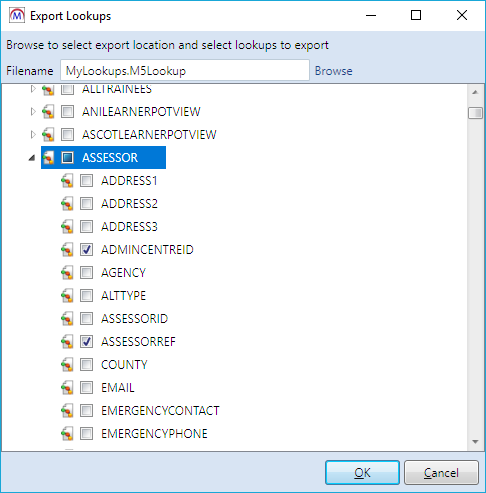
- Click OK to export the selected lookups.
- When the export has finished, a confirmation message will appear. Click OK to continue.
To import lookups:
- Go to Tools | DB Schema.
- Click Import Lookups.
- Browse to and select the lookup file and click Open.
- You will be asked if you wish to overwrite the longstring if a lookup already exists. Clicking Yes will check if the lookup shortstring already exists for the relevant field, and if it does then the longstring for that lookup will be overwritten with the one from the import. Clicking No will import any new lookups but will leave any existing lookups unchanged.
- When the import has finished, a confirmation message will appear. Click OK to continue.
Table Links
 Table links determine the fields which join two tables together to make them available in Report Generator. To access this feature in the Schema Editor, click Actions on the toolbar and click Table Links on the ribbon.
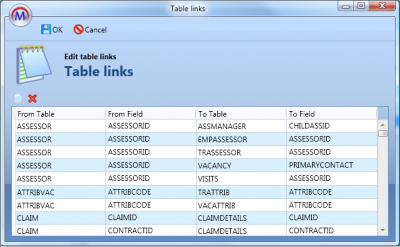
Each row specifies a link from a field in one table to a field in another table (i.e. the tables will join where the data in these fields match). If tables are joined on more than one field (e.g. the TRAINEEPOT and TRAINEEPOT2 tables join on both TRAINEEID and POT), a row is required for each field which they join on.
It is advisable to add reverse links for each join; for example, if you have links from TRAINEEPOT to TRAINEEPOT2, you should add the same links again, only from TRAINEEPOT2 to TRAINEEPOT.
The links for TRAINEEPOT and TRAINEEPOT2 would therefore be as follows:
| From Table | From Field | To Table | To Field |
|---|---|---|---|
| TRAINEEPOT | TRAINEEID | TRAINEEPOT2 | TRAINEEID |
| TRAINEEPOT | POT | TRAINEEPOT2 | POT |
| TRAINEEPOT2 | TRAINEEID | TRAINEEPOT | TRAINEEID |
| TRAINEEPOT2 | POT | TRAINEEPOT | POT |
To add a new link:
- Click the
 button. This will add a blank row.
 - Select the From Table and enter the From Field.
- Select the To Table and enter the To Field.
- Repeat for additional links as required.
- Click OK when finished.
To delete a link, select it and click the  button. Click Yes to confirm the deletion.
Edit Centres
 The Schema Editor allows you to add and maintain the centres in your database. To do this, click Actions on the toolbar and click Edit Centres on the ribbon.
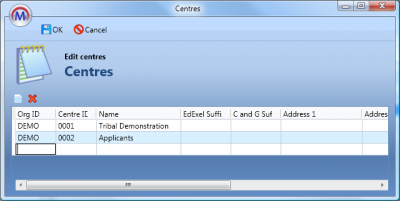
Each centre requires three fields to be completed:
- Org ID – This is your four-character organisation ID
- Centre ID – This is the four-character ID for the centre
- Name – This is the display name for the centre
There are also a number of additional fields, including the centre address, which can optionally be completed.
To add a centre:
- Click the
 button. This will add a blank row.
 - Complete the three required fields and, optionally, the additional fields.
- Click OK when finished.
To delete a centre, select it and click the  button. Click Yes to confirm the deletion.
New Field
 The New Field button allows you to add a new field to the database.
Please take note of the following before adding a new field:
- A backup of the database MUST be taken.
- All users MUST be logged out of Maytas.
- If possible, it is strongly recommended to try adding the field to a test system first.
- Once the new field has been added, it must be tested before any further users reconnect to the system.
If you have any questions or doubts about adding a new field, please contact Maytas Support for advice. Tribal cannot be held responsible for any issues which occur from adding a field without heeding the above information.
To add a new field:
- Go to the Actions tab on the toolbar and click the New Field button on the ribbon.
-
You will be prompted to ensure a backup has been taken. Click Yes to continue if a backup has been taken. Otherwise click No and backup the database.
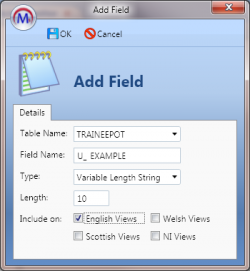
- In the window which appears, complete the following fields:
- Table Name – Select the table name from the dropdown list.
- Field Name – Enter the field name. Please note that all user-created fields are prefixed with U_ (e.g. U_EXAMPLE). This cannot be removed.
- Type – This is the type of field. Select one of the following types from the dropdown box:
- Variable Length String – For storing text of variable length. Fields which need to store large amounts of text should use the Notes type instead.
- Fixed Length String – For storing text which always has the same number of characters.
- Integer – For storing whole numbers (not decimals).
- Currency – For storing currency figures.
- DateTime – For storing dates.
- Notes – For storing large amounts of text.
- Length – If you have chosen variable or fixed length string, enter the length of the field. Please note that this should be as small as possible for the field requirements. For example, a variable length string to store text which will only ever be 10 characters or less should be given a length of 10. Fields with less certain length of data, such as names, should be given reasonable leeway without being excessive. It is important to consider the length, as too many unnecessarily large fields can result in errors and cause potential issues with database size and performance.
- Include on – This determines which Report Generator views the field will be included on (e.g. if you intend to use the field on reports for English data, tick the English Views box.
- Once all details have been completed, click OK. A message will appear to confirm the field was created successfully. Click OK to finish.
Deletion of Unused Custom Fields
Custom fields, i.e. those which begin with U_ in the database, can be removed via the Schema Editor if every row for that field is null. This requires a permission to be set:
- Go to Tools | Edit Permissions.
- Select the user or group which requires permission.
- Go to the Commands tab.
- Expand the Lookup Editor section.
- Set the Delete Field permission to Visible.
- Click Apply and restart Maytas for the change to take effect.
To delete an unused custom field:
- Go to Tools | DB Schema.
- Expand the relevant table on the left and select the U_ field you wish to delete.
-
Click Remove Field on the ribbon.
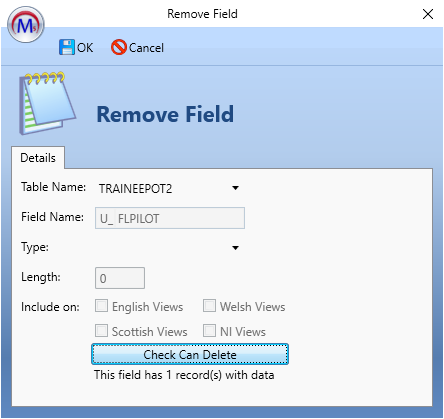
- Click the Check Can Delete button. If there are any records with data in the field (i.e. where the field is not null), this will be indicated under the button and you will not be able to click the OK button to remove the field.
-
If you decide to remove any data from the field, click the Check Can Delete button again once the data has been removed. It will now indicate that the field is not used.
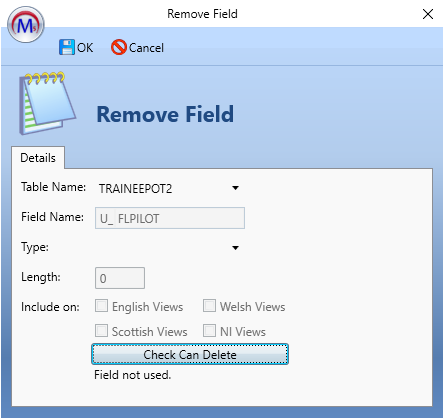
- Click OK to delete the field (or click Cancel to abort).