ebs-Link Release Notes
Maytas 5.18 Release Notes
Note regarding submissions
We would like to remind providers to create a submission early and check for any errors using reports from the appropriate software (i.e. the FIS or LLWR-Inform). Welsh providers should also remember to download their ULI file. After submission to the ESFA or DfES, providers should check that data has submitted correctly using the available reports. Providers should check that all their expected starts and completions are submitted correctly, and that start and outcome payments correctly match the PFR or ACE funding reports.
Our support desk gets extremely busy in the days prior to the submission deadlines, and although we try and prioritise submission-related queries, we cannot guarantee assistance if queries are sent late. If you do encounter any issues, please ensure that you contact Maytas Support as soon as possible, as we can only rectify issues of which we are aware. We also recommend checking Maytas Communities regularly for information on any known issues and solutions. Tribal cannot be held responsible for any issues caused by your failure to comply with this advice.
Technical specification
The latest Maytas and e-track technical specification can be found here.
Confirm the upgrade has been run
Once the upgrade has been completed, the version number should be checked to ensure it has been successful.
- Start Maytas and go to Support on the toolbar.
- Click About.
- The version numbers should read 181.20 / 5.18.7101.3. If you have any other version, please ensure you have followed the upgrade instructions correctly. If you require assistance, please contact Maytas Support.
It is the responsibility of customers to ensure that users carry out any required user acceptance testing and sign off on the upgrade.
Complete the Upgrade
Features Added in the Upgrade
These are the main updates in the upgrade:
- ILR tab for 2019/20
- ILR rollover funding for 2019/20 using 2018/19 rules
- ILR batch export
- Lookup changes for new and revised fields
- Fixes to a number of issues
Check the Contractor Details for the ESFA Export
- Open Maytas 5 and select Management | Contracts.
- Highlight the contractor name (company) you wish to edit.
-
Right-click and select Edit.
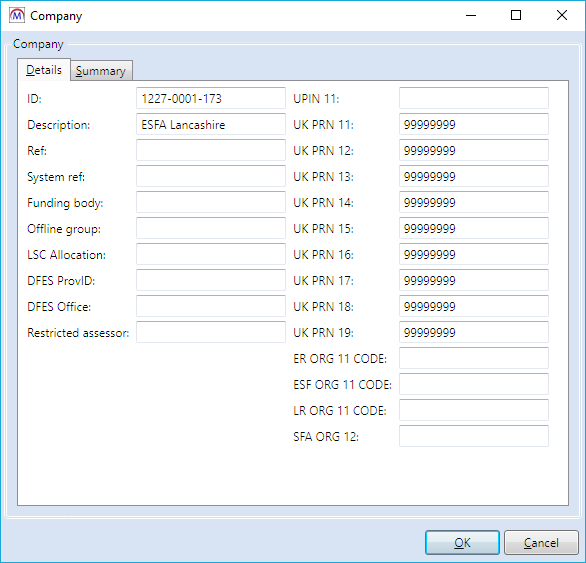
- The Company screen will be displayed. The technical upgrade will have copied the UK PRN field to the new 19 box. If necessary, you should amend this value.
- Providers need to ensure that these instructions are completed for each company (contractor) used for the ESFA export.
Create the 2019/20 ESFA Formula-Funded Contract
A 2019/20 ESFA formula-funded contract should be set up for each ESFA contractor. Without this contract, Maytas is unable to determine the funding rules, schemes and lookup codes to use.
- In the Contracts module, left-click the contractor (company) to which you wish to add the new contract.
- Click Add Contract on the ribbon.
-
Make sure that option 1. Existing company is selected then click Next.
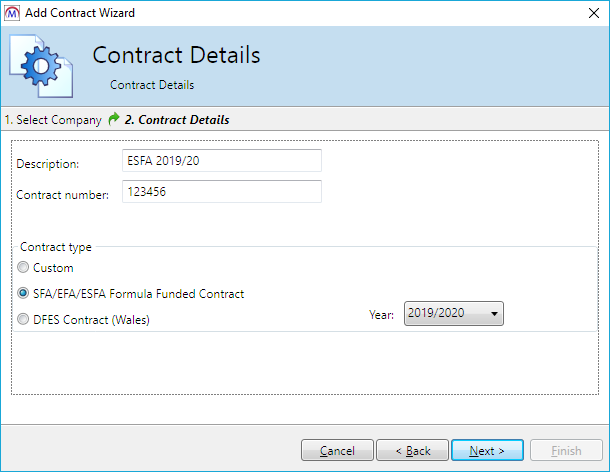
- Enter a contact description (e.g. ESFA 2019/20).
- Enter a contract number if required.
- Select the SFA/EFA/ESFA Formula Funded Contract option.
- Select year 2019/2020.
- Click Next.
- Amend the schemes you wish to include in the contract and click Next.
- Click Finish.
The Contract Wizard will create the appropriate funding model within Maytas and set up all of the schemes that apply.
Re-Import the FIS Data Sets
IMPORTANT - The FIS for 2019/20 is completely different to previous years. It does not currently include the data sets that are uploaded to Maytas, and so only allows submissions to be imported and validated. Our intention is to allow .CSV files for the LARS, postcode data, etc, to be imported into Maytas instead, but files for 2019/20 are not yet available.
For now, we recommend that providers continue to upload the 2018/19 FIS data sets into Maytas, though as of this upgrade it is not clear if this will include LARS updates for 2019/20. We will update providers with our plans around this as and when further information becomes available.
The FIS data sets must be re-imported for this upgrade, even if they were imported in a previous upgrade.
It is essential that the latest aim information is imported into Maytas for use by the ILR export. This should be done by importing the relevant information directly from the Data Service’s Funding Information System (FIS). To do this, you must have the FIS installed and correctly configured (please refer to the Data Service’s instructions for setting up the FIS).
Please ensure you have the latest version of the FIS with the latest components installed.
Once the FIS is installed and configured, the information can be imported as follows:
- Perform a sync in Maytas 5, then restart Maytas 5.
-
Go to Exports | Uploads | Upload FIS Data Sets.
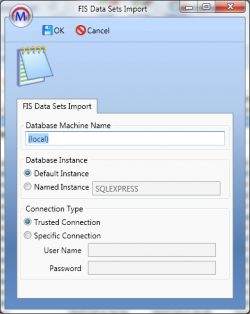
- There are three items to configure:
- Database Machine Name – If the FIS is installed on the same machine that you are using for Maytas 5, this can be left as (local). Otherwise, enter the machine name of the SQL server where the FIS database is held.
Database Instance – If the SQL server holding the FIS database has a named instance (e.g. MACHINENAME\INSTANCENAME), select Named Instance and enter the instance name. Otherwise leave this as Default Instance.
If you have no named instance and Default Instance does not work, you may need to select Named Instance and leave the instance name blank.
- Connection Type – This is the login for the SQL server holding the FIS database. Trusted Connection will use Windows authentication. If you wish to specify the login details, select Specific Connection and enter the credentials.
- Click OK. The FIS data will now be imported.
- If you have an Adult Skills budget contract and a transition factor, this must be entered on the contract:
- Go to Management on the toolbar and click Contracts on the ribbon.
- Select the relevant contractor, then select the Adult Skills contract on the right.
- Click the
 button.
 - Go to the Uplifts tab.
- Enter the ASB Transition Factor and click OK.
- Click Apply to save the change.
Note on the Funding Cache
By default, the funding cache will update overnight so that funding information in Maytas uses the newly-imported FIS and postcode information. Please check with your system administrator if you are unsure if or when the funding cache is updated on your system. You can also manually set the funding cache to update by going to Management | Profiles and clicking the Funding Cache button, though please be aware that this may take a long time and may use a large amount of system resources, which could affect performance for other users on the system.
Import ILR 2019/20 Tab
A new ILR tab for 2019/20 has been produced. It includes the new fields for 2019/20:
- Learning start date postcode (parts 1 and 2)
- Planned hours
- End point assessment date
- Use EAD to update achievement date
- Devolved area monitoring 1 to 4
- National learning aim monitoring 5 and 6
The Off the Job Training Hours field has been removed as it has been replaced by Planned hours.
To import the tab in Maytas:
- Go to Tools on the toolbar.
- Click Import on the Screens panel of the ribbon.
- Click Browse.
- Browse to the ebs-Link\ebs Tabs folder of the upgrade, select ebs ILR 2019.m5tab and click Open.
- Click Next, then click Finish.
- Sync Maytas to apply the tabs to all clients.
Maytas 5 Release Notes – Version 5.18.7101.3
LRS Web Service Certificate Renewal
The LRS are issuing new LRS certificates for use with the LRS and PLR web services which are utilised by Maytas. It is important that you install the new certificate before 21/09/2019 to ensure continuation of the services.
Instructions for this can be found on the Tribal Communities site:
OneFile Integration Updates
Several features in the OneFile integration have been updated. See here for more information on using the OneFile integration in Maytas.
Updated OneFile tab
An updated version of the OneFile tab is available for importing:
- In Maytas go to Tools on the toolbar and click Import on the Screens panel of the ribbon.
- Click Browse.
- Browse to the Maytas 5\Extras\Tabs folder of the upgrade.
- Select OneFile.m5tab and click Open.
- Click Next, then click Finish.
- Go to Home on the toolbar and click Sync.
Centre ID in centre mapping
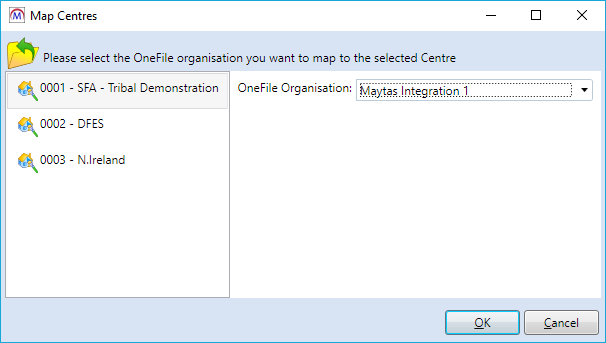
When mapping centres to OneFile organisations, the centre ID is now displayed alongside the centre name so that it is clearer which centre is being mapped.
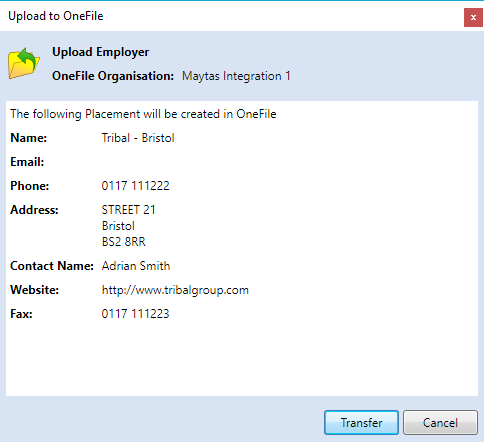
Branch name included with employer name
When an employer record is sent to OneFile, the branch name is now included (if one is entered) along with the employer name. If an employer with a branch name has already been sent to OneFile before this upgrade, uploading it again will update the existing record on OneFile with the branch name.
Extra learner fields included in upload
Four additional fields are now included when uploading a learner record to OneFile:
- Unique learner number (ULN) - TRAINEE.UNIQUELEARNERNUMBER
- Ethnicity - TRAINEE.ETHNICGROUP
- Gender - TRAINEE.GENDER
- Disability - TRAINEEDETAILS.DISABILITY
Search across all organisations
When uploading a learner, assessor or employer record to OneFile, Maytas will now check across all OneFile organisations to see if an existing record already exists, and if so, that record will be updated rather than creating a new one. This prevents duplicates being created in OneFile if the centre/organisation has changed since the record was first uploaded.
Usability Survey
As with previous major releases, Maytas users will be asked to complete a usability survey after the 5.18 upgrade (this will appear 30 days after the upgrade to allow for time using the updated system). The information gathered via the survey is anonymous and is used to improve the Maytas user experience. Only Tribal receives the results and we do not share the results with third parties. As always, we are very grateful for completed surveys as well as any additional feedback you have on Maytas.
Funding Rules Update
The funding calculation in Maytas for funding model 36 has been updated so that it uses the new employer co-investment rate of 5% for apprenticeships, as per the latest available specification and associated documents.
e-track Online Release Notes – Version 5.18.7101.3
Usability Survey
As with previous major releases, e-track users will be asked to complete a usability survey after the 5.18 upgrade (this will appear 30 days after the upgrade to allow for time using the updated system). The information gathered via the survey is anonymous and is used to improve the e-track user experience. Only Tribal receives the results and we do not share the results with third parties. As always, we are very grateful for completed surveys as well as any additional feedback you have on e-track.
Ordering of Units by Target Date
The summary of units for each module assigned to a learner can now be ordered by the unit target dates rather than by the unit code.

To do this:
- Select Browse Modules on the sidebar.
- Search for the base module for which you wish to change the unit ordering.
- From the search results, click edit at the end of the row for the relevant module.
-
Select the top row (i.e. the base module) and click Edit.
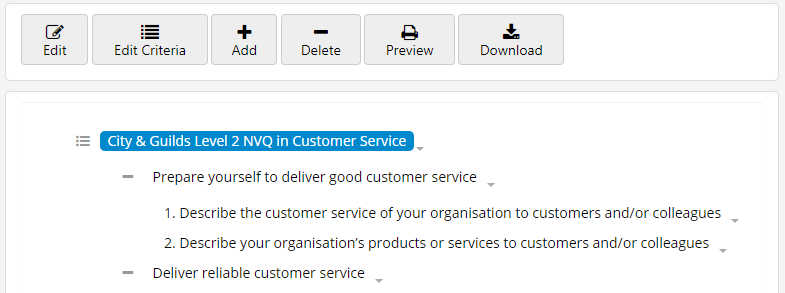
- Scroll down the module details screen and tick the Order By Target Date box.
- Click Save at the top of the details screen.
The units for that module will now be ordered by the unit target dates on the learner homepage and the learner summary screen for assessor and employer logins. Note that if a display index has been set on the units, the target date ordering will take precedence.
Obsolete Lookups on Application Forms
Obsolete lookups (i.e. those where the Valid to date for the lookup is in the past) will no longer display in e-track application forms created from the screen designer. This may require the lookups to be refreshed in e-track:
- Go to Settings on the toolbar.
- Next to Reload lookups & System config, click the Reload button.
- Restart e-track.
To check or set the Valid to date for a lookup in Maytas:
- Go to Tools | DB Schema.
- Expand Tables on the left, then expand the table which has the field you wish to check the lookups for.
- Select the relevant field and go to the Look-ups tab.
-
View or set the Valid to date for lookups as required.
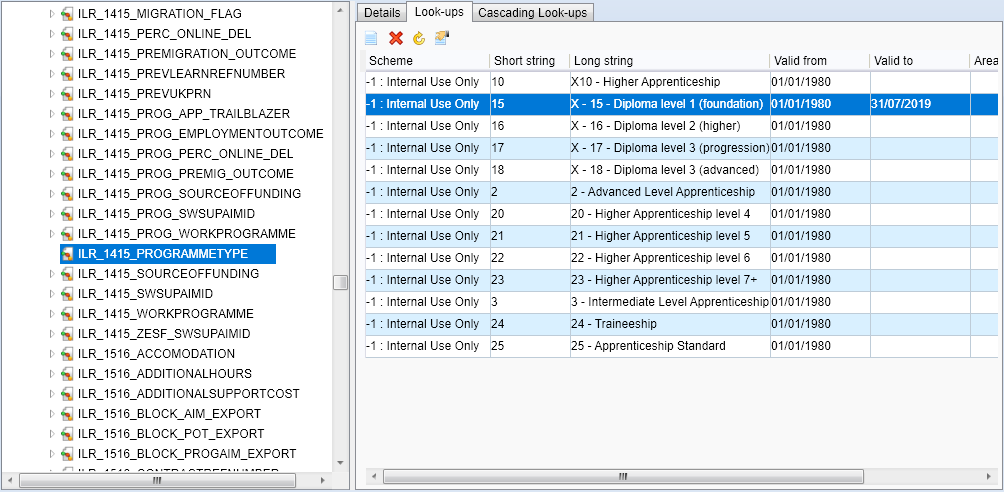
- Click Apply, then go to Home on the toolbar and click Sync.
Accessibility Improvements for Employer Login
The accessibility features for the employer login in e-track have been overhauled so that they now meet the WCAG2.0 AA standard.
When an employer logs into e-track, they will now see an Accessibility Mode toggle button at the top, which is off by default.
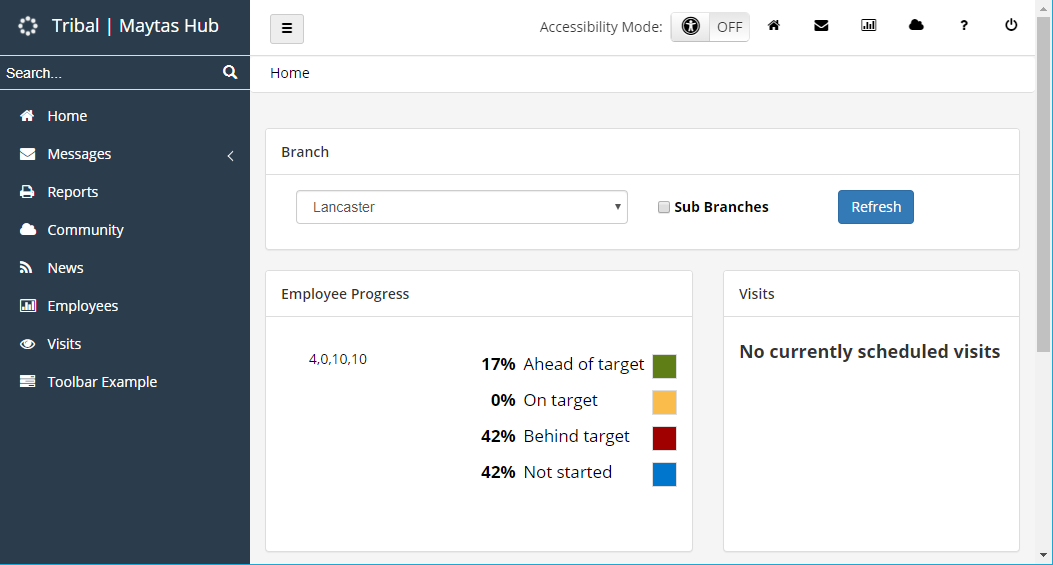
Above - The employer login with accessibility mode off.
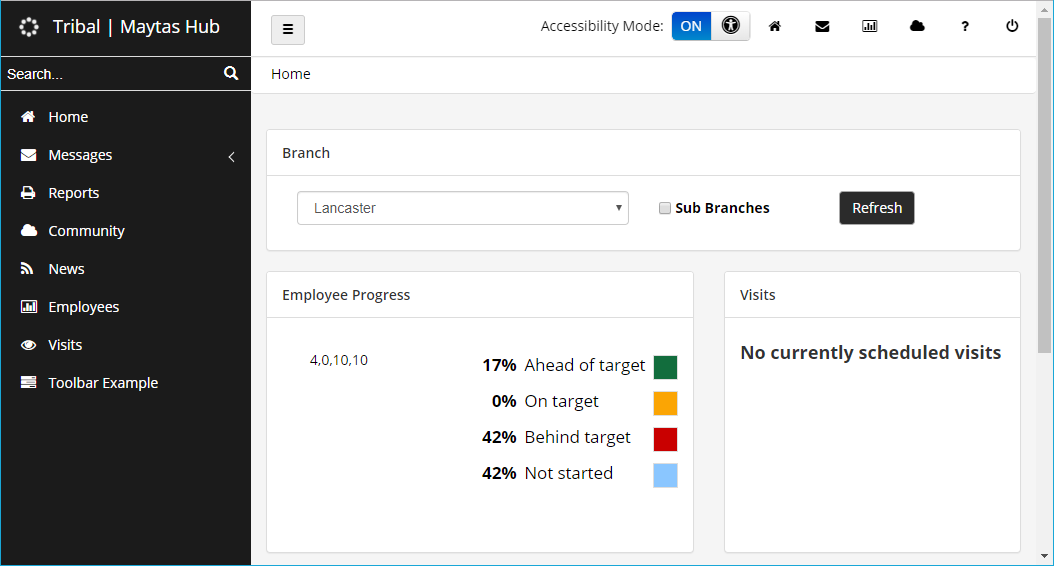
Above - The employer login with accessibility mode on.
With accessibility mode on, all screens have higher contrast colours to make them easier to view, and screens are tagged in the background so that they work with screen readers (software which dictates the screen content to the user).
The Accessibility button is visible at all times and can be toggled at any time. The employer's preference is remembered when they log out and back in again.
Some accessibility improvements have also been made in e-track even when accessibility mode is off, such as the general layout and colours on some screens.