5.19 SP1 Maytas Release Notes
Note regarding submissions
We would like to remind providers to create a submission early and check for any errors using reports from the appropriate software (i.e. the FIS or LLWR-Inform). Welsh providers should also remember to download their ULI file. After submission to the ESFA or DfES, providers should check that data has submitted correctly using the available reports. Providers should check that all their expected starts and completions are submitted correctly, and that start and outcome payments correctly match the PFR or ACE funding reports.
Our support desk gets extremely busy in the days prior to the submission deadlines, and although we try and prioritise submission-related queries, we cannot guarantee assistance if queries are sent late. If you do encounter any issues, please ensure that you contact Maytas Support as soon as possible, as we can only rectify issues of which we are aware. We also recommend checking Maytas Communities regularly for information on any known issues and solutions. Tribal cannot be held responsible for any issues caused by your failure to comply with this advice.
Technical specification
The latest Maytas and e-track technical specification can be found here.
Once the upgrade has been completed, the version number should be checked to ensure it has been successful.
- Start Maytas and go to Support on the toolbar.
- Click About.
- The version numbers should read 181.20 / 5.19.7360.4. If you have any other version, please ensure you have followed the upgrade instructions correctly. If you require assistance, please contact Maytas Support.
It is the responsibility of customers to ensure that users carry out any required user acceptance testing and sign off on the upgrade.
Complete the Upgrade
Features Added in the Upgrade
These are the main updates in the upgrade:
- Standard Import watchers
- Additional Payments PFR Reconciler for 2019/20
- PCR - Scheduled QAR cache update
- Assessor data collection queue
- Module register wizard
- Miscellaneous minor updates
- Fixes to a number of issues
Reports Library 1.0.3.4 is also included in the upgrade but must be installed separately, which is detailed in the Upgrade Guide. It can be found in the Maytas 5\Extras\Reports Library folder of the upgrade. If you are a hosted customer, please contact the Service Desk to arrange for the reports library update to be applied.
Import Funding Information
Due to the major changes to the FIS for 2019/20, the process for importing the required funding information into Maytas is now as follows:
- The old FIS 2018/19 application should be used to import data sets for 2018/19 and earlier, as per previous releases. This only needs to be performed once more after the upgrade and then it will no longer be required in future releases.
- The LARS for 2019/20 should be imported.
- Postcode data for 2019/20 should be imported.
- Once all data has been imported, ensure that the funding cache is refreshed (either on a database schedule or a manual update out of working hours).
Re-Import the FIS Data Sets
It is essential that the FIS data sets for 2018/19 and earlier are imported into Maytas one final time for use by the funding cache. This should be done by importing the relevant information directly from the Data Service’s Funding Information System (FIS). To do this, you must have the FIS installed and correctly configured (please refer to the Data Service’s instructions for setting up the FIS).
Please ensure you have the latest version of the 2018/19 FIS application with the latest components installed.
Once the FIS is installed and configured, the information can be imported as follows:
- Perform a sync in Maytas 5, then restart Maytas 5.
-
Go to Exports | Uploads | Upload FIS Data Sets.
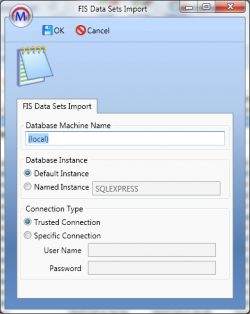
- There are three items to configure:
- Database Machine Name – If the FIS is installed on the same machine that you are using for Maytas 5, this can be left as (local). Otherwise, enter the machine name of the SQL server where the FIS database is held.
Database Instance – If the SQL server holding the FIS database has a named instance (e.g. MACHINENAME\INSTANCENAME), select Named Instance and enter the instance name. Otherwise leave this as Default Instance.
If you have no named instance and Default Instance does not work, you may need to select Named Instance and leave the instance name blank.
- Connection Type – This is the login for the SQL server holding the FIS database. Trusted Connection will use Windows authentication. If you wish to specify the login details, select Specific Connection and enter the credentials.
- Click OK. The FIS data will now be imported.
- If you have an Adult Skills budget contract and a transition factor, this must be entered on the contract:
- Go to Management on the toolbar and click Contracts on the ribbon.
- Select the relevant contractor, then select the Adult Skills contract on the right.
- Click the
 button.
 - Go to the Uplifts tab.
- Enter the ASB Transition Factor and click OK.
- Click Apply to save the change.
Import LARS
The LARS for 2019/20 should be imported as follows:
- Download the LARS MDB file for 2019/20. At the time of this release, the latest version is the LARS MDB version 7.
- In Maytas, go to Exports on the toolbar.
- On the ILR Tools panel of the ribbon, go to Uploads | Upload Funding Information | Upload LARS (Version 7).
- Browse to and select the downloaded LARS file and click Open.
- The file will now be imported. Click OK on the message which appears.
Progress on the import can be checked by going to Home | Server Tasks | Server Jobs. Typically it will take several minutes.
Import Postcode File
Postcode data for 2019/20 should be imported as follows:
- Obtain the postcode uplift factors file - Download the zip file under 2019 to 2020 uplift factors by postcode and LLSOA: CSV files.
- In Maytas, go to Exports on the toolbar.
- On the ILR Tools panel of the ribbon, go to Uploads | Postcode Uploads | Upload Post Code Data (2019/20).
- Browse to and select the postcode uplifts zip file and click Open.
- The file will now be imported. Click OK on the message which appears.
Progress on the import can be checked by going to Home | Server Tasks | Server Jobs. Typically this will take several minutes.
Devolved AEB postcode data is also available for importing, but it is not currently used in Maytas and so there is no need to import it. Future upgrades may require it to be imported, depending on whether the data is used in the funding calculations.
Large employer factor data sets do not need to be imported for 2019/20. LEF data for 2018/19 and earlier is included in the FIS import.
Note on the Funding Cache
By default, the funding cache will update overnight so that funding information in Maytas uses the newly-imported FIS and postcode information. Please check with your system administrator if you are unsure if or when the funding cache is updated on your system. You can also manually set the funding cache to update by going to Management | Profiles and clicking the Funding Cache button, though please be aware that this may take a long time and may use a large amount of system resources, which could affect performance for other users on the system.
Import PFR Reconciler Reports
The PFR Reconciler reports for 2019/20 should be imported as follows:
- In Maytas, go to Home on the toolbar and click Import on the Reports panel of the ribbon.
- Click Add Files.
- Browse to the Maytas 5\Extras\Module Reports folder of the upgrade.
- Select PFR Reconcilers – 1920.m5rep and click Open.
- Click Finish.
- Once the reports have finished importing, click Finish.
Due to the size of the .rdl file for the FM36 PFR report, some report servers may produce the following error when importing:
Error: There was an exception running the extensions specified in the config file. —>
Maximum request length exceeded.
This means that the report server's MaxRequestLength property is configured to only allow uploads up to a certain size, and the configuration must be changed to allow larger files to be uploaded. Please contact your system administrator to do this. Please note that Maytas Support cannot offer support on how to configure a SQL Server Report Server, as these are Microsoft products.
Publish Apprenticeship Service Export Tab
A new tab for the Apprenticeship Service (AS) export is automatically imported in this upgrade. As it is unpublished when imported, it must be published to make it visible for a user.
If you do not use the AS export, this section can be skipped.
To publish the tab:
- Go to Tools on the toolbar.
- Click Publish / Unpublish on the Screens panel of the ribbon.
- Click the Name header to sort alphabetically.
- Locate the two screens called AS Exported Apprenticeships and ensure the Published box is ticked for both of them.
- Click Finish.
- Go to Home on the toolbar and click Sync.
Updated Smart Assessor Tabs
Updated versions of the Smart Assessor tabs are available in this upgrade.
If you do not use the Smart Assessor integration, this section can be skipped.
- If you DO NOT have previous versions of these tabs in Maytas, the upgrade will automatically import them and set them to unpublished.
- If you DO have previous versions of these tabs in Maytas, the upgrade will not overwrite them and they must be manually imported.
To publish the tabs:
- Go to Tools on the toolbar.
- Click Publish / Unpublish on the Screens panel of the ribbon.
- Click the Name header to sort alphabetically.
- Locate the three screens called Smart Assessor and the screen called Register course and ensure the Published box is ticked for all of them.
- Click Finish.
- Go to Home on the toolbar and click Sync.
To manually import the tabs:
- In Maytas, go to Tools on the toolbar and click Import on the Screens panel of the ribbon.
- Click Browse.
- Browse to the Maytas\Extras\Tabs folder of the upgrade.
- Select the Smart Assessor.m5tab package and click Open.
- Click Next, then click Finish.
- Go to Home on the toolbar and click Sync.
Maytas 5 Version 5.19.7360.4 Release Notes
Engage Integration
Maytas and e-track now integrate with Engage in the following ways:
- A button in the Engage app can be configured to allow you to log directly into e-track using the Engage user account.
- Linked user accounts for Maytas and Engage can be used to show contact log entries from Maytas in Engage.
- Engage groups can be created from the Module Editor in Maytas, using a module title as the group name.
Technical Overview
The process for setting up the integration is as follows:
- The integration between Maytas and Engage first requires a number of configuration options to be set (detailed below).
-
Each user requiring access to both e-track and Engage has a web user account created in Maytas with the Engage Login option ticked. When saved, this creates a corresponding user account in Engage with the same login details. This can also be done with existing web user accounts.
Users who also (or only) use Maytas must have their Maytas user linked to the web user to allow them to send messages to Engage through the Contact Log.
- To setup the option to launch e-track from the Engage app, a button must be configured from Maytas which will then appear in the Engage app.
Setup
Configuration Options
Several configuration options must be set for the Engage integration to work. Before continuing, ensure you have obtained from Tribal the values to enter for the following configs:
- Client ID for IDS
- Client secret IDS URL
- Edge IDS URL
- Edge sync URL
- Engage API URL
- Engage API username
- Engage API password
- Engage location
- In Maytas, click the M5 button at the top left and click Options.
- Select Engage Integration on the left (under the e-track Online header).
-
Tick the boxes next to the configs and enter the values as follows:
- Client ID for IDS - As provided by Tribal
- Client secret IDS URL - As provided by Tribal
- Edge IDS URL - As provided by Tribal
- Edge IDS password - The password for the admin web user created below
- Edge IDS username - The username for the admin web user created below
- Edge sync URL - As provided by Tribal
- Select Engage Integration on the left (under the Maytas header)
- Complete the following configs:
- Engage API password - As provided by Tribal
- Engage API username - As provided by Tribal
- Engage API URL - As provided by Tribal
- Engage location - As provided by Tribal
- Engage sender Username For AutoContact - Enter the username for the Engage user you want to show as the sender for any Engage messages sent on an automated schedule (i.e. via the auto-communication feature in Report Generator)
- Select Admin on the left (under the Maytas header).
- Scroll down to the General section and locate the config Allow you to edit data in the specified table(s).
- Add the table ENGAGETHIRDPARTYLINK to the end of the existing set of tables, separated by a comma and a space (e.g. TABLE1, TABLE2, ENGAGETHIRDPARTYLINK).
- Click OK.
- Sync and restart Maytas.
Create Admin Account
A new web user admin account must be created with the same username as an Engage admin user.
- In Maytas, go to Tools | Web User Editor.
- Click the
 button to create a new user account.
 -
Enter the user details as required. The important fields with regards to the Engage integration are:
- Username - This must be the same as the username for the Engage admin user which this account will link to.
- Edge Roles - Enter SMSService
- Click Next.
- On the Permissions screen, tick Web Administrator and Engage Login.
- Click Next, then Next again, then Finish.
Create Web User Accounts
Web user accounts should be created for users who will log into both Engage and Maytas or e-track. When the Engage Login permission is enabled, this will generate a new corresponding user account in Engage with the same login details.
Existing web user accounts can be used by ticking the Engage Login permission against them in the web user editor.
Shared user accounts between Maytas/e-track and Engage MUST exist or be created in Maytas/e-track first. It is not currently possible to link existing Engage user accounts to Maytas/e-track user accounts, or to create a user in Engage and generate a corresponding user in Maytas/e-track.
To create a web user account with a corresponding Engage user account:
- In Maytas, go to Tools | Web User Editor.
- Click the
 button to create a new user account.
 -
Enter the user details as required and click Next.
- On the Permissions screen, tick Engage Login, as well as any other required permissions.
- Click Next and select the required report permissions.
- Click Next, then click Finish.
Create Contact Log Entries
The Contact Log can be used to send messages to Engage. This can be done by manually creating a message or via the auto-communication feature.
To manually send a message to Engage:
- Log into Maytas as a user configured as detailed above.
- Open a learner, assessor or employer record. The record must also be linked to a web user configured for use with Engage.
- Go to the Contact Log tab.
-
Click the
 button and choose either Engage Message or Engage Notification. These options will only appear for valid users configured for use with Engage.
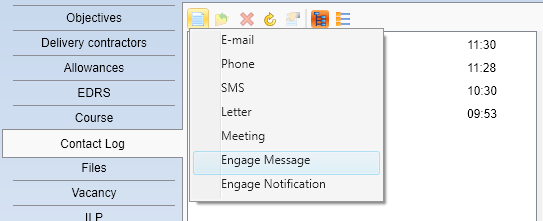
- Complete the Contact Log entry as you normally would and click OK. The message will then appear in Engage, in the Messages section.
Create a Group
The Module Editor in Maytas can be used to create a group with the title of a module.
- Go to Tools | Module editor.
- Select the module you wish to use on the left (note that this must be a base module).
-
Go to the Misc tab on the right.
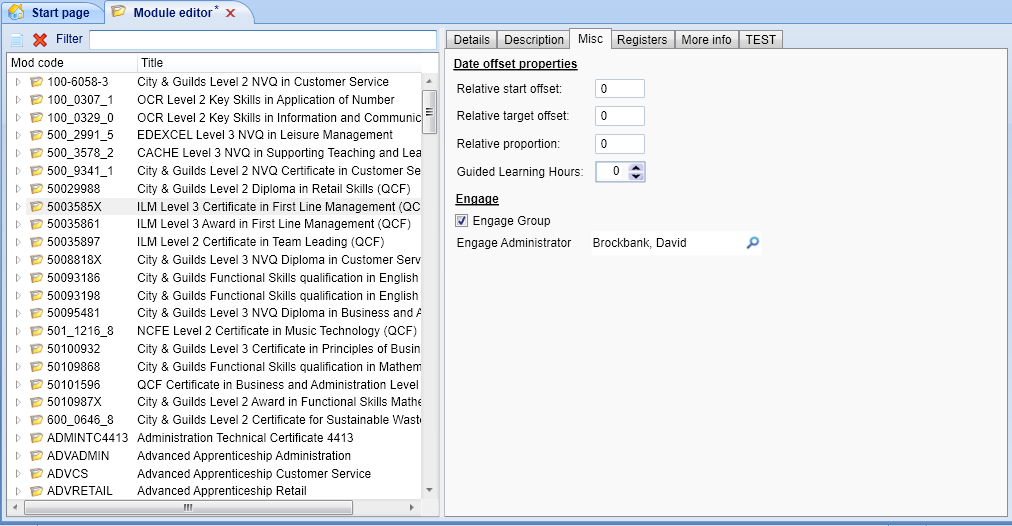
- Tick the Engage Group box.
- Search for and select the assessor to set as the group administrator in Engage.
- Click Apply. The group will now appear in the Groups section in Engage.
Launch e-track from the Engage App
To allow Engage users to launch and log directly into e-track from the Engage app, a button must be configured in Maytas. First, this requires the Table Edit permission if it is not already set:
- In Maytas, go to Tools | Edit Permissions.
- Select the user or group which requires permission.
- Go to the Commands tab and expand the Table Editor section.
- Ensure all the Table Editor permissions are ticked and set to Visible.
- Click Apply, then restart Maytas.
Next the button must be created and configured:
- Go to Tools | Table Edit.
- Select ENGAGETHIRDPARTYLINK from the Table Name dropdown.
-
Click the
 button to add a new row.
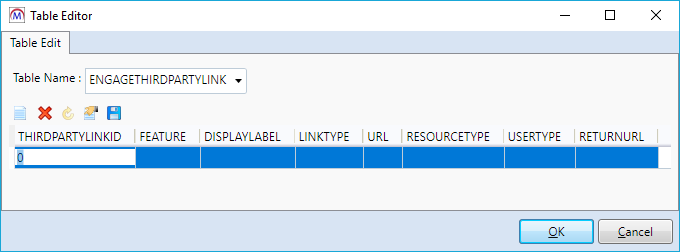
-
Complete the fields as follows:
Field What to enter THIRDPARTYLINKID Leave this unchanged FEATURE Not required DISPLAYLABEL Enter the text you want to appear on the button in Engage (e.g. Start e-track) LINKTYPE dynamicEdge URL This must be obtained from Tribal RESOURCETYPE Link USERTYPE I (i.e. I for indigo, not a lowercase L) RETURNURL ~/Trainee/index The RETURNURL of ~/Trainee/index will take you to the learner home page, but other values can be used to take you to other pages instead. e.g. ~/Messages/inbox will take you to the Messages page. Please contact Tribal if you need help with pointing to a particular page.
-
Click the
 button to save changes. The row should look similar to this:
-
Click OK. The button will now appear in Engage.
Signature Fields
New tables and fields have been added to the database to accommodate the use of confirmation checkboxes which can act as signatures. When ticked, a confirmation checkbox will record the user, date and time as auditable data.
There are several areas which include signature fields:
Entity Table where signature data is recorded Standard confirmation checkbox field Learners TRAINEE_AUDIT TRAINEE.CONFIRMATION Learner POTs TRAINEEPOT_AUDIT TRAINEEPOT.CONFIRMATION Assessors EMPLOYER_AUDIT ASSESSOR.CONFIRMATION Employers ASSESSOR_AUDIT EMPLOYER.CONFIRMATION Visits VISITS_AUDIT VISITS.CONFIRMATION There is also a table called SIG_AUDIT which records audit information from all the above entities.
Each entity includes calculated fields in the screen designer for displaying the confirmation date (C_CONFIRMATIONDATE) and the user who ticked the confirmation checkbox (C_CONFIRMATIONUSER).
It is also possible to flag other fields in the schema editor so that they record confirmation / audit data when they are entered or edited. Details can be found below.
Add standard signature fields to a tab
The standard signature fields can be added to a tab as follows (this example will add the learner fields):
- Go to Tools on the toolbar and click New / Load on the Screens panel of the ribbon.
- Select Trainee on the left and open the tab you wish to add the fields to (or create a new tab).
- Go to the Fields tab in the screen designer.
-
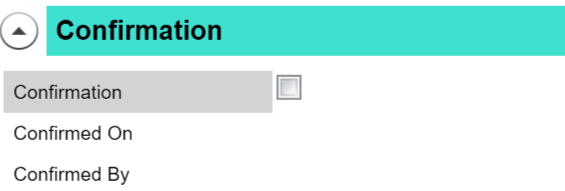
Under the Trainee section on the left, drag the CONFIRMATION, C_CONFIRMATIONDATE and C_CONFIRMATIONUSER fields onto the design area.
- Click Apply.
- Go to Home on the toolbar and click Sync.
When you go to the tab, tick the Confirmation box and save, the Confirmed On and Confirmed By fields will display the date and time of the confirmation and the user who performed it.

If the Confirmation box is un-ticked, this will clear the Confirmed On and Confirmed By fields, but the data will still be retained in the relevant AUDIT table.
Custom audit fields
Fields can be flagged in the schema editor so that they record confirmation / audit data when they are entered or edited. This is restricted to fields on tables that are supported for signature auditing - i.e. TRAINEE, TRAINEEPOT, ASSESSOR, EMPLOYER and VISITS.
- Go to Tools | DB Schema.
- Expand Tables on the left.
- Expand the relevant table and select the field you want to use for auditing.
-
On the right, select Confirmation from the Audit Type dropdown box.
If you want to use a term other than Confirmation, you can add values to this dropdown box by adding lookups to the field M32$_FIELDATTR.AUDITTYPE.
- Click Apply.
- Go to Home on the toolbar and click Sync.
Whenever data in the selected field is edited, an audit record of this will be added to the relevant AUDIT table (e.g. TRAINEE_AUDIT).
Maytas 5 Version 5.19.7360.3 Release Notes
Standard Import Watchers
Standard imports into Maytas can now be semi-automated through the use of watchers, which watch a folder and import data from documents placed in that folder. The basic process for this is as follows:
- A watcher is configured in Maytas. This is much like performing a manual standard import, where a .con file is used to define the format and destination of the data to be imported. The folder to watch is also specified, along with how frequently the watcher should check the folder for new documents.
- Users place correctly-formatted documents in the folder.
- When the watcher next checks the folder, any new documents in the correct format (as per the .con file) will be moved to a Processing folder within the watcher folder and the import will begin.
- When processing has completed, the imported files will be moved to a Completed folder (unless the option to retain copies of imported files is disabled - see below for details).
First time setup
Before using watchers, they must be enabled in permissions:
- Go to Tools | Edit Permissions.
- Select the user or group which requires permission.
- Go to the Commands tab and expand the Standard Import section.
- Tick the checkbox next to the Standard Import Watcher permission and ensure the dropdown box is set to Visible.
- Click Apply and restart Maytas for the changes to take effect.
The base directory to be used for watchers must also be specified:
- Click the M5 button at the top-left and click Options.
- Select Standard Import on the left.
- Tick the checkbox next to the Base path for standard import watchers config.
- Enter the base directory to be used (e.g. C:\watchers). Each watcher must have its own folder within this directory (this is specified on the watcher).
- Click OK.
Create a watcher
-
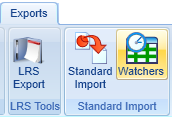
Go to Exports on the toolbar and click Watchers.
-
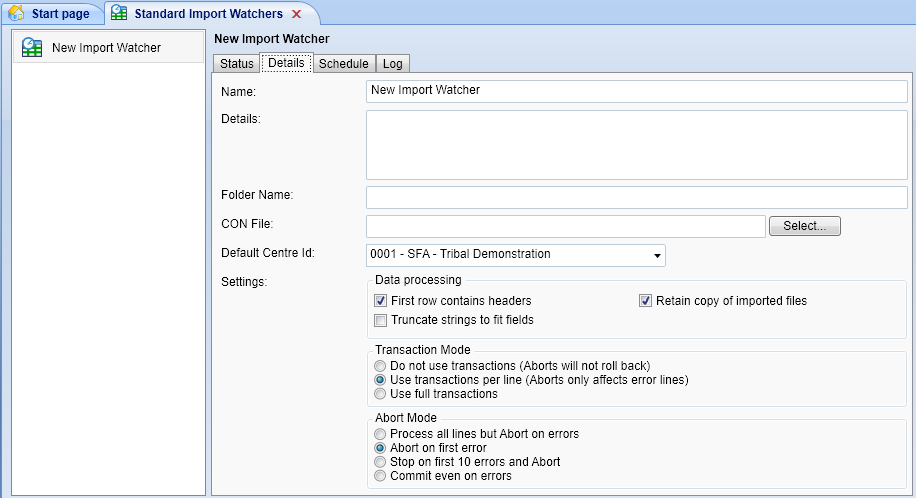
The watchers screen will be displayed. Click New and go to the Details tab.
-
Complete the details as required:
- Name - Enter a name for the watcher.
- Details - Enter any notes about the watcher.
- Folder Name - Enter the name of the folder which will be watched for documents. The folder will be automatically created within the base watchers directory specified in the configuration above. Only the folder name should be entered here, not the full directory path. Note that the folder name must be entered before selecting the CON file below.
- CON File - Click the Select button, browse to and select the .con file to use and click Open. This will place the .con file in the watcher folder.
- Default Centre Id - Select the default centre to use for new learners created from imports via this watcher.
- First row contains headers - Ensure this box is ticked if your import files for this watcher will have headers in the first row.
- Truncate strings to fit fields - By default (un-ticked), imports will error if data exceeds the maximum length of a target column. Tick the box if you want the import to shorten data to fit the target columns instead.
-
Retain copy of imported files - By default (ticked), files placed in the watcher folder will not be automatically deleted after being imported. With this option, it is recommended that the Completed folder (within the watcher folder) is periodically cleared out manually (e.g. for data security / GDPR purposes).
If the box is not ticked, files in the watcher folder will be automatically deleted after being imported.
- Transaction Mode - In most cases, this can be left as the default.
- Do not use transactions - If an error occurs on import, all changes up to that point will not roll back, including the current line (e.g. if 5 out of 10 columns have been changed on a line and an error occurs on column 6, columns 1 to 5 will not roll back).
- Use transactions per line (default) - If an error occurs, only changes on the current line will roll back. Changes on lines already committed will not roll back.
- Use full transactions - If an error occurs, all changes will be rolled back.
- Abort Mode - In most cases, this can be left as the default.
- Process all lines but Abort on errors - All lines will be processed, but lines with errors will not be committed.
- Abort on first error (default) - The import will abort upon encountering the first error.
- Stop on first 10 errors an Abort - The import will pause after the first 10 errors and will abort on additional errors.
- Commit even on errors - All lines will be processed and all lines will be committed, even if there are errors.
-
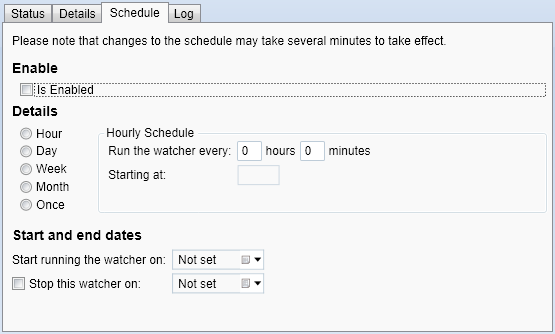
Go to the Schedule tab.
-
Here you can configure the schedule for when the watcher will run and how often it should check for new files to import:
- Is Enabled - When this is ticked, the watcher will begin looking for files to import as per the schedule.
-
Details - First, choose whether the watcher should check for new files to import every hour, day, week or month (or once). This will display additional settings on the right which should be set as required. Note that a starting time must be entered, and the frequency cannot be less than 1 minute.
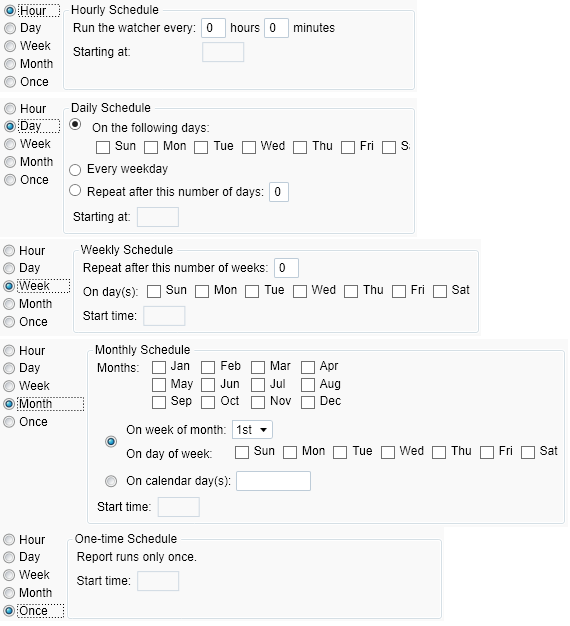
- Start and end dates - The watcher will only run between the dates entered here. If no dates are entered, the watcher will run on the schedule indefinitely.
- Click Apply to save changes.
- Once the watcher is configured and enabled, import files can be placed in the watcher's folder. When the watcher detects a new file to import, it will be moved to a folder called Processing. When processing has finished, the file will be moved to a Completed folder.
Watchers ribbon

- New - This creates a new watcher, which will be listed on the left side of the screen.
- Run - This will manually run the selected watcher, so that it immediately checks the watcher's folder for any new files, rather than waiting until the next scheduled check.
- Reset - This resets the watcher on the server, which will refresh any watcher configuration settings and may help if a watcher has stopped running for any reason.
- Delete - This will delete the selected watcher.
Logging
Each watcher produces a log of each import, including any errors encountered. These can be viewed by opening a watcher and going to the Log tab.

If a log file is available, click View Log File to view the full details.
By default, logs will only be recorded when an event takes place (e.g. when a new import file is detected). However, it is possible to enable logging for every time a watcher checks for files, even if none are found. To do this:
- Click the M5 button at the top-left and click Options.
- Select Standard Import on the left.
- Tick the checkbox next to the Verbose Logging config and ensure the toggle button is set to ON.
- Click OK.
It is not recommended to use verbose logging if you have watchers with high frequencies (e.g. more than once an hour), as the log will quickly fill up with entries of the watcher performing scheduled checks.
Additional Payments PFR Reconciler
The updated PFR reports for 2019/20 require Reports Library 1.0.3.4 to be installed. Please refer to the Upgrade Guide for instructions.
The funding model 36 PFR reconciler report for 2019/20 has been updated to support the Additional Payments PFR. The PFR must first be imported:
- Go to Management on the toolbar.
- On the PFR section of the ribbon, go to Upload | FM36 Funding Reports | 2019/20 | Upload Additional Payments Report (2019/20).
- Browse to and select the Additional Payments PFR file and click Open.
The file will now be imported. Click OK on the confirmation message which appears.
To run the report:
- On the Home tab, go to Reports Library | Finance | PFR Reconciler FM36 - 1920.
- On the parameters window, set Report type to Additional payments.
- Set the other parameters as required and run the report.
PCR - Scheduled QAR Cache Update
The QAR cache update (which generates the data used in the QAR reports) can now be scheduled to run automatically after the funding cache update. To do this:
- Click the M5 button at the top-left and click Options.
- Select Admin on the left (under the Maytas 5 header) and scroll down to the Funding Cache section on the right.
- Tick the checkbox next to the Run Ofsted update config and set the toggle button to ON.
- Click OK.
Assessor Data Collection Queue
e-track now allows you to send multiple data collection forms to an assessor for completion, which works in the same way as the learner and employer data collection queues. This is done on the Data Queue tab on the relevant user's record, where a row can be added to the grid and configured for each form that needs to be completed.
Requirements
On-line applications, data collection and data authentication require licences for e-track screen design and online applications, as well as licences for learners and employers. Please contact your account manager for the required licences, and consultancy will be required.
Import Data Queue Tabs
- In Maytas, go to Tools on the toolbar and click Import on the Screens panel of the ribbon.
- Click Browse.
- Browse to the Maytas 5\Extras\Tabs folder of the upgrade, select the Data Queue tabs.m5tab package and click Open.
- Click Next, then click Finish.
- Go to Home on the toolbar and click Sync.
Form Setup
First, data collection forms should be created for an assessor as required (in the Personnel entity of the Maytas screen designer). The important points for a screen to work as a data collection form are on the screen designer Overview tab:
- Published - This should be ticked.
- e-track Publish - Application Form should be ticked.
- App Form ID - This should be a single-digit integer (i.e. 0 to 9) which is used to identify the form. Each learner form should have a different number, as should each employer form, but learner and employer forms can share a number. e.g. You could have a learner and an employer form both with an ID of 1, but not two learner forms with an ID of 1.
- Position - This essentially the page number of a form. For example, if you wanted a four page form, you would create a separate screen for each page, give them all the same App Form ID and then enter 1 to 4 for the position (i.e. 1 for page 1, 2 for page 2, etc).
Once you have created a form, a lookup should be added for it so that it is available in the Data Queue grid:
- In Maytas, go to Tools | DB Schema.
- Expand Tables on the left to show a list of tables in the database.
- Expand ASSESSOR_DATACOLLECTIONQUEUE and select FORMID.
- If the Set button appears on the right, click it.
- Select the Look-ups tab.
- Click the
 button to add a new lookup.
 - The Short string should be two-characters:
- The first character is C for an assessor form. Note that for a learner form being completed by an assessor on the learner's behalf, this should be A.
The second character is the App Form ID of the form.
e.g. For an assessor form with an ID of 3, the short string would be C3.
- The Long string should be the name or title of the form which will be displayed on the Data Queue grid.
- Click Apply and add additional lookups for forms as required.
- Go to Home on the toolbar and click Sync, then restart Maytas.
Assessor Data Queue
To add a form to an assessor's queue:
-
In Maytas, open the assessor's record and go to the Data Queue tab.

- Click the
 button on the top grid to add a new row.
 - In the pop-up window which appears, select a Form (this is populated by the lookups set above) and enter a Due Date.
- Click OK.
- Click Apply.
The row will be added to the grid. The Date Created field will be populated with the current date (the assessor record may need to be closed and re-opened for this to show) and the Status will be set to Outstanding, which means the assessor has not yet started the form.
The next time the assessor logs into e-track, they will be given a prompt to choose which form to complete (they will be given the option of all outstanding or in-progress forms currently in their queue).
When an assessor clicks Save on a form, the status in the queue for that form will change to In Progress. If a learner closes their browser and then returns to the form later on, they will be able to continue from where they left off.
When an assessor clicks Submit, providing any and all form validation has been met, the form status will change to Completed and they will not be prompted to complete the form again.
Forms Completed by an Assessor on behalf of a Learner
An assessor can be sent a form to complete on behalf of a learner. To do this:
-
In Maytas, open the assessor's record and go to the Data Queue tab.

- Click the
 button on the grid to add a new row.
 -
In the pop-up window which appears, complete the following fields:
- Trainee ID - Use the
 button to search for an select the learner for whom the assessor will be completing the form.
 - Form - Select the form to complete (this is populated by the lookups set above).
- Form Type - Select Assessor on behalf of trainee.
- Due Date - Enter the date by which the form should be completed.
- Trainee ID - Use the
- Click OK.
- Click Apply.
The row will be added to the grid. The Date Created field will be populated with the current date (the assessor record may need to be closed and re-opened for this to show) and the Status will be set to Outstanding, which means the assessor has not yet started the form.
A row will also be added to the bottom grid on the learner's Data Queue tab to indicate their assessor has an outstanding form to complete on their behalf.
The next time the assessor logs into e-track, they will be given a prompt to choose which form to complete (they will be given the option of all outstanding or in-progress forms currently in their queue).
When an assessor clicks Save on a form, the status in the queue for that form will change to In Progress. If an assessor closes their browser and then returns to the form later on, they will be able to continue from where they left off.
When an assessor clicks Submit, providing any and all form validation has been met, the form status will change to Completed and they will not be prompted to complete the form again.
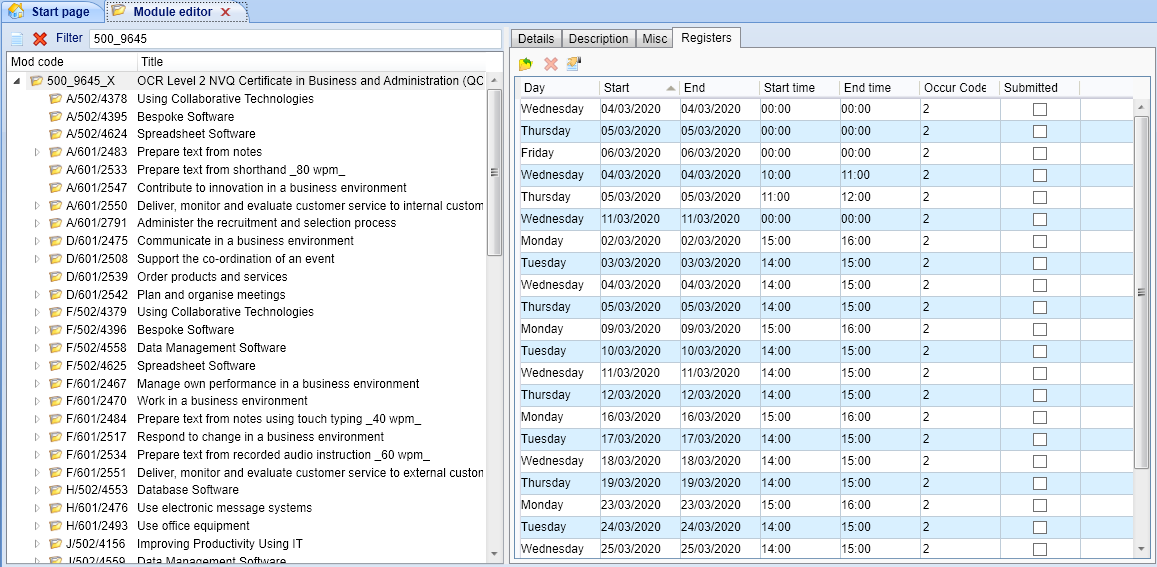
Module Registers Wizard
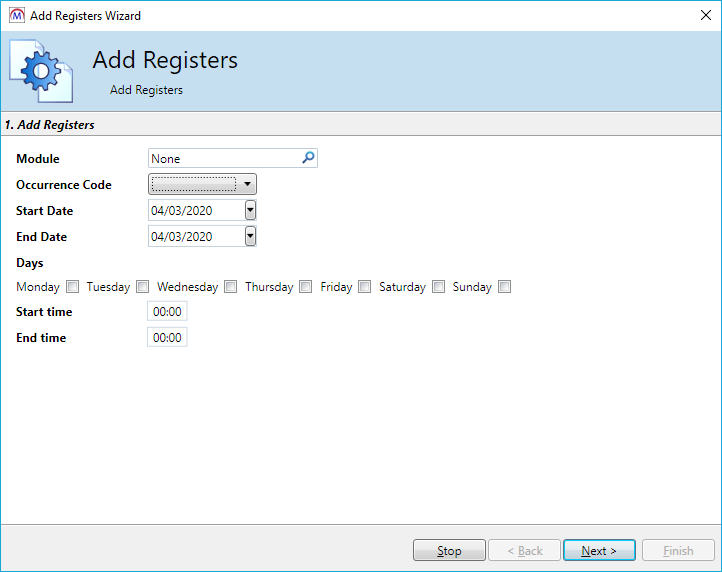
A wizard is now available to generate registers on a module in the module editor, based on a date range, days of the week and start/end times for each register.
This feature requires a licence for Module Registers. Please contact your account manager for more information.
There are several prerequisites before registers can be added to a base module:
- The Enable Register box must be ticked on the module. This can be found on the Details tab when you select a module in the module editor.
- At least one learner must be enrolled on the module with an occurrence code specified. To do this, go to the Objectives tab on a learner record and add or edit the required module. The Occurrence Code can be found on the Details tab.
To use the wizard:
- Go to Tools | Module editor.
-
Click Add Registers.
- Click the
 button at the end of the Module field.
 - Search for and select the module to add registers to and click OK (note that only modules that meet the prerequisites above will appear).
- Select the Occurrence Code. The available values are determined by the various occurrence codes entered against learners on the selected module.
- Select the Start Date and End Date which registers should be generated between.
- Select the days of the week when registers should be included.
- Enter the default start and end times for each register (if required). Times for specific registers can be modified on the next screen.
-
Click Next.
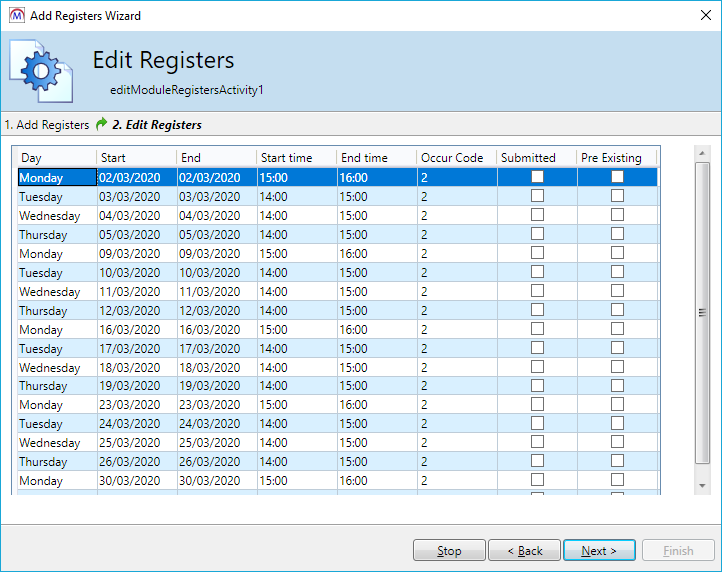
- You will see a list of the registers to be generated, based on the specified date range, days of the week and start/end times. The dates and times for specific registers can be edited by double-clicking them and entering the changes.
- Click Next.
- The registers will now be created. Click Finish.
-
Select a different module and return to the previous one to refresh the registers, then go to the Registers tab. The newly-created registers will be listed here, and they can also be edited by double-clicking the cells and entering the changes.
HE Qual on Entry - Lookups Correction
An issue was identified with the lookups for the HE Qual on Entry field on the HE tab, specifically for codes X03, X04 and X05. While the lookups have now been corrected, it is important that providers who use the HE tab check that the HE Qual on Entry field is correct for learners who use codes X03, X04 and X05.
AS Exported Apprenticeships Tab
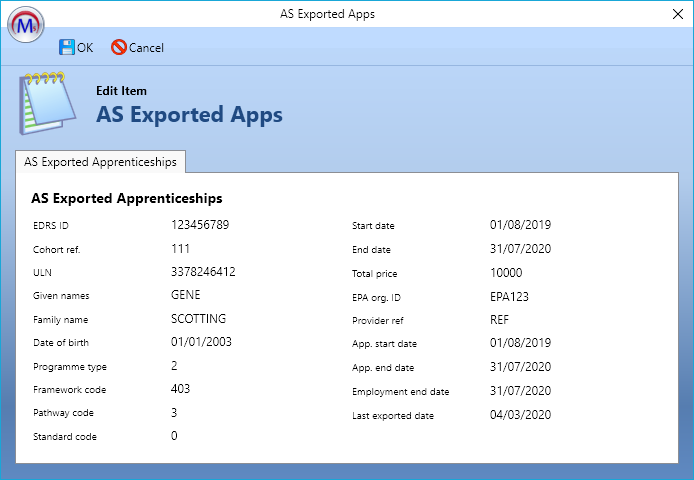
A new learner tab called AS Exported Apprenticeships has been added to show what has been exported from the AS export for a learner.
To view the tab, open a learner record and go to AS Exported Apprenticeships. The tab consists of a grid which lists all data produced by the AS export for the learner.

Select a row and click the  button to view full details.
Reports Centre Updates
The Reports Centre has been updated so that scheduled reports can now be output to .csv format. There is also a new configuration option which lets you specify the base directory where scheduled reports will be saved (each scheduled report can specify its own sub-folder within that directory).
Saving Scheduled Reports
To specify the base directory:
- Click the M5 button at the top-left and click Options.
- Select Admin on the left (under the Maytas 5 header) and scroll down to the Reporting section on the right.
- Tick the checkbox next to the Base path for scheduled report exports config.
- Enter the base directory where scheduled reports should be saved (e.g. C:\Reports).
- Click OK.
Reports schedules will then let you specify a sub-folder within that directory:
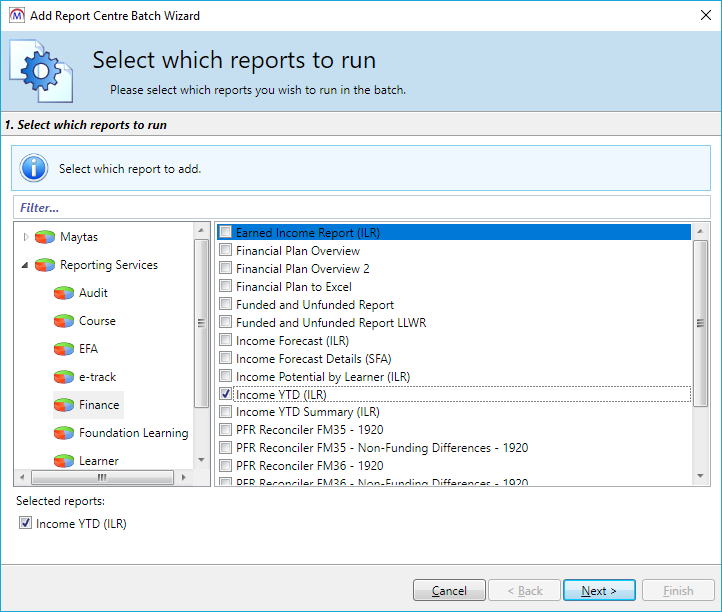
- Go to Home | Reports Centre.
- Go to Scheduled batches | Create new.
-
Select the report(s) you wish to schedule and click Next.
- Configure the name, publish settings, output type and filename as required.
-
Tick the Save report(s) box. Additional settings will appear.
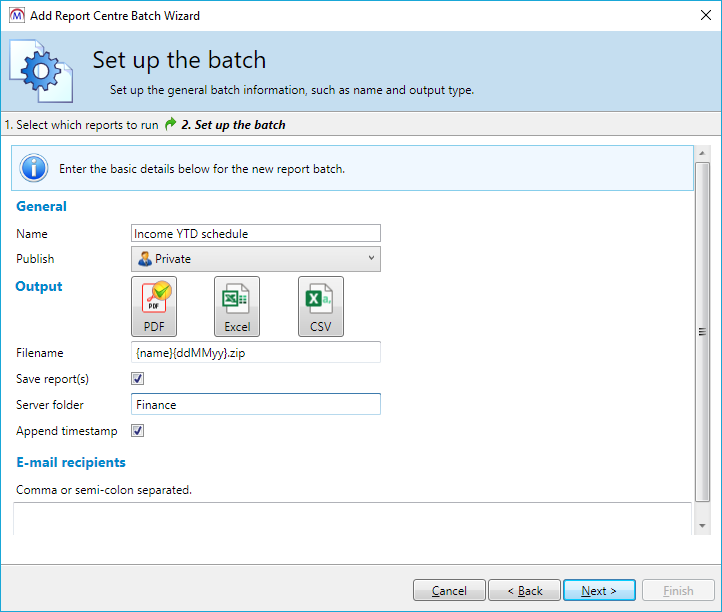
- Enter a Server folder. This is the sub-folder within the base directory where the scheduled reports will be saved.
- If you wish to include the date and time in the filename of saved reports, tick the Append timestamp box.
- Enter email addresses for any email recipients and click Next.
- Configure report parameters as required and click Next.
- Configure the schedule as required and click Next.
- Click Finish.
If no base directory is specified in the configuration, reports will not be saved.
Output to .csv
Reports in the report centre can now be set to output to .csv format. The option appears alongside the existing output formats when configuring a report.
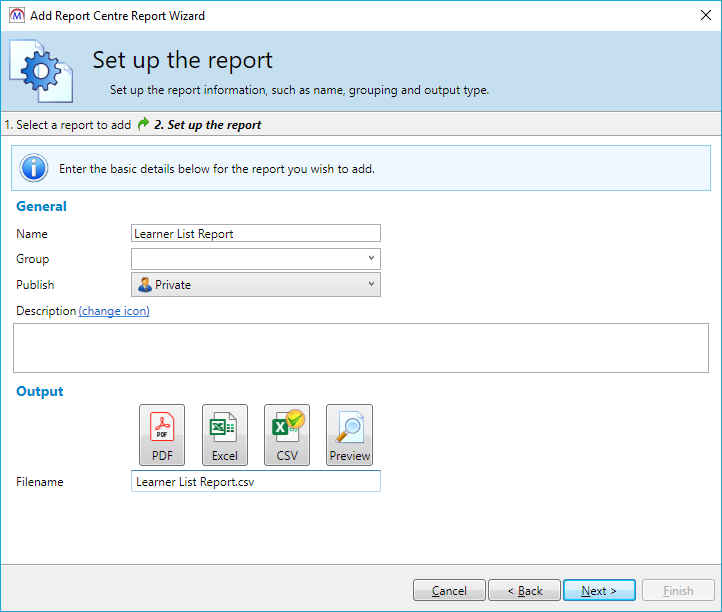
Click the CSV option to select it.
The .csv format is best suited to simple list reports with little or no formatting (e.g. headers, footers, charts, etc). While it is possible to output more complex reports to .csv, please be aware that this may produce unexpected or unintended results in the output file, such as additional rows or columns with formatting information.
Visits File Upload
Files can now be uploaded against a visit in Maytas. To do this, a field must be added to a visits tab which will be used to store the filename:
- Go to Tools on the toolbar and click New / Load on the Screens panel of the ribbon.
- Select Visit on the left, then add or edit a tab.
- Go to the Fields tab at the bottom left of the Screen Designer.
- Drag a field into the design area from the Visit table. This should be a varchar field long enough to store the filename of any files being uploaded to a visit. It should also be a field that is not otherwise used, as any data in it will be overwritten with the filenames of uploaded files.
-
Select the field in the design area (the middle of the screen) and change the Control Type on the right to File Select.
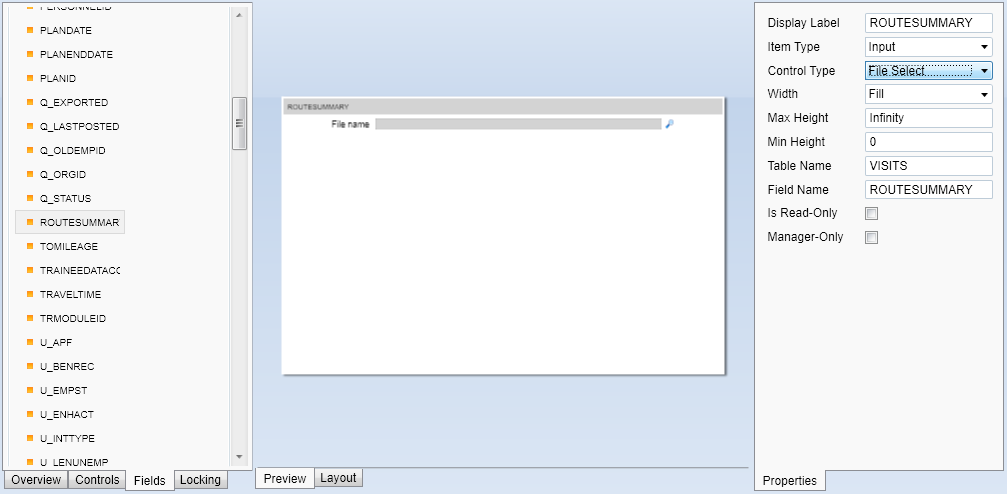
- Edit the rest of the tab as required and click Apply.
- Go to Home on the toolbar and click Sync.
- Open or create a visit in a learner, assessor or employer diary and go to the tab with the file select on it.
-
Click the
 button, browse to and select a file to upload and click Open.
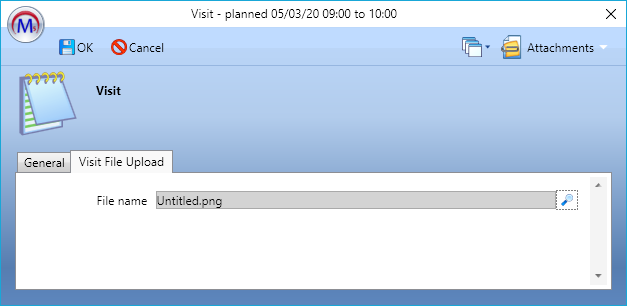
- Click OK. The file will now be uploaded to the file store and the name of the file will be recorded in the field used in the Screen Designer.
Courses - Delete Course Permission
A new permission is available which controls the ability to delete courses. The permission is disabled by default, meaning it must be set to allow courses to be deleted.
To set the permission:
- Go to Tools | Edit Permissions.
- Select the user or group which requires permission.
- Go to the Commands tab and expand the Courses Module section.
- Tick the box next to the Delete Course permission and set the dropdown box to Visible.
- Click Apply.
- Sync and restart Maytas for the change to take effect.
FIPS Update - Leaver Fields
The FIPS tab has been updated to include leaver fields. The fields can be found at the bottom of the tab.

The FIPS assignment import has also been updated so that it will populate the following fields:
- Date leaver notification received
- Redundancy
- Early leaver
- Units achieved prior to leaving
- Achieved units resulted (if applicable)
- Achievement information completed
This requires an updated version of FIPS Assignment Import.CON, which can be found in the Maytas 5\Extras\FIPS folder of the upgrade.
Grid Editor Improvements
The grid editor in the screen designer has been improved so that the interface is clearer and more informative.
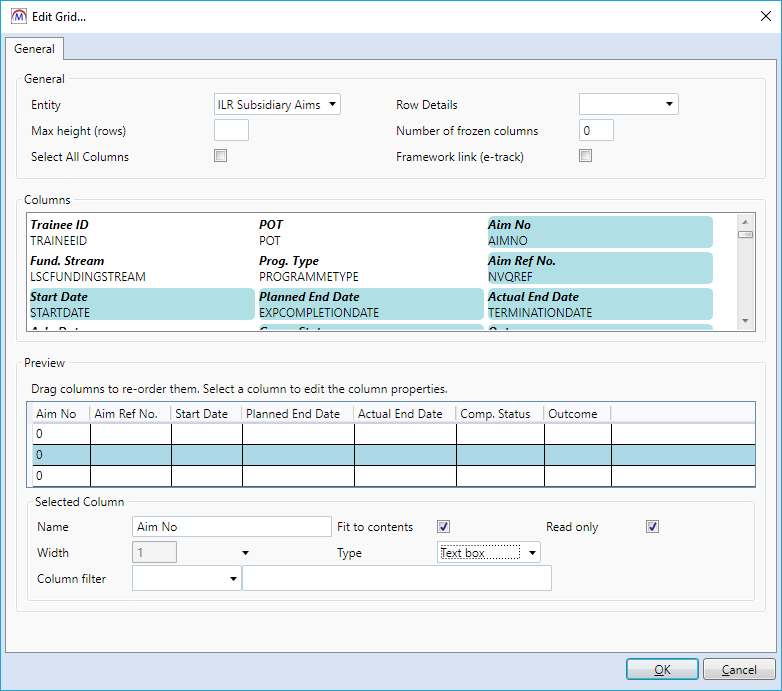
The Columns area now lists each field's descriptive name (if available) as well as its name in the database, and the fields are aligned more clearly.
Reports Library 1.0.3.4
Terminology Updates
The reports library has been updated and standardised to use configurable terminology already implemented in Maytas and e-track. There are two primary areas where configurable terms are now used in reports:
- Learners / Trainees
- Modules / Objectives
If the relevant config options are not used, the default terms used are learner and module.
Please be aware that there are some specific areas where the configurable terminology cannot be implemented, the most prominent of these being the report names (e.g. Trainee Module Progress cannot be configured to be called Learner Module Progress).
How to set the config options
The terminology config options used for the reports library are the same ones which apply to Maytas and e-track. Please note that setting or changing these options will reflect across Maytas and e-track, not just the reports library.
- In Maytas, click the M5 button at the top-left and select Options.
- Select Terminology on the left (under the e-track Online header).
- Tick the boxes next to the configs Change all instances of "Trainee" and Change all instances of "Module" and enter the terms to use.
- Click OK.
Module Register Updates
The Module Register and Module Register Summary reports have been updated to take into account the improvements to registers in the 5.19 upgrade, so that the reports can now include future registers which have been created but not marked. There are two new parameters:
- Only show active modules - When set to Yes, the report will only show modules without a completion date.
- Only show marked registers - When set to Yes, the report will only show registers that have been marked (as opposed to registers which have been created but not yet marked).
Volume Check Update
The Volume Check report has been updated so that the Starters column counts POT starts rather than learner starts, which makes it consistent with the Leavers and Achievers columns (which also count at POT level rather than learner level).