5.20 SP1 Maytas LLWR Release Notes
Note regarding submissions
We would like to remind providers to create a submission early and check for any errors using reports from the appropriate software (i.e. the FIS or LLWR-Inform). Welsh providers should also remember to download their ULI file. After submission to the ESFA or DfES, providers should check that data has submitted correctly using the available reports. Providers should check that all their expected starts and completions are submitted correctly, and that start and outcome payments correctly match the PFR or ACE funding reports.
Our support desk gets extremely busy in the days prior to the submission deadlines, and although we try and prioritise submission-related queries, we cannot guarantee assistance if queries are sent late. If you do encounter any issues, please ensure that you contact Maytas Support as soon as possible, as we can only rectify issues of which we are aware. We also recommend checking Maytas Communities regularly for information on any known issues and solutions. Tribal cannot be held responsible for any issues caused by your failure to comply with this advice.
Technical specification
The latest Maytas and e-track technical specification can be found here.
Once the upgrade has been completed, the version number should be checked to ensure it has been successful.
- Start Maytas and go to Support on the toolbar.
- Click About.
- The version numbers should read 181.20 / 5.20.7600.1. If you have any other version, please ensure you have followed the upgrade instructions correctly. If you require assistance, please contact Maytas Support.
It is the responsibility of customers to ensure that users carry out any required user acceptance testing and sign off on the upgrade.
Complete the Upgrade
Features Added in the Upgrade
These are the main updates in the upgrade:
- Employer contacts
- Engage integration updates
- Fixes to a number of issues
Reports Library 1.0.3.6 is also included in the upgrade but must be installed separately, which is detailed in the Upgrade Guide. The reports library can be downloaded here. If you are a hosted customer, please contact the Service Desk to arrange for the reports library update to be applied.
Maytas 5 Version 5.20.7600.1 Release Notes
Employer Contacts
An overhauled system for recording and assigning employer contacts is now available. Contacts can be entered against an employer, and a learner can then be assigned one of those contacts as their key contact for the employer. Whenever a data collection form is assigned to an employer to complete on behalf of a learner, the form will be sent to the learner's key contact for completion. If a learner does not have a key contact specified, the form will be sent to the employer user instead.
To publish the Employer Contacts tab:
- Go to Tools on the toolbar and click New / Load on the Screens panel of the ribbon.
- Select Employer on the left and double-click Employer Contacts on the right.
- Tick the Published box on the left. If you want the tab to also be available in the e-track Employer Editor, tick the Employer box.
- Click Apply.
- Go to Home on the toolbar and click Sync.
The tab can be found by opening an employer record and selecting Employer Contacts on the left:

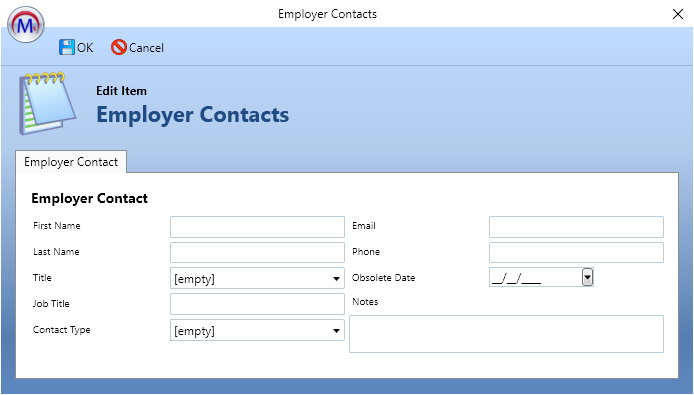
Click the  button to add a new contact.

Complete the details as required and click OK, then click Apply to save the changes.
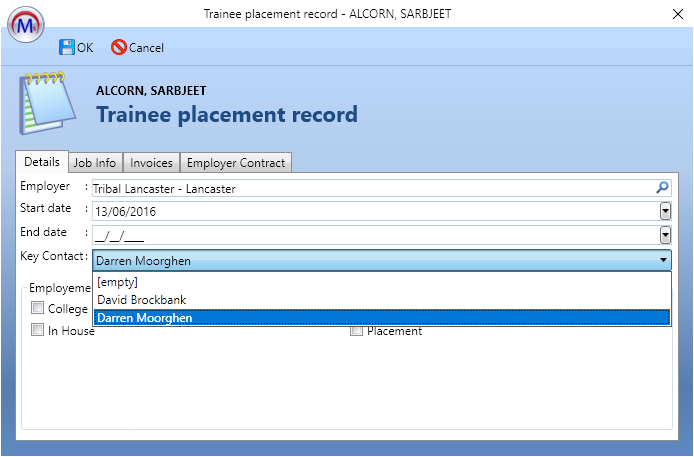
Once contacts have been set up for an employer, a learner at that employer can be assigned a key contact:
- Open a learner record and go to the Summary tab.
- Add or edit the employer row in the Employer / Personnel grid.
-
The contact can be selected from the Key Contact dropdown.

- Click OK, then click Apply to save changes.
Engage Integration Updates
Web User Account Tab
A new tab has been created which shows the basic web user account details for a learner or assessor, including their Edge Person ID which is used in the Engage integration.
To enable the learner tab:
- Go to Tools on the toolbar and click New / Load on the Screens panel of the ribbon.
- Select Trainee on the left and double-click Web User Account on the right.
- Tick the Published box on the left.
- Click Apply.
- Go to Home on the toolbar and click Sync.
To enable the assessor tab:
- Go to Tools on the toolbar and click New / Load on the Screens panel of the ribbon.
- Select Personnel on the left and double-click Web User Account on the right.
- Tick the Published box on the left.
- Click Apply.
- Go to Home on the toolbar and click Sync.
The tabs can be found by opening a learner or assessor record and selecting Web User Account on the left.

The username, last login and Edge Person ID fields are read-only and will be blank if the learner or assessor does not have a web user account. You can generate a web user account for them by entering their email address, ticking the Create Web User Account box and clicking Apply. Please note that this requires the Engage integration to have been correctly configured.
Clarifications
After feedback from the initial release of the Engage integration, we would like to clarify the following points:
-
If you are a user of Engage, you will have a web user account which is then linked to an assessor record. If you are also a Maytas user and wish to use the contact log to send messages to Engage via Maytas, your web user account must also be linked to your Maytas user account. This can be done as follows:
- In Maytas, go to Tools | Web User Editor.
- Select the web user on the left and click the
 button next to Linked Maytas User.
- Search for and select the Maytas user and click OK.
- Click Apply.
- When automatic web user creation is used, the email address used for a learner is taken from TRAINEE.EMAIL if a value is entered there. This is the default email field on the learner Summary tab and the ILR tabs. If there is no value in TRAINEE.EMAIL, TRAINEE.ILR_EMAIL is used instead.
Standard Import Refactor Beta
The code behind the Standard Import system has been re-written in the C# language as part of the transition from legacy languages. The new version is currently only available as a closed beta, because while the functionality of the new Standard Import is the same as in the old version, it is a major update to a complex system and requires extensive testing. As such, the old version will remain in place as the default for this release.
We will be in contact with some customers to arrange possible access to the beta before the new version is publicly released in a future upgrade. If you are interested in trying the beta version, please contact your account manager.
Once the full release version of the updated Standard Import is available, Maytas will default to using the new version instead and the legacy version will remain available for a limited time before being disabled. This is to ensure a smooth transition between the two versions of the system.
Reports Library 1.0.3.6
Track and Trace
The Track and Trace report can be used as an aid for determining possible contact between someone who has reported symptoms of COVID-19 and other learners and assessors, based on visits, courses and module registers.
The expected use-case for the report is as follows:
- A learner or an assessor informs you that they have COVID-19 symptoms. At this point, the NHS may have asked them for details of anyone they have recently been in contact with.
- The report is run for that person (referred to here as the reported person) over a date range, which defaults to the past week.
- The report displays any learners and assessors who have been on the same visit, course or module register as the reported person in the date range, along with their contact details.
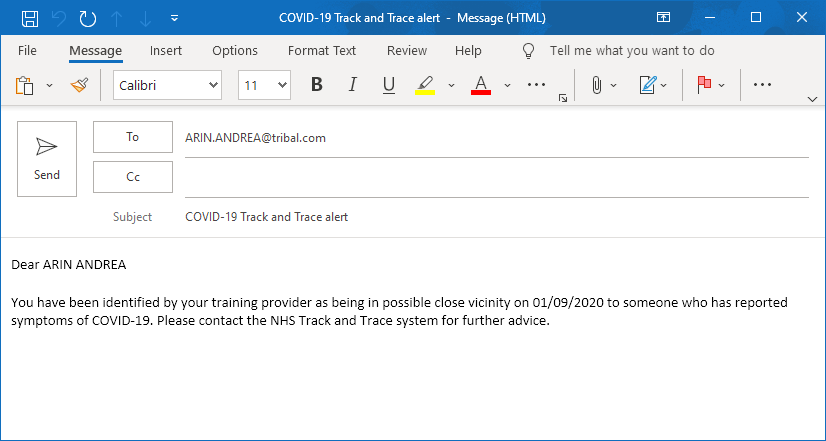
- If you wish to contact someone in the list, the columns at the end of each row can be clicked to generate an email to that person, informing them that they may have been in close vicinity to someone with COVID-19 symptoms (the email can be edited before it is sent).

Parameters
Known issue - In some cases, clicking the View button on the parameters window for this report will not appear to do anything. If this happens, go to the main Maytas 5 window and click the Refresh button, which will then run the report.
- Is the reported COVID-19 case for a learner or an assessor? - Choose Learner or Assessor.
- Search for the person who has reported symptoms and press tab key - Enter full or partial names to search for. You can also search by trainee ID or assessor ID.
- Select the person who reported symptoms - The list will be populated with learners or assessors (depending on which was selected) who match the search terms. Select the required person.
- Areas to include - Select whether to show visits, courses or registers (all are selected by default).
- Earliest / latest contact date to search from / to - Choose the date range (this defaults to the past week). The dates are compared against the following (inclusive):
- Visits - The actual date if entered, otherwise the planned date. Visits without actual dates are included in case the visit took place but has not been updated yet.
- Courses - The course period start date.
- Registers - The register start date.
-
Levels of contact to show - The default option will only show people in direct contact with the reported person (i.e. those on the same visits, courses and registers).
If we call that List A, the second option (Indirect - 1 level of separation) will include everyone on List A and everyone who was on visits, courses and registers with the people in List A during the date range.
If we call that list B, the third option (indirect - 2 levels of separation) will include everyone on List B and everyone who was on visits, courses and registers with the people in List B during the date range.
The level of separation is indicated by the Level of Contact column on each table in the results.
-
Repeat contacts - If the reported person has contact with someone multiple times during the date range, the default option will only show the latest contact for each person.
e.g. If John Smith is the reported person and he had two courses with Jane Williams, followed by a visit with Jane Williams the next day, only the visit would be listed for Jane Williams.
The Show all contact option lists all contact, so the visit and the courses would all be shown in the example above.
- Sort results by - This sorts each table by date or name.
Tables
Each table lists the name and contact details of the people who have potentially been in contact with the reported person during the date range. If further levels of contact have been included, the Level of contact column will indicate how many levels of separation the person on that row is from the reported person and who they may have been in contact with.
At the end of each row are two columns which can be clicked to generate an email to the person on that row. The first column will include the reported person's name on the email, whereas the second column will keep the reported person anonymous. Both emails include the date of possible contact. They can also be edited before sending.

The Courses and Registers tables exclude anyone who was recorded as absent for a period or register when the reported person was present.