Engage Integration
Maytas and Maytas Hub now integrate with Engage in the following ways:
- A button in the Engage app can be configured to allow you to log directly into Maytas Hub using the Engage user account.
- Linked user accounts for Maytas and Engage can be used to show contact log entries from Maytas in Engage.
- Engage groups can be created from the Module Editor in Maytas, using a module title as the group name.
Technical Overview
The process for setting up the integration is as follows:
- Step 1 - The integration between Maytas and Engage first requires a number of configuration options to be set and an admin account to be created.
- Step 2 - Each user requiring access to both Maytas Hub and Engage has a web user account created in Maytas with the Engage Login option ticked. When saved, this creates a corresponding user account in Engage with the same login details. This can also be done with existing web user accounts.
- Step 3 - The web user account is then linked to an assessor record in Maytas.
- Step 4 - Users who also (or only) use Maytas must have their Maytas user linked to the web user to allow them to send messages to Engage through the Contact Log.
- Step 5 - To setup the option to launch Maytas Hub from the Engage app, a button must be configured from Maytas which will then appear in the Engage app.
- Step 6 - Web user accounts for learners can be automatically generated.
Setup
Configuration Options
Several configuration options must be set for the Engage integration to work. Before continuing, ensure you have obtained from Tribal the values to enter for the following configs:
- Client ID for IDS
- Client secret IDS URL
- Edge IDS URL
- Edge sync URL
- Engage API URL
- Engage API username
- Engage API password
- Engage location
- In Maytas, click the M5 button at the top left and click Options.
- Select Engage Integration on the left (under the Maytas Hub Online header).
-
Tick the boxes next to the configs and enter the values as follows:
- Client ID for IDS - As provided by Tribal
- Client secret IDS URL - As provided by Tribal
- Edge IDS URL - As provided by Tribal
- Maytas Hub Password for Edge Authentication - The password for the admin web user created below
- Maytas Hub Username for Edge Authentication - The username for the admin web user created below
- Edge sync URL - As provided by Tribal
- Select Admin on the left (under the Maytas Hub Online header).
- Complete the following configs in the Engage section:
- Edge authentication Password - The password for an Edge user to allow basic authentication from Maytas Hub to Edge
- Edge authentication Username - The username for an Edge user to allow basic authentication from Maytas Hub to Edge
- Select Other on the left (under the Maytas 5 header).
- Complete the following configs in the Engage section:
- Engage API password - As provided by Tribal
- Engage API username - As provided by Tribal
- Engage API URL - As provided by Tribal
- Engage location - As provided by Tribal
- Select Engage Integration on the left (under the Maytas 5 header).
- Complete the following config in the Engage section:
- Engage sender Username For AutoContact - Enter the username for the Engage user you want to show as the sender for any Engage messages sent on an automated schedule (i.e. via the auto-communication feature in Report Generator)
- Select Admin on the left (under the Maytas header).
- Scroll down to the General section and locate the config Allow you to edit data in the specified table(s).
- Add the table ENGAGETHIRDPARTYLINK to the end of the existing set of tables, separated by a comma and a space (e.g. TABLE1, TABLE2, ENGAGETHIRDPARTYLINK).
- Click OK.
- Sync and restart Maytas.
Create Admin Account
A new web user admin account must be created with the same username as an Engage admin user.
- In Maytas, go to Tools | Web User Editor.
- Click the
 button to create a new user account.
 -
Enter the user details as required. The important fields with regards to the Engage integration are:
- Username - This must be the same as the username for the Engage admin user which this account will link to.
- Edge Roles - Enter SMSService
- Click Next.
- On the Permissions screen, tick Web Administrator and Engage Login.
- Click Next, then Next again, then Finish.
Create Web User Accounts
Web user accounts should be created for users who will log into both Engage and Maytas or Maytas Hub. When the Engage Login permission is enabled, this will generate a new corresponding user account in Engage with the same login details.
Existing web user accounts can be used by ticking the Engage Login permission against them in the web user editor.
Shared user accounts between Maytas/Maytas Hub and Engage MUST exist or be created in Maytas/Maytas Hub first. It is not currently possible to link existing Engage user accounts to Maytas/Maytas Hub user accounts, or to create a user in Engage and generate a corresponding user in Maytas/Maytas Hub.
To create a web user account with a corresponding Engage user account:
- In Maytas, go to Tools | Web User Editor.
- Click the
 button to create a new user account.
 - Enter the user details as required and click Next.
- On the Permissions screen, tick Engage Login, as well as any other required permissions.
- Click Next and select the required report permissions.
- Click Next, then click Finish.
The web user should then be linked to an assessor record:
-
In the web user editor, select the web user on the left and click the
 button next to Linked Assessor.
- Search for and select the assessor and click OK.
- Click Apply.
If the user is also a Maytas user who needs to be able to send messages to Engage via the Maytas Contact Log, the web user should also be linked to the Maytas user:
-
In the web user editor, select the web user on the left and click the
 button next to Linked Maytas User.
- Search for and select the Maytas user and click OK.
- Click Apply.
Create Contact Log Entries
The Contact Log can be used to send messages to Engage. This can be done by manually creating a message or via the auto-communication feature.
To manually send a message to Engage:
- Log into Maytas as a user configured as detailed above.
- Open a learner, assessor or employer record. The record must also be linked to a web user configured for use with Engage.
- Go to the Contact Log tab.
-
Click the
 button and choose either Engage Message or Engage Notification. These options will only appear for valid users configured for use with Engage.
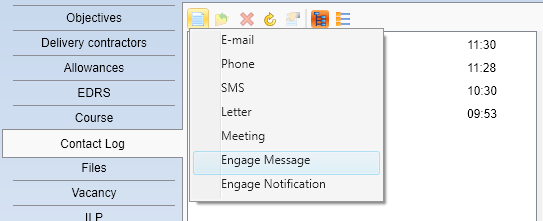
- Complete the Contact Log entry as you normally would and click OK. The message will then appear in Engage, in the Messages section.
The Contact Log will confirm that messages and notifications have successfully been sent to Engage by showing a green tick.
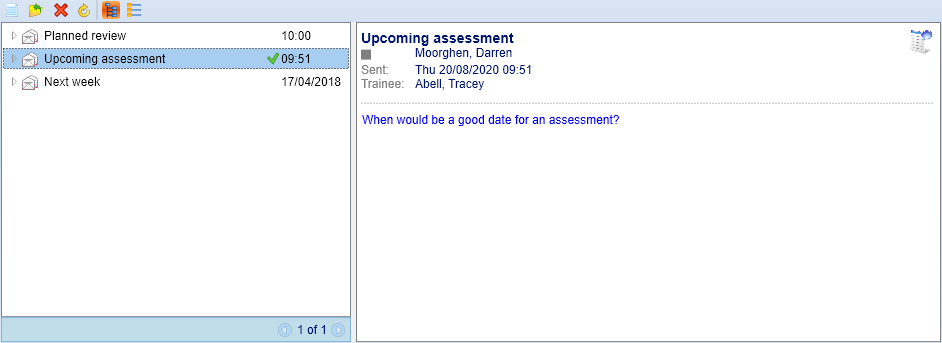
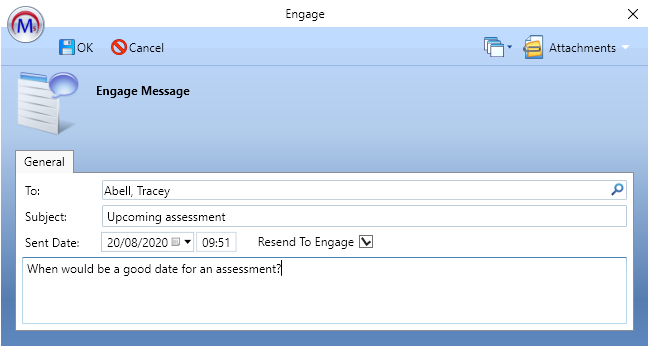
If a message or notification has failed to send to Engage, there is now the option to resend it. To do this:
- Select the message or notification and click the
 button.
 -
Tick the Resend To Engage box and click OK.
Create a Group
The Module Editor in Maytas can be used to create a group with the title of a module.
- Go to Tools | Module editor.
- Select the module you wish to use on the left (note that this must be a base module).
-
Go to the Misc tab on the right.
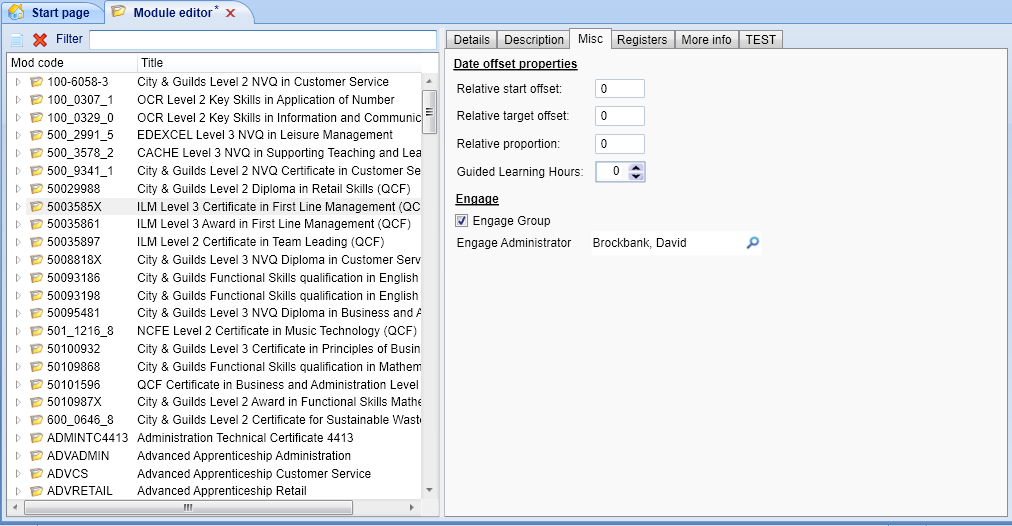
- Tick the Engage Group box.
- Search for and select the assessor to set as the group administrator in Engage.
- Click Apply. The group will now appear in the Groups section in Engage.
Launch Maytas Hub from the Engage App
To allow Engage users to launch and log directly into Maytas Hub from the Engage app, a button must be configured in Maytas. First, this requires the Table Edit permission if it is not already set:
- In Maytas, go to Tools | Edit Permissions.
- Select the user or group which requires permission.
- Go to the Commands tab and expand the Table Editor section.
- Ensure all the Table Editor permissions are ticked and set to Visible.
- Click Apply, then restart Maytas.
Next the button must be created and configured:
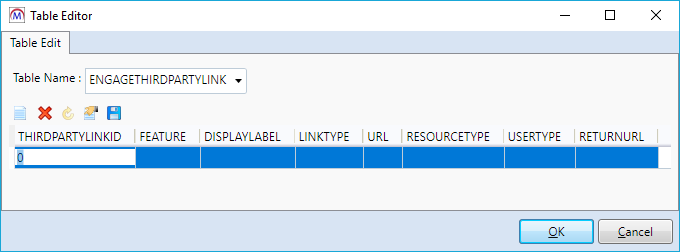
- Go to Tools | Table Edit.
- Select ENGAGETHIRDPARTYLINK from the Table Name dropdown.
-
Click the
 button to add a new row.
-
Complete the fields as follows:
Field What to enter THIRDPARTYLINKID Leave this unchanged FEATURE Not required DISPLAYLABEL Enter the text you want to appear on the button in Engage (e.g. Start Maytas Hub) LINKTYPE dynamicEdge URL This must be obtained from Tribal RESOURCETYPE Link USERTYPE I (i.e. I for indigo, not a lowercase L) RETURNURL ~/Trainee/index The RETURNURL of ~/Trainee/index will take you to the learner home page, but other values can be used to take you to other pages instead. e.g. ~/Messages/inbox will take you to the Messages page. Please contact Tribal if you need help with pointing to a particular page.
-
Click the
 button to save changes. The row should look similar to this:
-
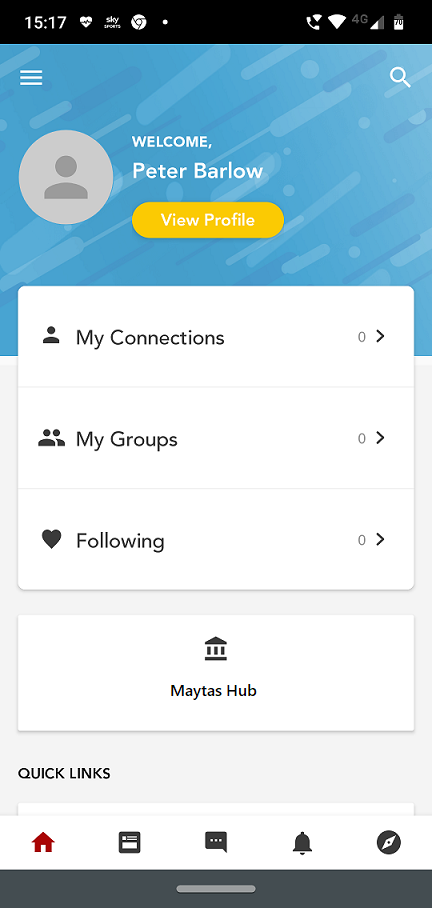
Click OK. The button will now appear in Engage.
Automatic Web User Creation
Trainee web user accounts for use with Engage can be created automatically and in bulk using the Global Updater. First, a configuration option must be set:
- In Maytas, click the M5 button at the top-left and select Options.
- Select Learner Login on the left (under the Maytas Hub Online header).
- Tick the box for the config Auto Create Trainee Account from Maytas and ensure the toggle button is set to ON.
- Optionally, you can also configure in this section the content of the email that is sent to a trainee when an account is generated for them (if this is not set, a default email body is used):
- Trainee Account Email Subject - The subject of the email.
Trainee Account Email Body - The body of the email. A recovery link can be included in the body in two ways:
- Simply include the {{link}} parameter, which will use the Maytas Hub URL specified above to generate a recovery URL.
- Enter the Maytas Hub URL and include the {{recoveryid}} parameter, which will achieve the same result (e.g. https://myserver/MaytasHub/Default.aspx?recover={{recoveryid}} ).
An example email body may look like this:
<p>Hello {FNAME} {LNAME}.</p><p>Your Maytas Hub username is {{user}}.</p><p>Please login below: </p>
<br />{{link}}Click Save when finished.
- Click OK.
With this config enabled, a web user account will be automatically created for a trainee when the field TRAINEE.WEB_USER_ACCOUNT is set to Y. If this field is added to a tab in the Screen Designer, it will default to a checkbox which will create the web user account when ticked and saved. This can be used for generating an account for an individual trainee.
When an account is generated, the trainee will be emailed their username along with a link to set their password. This requires the config for generating Maytas Hub recovery links to be set:
- In Maytas, click the M5 button at the top-left and select Options.
- Select Admin on the left (under the Maytas Hub Online header).
- Locate the Base URL config in the General section.
- Tick the box for the config and enter your Maytas Hub URL (e.g. https://myserver/MaytasHub).
- Click OK.
The email address used for a learner is taken from TRAINEE.EMAIL if a value is entered there. This is the default email field on the learner Summary tab and the ILR tabs. If there is no value in TRAINEE.EMAIL, TRAINEE.ILR_EMAIL is used instead.
To generate accounts in bulk, the Global Updater can be used to set WEB_USER_ACCOUNT to Y for multiple trainees at once:
Before continuing it is extremely important to take a backup of the database and fully understand the implications of updating data in bulk. Once changes to data have been committed to the database, it is not possible to undo the changes.
- Go to Management on the toolbar and click Definitions on the Global Update panel of the ribbon.
- Click the Rebuild Views button. This may take a while to complete. Click OK when finished.
- Click the
 button.
 - Enter a name for the new definition and select English Learner View from the Update view dropdown box.
-
Tick the Create Web User box.
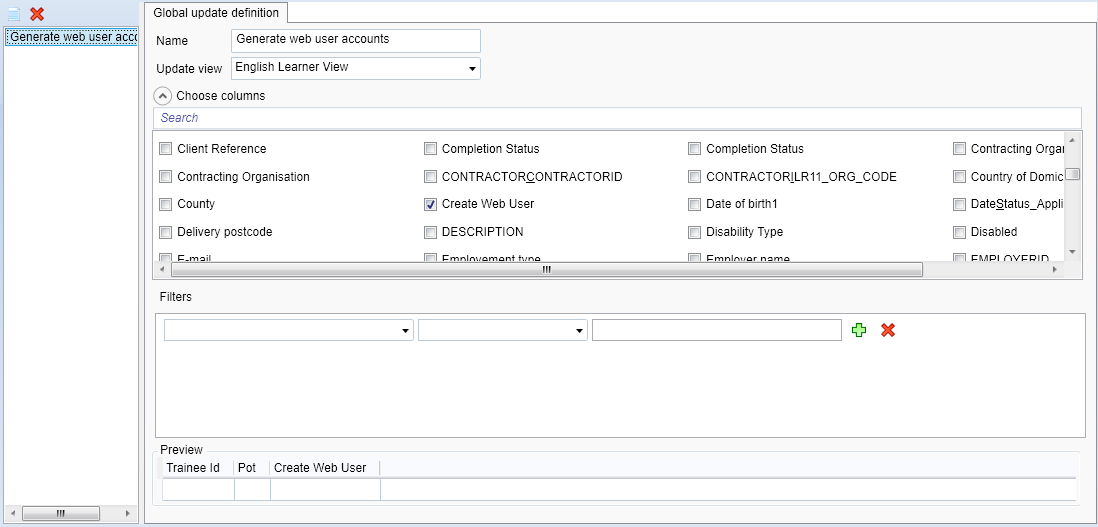
- Include other fields as required to help identify trainees (e.g. first name and last name).
- Click Apply.
- Go to Management on the toolbar, click Update (on the Global Update panel) and select the new definition.
-
Enter Y in the Create Web User column for each trainee you wish to generate an account for. Note that if a trainee has multiple POTs, each row for that trainee will show a value of Y when you click away from the cell.
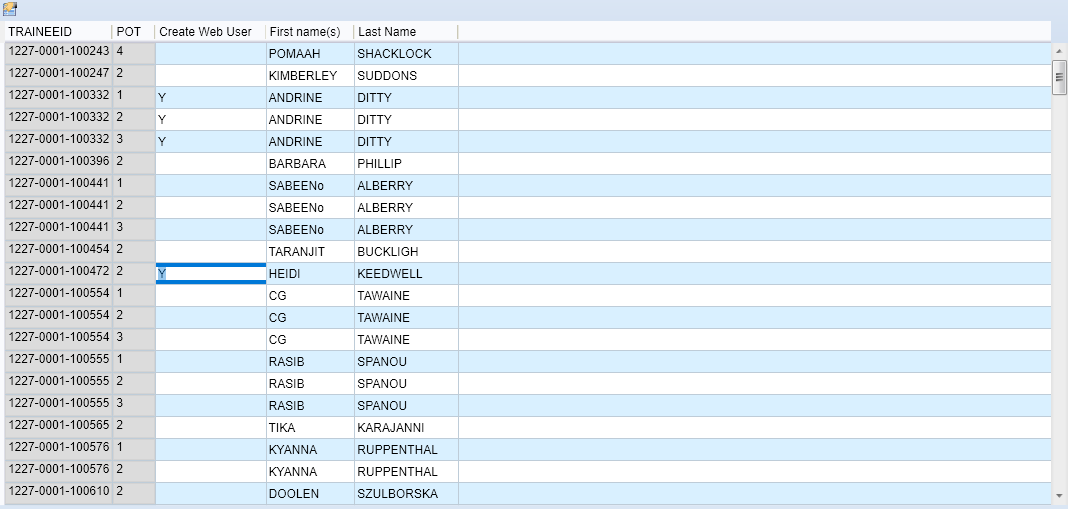
Before clicking Apply, ensure that ONLY records you wish to generate a web user account for have a value of Y in the Create Web User column. Once saved, the accounts will be created and the relevant trainees will be emailed with their login details.
- When ready, click Apply. This will commit the changes to the database and web user accounts will be generated for all specified trainees.
Manual Data Synchronisation
Users and groups can be manually synced to Engage from Maytas. This is primarily intended for use should the initial upload to Engage fail. First, a user permission must be set to enable it:
- Go to Tools | Edit Permissions.
- Select the user or group which requires permission and go to the Commands tab.
- Expand the Engage section.
- Set the permission Update Engage to Visible.
- Click Apply and restart Maytas for the changes to take effect.
To manually sync between Maytas and Engage, go to Management | Update Engage and select one of the following options:
- Sync All - This will synchronise users, groups and third party links between Maytas and Engage.
- Synchronise users - This will synchronise users only.
- Synchronise Users/groups - This will synchronise users and groups only.
- Update Links - This will synchronise third party links only (see here for details of how links can be used in the Engage mobile app).
Auto-Contact Report Tracking
When using auto-contact reports with Engage in the Reports Centre, the auto-contact history will show Engage messages which have been sent. It will also show errors for messages which have failed to send to Engage and for recipients who were sent an Engage message but do not have an Engage account. The log can be viewed in the Reports Centre by selecting Auto Contact | View History.
Third Party Links
As well adding a link to Engage to launch Maytas Hub, it is possible to add a link to Engage for any URL:
- Go to Tools | Table Edit.
- Select ENGAGETHIRDPARTYLINK from the Table Name dropdown.
-
Click the
 button to add a new row.
-
Complete the fields as follows:
Field What to enter THIRDPARTYLINKID Leave this unchanged FEATURE Not required DISPLAYLABEL Enter the text you want to appear on the button in Engage LINKTYPE Not required URL The URL you want the button to go to RESOURCETYPE Link USERTYPE I (i.e. I for indigo, not a lowercase L) RETURNURL Not required -
Click the
 button to save changes. The row should look similar to this example, which would create a button in Engage which goes to the Maytas and Maytas Hub Docs homepage:
-
Click OK. The button will now appear in Engage.
Web User Account Tab
Two tabs are available which show the basic web user account details for a learner or assessor, including their Edge Person ID which is used in the Engage integration.
To enable the learner tab:
- Go to Tools on the toolbar and click New / Load on the Screens panel of the ribbon.
- Select Trainee on the left and double-click Web User Account on the right.
- Tick the Published box on the left.
- Click Apply.
- Go to Home on the toolbar and click Sync.
To enable the assessor tab:
- Go to Tools on the toolbar and click New / Load on the Screens panel of the ribbon.
- Select Personnel on the left and double-click Web User Account on the right.
- Tick the Published box on the left.
- Click Apply.
- Go to Home on the toolbar and click Sync.
The tabs can be found by opening a learner or assessor record and selecting Web User Account on the left.

The username, last login and Edge Person ID fields are read-only and will be blank if the learner or assessor does not have a web user account. You can generate a web user account for them by entering their email address, ticking the Create Web User Account box and clicking Apply.
Edge Roles for Learners
This is only applicable to customers who have configured Edge roles.
The Web User Account tab on learner records in Maytas has a field called Additional Edge Roles, which allows you to specify Edge roles for learners (in addition to the default role of Student) so that they can be sent to Edge / Engage.
The lookups displayed for this field (TRAINEEINFO.EDGEROLES) depend on your configured Edge roles. When a learner's roles are sent to Edge / Engage, it is the longstring values from the lookups which are sent. Multiple roles can be selected and sent for a learner.
Ending Learners in Engage
If a learner has no open POTs in Maytas, they will be automatically set as a blocked user in Engage rather than a current user when their record is sent to Engage.
Single Sign-on - Login Using Azure Active Directory
To setup SSO logins using Azure AD for use with Engage, please follow the separate guides for Maytas and Maytas Hub.
Open Third-Party Links in External Window
The Engage integration can be configured to allow third-party links to open in an external window.
-
Go to Tools | Table Edit.
-
Select ENGAGETHIRDPARTYLINKS from the Table Name dropdown box.
-
Locate the USEEXTERNAL column and set the value to Y for each link that you want to open in an external window.
-
Click the
 button to save changes, then click OK.