5.20 SP2 Maytas LLWR Release Notes
Note regarding submissions
We would like to remind providers to create a submission early and check for any errors using reports from the appropriate software (i.e. the FIS or LLWR-Inform). Welsh providers should also remember to download their ULI file. After submission to the ESFA or DfES, providers should check that data has submitted correctly using the available reports. Providers should check that all their expected starts and completions are submitted correctly, and that start and outcome payments correctly match the PFR or ACE funding reports.
Our support desk gets extremely busy in the days prior to the submission deadlines, and although we try and prioritise submission-related queries, we cannot guarantee assistance if queries are sent late. If you do encounter any issues, please ensure that you contact Maytas Support as soon as possible, as we can only rectify issues of which we are aware. We also recommend checking Maytas Communities regularly for information on any known issues and solutions. Tribal cannot be held responsible for any issues caused by your failure to comply with this advice.
Technical specification
The latest Maytas and e-track technical specification can be found here.
Once the upgrade has been completed, the version number should be checked to ensure it has been successful.
- Start Maytas and go to Support on the toolbar.
- Click About.
- The version numbers should read 181.20 / 5.20.7620.1. If you have any other version, please ensure you have followed the upgrade instructions correctly. If you require assistance, please contact Maytas Support.
It is the responsibility of customers to ensure that users carry out any required user acceptance testing and sign off on the upgrade.
Complete the Upgrade
Features Added in the Upgrade
These are the main updates in the upgrade:
- Invoke workflows from Maytas
- Smart Assessor integration updates.
- Fixes to a number of issues
Maytas 5 Version 5.20.7620.1 Release Notes
Invoke Workflows
Workflows created in e-track can now be invoked from Maytas. This requires a permission to be set:
- Go to Tools | Edit Permissions.
- Select the user or group which requires permission.
- Go to the Commands tab.
- Expand the Workflows Integration section.
- Tick the box next to the Invoke Workflows permission and ensure the toggle box is set to Visible.
- Click Apply.
- Restart Maytas for the change to take effect.
Invoking a workflow for a learner
- Open a learner record.
-
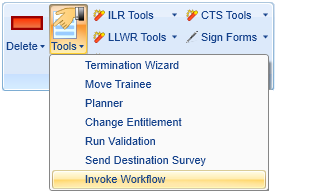
On the Actions panel of the ribbon, go to Tools | Invoke Workflow.

-
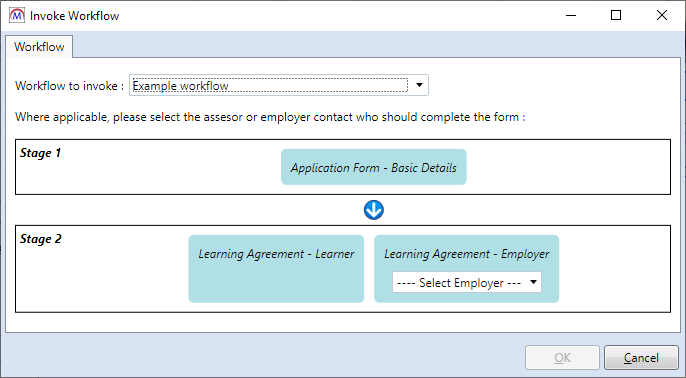
The Invoke Workflow screen will appear. Select the workflow to invoke from the dropdown box and select any options on forms as required.

- Click OK. A message will appear confirming that the workflow has successfully been added. Click OK to close the message.
- Click Apply to save the changes and invoke the workflow.
Invoking a workflow for a visit
Visit workflows can be invoked from the Diary tab on learner, assessor and employer records. However, a visit workflow can only be invoked on a learner if the learner is assigned to the selected visit.
Also please be aware that if a visit workflow is invoked on a learner and that visit has multiple learners assigned to it, the workflow will only be invoked against the first learner assigned to the visit.
- Open a learner, assessor or employer record and go to the Diary tab.
- Open the visit you want to invoke a workflow for.
- Click the
 button at the top of the visit window.
 -
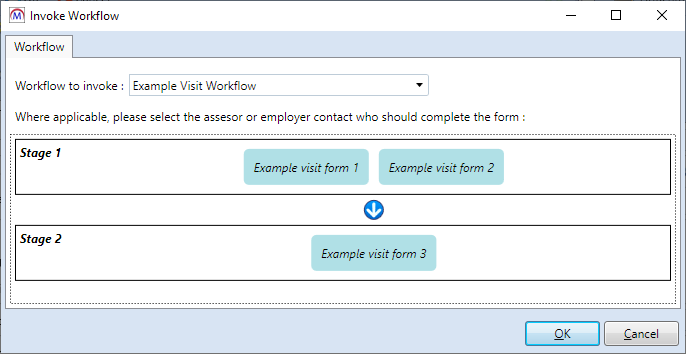
The Invoke Workflow screen will appear. Select the workflow to invoke from the dropdown box and select any options on forms as required.

- Click OK. A message will appear confirming that the workflow has successfully been added. Click OK to close the message.
- Click OK to close the visit, then click Apply to save the changes and invoke the workflow.
Smart Assessor Integration - Additional Fields
The Maytas integration with Smart Assessor now includes several additional fields which are mapped between the two systems. The fields are included on updated versions of the Smart Assessor tabs, which are imported automatically in the upgrade but must be re-published:
- Go to Tools on the toolbar and click New / Load on the Screens panel of the ribbon.
- Select Trainee on the left and double-click Smart Assessor on the right.
- Tick the Published tab on the left.
- Click Apply.
- Repeat the above steps for the Smart Assessor tabs in the Employer and Personnel entities.
- Go to Home on the toolbar and click Sync.
New Learner Mappings
These fields can be found on the updated Smart Assessor tab for learners in Maytas.
| Field Name | Name in Smart Assessor | Maytas Table and Field |
|---|---|---|
| Initial Assessment - Numeracy | InitialAssessmentNumeracy | TRAINEEPOT.INITIALASSESSMENTNUMERACY |
| Initial Assessment - Literacy | InitialAssessmentLiteracy | TRAINEEPOT.INITIALASSESSMENTLITERACY |
| Initial Assessment - ICT | InitialAssessmentICT | TRAINEEPOT.INITIALASSESSMENTICT |
| Domicile | Domicile | TRAINEEPOT2.ILR_DOMICILE |
New Employer Mappings
These fields can be found on the updated Smart Assessor tab for employers in Maytas.
| Field Name | Name in Smart Assessor | Maytas Table and Field |
|---|---|---|
| Health & Safety Assessment Date | HandSassessmentdate | EMPLOYER.HANDSASSESSMENTDATE |
| Health & Safety Assessment Renewal Date | HandSassessmentdaterenewal | EMPLOYER.HANDSASSESSMENTRENEWALDATE |
Screen Designer - Hide Grid Buttons
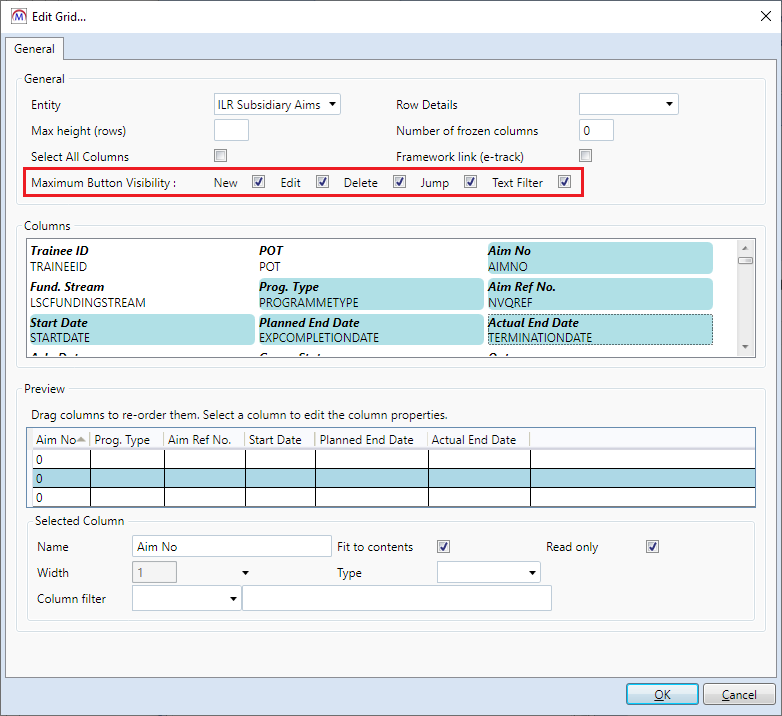
New options to show or hide grid buttons are now available when configuring grids in the Screen Designer.

Each button can be ticked or un-ticked to enable or disable it. Click OK, then click Apply once changes have been made.

The example grids above show all buttons enabled (top) and disabled (bottom). Note that with all buttons disabled, the refresh and column filter buttons remain.