e-track Online Release Notes
Technical specification
The latest Maytas and e-track technical specification can be found here.
e-track Online Release Notes – Version 5.20.7620.1
Workflow Improvements
Workflows have been improved so that default assessors and employers can be configured for learner forms being completed by an assessor or employer. When the new options are selected, they override the ability to manually select an assessor or employer to assign a form to when invoking a workflow against a learner.
Default to latest assessor/employer
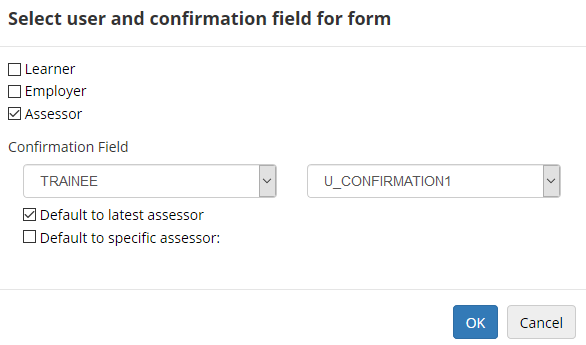
When a learner form is added to a workflow and the Employer or Assessor box is ticked, a new Default to latest assessor/employer checkbox is available:

If this is ticked and the workflow is invoked against a learner, the form will be assigned to the latest live assessor/employer record associated with the learner, ordered by start date.
When all forms in a stage have been completed and the next stage is made available, the workflow will check that the assessor/employer record is still live and will change to the latest live record if not.
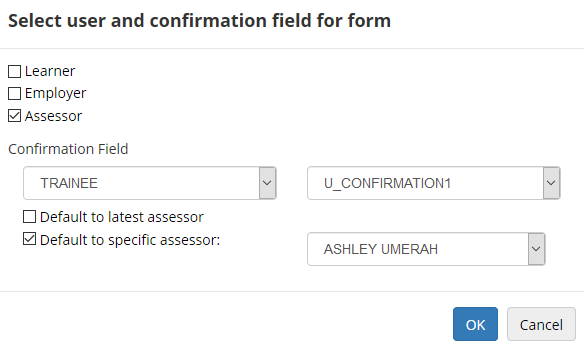
Default to specific assessor/employer
This option lets you specify an assessor or employer to be assigned to a form before the workflow is invoked. However, assessors and employers must have a field set for them to appear in the list of available assessors/employers to select from. The fields are:
- Assessors - ASSESSOR.ALLOW_DEFAULT_WORKFLOW_USER
- Employers - EMPLOYER.ALLOW_DEFAULT_WORKFLOW_USER
A value of Y in these fields makes the assessor or employer available to select for this option. The fields can be added to tabs in the Screen Designer.

Assessors and employers not associated with the learner can be selected for this option.
If no assessors or employers have a value in ALLOW_DEFAULT_WORKFLOW_USER, the Default to specific assessor/employer option will not appear.
With both options ticked
If Default to latest assessor/employer and Default to specific assessor/employer are both ticked, the workflow will select the latest assessor/employer record if one is available. If no live record is found, the specific record is selected instead. This may be useful for completing forms where, for instance, learners are unlikely to have had assessors and employers assigned to them yet.
Trainee to Employer Link Permissions
New permissions are available to control the editing and deletion of trainee to employer (TREMPLOYER) links:
- Go to Web User Editor on the sidebar.
- Search for and select the user who requires permission.
- Click Permissions to expand that section.
-
There are two new options in the Assessor section.
- Restrict editing TrEmployer links - When ticked, this prevents the user from being able to edit the start and end dates on existing TrEmployer links in e-track. New links are not affected and can be completed as normal.
- Restrict deleting TrEmployer links - When ticked, this prevents the user from being able to delete TrEmployer links in e-track.
- Click Save.
Employer Editor Tab Permissions
The Details and User tabs in the employer editor can now be disabled for an assessor user.
- Go to Web User Editor on the sidebar.
- Search for and select the user who requires permission.
- Click Custom Tabs to expand that section.
-
There are two new options in the Employer Editor section.
- Details
- User
- These tabs are ticked by default. Un-tick them to disable them for the user.
- Click Save.
Key Contact Details
If an employer key contact has been specified for an learner, the contact's details will now appear under the learner's employer details. This can be found by clicking the View Details button on the learner Summary screen.

Grid Permissions
New permissions are available to restrict adding, editing and deleting rows on a grid in e-track. This is done per user and tab as follows:
- Go to Web User Editor on the sidebar.
- Search for and select the user who requires permission.
-
Click Custom Tabs to expand that section.

-
The Edit Grids column will have a + button for any tab that has a grid on it. Click the + to expand the grid permissions.

-
Tick the top box to make the tab visible, which will then allow you to select the grid permissions to Add Rows, Edit Rows and Delete Rows as required.

- Click Save.