e-track Online Release Notes
Technical specification
The latest Maytas and e-track technical specification can be found here.
e-track Online Release Notes – Version 5.20.7500.2
Data Collection - Employer Bulk Approval of Forms
Employer users can now approve multiple data collection forms that have been sent to them at once. To enable this:
- Go to Settings on the sidebar and click System configuration.
- Go to Employer Login on the left.
- In the Data Collection section, tick the box next to the config Allow multiple learner forms to be confirmed at once and ensure the toggle button is set to ON.
- Click Save.
Now when an employer has multiple forms to confirm, the Confirm multiple forms button will appear on the pop-up window when they login:
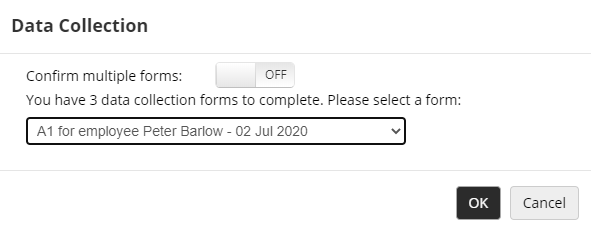
With the button set to OFF, a single form can be selected for confirmation. With the button set to ON, the dropdown list changes to an option list of each form:
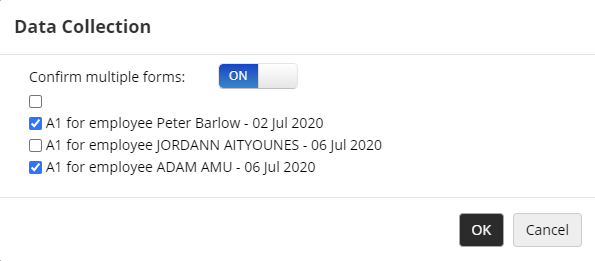
Tick the boxes of the forms you wish to confirm and click OK. Each selected form will then be presented.
Data Collection Forms for New Trainee Process
The standard process for adding a new trainee record in e-track can now be replaced with one or more data collection forms. First, two configuration options must be set:
- Go to Settings on the sidebar and click System configuration.
- Go to Assessor Login on the left.
- Scroll down to the General section and set the following two configs as required:
- Custom Add Trainee form(s) - Enter the short string values for each form you wish to include in the New Trainee process (details on form short strings can be found here). Each form should be separated with a semi-colon, e.g. A1;A2;A3.
- Custom Add Trainee assessor type - If this config is enabled, when an assessor adds a new trainee record in e-track, the trainee will automatically be added to their caseload, using the current date as their start date with the assessor (i.e. TRASSESSOR.STARTDATE). To enable this, tick the box for the config and select the default assessor type that should be used when a trainee is added to the caseload.
- Click Save.
Next, permissions must be set for the forms for each assessor who will use the new system:
- Go to the Web User Editor on the sidebar.
- Search for and open the required assessor user record.
- Click the Custom Tabs section to expand it.
- Locate the forms under the Application Forms section and tick the box for each form specified in the config above.
- Click the New Trainee Centres section to expand it.
- Select the centres in which the user can add new trainees.
- Click Save.
Finally, a non-funded flag must be set in Maytas against any contractors that you wish to add new trainees to:
- In Maytas, go to Management | Contracts.
- Select the contractor on the left.
- Click the
 button to open the contractor details.
 - Ensure the Non Funded box is ticked and click OK.
- Click Apply.
- Repeat for additional contractors as required.
With these configs and permissions set, when an assessor user with the Allow Add Trainee permission goes to the Browse Trainees screen and clicks the Add Trainee button, they will first be asked to complete some basic mandatory fields for the trainee, and then they will be able to complete the specified forms.
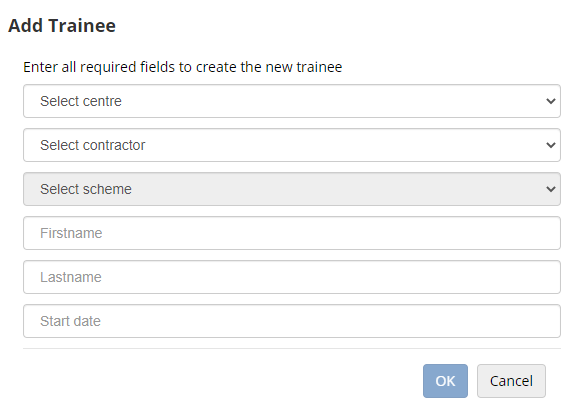
Data Collection - Email Body Parameters
The email body sent to new data collection users and to users recovering their login can now be configured to include parameters which produce a recovery URL where a new password can be provided.
First, the e-track URL must be set in a config option:
- Go to Settings on the sidebar and click System configuration.
- Go to Admin on the left (under the e-track Online header).
- Locate the Base URL config in the General section.
- Tick the box for the config and enter your e-track Online URL (e.g. https://myserver/e-track).
- Click Save.
Next, the email bodies can be configured (in the same section). The applicable configs are:
- Email body for new employer web users
- Email body for new trainee web users
- Email body for password recovery
A recovery link can be included in the body in two ways:
- Simply include the {{link}} parameter, which will use the e-track URL specified above to generate a recovery URL.
- Enter the e-track URL and include the {{recoveryid}} parameter, which will achieve the same result (e.g. https://myserver/e-track/Default.aspx?recover={{recoveryid}} ).
An example email body may look like this:
<p>Hello {FNAME} {LNAME}.</p><p>Your e-track username is {{user}}.</p><p>Please login below: </p>
<br />{{link}}
Click Save when finished.
National Insurance Number Validation
A field on a custom e-track tab created in the Screen Designer can now be designated as a National Insurance number field so that only valid NI numbers can be entered in it. To do this:
- In Maytas, go to Tools on the toolbar and click New / Load on the Screens panel of the ribbon.
-
Open or create the tab you wish to use.
The tab must be configured for use in e-track - see the e-track Screen Design page for details.
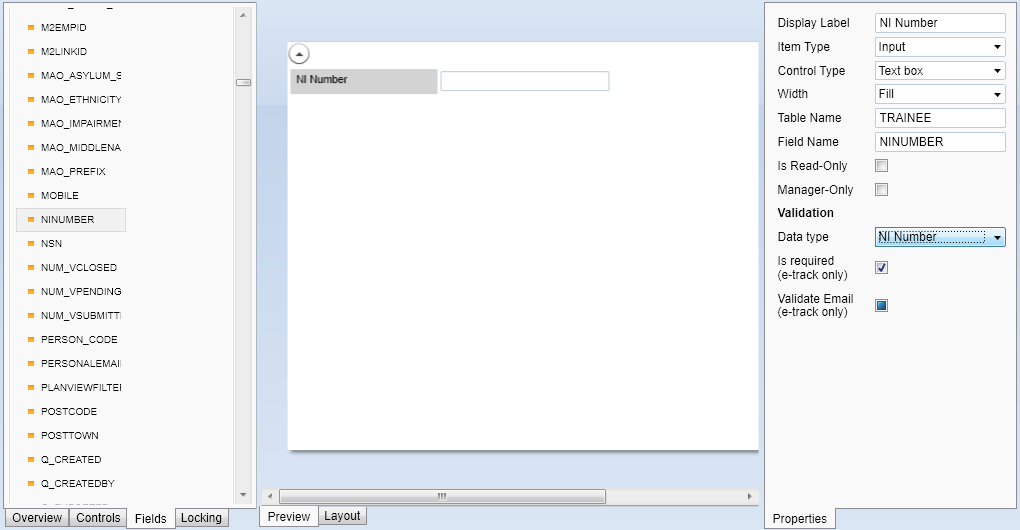
- Drag the field you wish to use for the NI number onto the design area (typically this would be TRAINEE.NINUMBER).
- Select the field in the design area.
-
On the right, click the dropdown for Data type and choose NI Number. This designates the field as requiring NI Number validation.
- Click Apply.
- Go to Home on the toolbar and click Sync.
When the tab is accessed in e-track, only valid NI numbers will be able to be saved in the designated field.
POT-Specific Data Collection Forms
Data collection forms can now be made POT-specific by entering the POT number in the relevant grid on the Data Queue tab for a learner, employer or assessor.

For example, if a learner has two POTs and POT 1 is entered in the grid against a form they need to complete, the data they enter on the form will apply to POT 1 rather than POT 2.
If the POT column is left empty, data applies to the latest POT.
This requires a new version of the Data Queue tabs to be imported in Maytas:
- In Maytas, go to Tools on the toolbar and click Import on the Screens panel of the ribbon.
- Click Browse.
- Browse to the Maytas\Extras\Tabs folder of the upgrade.
- Select the Data Queue tabs.m5tab package and click Open.
- Click Next, then click Finish.
- Go to Home on the toolbar and click Sync.
Evidence Wizard Confirmation Boxes
When a learner submits evidence via the evidence wizard, two confirmation boxes can now be included at the end of the wizard:
- A checkbox to flag the evidence as being related to off-the-job training. If this is ticked, the learner will be redirected to the Off-the-Job Training tab when the wizard is completed with a new row ready to be edited and saved. Once this row is saved, the file ID of the submitted evidence will be recorded against the row (in the field OFF_JOB_TRAINING.FILEID).
- A checkbox with configurable text which can be used for other confirmations (e.g. to confirm the attached evidence is the learner's own work). This maps to the field TRAINEEPORTFOLIO.ISCONFIRMED.
To enable the checkboxes:
- Go to Settings on the sidebar and click System configuration.
- Go to Learner Login on the left.
- Scroll down to the Evidence Wizard section.
- To enable the off-the-job training confirmation box, tick the box next to Off The Job Confirmation and ensure the toggle button is set to ON.
-
To enable the configurable checkbox, tick the box next to Confirmation text and enter the text you want to appear next to the checkbox.

- Click Save.
The checkboxes will now appear at the end of the evidence wizard when a learner submits evidence.

Regular Expressions on Custom e-track Screens
It is now possible to apply a Regular Expression (or regex) to fields on custom e-track screens via the Screen Designer so that data is validated to a particular format.
Regular Expressions can be complex and the details of how to form them are beyond the scope of this document. Various regex examples can be found here (please note that this is not a Tribal site).
To apply a regex to a field:
- In Maytas, go to Tools on the toolbar and click New / Load on the Screens panel of the ribbon.
-
Open or create the tab you wish to use.
The tab must be configured for use in e-track - see the e-track Screen Design page for details.
- Drag the field you wish to apply a regex to onto the design area. For this example we will apply a regex to the mobile phone field (TRAINEE.MOBILE) so that only valid mobile numbers can be saved to that field on this screen.
- Select the field in the design area.
- On the right, click the dropdown for Data type and choose Regular expression. A separate Regular expression box will appear underneath the dropdown.
-
Enter your regex in the Regular expression box. For this example, enter:
07\d{9}$
This will require any value entered in the field to begin with the digits 07, followed by exactly 9 other digits.
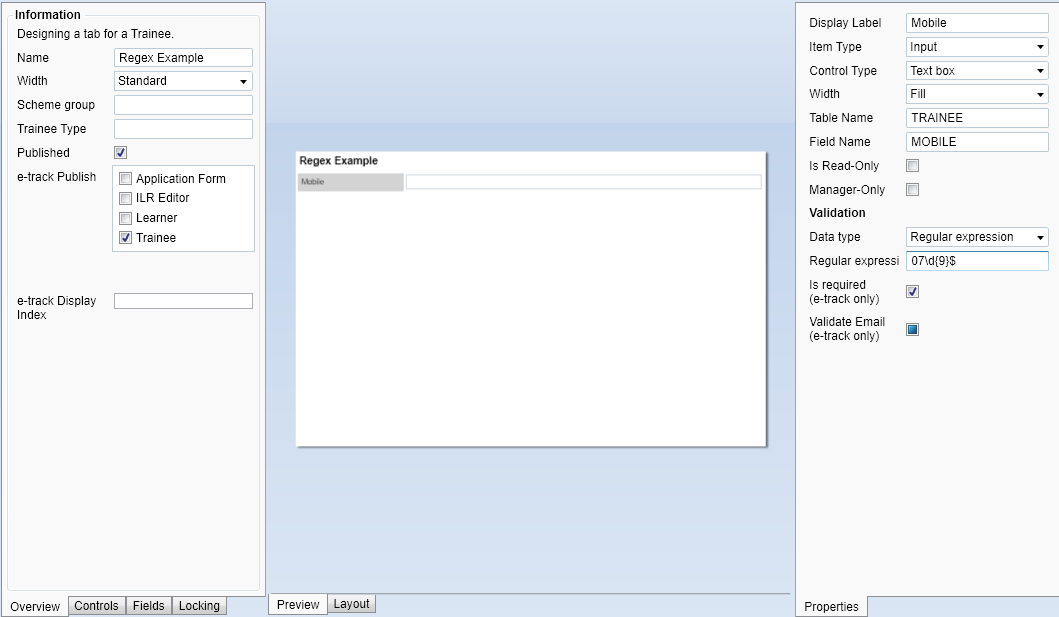
- Click Apply, the go to Home on the toolbar and click Sync.
When a value is entered in the field on this screen in e-track, only valid values as per the regex will be able to be saved.
It is important to note that regular expressions are screen-specific - i.e. if you apply a regex to a field on a screen, the regex will not apply to the same field if it appears on other screens.