ebs-Link Release Notes
Maytas 5.20 Release Notes
Note regarding submissions
We would like to remind providers to create a submission early and check for any errors using reports from the appropriate software (i.e. the FIS or LLWR-Inform). Welsh providers should also remember to download their ULI file. After submission to the ESFA or DfES, providers should check that data has submitted correctly using the available reports. Providers should check that all their expected starts and completions are submitted correctly, and that start and outcome payments correctly match the PFR or ACE funding reports.
Our support desk gets extremely busy in the days prior to the submission deadlines, and although we try and prioritise submission-related queries, we cannot guarantee assistance if queries are sent late. If you do encounter any issues, please ensure that you contact Maytas Support as soon as possible, as we can only rectify issues of which we are aware. We also recommend checking Maytas Communities regularly for information on any known issues and solutions. Tribal cannot be held responsible for any issues caused by your failure to comply with this advice.
Data migration
Please note that it is important to ensure that all 2019/20 learners have been entered before the upgrades are applied. This is because the upgrade migrates 2019 data to the 2020 fields, and any 2019 learners entered after the upgrades will not be migrated. As such, if any 2019 learners do need to be entered after the upgrade, both the 2019 and 2020 tabs must be completed to ensure all data is present and correct.
Technical specification
The latest Maytas and e-track technical specification can be found here.
Once the upgrade has been completed, the version number should be checked to ensure it has been successful.
- Start Maytas and go to Support on the toolbar.
- Click About.
- The version numbers should read 181.20 / 5.20.7500.2. If you have any other version, please ensure you have followed the upgrade instructions correctly. If you require assistance, please contact Maytas Support.
It is the responsibility of customers to ensure that users carry out any required user acceptance testing and sign off on the upgrade.
Complete the Upgrade
Features Added in the Upgrade
These are the main updates in the upgrade:
- ILR tabs for 2020/21
- ILR reports for 2020/21
- ILR rollover validation rules for 2020/21
- ILR rollover funding for 2020/21 using 2019/20 rules
- ILR batch export
- Lookup changes for new and revised fields
- Fixes to a number of issues
Check the Contractor Details for the ESFA Export
- Open Maytas 5 and select Management | Contracts.
- Highlight the contractor name (company) you wish to edit.
-
Right-click and select Edit.
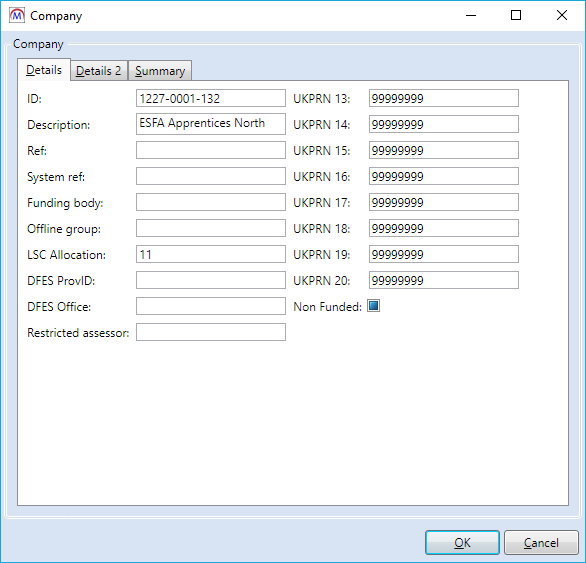
- The Company screen will be displayed. The technical upgrade will have copied the UK PRN field to the new 20 box. If necessary, you should amend this value.
- Providers need to ensure that these instructions are completed for each company (contractor) used for the ESFA export.
Create the 2020/21 ESFA Formula-Funded Contract
A 2020/21 ESFA formula-funded contract should be set up for each ESFA contractor. Without this contract, Maytas is unable to determine the funding rules, schemes and lookup codes to use.
- In the Contracts module, left-click the contractor (company) to which you wish to add the new contract.
- Click Add Contract on the ribbon.
-
Make sure that option 1. Existing company is selected then click Next.
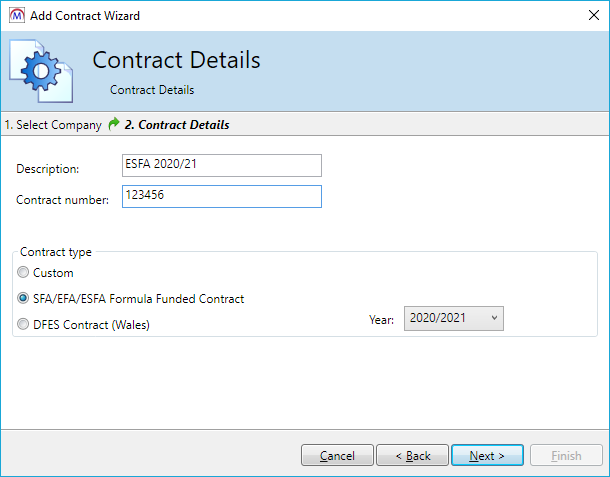
- Enter a contact description (e.g. ESFA 2020/21).
- Enter a contract number if required.
- Select the SFA/EFA/ESFA Formula Funded Contract option.
- Select year 2020/2021.
- Click Next.
- Amend the schemes you wish to include in the contract and click Next.
- Click Finish.
Import Funding Information
The process for importing the required funding information into Maytas is as follows:
- The old FIS 2018/19 application should be used to import data sets for 2018/19 and earlier if it has not previously been imported.
- The LARS for 2020/21 should be imported.
- Postcode data for 2020/21 should be imported.
- Once all data has been imported, ensure that the funding cache is refreshed (either on a database schedule or a manual update out of working hours).
Re-Import the FIS Data Sets
If the 2018/19 data sets were imported in 5.19, this step can be skipped and you should proceed to importing the LARS.
If the FIS data sets for 2018/19 were not imported in the 5.19 release, it is essential that they are imported into Maytas one final time for use by the funding cache. This should be done by importing the relevant information directly from the Data Service’s Funding Information System (FIS). To do this, you must have the FIS installed and correctly configured (please refer to the Data Service’s instructions for setting up the FIS).
Please ensure you have the latest version of the 2018/19 FIS application with the latest components installed.
Once the FIS is installed and configured, the information can be imported as follows:
- Perform a sync in Maytas 5, then restart Maytas 5.
-
Go to Exports | Uploads | Upload FIS Data Sets.
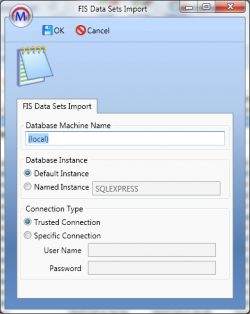
- There are three items to configure:
- Database Machine Name – If the FIS is installed on the same machine that you are using for Maytas 5, this can be left as (local). Otherwise, enter the machine name of the SQL server where the FIS database is held.
Database Instance – If the SQL server holding the FIS database has a named instance (e.g. MACHINENAME\INSTANCENAME), select Named Instance and enter the instance name. Otherwise leave this as Default Instance.
If you have no named instance and Default Instance does not work, you may need to select Named Instance and leave the instance name blank.
- Connection Type – This is the login for the SQL server holding the FIS database. Trusted Connection will use Windows authentication. If you wish to specify the login details, select Specific Connection and enter the credentials.
- Click OK. The FIS data will now be imported.
- If you have an Adult Skills budget contract and a transition factor, this must be entered on the contract:
- Go to Management on the toolbar and click Contracts on the ribbon.
- Select the relevant contractor, then select the Adult Skills contract on the right.
- Click the
 button.
 - Go to the Uplifts tab.
- Enter the ASB Transition Factor and click OK.
- Click Apply to save the change.
Import LARS
The LARS for 2020/21 should be imported as follows:
- Download the LARS MDB file for 2020/21. At the time of this release, the latest version is the LARS MDB version 7.
- In Maytas, go to Exports on the toolbar.
- On the ILR Tools panel of the ribbon, go to Uploads | Upload Funding Information | Upload LARS (Version 7).
- Browse to and select the downloaded LARS file and click Open.
- The file will now be imported. Click OK on the message which appears.
Progress on the import can be checked by going to Home | Server Tasks | Server Jobs. Typically it will take several minutes.
Import Postcode File
Postcode data for 2020/21 should be imported as follows:
- Obtain the postcode uplift factors file - Download the zip file under 2019 to 2020 uplift factors by postcode and LLSOA: CSV files.
- In Maytas, go to Exports on the toolbar.
- On the ILR Tools panel of the ribbon, go to Uploads | Postcode Uploads | Upload Post Code Data (2020/21).
- Browse to and select the postcode uplifts zip file and click Open.
- The file will now be imported. Click OK on the message which appears.
Progress on the import can be checked by going to Home | Server Tasks | Server Jobs. Typically this will take several minutes.
Devolved AEB postcode data is also available for importing, but it is not currently used in Maytas and so there is no need to import it. Future upgrades may require it to be imported, depending on whether the data is used in the funding calculations.
Large employer factor data sets do not need to be imported for 2020/21. LEF data for 2018/19 and earlier is included in the FIS import.
Note on the Funding Cache
By default, the funding cache will update overnight so that funding information in Maytas uses the newly-imported FIS and postcode information. Please check with your system administrator if you are unsure if or when the funding cache is updated on your system. You can also manually set the funding cache to update by going to Management | Profiles and clicking the Funding Cache button, though please be aware that this may take a long time and may use a large amount of system resources, which could affect performance for other users on the system.
Maytas 5 Version 5.20.7500.2 Release Notes
2020/21 Contract Year Updates
ILR Export 2020/21
The ILR export for 2020/21 is now available in Maytas. To view the ILR export screen for 2020/21:
- Click Exports on the toolbar.
- Click ILR Export on the ribbon.
-
Click the
 button.
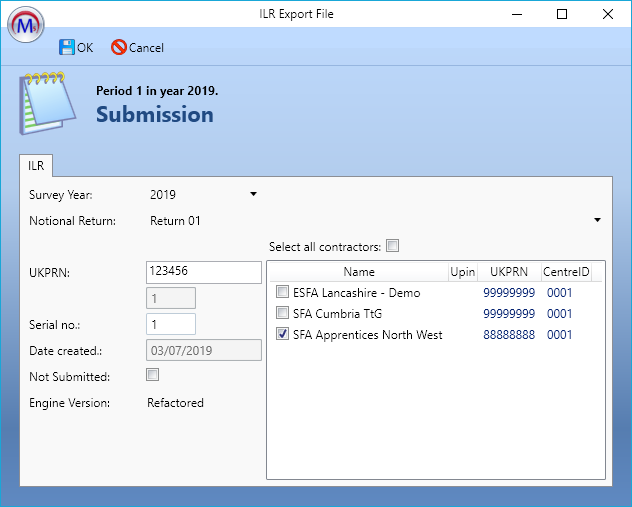
- Choose 2020 from the Survey Year dropdown box.
- Choose the Notional Return period.
- Amend the UKPRN as required.
-
Once ready, click OK.
Please be aware that the option to choose between the legacy and refactor export engines is not available for 2019/20 exports, as they are only produced using the new refactor engine.
-
Locate the submission by expanding the contract year and period using the arrows to the left. Click the submission to select it. The status will say Generate pending until the export data has been generated. It will then say File preparation finished. Please note that this may take a while, depending on the amount of data being exported.

- Edit opens the export and allows you to view and edit the export settings. Please note that not all settings can be changed once an export has been created.
- Generate processes the export and produces a text file showing any errors for each learner. This allows you to correct any errors and re-generate before the batch file is created. The generation progress is shown with the circular progress bar to the right.
- View Log shows any errors in the export. These should be investigated and resolved and the data re-generated before outputting the XML.
- Output XML creates the actual batch file. The file will be created at C:\Temp on the Maytas server.
- Get File lets you download the batch file once it has been created.
The 2020/21 ILR export has been tested and validated against the latest version of the online ILR specification as of the time of this release, as well as other accompanying documents. As of this release, the 2020/21 FIS is still in a beta stage, and so we have not yet been able to test the ILR export with the FIS comprehensively. Further testing will be done as new versions of the FIS become available. At the time of this upgrade, the provider support manual has only just been published and so any changes required from it will be implemented in a future release.
While we have tested the ILR export to the best of our ability with the available specifications, there may be further issues which have not yet been identified. It is also possible that future versions of the FIS and the ILR specification may require the export and/or FIS import to be changed to meet any new criteria. Any changes that are required will be implemented in a follow-up release of Maytas.
Migration of ILR export override flags
The following details whether ILR export flags are migrated from 2019/20 to 2020/21. For information on setting these flags, please contact Maytas support.
Force Export Flag
The 2019/20 force export flag is not copied to the 2020/21 force export flag. To override the ILR export and include a POT that does not meet the 2020/21 ILR export criteria, the 2020/21 export flag must be set.
Blocking Flags
The 2019/20 blocking flags are copied to the 2020/21 blocking flags. Aims blocked from the 2019/20 export will continue to be blocked in the 2020/21 export.
Funding Information
The funding information for 2020/21 in this upgrade is based on the funding rules for 2019/20, since full specifications were not available at the time of development. The 2020/21 funding information in this upgrade should be considered a beta version and is subject to change once future specifications have been published.
ACE 360 Tab and Report
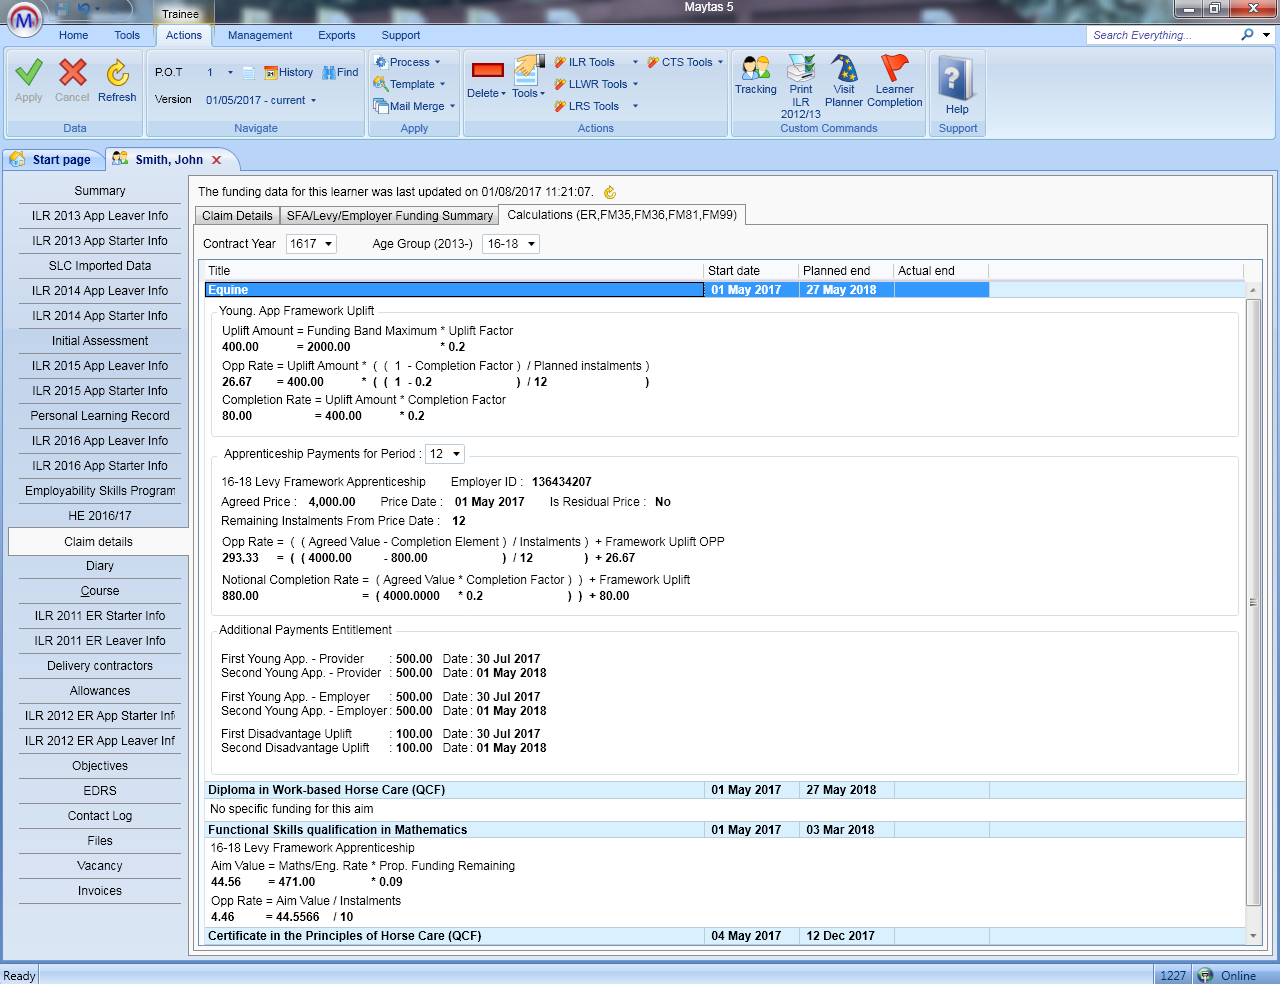
A new tab and report are available for entering and exporting data for Apprenticeship Standard learners so that they can be sent to ACE 360.
To import the tab:
- In Maytas, go to Tools on the toolbar and click Import on the Screens panel of the ribbon.
- Click Browse.
- Browse to the Maytas\Extras\Tabs folder of the upgrade.
- Select the ACE 360.m5tab package and click Open.
- Click Next, then click Finish.
- Go to Home on the toolbar and click Sync.
To import the report:
- In Maytas, go to Home on the toolbar and click Import on the Reports panel of the ribbon.
- Click Add Files.
- Browse to the Maytas 5\Extras\Module Reports folder of the upgrade.
- Select ACE 360.m5rep and click Open.
- Click Finish.
- Once the reports have finished importing, click Finish.
The tab is called ACE 360 and contains all the fields required for ACE 360 (many of these are existing fields that can be found on other tabs).
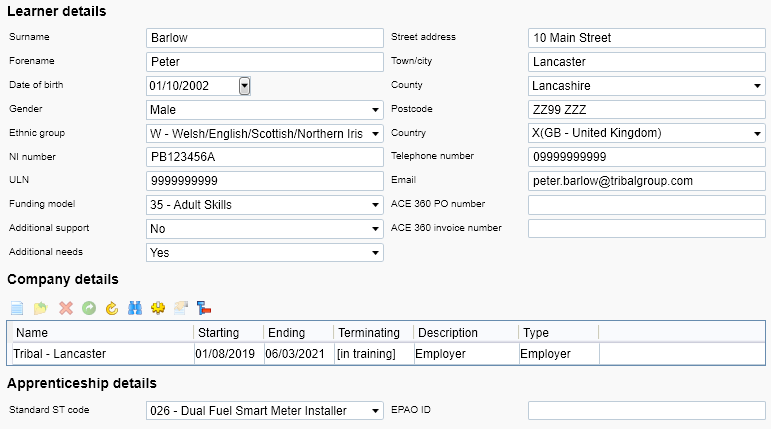
The ACE 360 report can be found in the Progression folder of the Reports Library. The base criteria for a learner to appear on the report is as follows:
- The learner is on an Apprenticeship Standard (i.e. they have a standard code selected on the programme aim or main aim).
- The programme aim was achieved between the start and end date parameters. This is determined using the programme achievement date if entered, otherwise the programme actual end date is used and the programme outcome must be achieved.
- The learner must be assigned to an employer who they were active with when they achieved (using the same achievement criteria as above).
e-track Online Release Notes – Version 5.20.7500.2
Data Collection - Employer Bulk Approval of Forms
Employer users can now approve multiple data collection forms that have been sent to them at once. To enable this:
- Go to Settings on the sidebar and click System configuration.
- Go to Employer Login on the left.
- In the Data Collection section, tick the box next to the config Allow multiple learner forms to be confirmed at once and ensure the toggle button is set to ON.
- Click Save.
Now when an employer has multiple forms to confirm, the Confirm multiple forms button will appear on the pop-up window when they login:
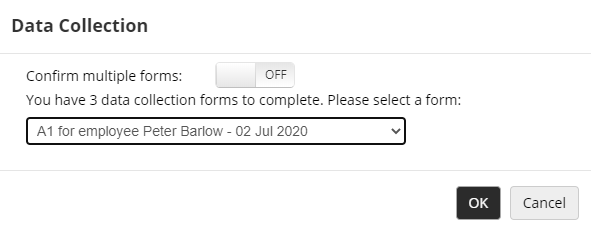
With the button set to OFF, a single form can be selected for confirmation. With the button set to ON, the dropdown list changes to an option list of each form:
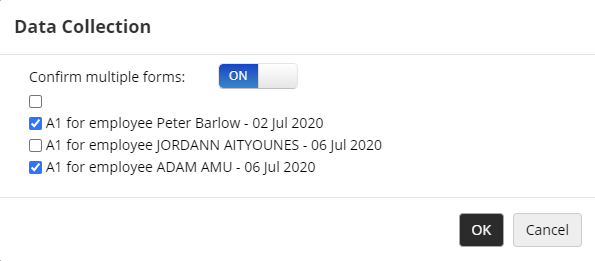
Tick the boxes of the forms you wish to confirm and click OK. Each selected form will then be presented.
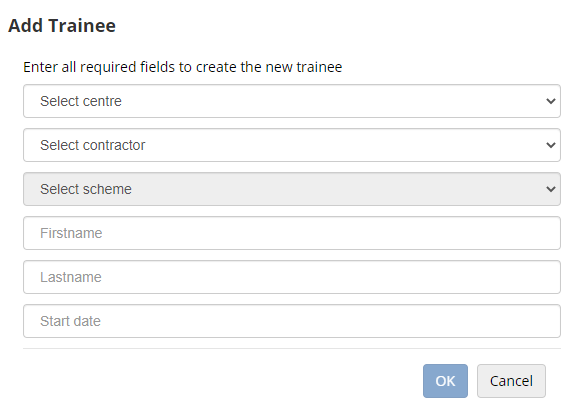
Data Collection Forms for New Trainee Process
The standard process for adding a new trainee record in e-track can now be replaced with one or more data collection forms. First, two configuration options must be set:
- Go to Settings on the sidebar and click System configuration.
- Go to Assessor Login on the left.
- Scroll down to the General section and set the following two configs as required:
- Custom Add Trainee form(s) - Enter the short string values for each form you wish to include in the New Trainee process (details on form short strings can be found here). Each form should be separated with a semi-colon, e.g. A1;A2;A3.
- Custom Add Trainee assessor type - If this config is enabled, when an assessor adds a new trainee record in e-track, the trainee will automatically be added to their caseload, using the current date as their start date with the assessor (i.e. TRASSESSOR.STARTDATE). To enable this, tick the box for the config and select the default assessor type that should be used when a trainee is added to the caseload.
- Click Save.
Next, permissions must be set for the forms for each assessor who will use the new system:
- Go to the Web User Editor on the sidebar.
- Search for and open the required assessor user record.
- Click the Custom Tabs section to expand it.
- Locate the forms under the Application Forms section and tick the box for each form specified in the config above.
- Click Save.
With these configs and permissions set, when an assessor user goes to the Browse Trainees screen and clicks the Add Trainee button, they will first be asked to complete some basic mandatory fields for the trainee, and then they will be able to complete the specified forms.
Data Collection - Email Body Parameters
The email body sent to new data collection users and to users recovering their login can now be configured to include parameters which produce a recovery URL where a new password can be provided.
First, the e-track URL must be set in a config option:
- Go to Settings on the sidebar and click System configuration.
- Go to Admin on the left (under the e-track Online header).
- Locate the Base URL config in the General section.
- Tick the box for the config and enter your e-track Online URL (e.g. https://myserver/e-track).
- Click Save.
Next, the email bodies can be configured (in the same section). The applicable configs are:
- Email body for new employer web users
- Email body for new trainee web users
- Email body for password recovery
A recovery link can be included in the body in two ways:
- Simply include the {{link}} parameter, which will use the e-track URL specified above to generate a recovery URL.
- Enter the e-track URL and include the {{recoveryid}} parameter, which will achieve the same result (e.g. https://myserver/e-track/Default.aspx?recover={{recoveryid}} ).
An example email body may look like this:
<p>Hello {FNAME} {LNAME}.</p><p>Your e-track username is {{user}}.</p><p>Please login below: </p>
<br />{{link}}
Click Save when finished.
National Insurance Number Validation
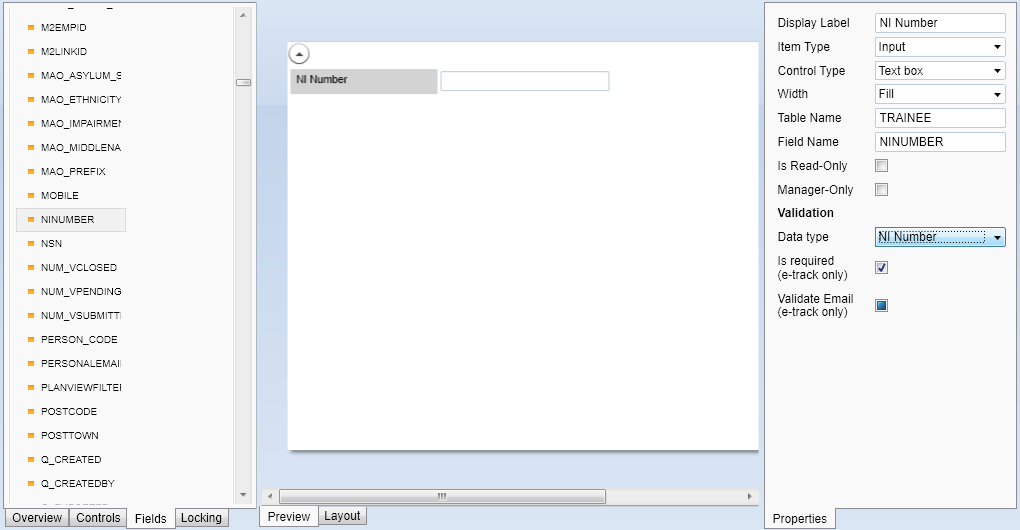
A field on a custom e-track tab created in the Screen Designer can now be designated as a National Insurance number field so that only valid NI numbers can be entered in it. To do this:
- In Maytas, go to Tools on the toolbar and click New / Load on the Screens panel of the ribbon.
-
Open or create the tab you wish to use.
The tab must be configured for use in e-track - see the e-track Screen Design page for details.
- Drag the field you wish to use for the NI number onto the design area (typically this would be TRAINEE.NINUMBER).
- Select the field in the design area.
-
On the right, click the dropdown for Data type and choose NI Number. This designates the field as requiring NI Number validation.
- Click Apply.
- Go to Home on the toolbar and click Sync.
When the tab is accessed in e-track, only valid NI numbers will be able to be saved in the designated field.
POT-Specific Data Collection Forms
Data collection forms can now be made POT-specific by entering the POT number in the relevant grid on the Data Queue tab for a learner, employer or assessor.

For example, if a learner has two POTs and POT 1 is entered in the grid against a form they need to complete, the data they enter on the form will apply to POT 1 rather than POT 2.
If the POT column is left empty, data applies to the latest POT.
This requires a new version of the Data Queue tabs to be imported in Maytas:
- In Maytas, go to Tools on the toolbar and click Import on the Screens panel of the ribbon.
- Click Browse.
- Browse to the Maytas\Extras\Tabs folder of the upgrade.
- Select the Data Queue tabs.m5tab package and click Open.
- Click Next, then click Finish.
- Go to Home on the toolbar and click Sync.
Evidence Wizard Confirmation Boxes
When a learner submits evidence via the evidence wizard, two confirmation boxes can now be included at the end of the wizard:
- A checkbox to flag the evidence as being related to off-the-job training. If this is ticked, the learner will be redirected to the Off-the-Job Training tab when the wizard is completed with a new row ready to be edited and saved. Once this row is saved, the file ID of the submitted evidence will be recorded against the row (in the field OFF_JOB_TRAINING.FILEID).
- A checkbox with configurable text which can be used for other confirmations (e.g. to confirm the attached evidence is the learner's own work). This maps to the field TRAINEEPORTFOLIO.ISCONFIRMED.
To enable the checkboxes:
- Go to Settings on the sidebar and click System configuration.
- Go to Learner Login on the left.
- Scroll down to the Evidence Wizard section.
- To enable the off-the-job training confirmation box, tick the box next to Off The Job Confirmation and ensure the toggle button is set to ON.
-
To enable the configurable checkbox, tick the box next to Confirmation text and enter the text you want to appear next to the checkbox.

- Click Save.
The checkboxes will now appear at the end of the evidence wizard when a learner submits evidence.

Regular Expressions on Custom e-track Screens
It is now possible to apply a Regular Expression (or regex) to fields on custom e-track screens via the Screen Designer so that data is validated to a particular format.
Regular Expressions can be complex and the details of how to form them are beyond the scope of this document. Various regex examples can be found here (please note that this is not a Tribal site).
To apply a regex to a field:
- In Maytas, go to Tools on the toolbar and click New / Load on the Screens panel of the ribbon.
-
Open or create the tab you wish to use.
The tab must be configured for use in e-track - see the e-track Screen Design page for details.
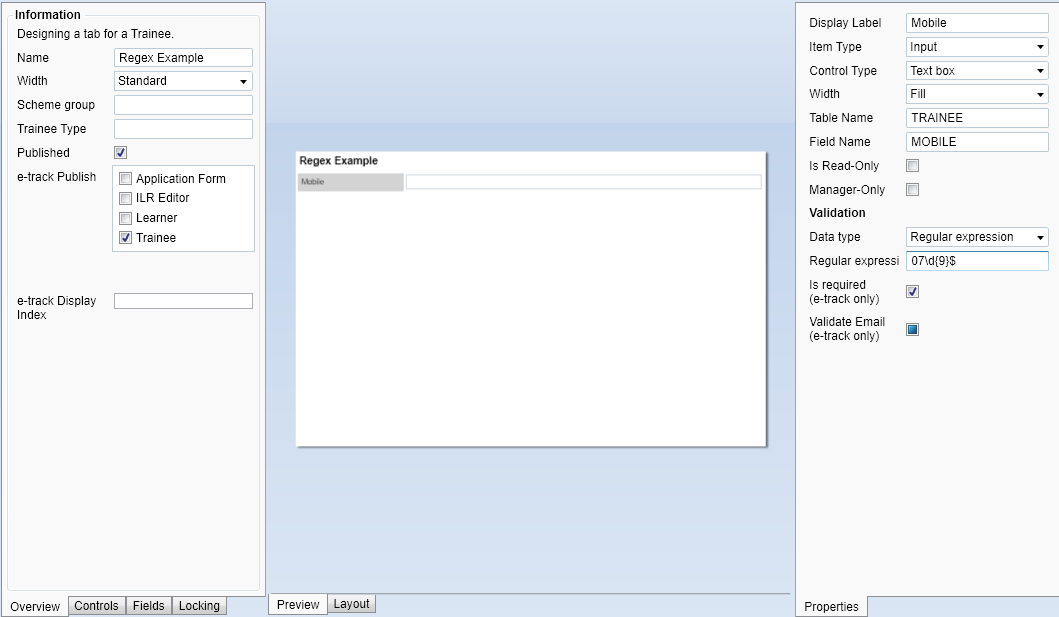
- Drag the field you wish to apply a regex to onto the design area. For this example we will apply a regex to the mobile phone field (TRAINEE.MOBILE) so that only valid mobile numbers can be saved to that field on this screen.
- Select the field in the design area.
- On the right, click the dropdown for Data type and choose Regular expression. A separate Regular expression box will appear underneath the dropdown.
-
Enter your regex in the Regular expression box. For this example, enter:
07\d{9}$
This will require any value entered in the field to begin with the digits 07, followed by exactly 9 other digits.
- Click Apply, the go to Home on the toolbar and click Sync.
When a value is entered in the field on this screen in e-track, only valid values as per the regex will be able to be saved.
It is important to note that regular expressions are screen-specific - i.e. if you apply a regex to a field on a screen, the regex will not apply to the same field if it appears on other screens.