e-track Online Release Notes
Technical specification
The latest Maytas and e-track technical specification can be found here.
e-track Online Release Notes – Version 5.21.7800.2
Skill Scan Updates
Skill Scan Progress Chart
The Skill Scan tab now includes a progress chart that shows a learner's average skill scan scores over time for a particular module.
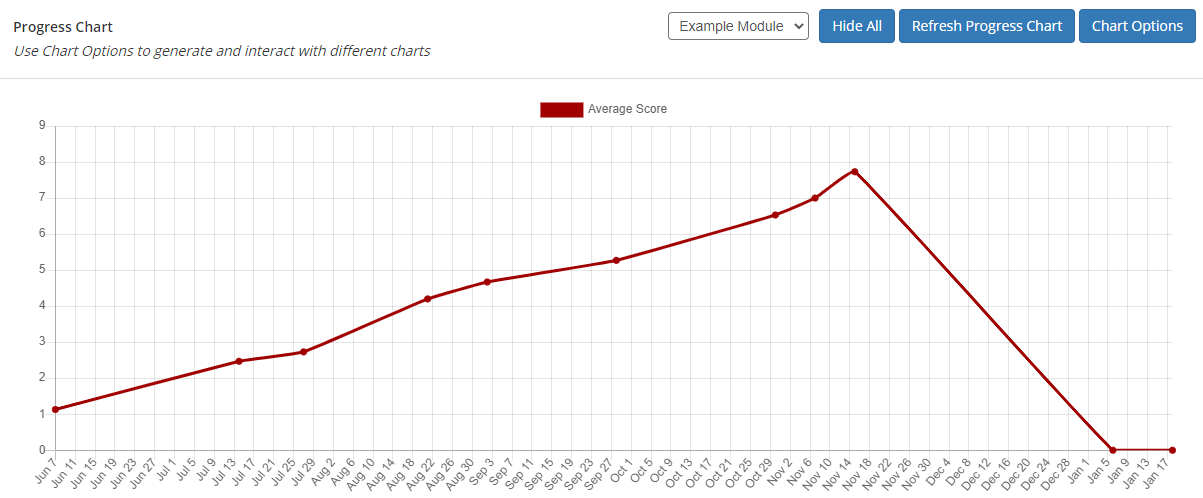
There are various options above the chart which let you configure it:
- Module dropdown box - This lets you choose which module to display skill scan progress for. The modules shown in the list are limited by the selected framework (at the top-right of the Skill Scan tab) and whether a module is configured for skill scans.
- Hide All - This button will hide all chart data. The button will change to Show All, which will show the chart data again.
- Refresh Progress Chart - Click this button after selecting a different module or changing chart options to refresh the chart data.
-
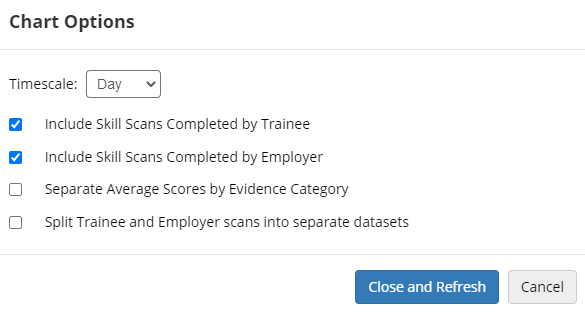
Chart Options - This button will open the following pop-up window:
-
Timescale - This sets the chart's horizontal scale to days, weeks, months or years.
-
Include Skill Scans Completed by Trainee / Employer - These determine whether the chart data includes skill scans completed by trainees, employers or both.
-
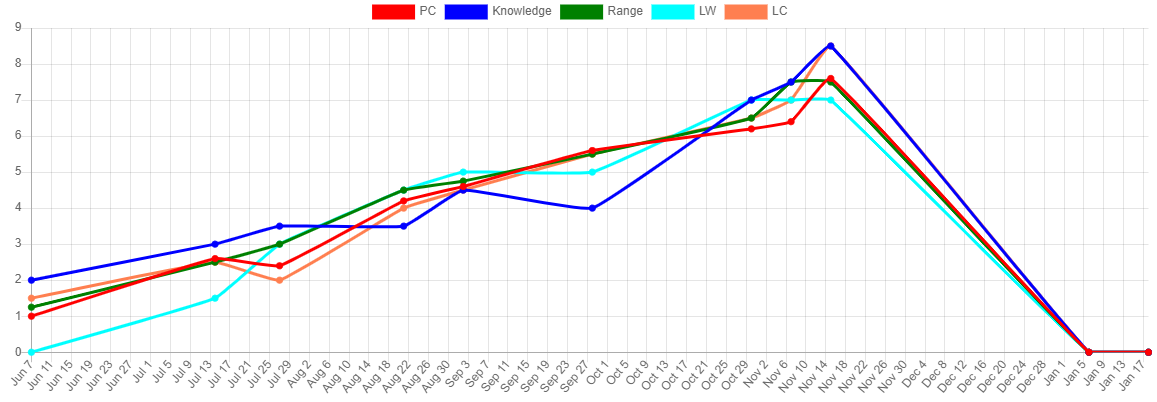
Separate Average Scores by Evidence Category - If completed skill scans are configured for evidence categories, this will split the results on the chart by each category.
-
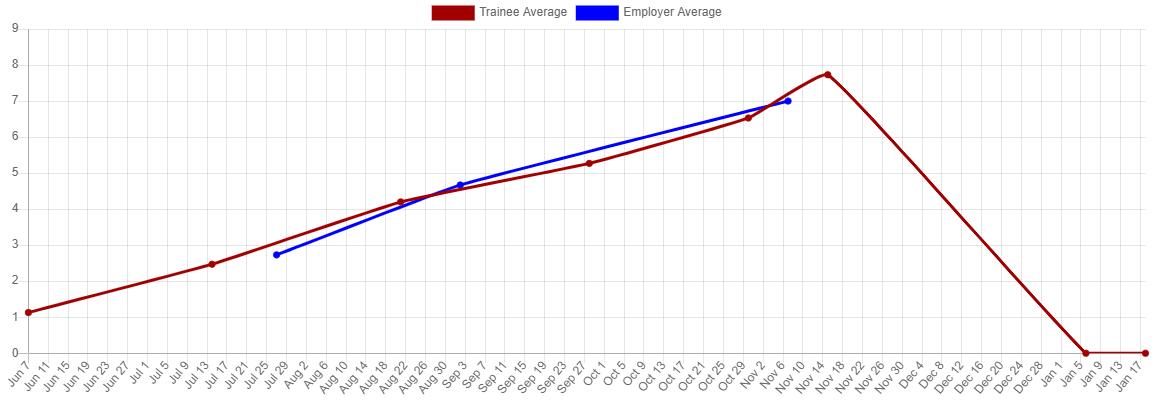
Split Trainee and Employer scans into separate datasets - When this is not ticked, results from trainee and employer scans are merged. When it is ticked, trainee and employer results are shown separately.
-
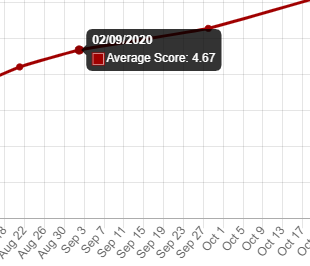
Each node in the chart represents one or more skill scans used to produce an average. Hovering over a node shows the date of the scan(s) and the average score.
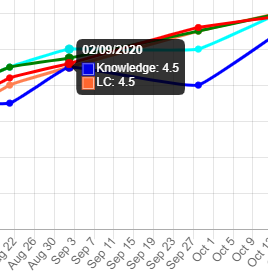
If there are multiple categories with the same score on the same date, these are separated out.
Edit and Delete Skill Scans
Scheduled skill scans can now be edited and deleted. Completed skill scans cannot be edited or deleted.
This requires a permission to be set:
- Go to Web User Editor on the sidebar.
- Search for and open the required user or group.
- Click Permissions to expand the list of permissions.
- In the Assessor section, tick Edit and Delete Skill Scans.
- Click Save.
On the Skill Scan tab, the Scheduled Skill Scans section will now have a Delete button at the end of every row.

Each row will also allow you to edit to the scheduled date and whether or not it needs to be completed by an employer. The module title and framework cannot be edited.
Skill Scans on Learner Timeline
The learner timeline now shows scheduled skill scans, coloured yellow.

Partial Completion of Skill Scans
Skill scans can now be configured to determine whether partial completion is permitted or whether a scan must be fully completed to be submitted. To configure this:
- On the sidebar, click Browse Modules.
- Search for the base module you wish to configure skill scans for and click edit at the far-right of the row.
- Select the base module (the top row) and click the Edit button.
-
Select the Skill Scan tab on the sidebar which appears on the right.

-
If a skill scan should be fully completed before submitting, ensure the Force scoring for all Skill Scan criteria checkbox is ticked.
If you want to allow partially-completed skill scans to be submitted, ensure the checkbox is not ticked.
- Click Save.
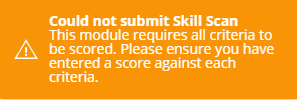
When the option is ticked, an error is displayed if a user attempts to submit a partially completed skill scan for the configured module.
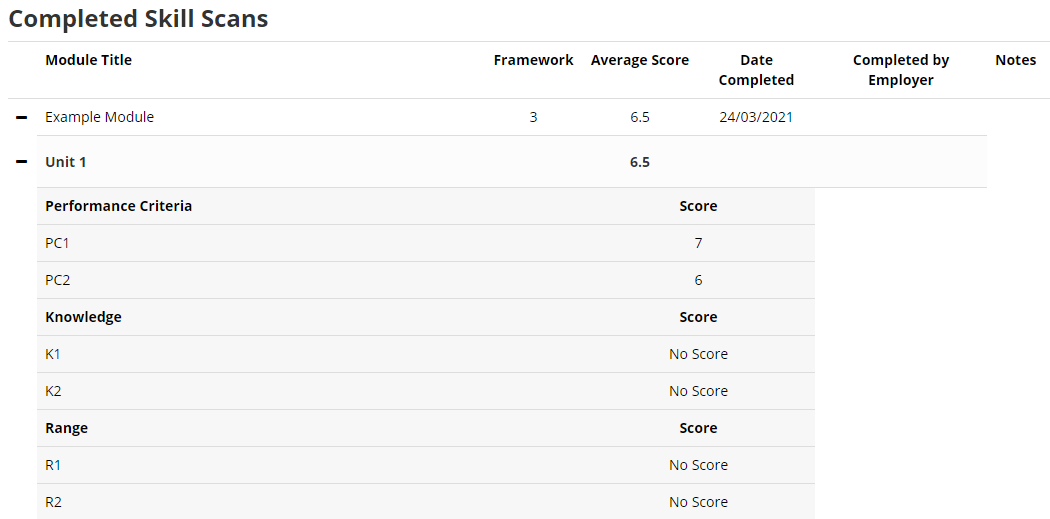
When the option is not ticked, users can submit partially completed skill scans. The missing scores from the scan are indicated on the Skill Scan tab with an entry of No Score.
Learner Login - Off-the-Job Training Progress
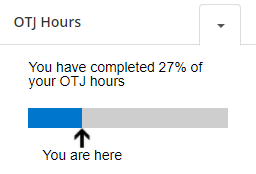
Learner users can now see their off-the-job training overall progress, measured as the percentage of recorded OTJ activity hours out of the total planned OTJ hours.
To view this, on the learner home page, click the arrow to the right of Expected v Actual Progress and select OTJ. This will toggle the view of that panel to show to the OTJ Hours.
Access Off-the-Job Training Tab from Visit
The OTJ training tab can now be accessed from visits. This first needs enabling:
- In e-track, go to Settings on the sidebar.
- Click the System configuration button.
- Go to Assessor Login on the left (under the e-track Online header).
- Tick the box for the Access Off The Job Tab from Visits setting on the right (in the Visits section).
- Click Save.
When editing a visit with the config enabled, the Edit appointment screen will have a checkbox to Associate visit with Off The Job activity. If this is ticked, the Off The Job Tab button will appear.
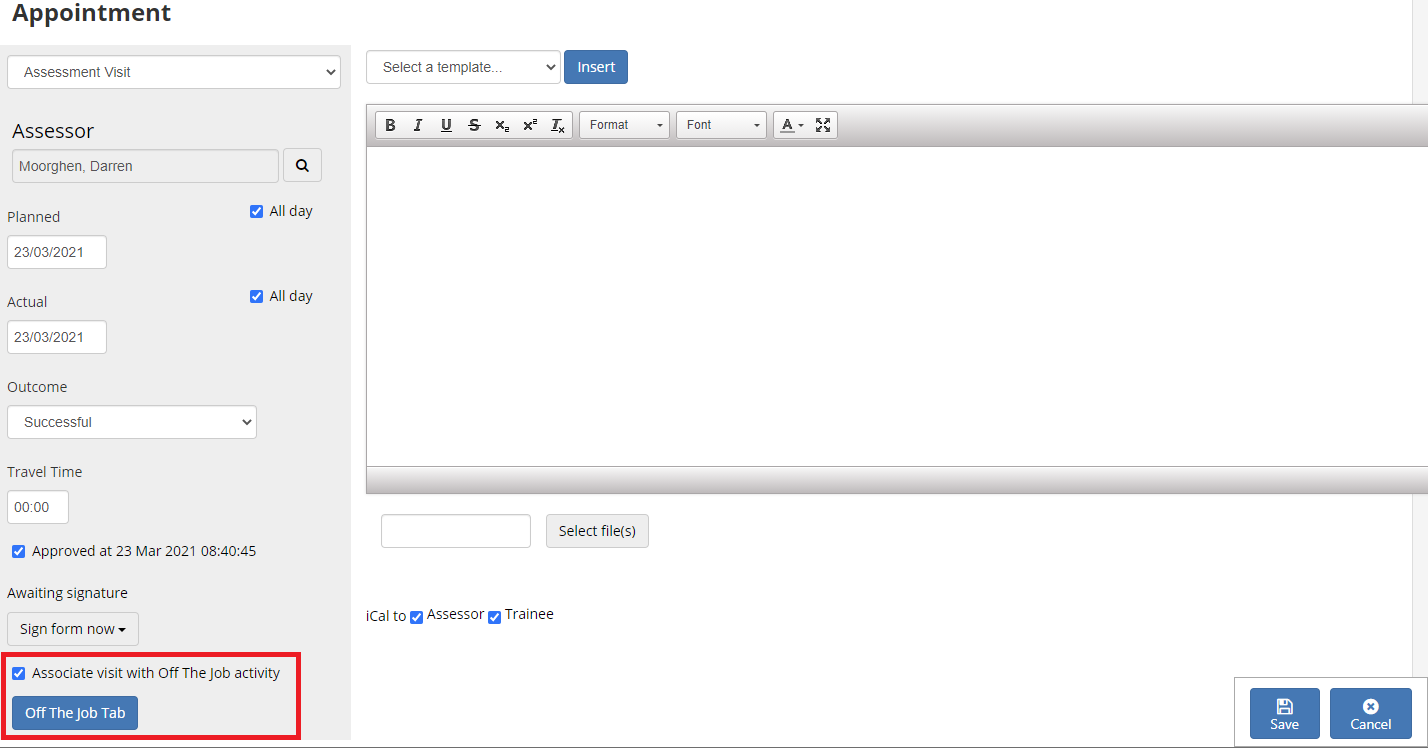
Clicking the button will take you to the Off-the-Job Training tab. When OTJ activity is recorded on the tab via this method, the activity is automatically linked to the visit. Click Save, then click the Return to Visit button at the bottom of the Off-the-Job Training tab to continue editing the visit.
IQA Visits Button on Files Tab
When an assessor views the Files tab for a learner, any files which have been sampled by an IQA user will have an IQA Visit button next to them.

Clicking the IQA Visit button will open the visit associated with the sample. If file was sampled in more than one visit, a dropdown will appear so you can choose which visit to view.
Restrict Visibility of Projected Completion Date
Learners can now be prevented from seeing their projected completion date via a configuration option. Note that this will hide or show the projected completion date for ALL learners, not individual learners.
- In e-track, go to Settings on the sidebar.
- Click the System configuration button.
- Go to Learner Login on the left (under the e-track Online header).
- In the General section, tick the box for the permission Restrict learners from viewing Projected Completion Date and ensure the toggle button is set to ON.
- Click Save.
Unsupported Browser Message
If you are using e-track in an unsupported browser, a message informing you of this will appear on the login screen.
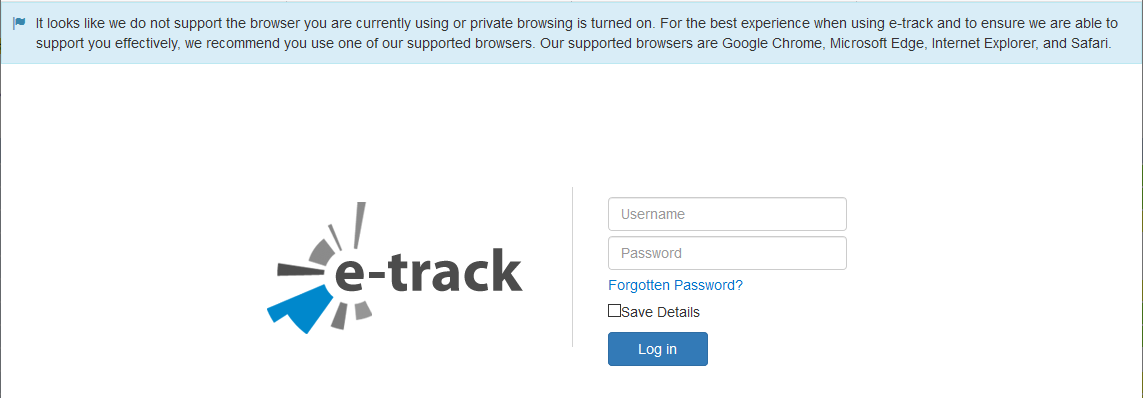
The supported browsers for e-track are Chrome, Edge, Internet Explorer and Safari.
Email and Stats Queue Alerts
If there are unprocessed items in the email queue or Stats Service queue that are more than 24 hours old, e-track will now display a banner alert to admin users upon logging in.

You can click the System Queues link to view the items in the Status Queue and Email Queue.
You can also access the queues by going to System Queues on the sidebar.

Set Assessor Homepage
Assessor users can now be configured so that they go straight to the caseload screen after logging in, rather than the current homepage. To set this:
- Go to Web User Editor on the sidebar.
- Search for and open the required user or group.
-
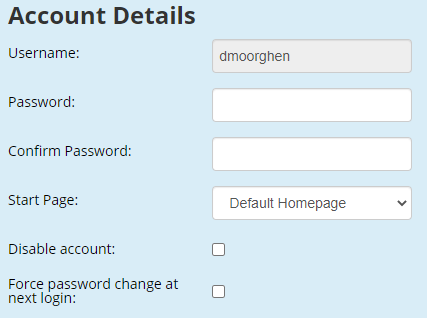
In the Account Details section, set the Start Page dropdown box as required. There are two options:
-
Default Homepage - This is the existing homepage.
-
Caseload - This will take the user straight to their caseload upon logging in.
-
- Click Save.
Generate Random Password for Users
An option can be enabled in the Web User Editor which allows you to generate a random GUID password for a user. This is primarily intended for users who are setup with LDAP authentication, where a separate e-track login will not be used.
To enable this:
- In e-track, go to Settings on the sidebar.
- Click the System configuration button.
- Go to Admin on the left (under the e-track Online header).
- In the General section, tick the box for the permission Password Generation and ensure the toggle button is set to ON.
- Click Save.
This will enable a button in the Web User Editor to generate a random password:
- Go to Web User Editor on the sidebar.
- Search for and open the required user or group.
-
Click the Random button next to the Password box.
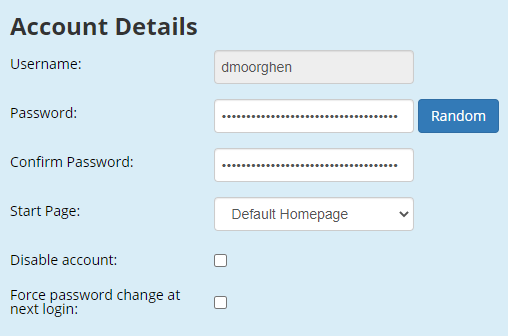
- Click Save.
The generated password will not be sent to anyone, as users with LDAP authentication will use their Windows login to access e-track. The purpose of the password generation is to store a complex, randomised password for the e-track web user account in the database.
Timeline - Select / De-select All
The Timeline now allows you to select or de-select all event options:
-
Click the
 button at the top-right of the timeline.
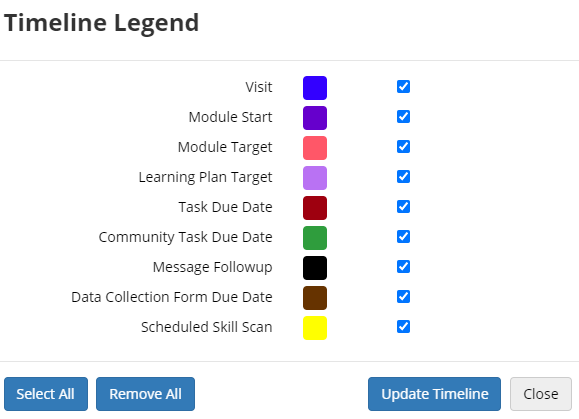
- Click Remove All to clear all options or Select All to select all options.
- Click Update Timeline.