5.22 SP1 Maytas LLWR Release Notes
Note regarding submissions
We would like to remind providers to create a submission early and check for any errors using reports from the appropriate software (i.e. the FIS or LLWR-Inform). Welsh providers should also remember to download their ULI file. After submission to the ESFA or DfES, providers should check that data has submitted correctly using the available reports. Providers should check that all their expected starts and completions are submitted correctly, and that start and outcome payments correctly match the PFR or ACE funding reports.
Our support desk gets extremely busy in the days prior to the submission deadlines, and although we try and prioritise submission-related queries, we cannot guarantee assistance if queries are sent late. If you do encounter any issues, please ensure that you contact Maytas Support as soon as possible, as we can only rectify issues of which we are aware. We also recommend checking Maytas Communities regularly for information on any known issues and solutions. Tribal cannot be held responsible for any issues caused by your failure to comply with this advice
Technical specification
The latest Maytas and Maytas Hub technical specification can be found here.
Once the upgrade has been completed, the version number should be checked to ensure it has been successful.
- Start Maytas and go to Support on the toolbar.
- Click About.
- The version numbers should read 181.20 / 5.22.7990.4. If you have any other version, please ensure you have followed the upgrade instructions correctly. If you require assistance, please contact Maytas Support.
It is the responsibility of customers to ensure that users carry out any required user acceptance testing and sign off on the upgrade.
Complete the Upgrade
Features Added in the Upgrade
These are the main updates in the upgrade:
- Data Collection updates
- Bulk Apply Templates beta
- Fixes to a number of issues
Reports Library 1.0.4.0 is also included in the upgrade but must be installed separately, which is detailed in the Upgrade Guide. The reports library can be downloaded here. If you are a hosted customer, please contact the Service Desk to arrange for the reports library update to be applied.
Maytas 5 Version 5.22.7990.4 Release Notes
DfE Integration
Maytas now integrates with the DfE API so that Maytas learner records can be generated from DfE participant records, allowing DfE courses to be managed and declarations to be uploaded from Maytas..
A new licence is required for the DfE integration - please contact your account manager for more information. Instructions for installing the licence can be found in the Maytas Upgrade Guide.
Setup
Configuration options must be set before using the integration:
- In Maytas, click the M5 button at the top left and select Options.
- Go to Other on the left (under the Maytas 5 header).
-
In the DFE section, tick the boxes for each config option and enter the values as follows:
-
API Token - This can be obtained from the DfE by emailing them at:
continuing-professional-development@digital.education.gov.uk
-
Url for API - For a TEST system, this should be:
https://ecf-sandbox.london.cloudapps.digital/api/v1
For a LIVE system, this should be:
https://manage-training-for-early-career-teachers.education.gov.uk/api/v1
-
- Click OK.
Next, permissions must be set to access the system:
- Go to Tools | Edit Permissions.
- Select the user or group which requires permission.
- On the Modules tab, set the DFE Integration permission to Visible.
- Go to the Commands tab and expand the DFE section.
- Set each permission to Visible as required.
- Click Apply to save changes, then restart Maytas for the permission to take effect.
Finally, the DfE tabs must be made available:
- Go to Tools on the toolbar and click New / Load on the Screens panel of the ribbon.
- Scroll down and select Trainee on the left.
- Select DfE Data on the right and click OK.
- Tick the Published box on the left.
- Click Apply on the ribbon.
- Repeat the above steps for the DfE Declarations tab (also in the Trainee section).
- Go to Home on the toolbar and click the Sync button.
Downloading all participants from the DfE
To download all participants from the DfE so that learner records are generated for them in Maytas:
- In Maytas, go to Management on the toolbar.
- On the Third Party panel of the ribbon, go to DFE | Get All Participants.
-
Available ECF participants and NPQ applicants will now be downloaded.
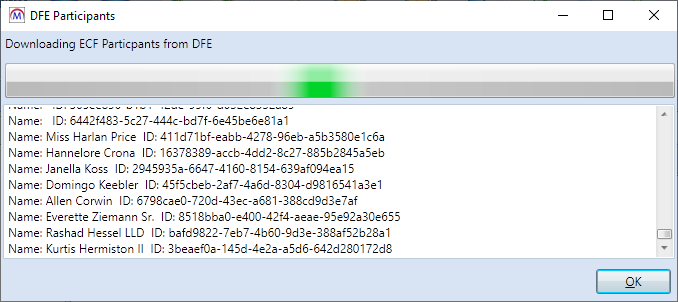
This may take a long time depending on the number of available records. Clicking OK will continue the download in the background, and progress can be checked by going to DFE | Get All Participants again.
- When the download has finished, the text No more NPQ Applicant updates found will appear at the bottom of the log. Click OK.
-
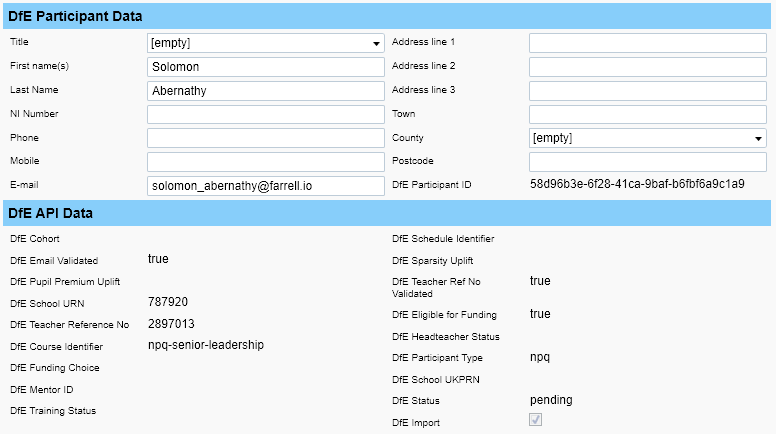
Learner records will now be available in Maytas for each downloaded participant / applicant. The imported data can be viewed on the DfE Data tab on learner records, which also includes basic Maytas learner fields that can be completed.
Downloading updates from the DfE
Rather than downloading all participants from the DfE each time, you can instead only download records which have been added or updated since the last download. To do this:
- In Maytas, go to Management on the toolbar.
- On the Third Party panel of the ribbon, go to DFE | Get Updates.
- Any added or updated records will now be downloaded.
- Click OK when the updates have finished downloading.
Searching for learners imported from the DfE
A search option can be added to Maytas to filter by learners who have been imported from the DfE. Another search option can also be added to filter by NPQ or ECF participants:
- Go to Tools on the toolbar and click Fields on the Search panel of the ribbon.
- Select Trainee on the left.
- Click the Add button on the right.
-
In the new row which appears, select TRAINEEPOT2 in the left dropdown box and DFE_IMPORT in the right dropdown box. Imported DfE participants will have a value of Y in this field.
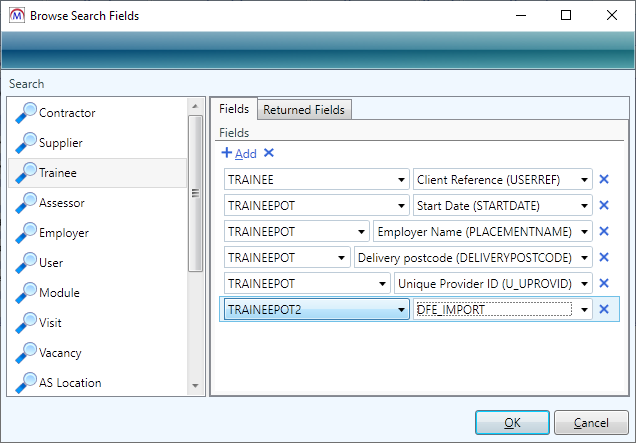
- Add another row and select TRAINEEPOT2 in the left dropdown box and DFE_PARTICIPANT_TYPE in the right dropdown box. NPQ participants will have a value of npq, whereas ECF participants will have a value of ect or mentor.
- Click OK.
-
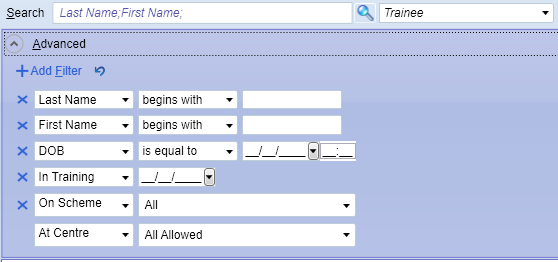
Go to Home on the toolbar and expand the Advanced section under the search box.
- Click Add Filter.
-
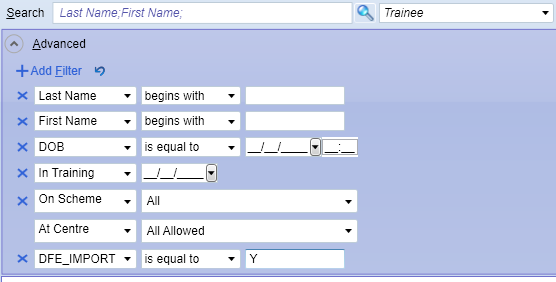
In the new row that appears, select DFE_IMPORT, then set the other boxes to is equal to and Y. This will filter by learners imported from the DfE.
-
Add another row and set it to DFE_PARTICIPANT_TYPE. Set the middle dropdown box to is equal to. You can then use the right-hand text box to enter the type of learner you want to search by (npq, ect or mentor).

Adding and uploading declarations
Declarations can be added to a learner in Maytas and then uploaded to their participant record in the DfE.
To add a declaration to a learner:
- On the learner's record, go to the DfE Declarations tab.
-
Click the
 button on the grid.
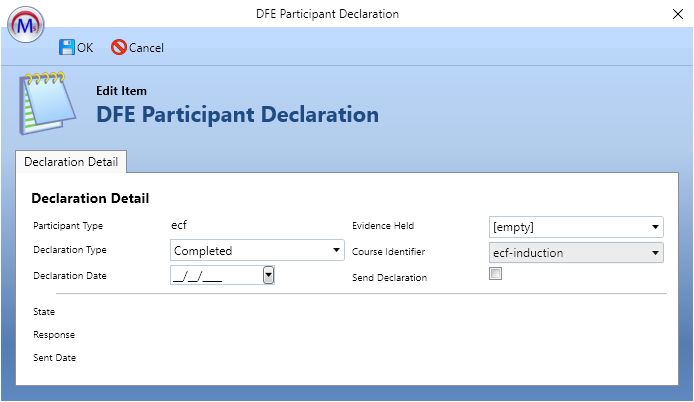
- Complete the declaration details as required. Only tick the Send Declaration box if the declaration is ready to be uploaded.
- Click OK.
- Click Apply. Additional declarations can be added as required.
To upload all declarations for the learner where the Send Declaration box is ticked:
- From the learner's record, go to Actions | DFE | Post Declarations.
-
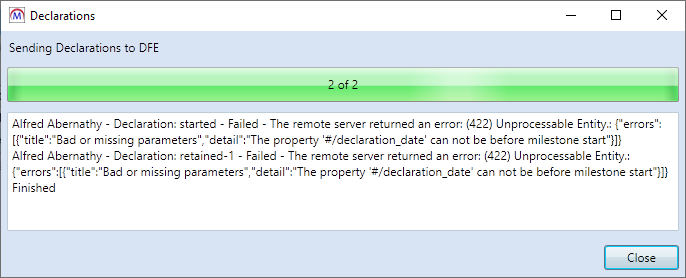
Any declarations for the learner with Send Declaration ticked will now be uploaded. The result of each row will be displayed in the log, along with any errors.
- Click Close when finished.
To bulk upload declarations for all learners:
-
Go to Management | DFE | Post Declarations. The Post Declarations window will appear.
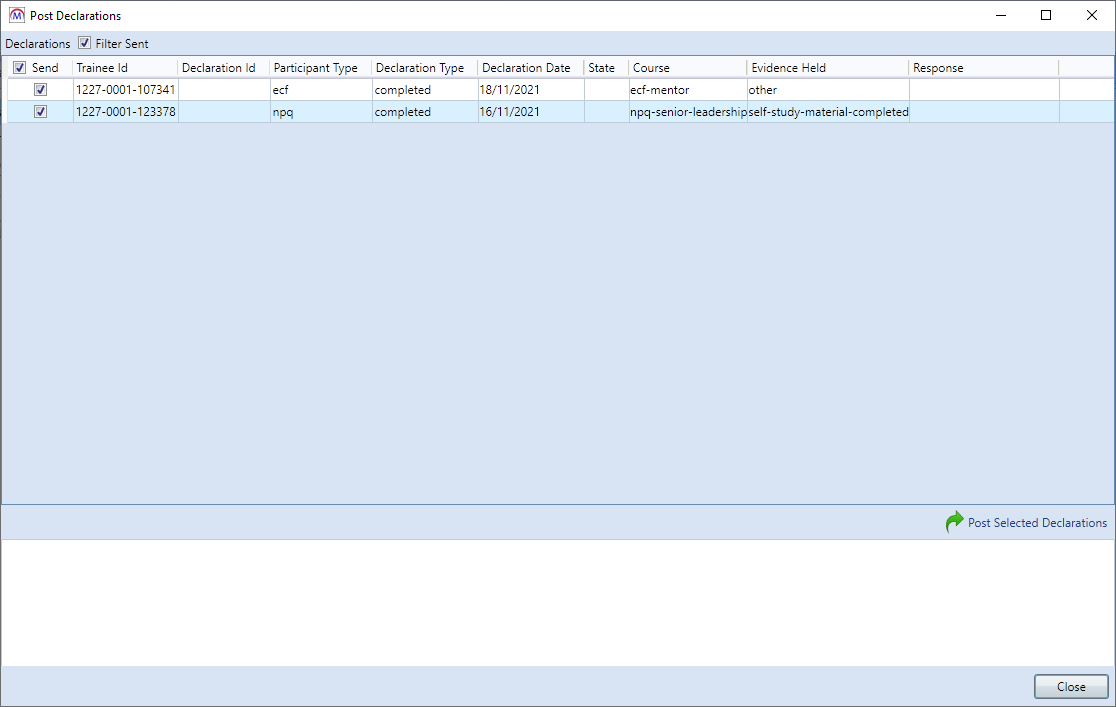
- The rows to be posted will be displayed at the top. To de-select a row so that it is not sent, un-tick the Send box.
- Click Post Selected Declarations (near the bottom right) to send the rows to the DfE.
- The status of each row will be shown in the log at the bottom of the window. Click Close when finished.
Voiding declarations
To void a learner's declarations:
-
In the learner's record, go to Actions | DFE | Void Declarations.
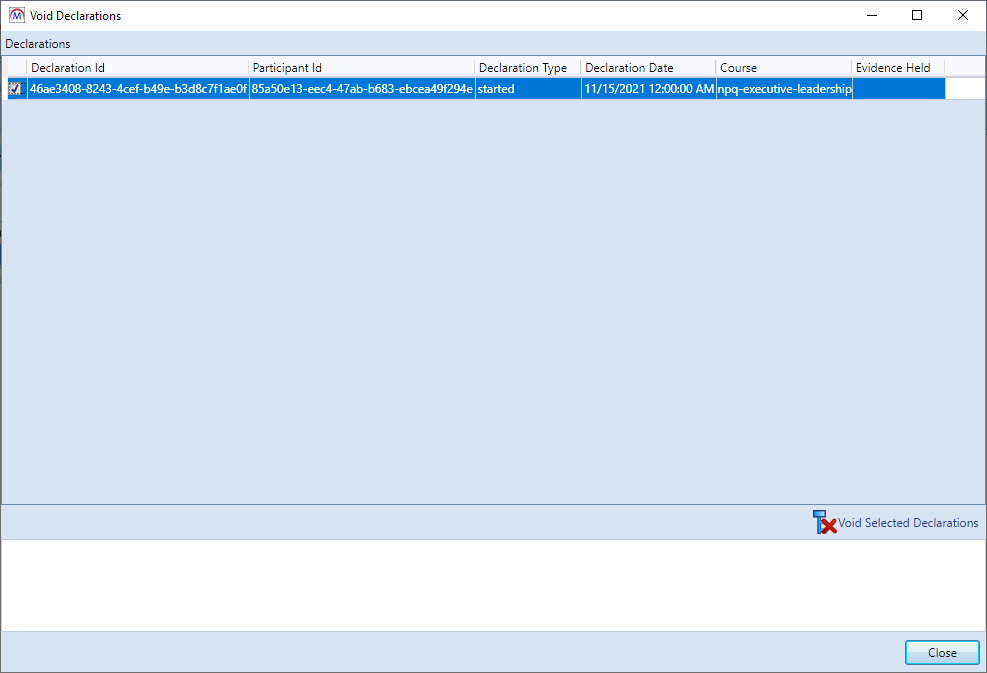
- Tick the checkbox on the left next to each declaration you wish to void.
- Click the Void Selected Declarations button near the bottom right.
- You will be asked to confirm. Click Yes to continue.
-
The selected declarations will now be processed and their status will be shown in the log at the bottom.

- Click Close when finished.
Managing courses
To manage a learner's course, from the learner's record, go to Actions | DFE | Manage Course.
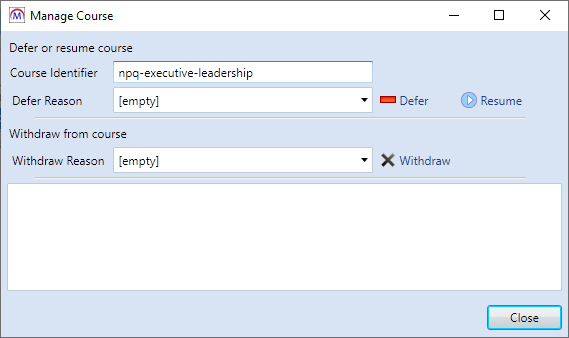
From here you can defer a course, resume a course or withdraw from a course.
To defer a course:
- Choose the Defer Reason from the dropdown list.
-
Click the Defer button.
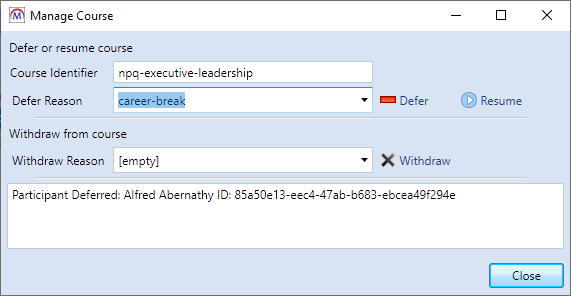
- The course will now be deferred, as indicated in the log at the bottom of the window. Click Close.
To resume a deferred course:
-
Click the Resume button.
- The course will now be resumed, as indicated in the log at the bottom of the window. Click Close.
To withdraw from a course:
- Choose the Withdraw Reason from the dropdown list.
- Click the Withdraw button.
-
You will be asked to confirm. Click Yes to continue.
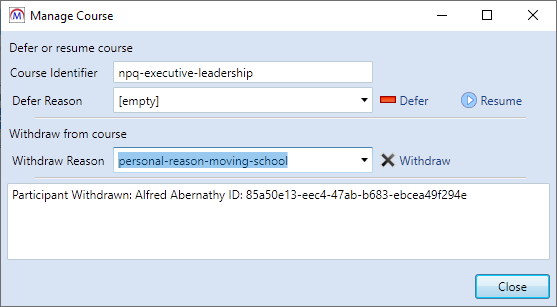
- The course will now be withdrawn, as indicated in the log at the bottom of the window. Click Close.
ECF participants have an additional option to change the course schedule:
-
Choose the schedule you wish to apply to the course from the Schedule Identifier dropdown box.
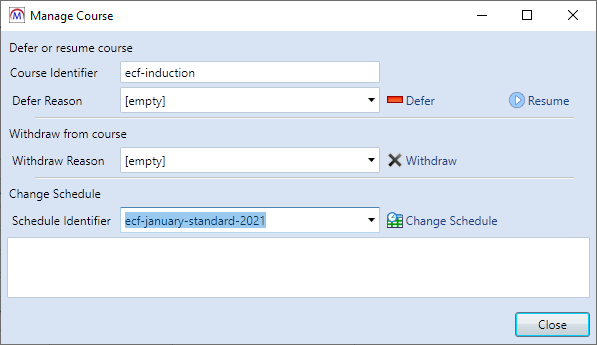
- Click the Change Schedule button. If the learner has existing declarations that would be invalidated by changing the schedule, this will be indicated in the log. It can be rectified by voiding the declarations.
- The selected schedule will now be applied to the course. Click Close.
Accepting or rejecting applications
This option is only available for NPQ applicants, not ECF participants.
To accept or reject an NPQ applicant for an individual learner:
-
In the learner's record, go to Actions | DFE | Accept/Reject Application.
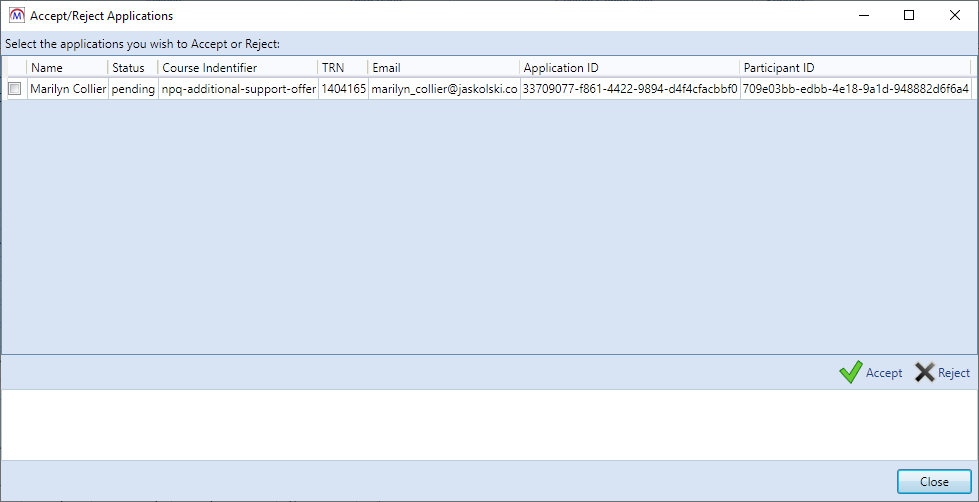
- Tick the checkbox on the left next to each row you wish to accept or reject.
- Click the Accept or Reject button near the bottom right.
- You will be asked to confirm. Click Yes to continue.
- The selected applications will now be processed and their status will be shown in the log at the bottom. Click Close when finished.
To accept or reject applications in bulk:
-
Go to Management | DFE | Accept/Reject NPQ Applications.
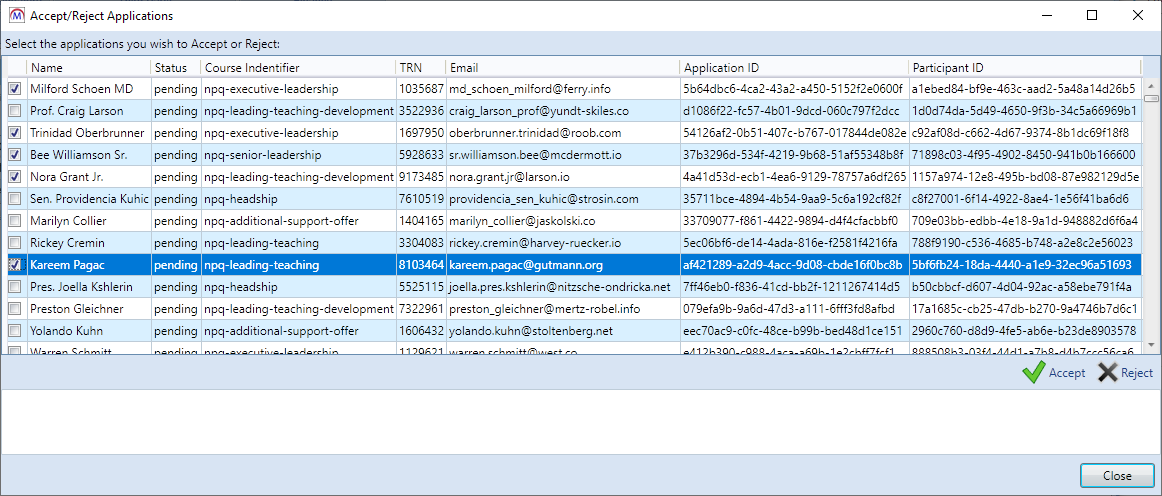
- Tick the checkbox on the left next to each row you wish to accept or reject.
- Click the Accept or Reject button near the bottom right.
- You will be asked to confirm. Click Yes to continue.
-
The selected applications will now be processed and their status will be shown in the log at the bottom.

- Click Close when finished.
Maytas 5 Version 5.22.7950.1 Release Notes
Data Collection Updates
Configurable GUID Expiry for Data Collection and Password Resets
It is now possible to configure when a GUID will expire for data collection and password reset links:
- In Maytas, click the M5 button at the top left and select Options.
- Go to Admin on the left (under the Maytas Hub Online header).
- Tick the box for the Days before GUID expiry setting on the right (in the General section).
- Enter the number of days after which the GUID should expire.
- Click OK.
If the config is not set, a GUID will expire after 2 days by default.
Data Collection Form Reminders
Reminder emails for data collection forms can now be sent out to ensure users complete assigned forms by their due date.
This can be configured in a variety of ways:
- In Maytas, click the M5 button at the top left and select Options.
- Go to Stats Settings on the left (under the Maytas Hub Online header).
- The relevant config options can be found in the Data Collection section on the right. Tick each required option and set them as follows:
- Body of the reminder email sent to existing users with a data collection form to fill out soon - Enter the email body you want to send to users who have an outstanding form approaching their due date.
- Send reminder email when form is due soon - This toggle button enables the sending of reminder emails to users who have an outstanding form approaching their due date.
- Days after due date that form expires - This can optionally be set to cause forms to expire a specified number of days after their due date. An expired form can no longer be completed.
- Body of the reminder email sent to existing users with an overdue data collection form - Enter the email body you want to send to users who have an outstanding form that has gone past its due date.
- Send reminder email after due date - This toggle button enables the sending of reminder emails to users who have an outstanding form that has gone past its due date.
- Days before due date to send reminder email - This determines how many days before a due date the reminder email is sent.
- Click OK.
The email body config options can use the following parameter tags to automatically insert data such as names into the email (similar to mail merge):
| Parameter | Description |
|---|---|
| {{fname}} | User first name |
| {{lname}} | User surname |
| {{user}} | Username |
| {{employername}} | Employer name |
| {{etrackurl}} | URL for Maytas Hub |
| {{duedate}} | Form due date |
If the email body config options are not entered, default email bodies are used.
Bulk Apply Templates Beta
The Bulk Apply Templates feature should be considered a beta version and must ONLY be used on a test system, not a live system. Due to the complexity and wide scope of this feature, it is possible that there are as-yet undetected issues which could result in irrevocable data loss and other problems. We expect this to come out of beta and become a full feature as of the 5.23 release.
The Bulk Apply Templates wizard allows you to apply a template to multiple learners at once. The wizard must first be enabled in permissions:
- Go to Tools | Edit Permissions.
- Select the user or group which requires permission.
- Go to the Commands tab.
- Expand the Template Editor section.
- Set the Bulk Apply Templates permission to Visible.
- Click Apply.
- Restart Maytas for the permission to take effect.
The wizard can be run by going to Tools on the toolbar and clicking Bulk Apply BETA on the Templates panel of the ribbon.
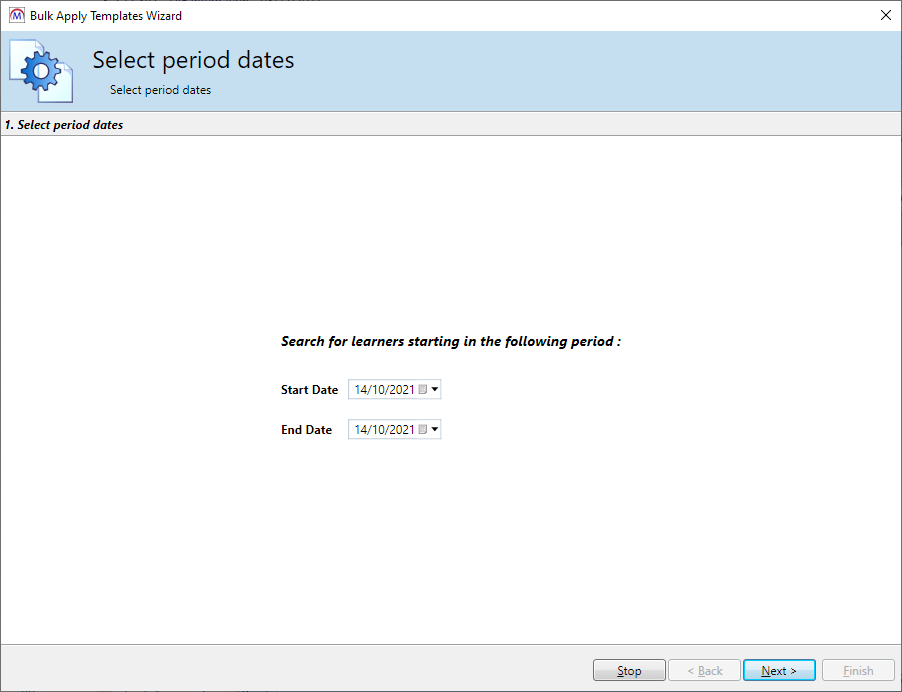
On the first screen, set the date range to search for learner starts, then click Next.
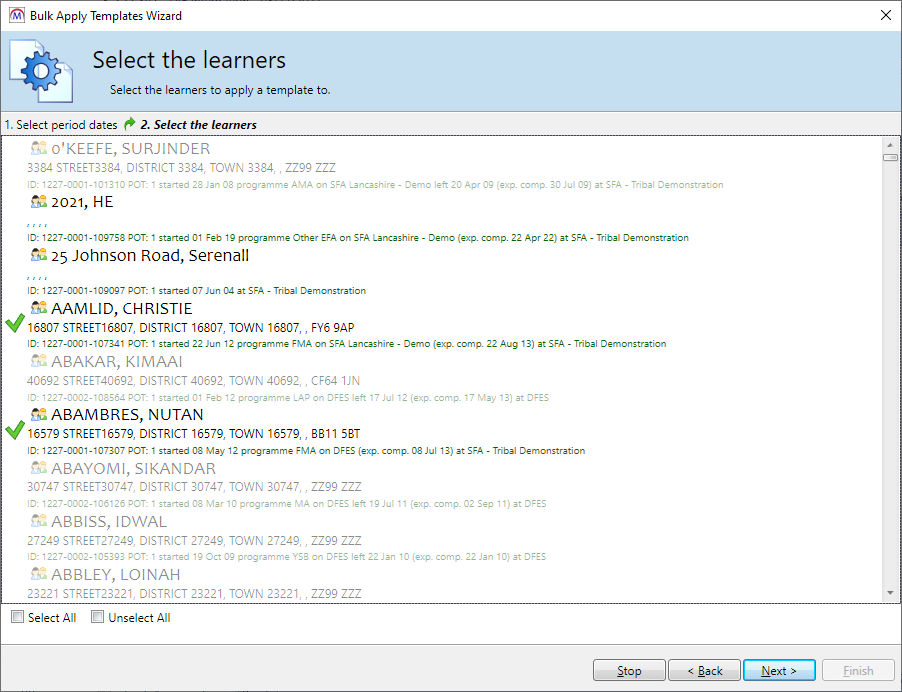
From the results, select the learners you wish to apply templates to and click Next. Note that learners who have ended learning are greyed out but can still be selected.
You can also Select All or Unselect All learners in the results using the checkboxes at the bottom-left of the wizard.
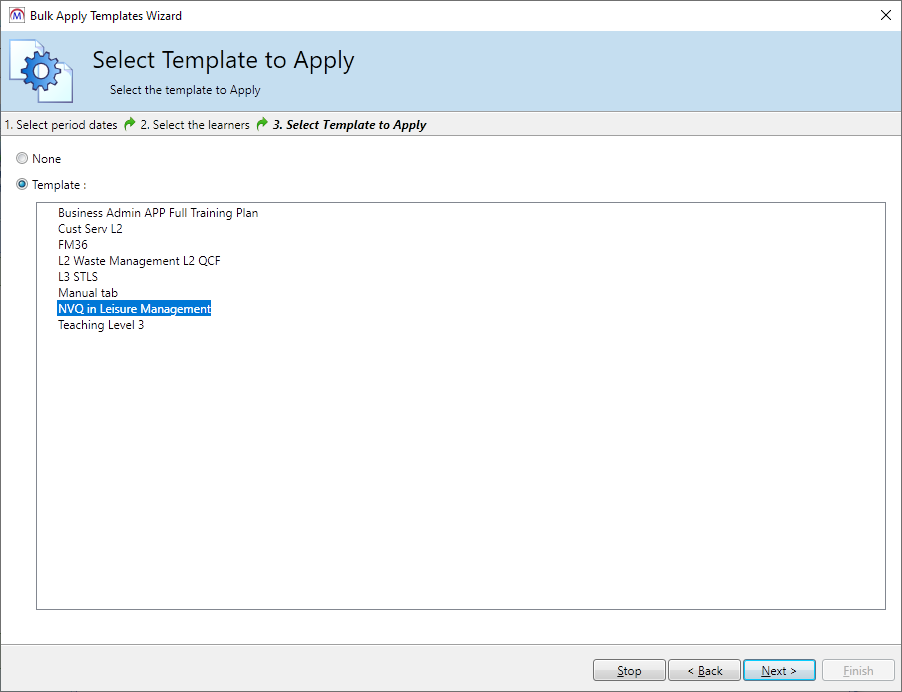
Click Template at the top and choose the template you wish to apply, then click Next.
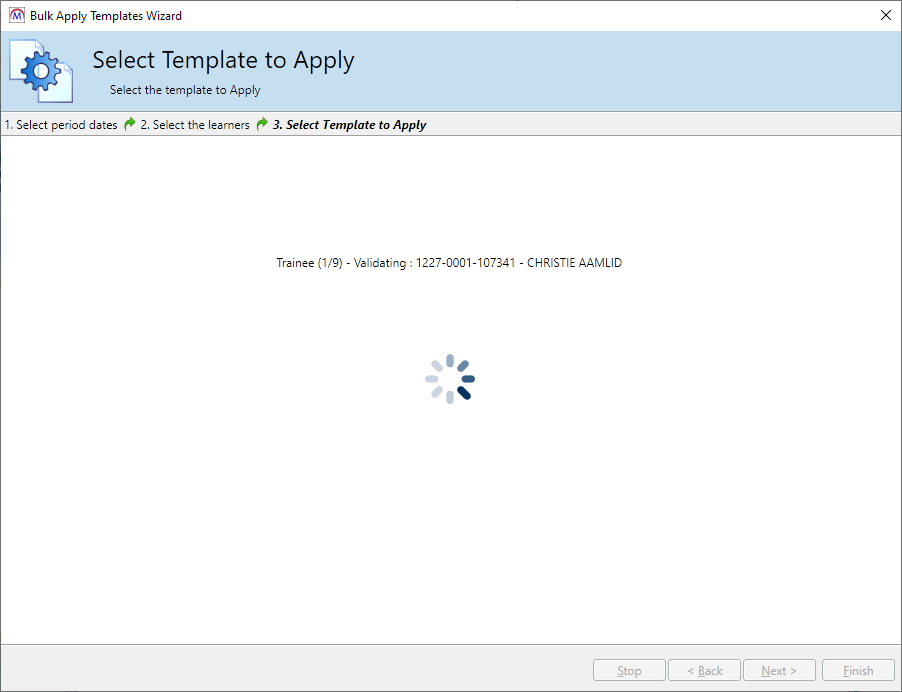
The templates will now be applied. The wizard will display its current status as it progresses. When the wizard has finished, a summary will be displayed.
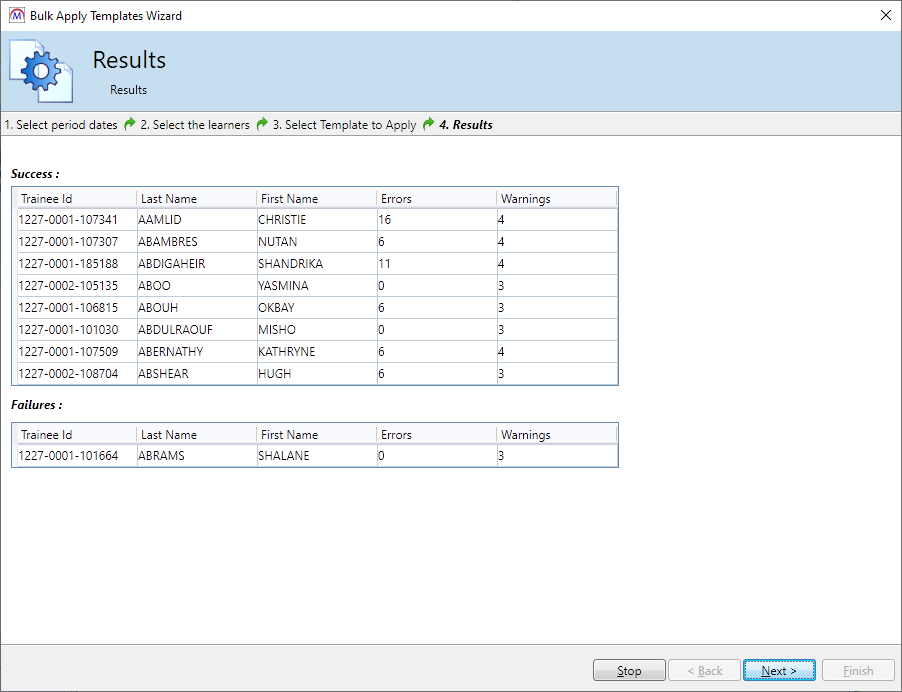
Rows in the Success column indicate the template was successfully applied to them, whereas rows in the Failures column will not have had the template applied.
Select a row from the results to view details of any errors or warnings encountered.
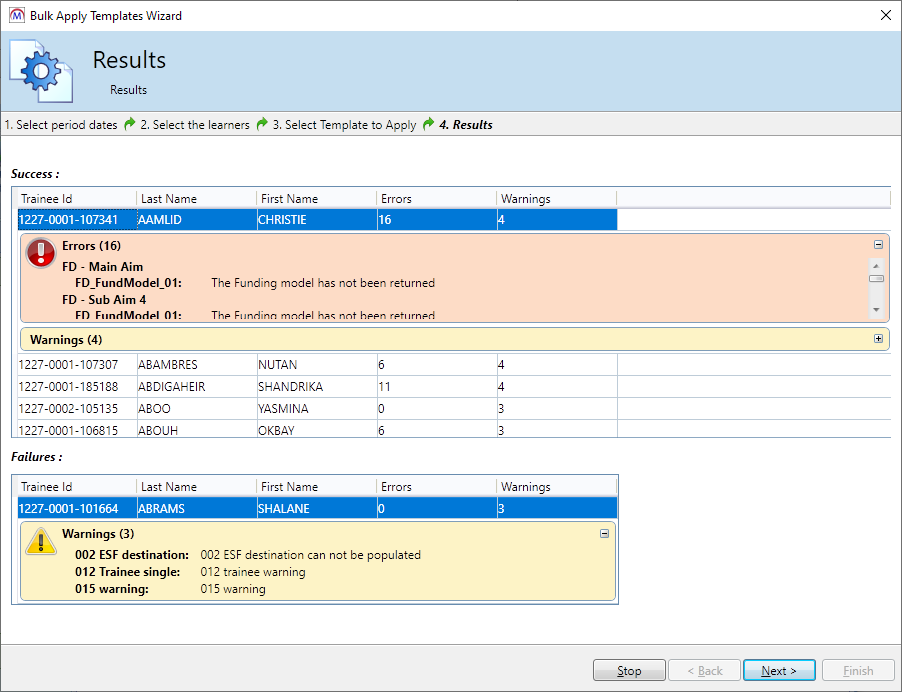
Click Next, then click Finish to exit the wizard.
Reports Library 1.0.4.0
Maytas Hub Reports
Updates to Maytas Hub reports are now included in the main Reports Library upgrade and no longer need to be installed separately. No additional action is required in terms of the usual reports upgrade process.
New Report - Communities Summary
The Communities Summary report lists communities and their basic details. The report can be found in the Maytas Hub folder of the Reports Library in Maytas and is also available to run in the Maytas Hub reports viewer.

Parameters
- Published communities - Allows you to show only published communities, only unpublished communities or both.
- Hide disabled accounts on drilldown - When set to Yes, disabled web user accounts will not be shown on the drildown.
Layout
The report lists all communities and their basic details. Clicking on a community name will drilldown to a list of its users.
If the hide disabled accounts parameter is set to Yes, disabled web user accounts will be hidden. If the parameter is set to No, all users in the community will show and an Account disabled column will appear, indicating if an account is disabled.
Unlike most reports that can run in Maytas Hub, this report does not have a username parameter to limit results to the logged in user, as it is intended to be an overview of all communities, not just communities that a user is a member of.
Community Task Progress Improvements
The Community Task Progress report has been updated to include a parameter to hide disabled accounts. It is also now available in both Maytas and Maytas Hub (it was previously not available in the Maytas Reports Library). In Maytas, it can be found in the Maytas Hub folder of the Reports Library.
When the Hide disabled accounts parameter is set to Yes, disabled web user accounts will not be included in the results.
When the report is run in Maytas 5, a Maytas Hub username parameter will be visible. This parameter is hidden when run in Maytas Hub as it automatically limits results to the logged in user, but for technical reasons the parameter cannot be hidden in Maytas 5. As such, it is recommended to leave the parameter as the default value of % when running it in Maytas 5, as this effectively includes all users. You can, however, enter a Maytas Hub username to limit results to that user.
Skill Scan Reports
New Report - Skill Scan Completions
The Skill Scan Completions report shows learner skill scans with a completion date, where the completion date is within a parameter date range. Only the latest completed scan for each framework and module is shown.
The report can be found in the Learner folder of the Reports Library in Maytas and is also available to run in the Maytas Hub reports viewer.

Parameters
- Show skill scan completions on or after/before - Filters results where skill scan completions are in this date range (inclusive).
- Only show active learner modules - When set to Yes, only skill scans where the associated base module has no completion date entered are included.
- Maytas Hub username - This is only visible when the report is run in Maytas 5. It is hidden when run in Maytas Hub as it automatically limits results to the logged in user, but for technical reasons the parameter cannot be hidden in Maytas 5. As such, it is recommended to leave the parameter as the default value of % when running it in Maytas 5, as this effectively includes all users. You can, however, enter a Maytas Hub username to limit results to that user.
Layout
The report lists skill scan completions in the date range, along with the associated module, the average score selected for the scan and the next scheduled skill scan (this will appear red if the scheduled date is in the past).
The Scheduled Date of Last Completed Skill Scan column does not show the date of the latest previously scheduled skill scan. It takes the latest previously completed skill scan and shows its scheduled date.
Clicking on a completed date drills down to show the scores for the scan. See below for details on the drilldown.
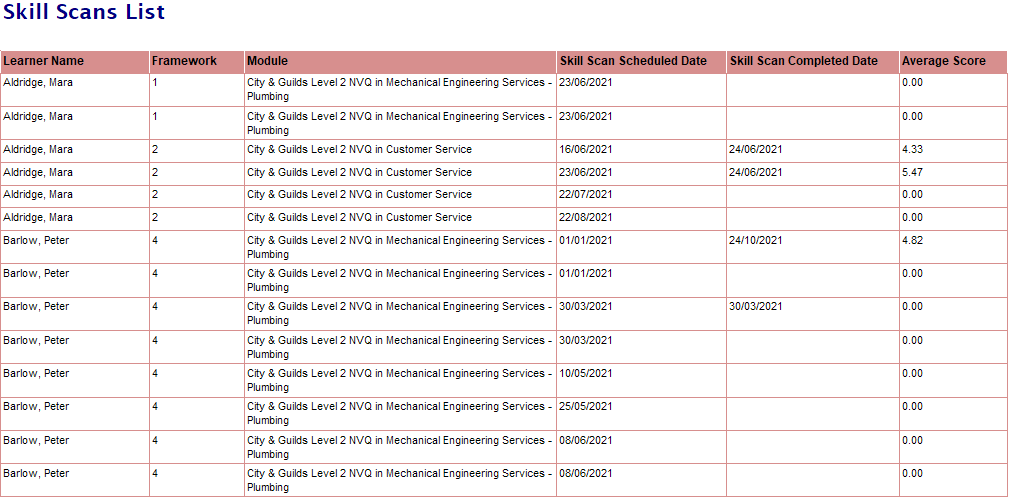
New Report - Skill Scans List
The Skill Scans List report shows learner skill scans where the scheduled date is within a date range and the completion date is within a separate date range (or the completion date is not entered).
The report can be found in the Learner folder of the Reports Library in Maytas and is also available to run in the Maytas Hub reports viewer.
Parameters
- Show skill scan completions on or after/before - Filters results where skill scan completions are in this date range (inclusive).
- Show skill scans scheduled on or after/before - Filters results where skill scan scheduled dates are in this date range (inclusive).
- Only show active learner modules - When set to Yes, only skill scans where the associated base module has no completion date entered are included.
- Only show completed skill scans - When set to Yes, only skill scans marked as completed are included. When set to No, skill scans not marked as completed will be included, regardless of the completions date range.
- Maytas Hub username - This is only visible when the report is run in Maytas 5. It is hidden when run in Maytas Hub as it automatically limits results to the logged in user, but for technical reasons the parameter cannot be hidden in Maytas 5. As such, it is recommended to leave the parameter as the default value of % when running it in Maytas 5, as this effectively includes all users. You can, however, enter a Maytas Hub username to limit results to that user.
Layout
The report lists skill scans scheduled in the date range, along with the associated module, the skill scan's scheduled and completed dates and the average score selected for the scan.
Clicking on a completed date drills down to show the scores for the scan. See below for details on the drilldown.
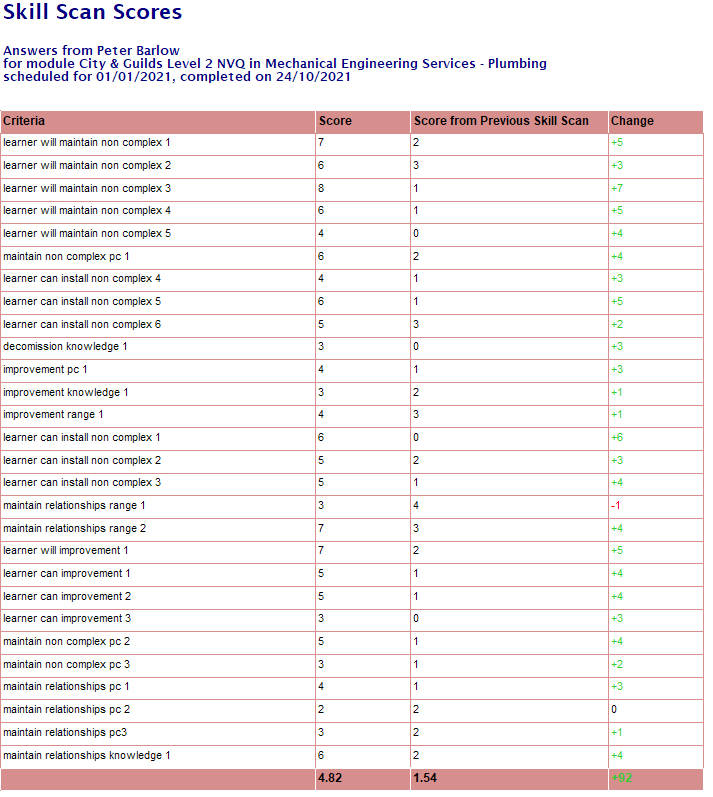
Skill Scan Scores
The Skill Scan Scores report is a drilldown report accessed from the Skill Scan Completions and Skill Scans List reports. It shows the scores / answers for the selected skill scan, along with the scores from the learner's previous scan (if available) and the change in scores. If the change is negative, it shows red; if it is positive, it shows green; if there is no change, it shows black.
If no score is entered for a criterion (e.g. if a learner has partially completed a skill scan), the report shows these as blank and treats them as 0 when totaling the scores. These rows are included when calculating the average score.
Reports Library 1.0.3.9
Learner List Report - Include Additional Columns
The English and Welsh versions of the Learner List Report have a new parameter which allows you to choose additional columns to include on the report. The available columns are as follows:
| Field | Used for Learner List Report (England) | Used for Learner List Report LLWR (Wales) |
|---|---|---|
| TRAINEE.EMAIL | TRAINEE.EMAIL | |
| Telephone | TRAINEE.TELEPHONE | TRAINEE.TELEPHONE |
| Mobile | TRAINEE.MOBILE | TRAINEE.MOBILE |
| Contact Address | TRAINEE.ADDRESS1 + ADDRESS2 + POSTTOWN + POSTCODE | TRAINEE.ADDRESS1 + ADDRESS2 + POSTTOWN + POSTCODE |
| LN02 Learner ID | TRAINEE.LLWR_LEARN_ID | |
| Gender | TRAINEE.GENDER | TRAINEE.GENDER |
| Ethnicity | TRAINEE.ETHNICGROUP | TRAINEE.ETHNICGROUP |
| Preferred Method of Contact | TRAINEEPOT2.ILR_PREFERREDMETHODOFCONTACT | |
| ULN | TRAINEE.UNIQUELEARNERNUMBER | TRAINEE.UNIQUELEARNERNUMBER |
| NI Number | TRAINEE.NINUMBER | TRAINEE.NINUMBER |
| UKPRN / LN03 Provider ID | CONTRACTOR.UKPRN21 | CONTRACTOR.ELWA_PROVIDERID |
| Standard or Framework | Checks for a value in TRAINEEDETAILS.SECTORCODE (frameworks) or TRAINEEPOT.ILR_1617_PROG_APP_STDCODE (standards) | |
| Status (in learning, leaver or suspended) |
In Learning - TRAINEEPOT.TERMINATIONDATE is null Leaver - TERMINATIONDATE is not null and TRAINEEPOT2.ILR11_COMPLETIONSTATUS is not 6 Suspended - TERMINATIONDATE is not null and ILR11_COMPLETIONSTATUS = 6 |
In Learning - TRAINEEPOT.TERMINATIONDATE is null Leaver - TERMINATIONDATE is not null and there are no activities in the POT where TRAINEE_LLWR_ACT.COMPSTAT = 5 Suspended - TERMINATIONDATE is not null and there is at least one activity in the POT where TRAINEE_LLWR_ACT.COMPSTAT = 5 |
| ILR Export Status / LLWR Export Status | The date of the latest ILR export where the learner is included and the export was output to a file | The date of the latest LLWR export where the learner is included and the export was output to a file |
| ACT Type |
Checks TRAINEE_ILR_DELFAM_ACT for latest prog aim record (where AIMNO is null) in the POT as follows: - No records have a null ACTTODATE, so the record with the latest ACTTODATE is used - OR out of the records with a null ACTTODATE, the record with the latest ACTFROMDATE is used; |
|
| Main Aim Title | TRAIMDATA.AIMTITLE where TRAIMDATA.MAINORSUB = Main | |
| Level | TRAIMDATA.NVQLEVELV2 where TRAIMDATA.MAINORSUB = Main | |
| App Standard Code | Taken from the programme aim (TRAINEEPOT.ILR_1617_PROG_APP_STDCODE) | |
| Current Age | Calculated from TRAINEE.DOB and the current date | |
| Current Employer | Most recent employer (based on TREMPLOYER.STARTDATE) of type E (Employer) that is currently active | Most recent employer (based on TREMPLOYER.STARTDATE) of type E (Employer) that is currently active |
| Current Assessor | Most recent assessor (based on TRASSESSOR.STARTDATE) of type A (Assessor) that is currently active | Most recent assessor (based on TRASSESSOR.STARTDATE) of type A (Assessor) that is currently active |
| ILR OTJ Planned Hours | TRAINEEPOT.ILR_1920_PHOURS | |
| ILR OTJ Actual Hours | TRAINEEPOT.ILR_2021_ACTHOURS |