ontrack WBL Release Notes
Maytas 5.24 Release Notes
Note regarding submissions
We would like to remind providers to create a submission early and check for any errors using reports from the appropriate software (i.e. the FIS or LLWR-Inform). Welsh providers should also remember to download their ULI file. After submission to the ESFA or DfE, providers should check that data has submitted correctly using the available reports. Providers should check that all their expected starts and completions are submitted correctly, and that start and outcome payments correctly match the PFR or ACE funding reports.
Our support desk gets extremely busy in the days prior to the submission deadlines, and although we try and prioritise submission-related queries, we cannot guarantee assistance if queries are sent late. If you do encounter any issues, please ensure that you contact Maytas Support as soon as possible, as we can only rectify issues of which we are aware. We also recommend checking Maytas Communities regularly for information on any known issues and solutions. Tribal cannot be held responsible for any issues caused by your failure to comply with this advice.
Data migration
Please note that it is important to ensure that all 2021/22 learners have been entered before the upgrades are applied. This is because the upgrade migrates 2021 data to the 2022 fields, and any 2021 learners entered after the upgrades will not be migrated. As such, if any 2021 learners do need to be entered after the upgrade, both the 2021 and 2022 tabs must be completed to ensure all data is present and correct.
Technical specification
The latest Maytas and Maytas Hub technical specification can be found here.
Once the upgrade has been completed, the version number should be checked to ensure it has been successful.
- Start Maytas and go to Support on the toolbar.
- Click About.
- The version numbers should read 5.24.8100.2. If you have any other version, please ensure you have followed the upgrade instructions correctly. If you require assistance, please contact Maytas Support.
It is the responsibility of customers to ensure that users carry out any required user acceptance testing and sign off on the upgrade.
Complete the Upgrade
Features Added in the Upgrade
These are the main updates in the upgrade:
- ILR rollover funding for 2022/23 using 2021/22 rules
- ILR batch export
- Skills Forward Integration
- Fixes to a number of issues
Check the Contractor Details for the ESFA Export
- Open Maytas 5 and select Management | Contracts.
- Highlight the contractor name (company) you wish to edit.
-
Right-click and select Edit.
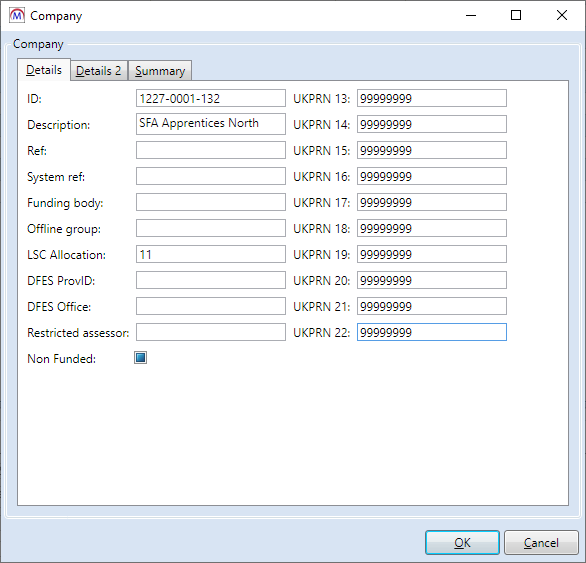
- The Company screen will be displayed. The technical upgrade will have copied the UKPRN field to the new 22 box. If necessary, you should amend this value.
- Providers need to ensure that these instructions are completed for each company (contractor) used for the ESFA export.
Create the 2022/23 ESFA Formula-Funded Contract
A 2022/23 ESFA formula-funded contract should be set up for each ESFA contractor. Without this contract, Maytas is unable to determine the funding rules, schemes and lookup codes to use.
- In the Contracts module, left-click the contractor (company) to which you wish to add the new contract.
- Click Add Contract on the ribbon.
-
Make sure that option 1. Existing company is selected then click Next.
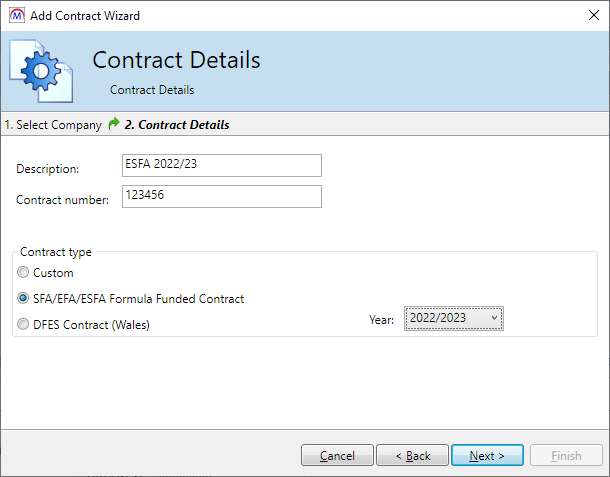
- Enter a contact description (e.g. ESFA 2022/23).
- Enter a contract number if required.
- Select the SFA/EFA/ESFA Formula Funded Contract option.
- Select year 2022/2023.
- Click Next.
- Amend the schemes you wish to include in the contract and click Next.
- Click Finish.
Import Funding Information
The process for importing the required funding information into Maytas is as follows:
- The LARS for 2021/22 should be imported.
- Postcode data for 2021/22 should be imported.
- Once all data has been imported, ensure that the funding cache is refreshed (either on a database schedule or a manual update out of working hours).
Import LARS
The LARS should be imported as follows:
- Download the latest LARS MDB file. At the time of this release, the latest version is the LARS MDB version 8.
- In Maytas, go to Exports on the toolbar.
- On the ILR Tools panel of the ribbon, go to Uploads | Upload Funding Information | Upload LARS (Version 8).
- Browse to and select the downloaded LARS file and click Open.
- The file will now be imported. Click OK on the message which appears.
Progress on the import can be checked by going to Home | Server Tasks | Server Jobs. Typically it will take several minutes.
Import Postcode File
-
Obtain the postcode uplift factors file - Download the zip file under 2021 to 2022 uplift factors by postcode and LLSOA: CSV files.
A new postcode uplift file for 2022/23 is not expected to be released, and so the 2021/22 file should be imported to Maytas for 2022/23.
- Rename the file to PostcodeFactors_2022-2023.zip.
- In Maytas, go to Exports on the toolbar.
- On the ILR Tools panel of the ribbon, go to Uploads | Upload Postcodes| Upload Post Code Data (2022/23).
- Browse to and select the postcode uplifts zip file and click Open.
- The file will now be imported. Click OK on the message which appears.
Progress on the import can be checked by going to Home | Server Tasks | Server Jobs. Typically this will take several minutes.
Note on the Funding Cache
By default, the funding cache will update overnight so that funding information in Maytas uses the newly-imported FIS and postcode information. Please check with your system administrator if you are unsure if or when the funding cache is updated on your system. You can also manually set the funding cache to update by going to Management | Profiles and clicking the Funding Cache button, though please be aware that this may take a long time and may use a large amount of system resources, which could affect performance for other users on the system.
Maytas 5 Version 5.24.8100.2 Release Notes
2022/23 Contract Year Updates
ILR Export 2022/23
The ILR export for 2022/23 is now available in Maytas. To view the ILR export screen for 2022/23:
- Click Exports on the toolbar.
- Click ILR Export on the ribbon.
-
Click the
 button.
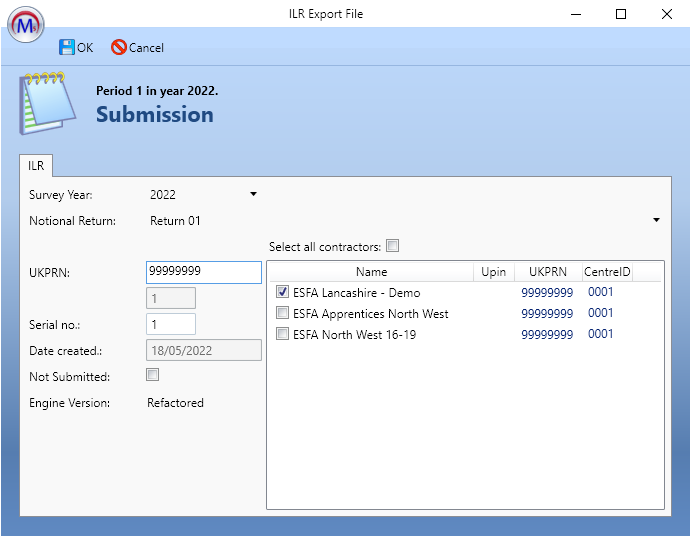
- Choose 2022 from the Survey Year dropdown box.
- Choose the Notional Return period.
- Amend the UKPRN as required.
-
Once ready, click OK.
-
Locate the submission by expanding the contract year and period using the arrows to the left. Click the submission to select it. The status will say Generate pending until the export data has been generated. It will then say File preparation finished. Please note that this may take a while, depending on the amount of data being exported.

- Edit opens the export and allows you to view and edit the export settings. Please note that not all settings can be changed once an export has been created.
- Generate processes the export and produces a text file showing any errors for each learner. This allows you to correct any errors and re-generate before the batch file is created. The generation progress is shown with the circular progress bar to the right.
- View Log shows any errors in the export. These should be investigated and resolved and the data re-generated before outputting the XML.
- Output XML creates the actual batch file. The file will be created at C:\Temp on the Maytas server.
- Get File lets you download the batch file once it has been created.
The 2022/23 ILR export has been tested and validated against the latest version of the online ILR specification as of the time of this release, as well as other accompanying documents. As of this release, the 2022/23 FIS is still in a beta stage, and so we have not yet been able to test the ILR export with the FIS comprehensively. Further testing will be done as new versions of the FIS become available.
While we have tested the ILR export to the best of our ability with the available specifications, there may be further issues which have not yet been identified. It is also possible that future versions of the FIS and the ILR specification may require the export and/or FIS import to be changed to meet any new criteria. Any changes that are required will be implemented in a follow-up release of Maytas.
Migration of ILR export override flags
The following details whether ILR export flags are migrated from 2021/22 to 2022/23. For information on setting these flags, please contact Maytas support.
Force Export Flag
The 2021/22 force export flag is not copied to the 2022/23 force export flag. To override the ILR export and include a POT that does not meet the 2022/23 ILR export criteria, the 2022/23 export flag must be set.
Blocking Flags
The 2021/22 blocking flags are copied to the 2022/23 blocking flags. Aims blocked from the 2021/22 export will continue to be blocked in the 2022/23 export.
Funding Information
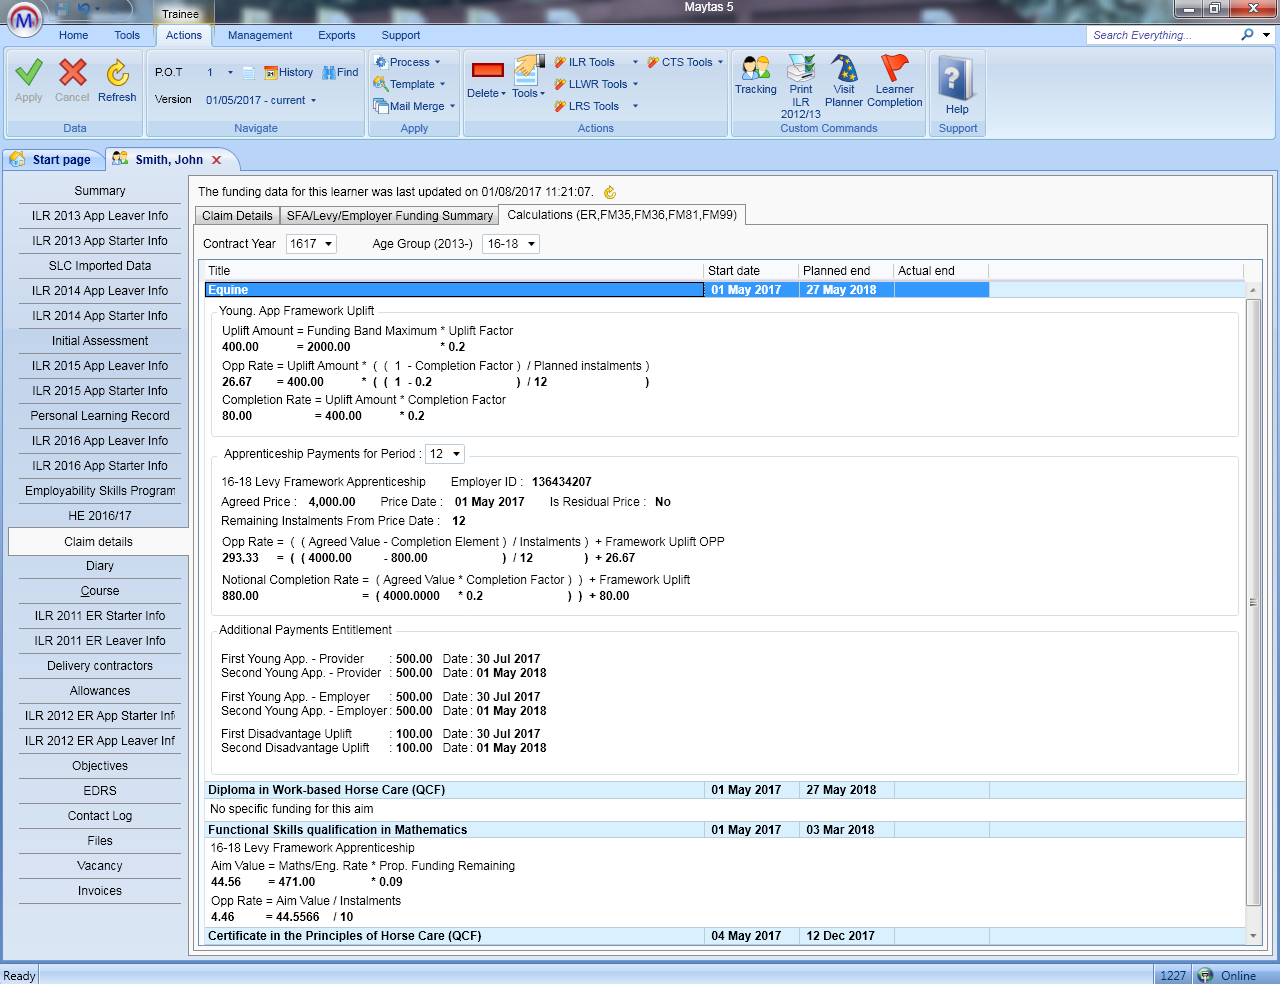
The funding information for 2022/23 in this upgrade is based on the funding rules for 2021/22, since full specifications were not available at the time of development. The 2022/23 funding information in this upgrade should be considered a beta version and is subject to change once future specifications have been published.
Skills Forward Integration
Maytas can now integrate with Skills Forward via the Skills Forward API, which allows data for learner diagnostics, initial assessments and screener results to be retrieved from Skills Forward and recorded against a learner in Maytas.
A new licence is required for the Skills Forward integration - please contact your account manager for more information. Instructions for installing the licence can be found in the
The integration supports multiple ways of associating records between Maytas and Skills Forward, depending on your requirements:
- If you already have learner records in Skills Forward, these can be linked to learner records in Maytas.
- Maytas learner records can also be used to create new user accounts for learners in Skills Forward which are then linked to their Maytas records.
When a learner's Maytas record is linked to their Skills Forward record, this allows their downloaded results to be associated with them in Maytas and viewed on the Skills Forward tab. A selection of fields in Skills Forward can also be updated from Maytas when records are linked. These fields are:
- Username
- First name
- Last name
- Deleted
- Email address
- Student reference
Setup
An API Key and API Token must be obtained from Skills Forward, which are then entered in Maytas to allow it to communicate with Skills Forward. To obtain these:
- As a Skills Forward admin user, log in to Skills Forward.
- Click Admin.
- Click Webhooks & API.
- Select API.
- Create an API and ensure you make a note of the API Key and Token values.
- Check that the permissions are set to Allow.
- Click Webhooks & API.
- Select Webhooks.
- Within the Provider dropdown, select Skills Assessment API Key Assessment.
- Select Add New Provider.
- Switch Status to ON.
- Add the API Key obtained earlier.
If you have any issues obtaining the API Key and Token, please email skillsassessments@ncfe.org.uk
The API Key and Token must then be added to the Maytas configuration options:
- In Maytas, click the M5 button at the top left and select Options.
- Go to Other on the left (under the Maytas 5 header).
-
In the Skills Forward section, tick the boxes for each config option and enter the values as follows:
-
API Keyand API Token - Enter the values obtained earlier.
-
Url for API - https://www.myskillsforward.co.uk/api/
-
- Click OK.
Next, permissions must be set to access the system:
- Go to Tools | Edit Permissions.
- Select the user or group which requires permission.
- On the Modules tab, set the Skills Forward permission to Visible.
- Go to the Commands tab and expand the Skills Forward section.
- Set the permission to Visible.
- Click Apply to save changes, then restart Maytas for the permission to take effect.
Finally, the Skills Forward tab must be made available:
- Go to Tools on the toolbar and click New / Load on the Screens panel of the ribbon.
- Scroll down and select Trainee on the left.
- Select Skills forward on the right and click OK.
- Tick the Published box on the left.
- Click Apply on the ribbon.
- Go to Home on the toolbar and click the Sync button.
Linking a Maytas learner record to an existing Skills Forward learner record
When a learner's Maytas record is linked to their Skills Forward record, this allows their downloaded results to be associated with them in Maytas and viewed on the Skills Forward tab.
To link a learner's records:
- Open the learner record in Maytas.
-
On the Third Party panel of the ribbon, go to Skills Forward | Link User.
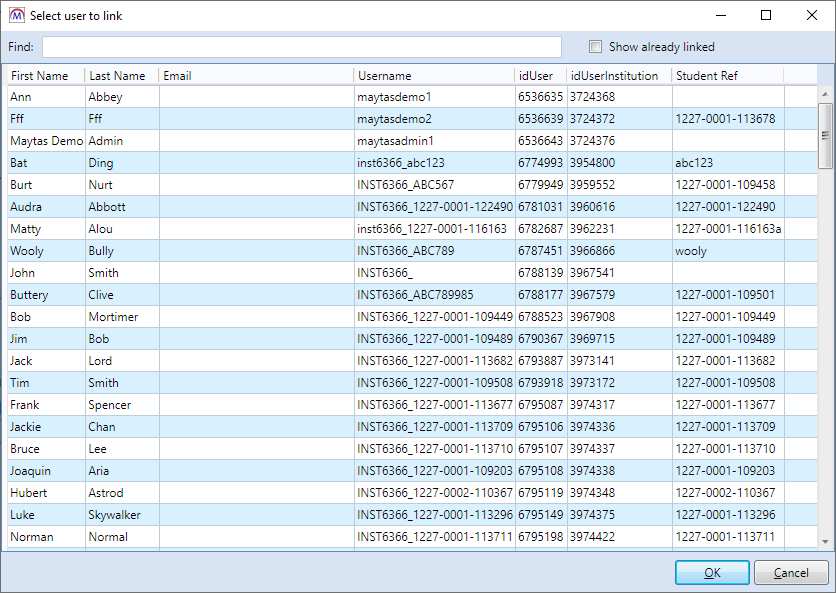
- You will see a list of available Skills Forward user records. Select the learner's record and click OK.
- A message will appear to confirm the records have been linked. Click OK.
While a Maytas learner record can only be linked to one Skills Forward record, you can view records that have already been linked to Maytas learners by ticking the Show already linked box at the top right. This can be useful if you are unsure whether a Skills Forward record has already been linked and need to check.
Once a learner's records have been linked, you will see the details of the linked record on the Skills Forward tab in Maytas:

Unlinking a Skills Forward record
If you need to unlink a Maytas learner record with a Skills Forward record (e.g. if they have been linked by mistake), this can be done as follows:
- Open the learner's record in Maytas.
- On the Third Party panel of the ribbon, go to Skills Forward | Unlink.
- You will be asked to confirm that you wish to unlink the records. Click Yes to continue.
- The records will now be unlinked.
Creating a Skills Forward user account from a Maytas record
If you have a Maytas learner who needs a Skills Forward user account and doesn't already have one, the account can be generated via Maytas:
- Ensure the learner has a valid email address entered in Maytas (TRAINEE.EMAIL). This will be used to send the learner a link to set their password.
- Open the learner's record in Maytas and go to the Skills Forward tab.
- Tick the Create User box.
- On the ribbon, go to Skills Forward | Create/Update User.
- A message will appear to confirm the user has been created. Click OK.
-
The User Institution, Student Ref. and Username fields will now be populated with values generated from Skills Forward. The username is what the learner will use to login to Skills Forward, though it can be changed within Skills Forward.

The Student Ref. will use a learner's Maytas Hub username if they are linked to a web user account, otherwise it will use their Trainee ID. This then forms part of the username generated by Skills Forward.
- The learner will receive an email from Skills Forward with a link to set their password. They can then login to Skills Forward using the username above (which is also included on the email) and their new password.
If you have multiple learners you wish to generate Skills Forward accounts for, this can be done in bulk by ticking the Create User box for each learner and then going to Management on the toolbar and selecting Skills Forward | Create Users. This will generate accounts in the same way as above for each of the learners with Create User ticked.
Downloading results for an individual learner
To download results for a learner:
- Open the learner's record in Maytas.
- On the ribbon, go to Skills Forward | Get Results.
-
The learner's available results will now be downloaded.
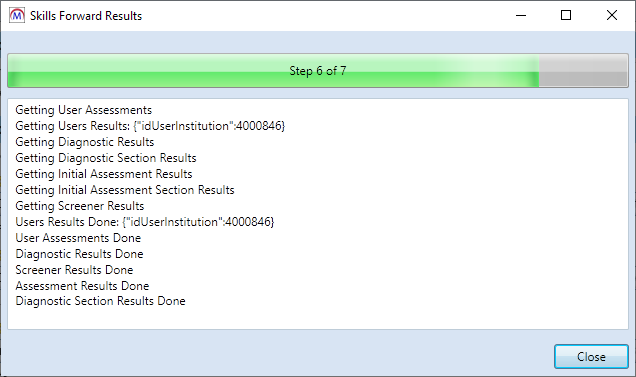
Clicking Close will continue the download in the background, and progress can be checked by going to Skills Forward | Get Results again.
-
The results will now show in the relevant grids on the Skills Forward tab (note that you may need to click Refresh on the ribbon for them to display after downloading).

Downloading results for an individual learner will not include diagnostic, initial assessment or screener results. These must be downloaded in bulk (i.e. for all learners) as per the instructions below.
Downloading all results from Skills Forward
To download all results from Skills Forward:
- In Maytas, go to Management on the toolbar.
- On the Third Party panel of the ribbon, go to Skills Forward | Get Results.
-
Available results will now be downloaded.
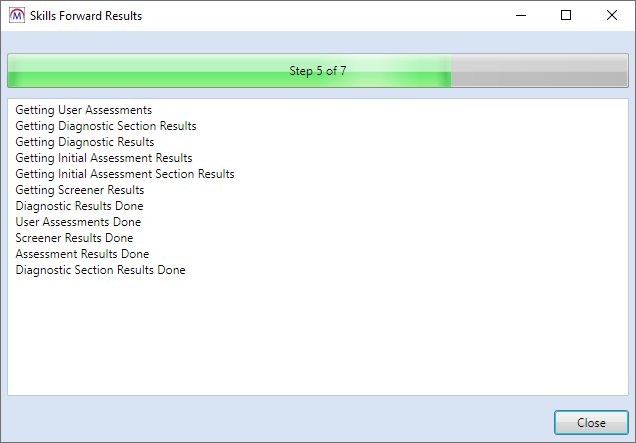
This may take a long time depending on the number of available records. Clicking Close will continue the download in the background, and progress can be checked by going to Skills Forward | Get Results again.
Scheduling Skills Forward downloads
The Scheduler can be used to schedule when results are downloaded from Skills Forward for all learners, rather than manually performing the download.
- Go to Tools | Scheduler.
-
On the ribbon, go to New | Skills Forward. A new Skills Forward schedule will be created.

- Enter a name and description for the schedule on the General tab.
-
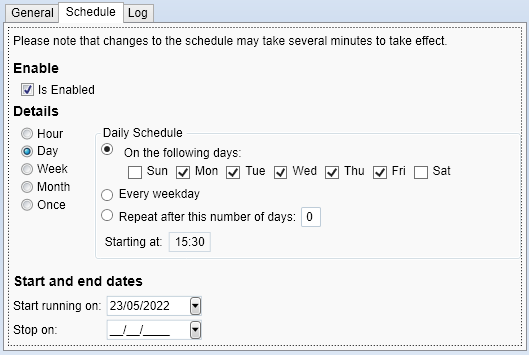
Go to the Schedule tab. This is where you can configure when (and how often) the schedule will run.
-
Set the schedule in the Details section. It can be set to run periodically (e.g. every day, week, etc) or just once at a specified time. Please note that if you intend to start the schedule immediately, the start time should be at least 10 minutes in the future to ensure it is picked up by the system.
- Set the start date at the bottom of the window. The schedule will run indefinitely by default, but if you want the schedule to end on a particular date then tick the Stop this schedule on box and set the date.
- When you have finished configuring the schedule and want to activate the schedule, tick the Is Enabled box at the top of the tab.
- Click Apply on the ribbon to save the schedule.
The Log tab shows a log of when the schedule has been run, which can be filtered between two dates.
Screen Designer - New / Load Improvements
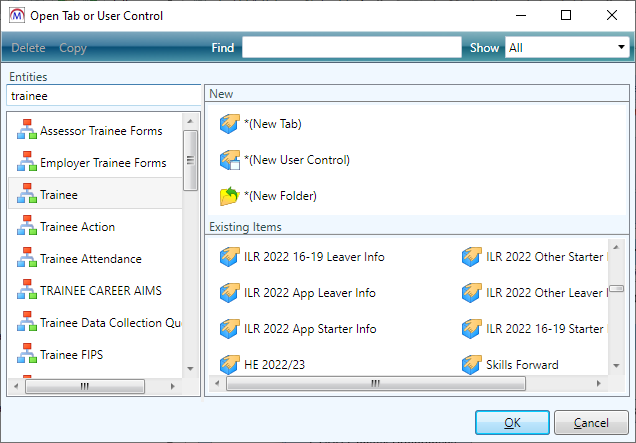
The Screen Designer's New / Load screen has been improved so that entities (on the left) can be filtered to access them faster and so that the Trainee entity is selected by default.
To filter entities:
- Go to Tools on the toolbar and select New / Load on the Screens panel of the ribbon.
-
Enter a search term in the Entities box (at the top-left of the window). This will filter the entities on the left by those that contain the search term.
-
You can then quickly select the required entity, rather than having to scroll down to locate it.
-
You can also now select multiple tabs and controls on the right to open them all at the same time (this is limited to 12 being opened at once). To do this, select a tab or control and then hold the CTRL key to click and select others.
Additionally, it is now possible to delete multiple tabs / controls at the same time, though this ability requires a permission to be set:
- Go to Tools | Edit Permissions.
- Select the user or group which requires permission.
- Go to the Commands tab and expand the Screen Designer section.
- Set the Delete Tabs permission to Visible.
- Click Apply to save changes, then restart Maytas for the permission to take effect.
You can then delete multiple tabs in the New / Load window by selecting them while holding the CTRL key and then clicking the Delete button.
Employer Contacts at Branch Level
A configuration option is available which allows employer contacts to be set at branch level as well as at parent employers. Additionally, the key contact for a branch can be set to a contact at the parent employer.
To set the config:
- Go to the M5 button at the top-left and select Options.
- Go to Employer Login on the left (under the Maytas Hub Online header).
- In the General section, tick the box for the Allow parent employer contacts at branches setting on the right and ensure the toggle button is set to ON.
- Click OK.
Off-the-Job (OTJ) Calculation Update
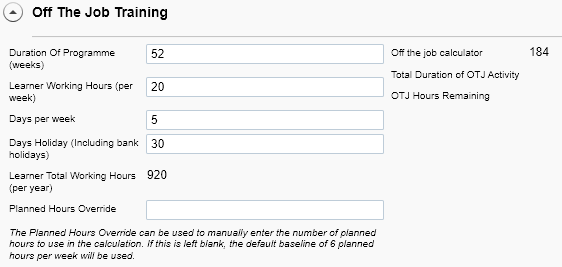
The OTJ calculation has been updated so that it can be based on weeks rather than months (divided by 4), which brings it in line with the ESFA's Apprenticeship Commitment Statement template.
If the number of planned weeks is not entered on a learner's Off the Job Training tab, the calculation will continue use the number of planned months divided by 4 instead. If both weeks and months are entered, weeks will be used in the calculation.
To use weeks in the OTJ calculation:
- Open a learner record and go to the Off the Job Training tab.
- Complete the Duration of Programme (Weeks) field.
- Click Apply. The Off the job calculator field will now be updated using the entered weeks.
Maytas Hub Release Notes – Version 5.24.8100.2
Showcase Portfolio
The Showcase Portfolio is a predominantly learner-led feature which allows a learner to create a showcase of their best work. Users are able to create multiple portfolios, add existing files, add new files, remove files, move files between portfolios, amend existing showcase items, check on the details and mappings of a showcase item and export portfolio items both individually and in bulk from within the new Showcase tab.
As part of the Add to Showcase process, users are asked for some key information such as title, description, which showcase file is to be added to and item type. Due to the nature of the new Showcase tab, the tile that is presented is based entirely on the selection within the item type field. This builds up a dynamic portfolio of screens for users to view.
There is a configuration option to add a new Add to Showcase step within the Evidence Wizard so that it forms part of the learner file upload process. Users are also able to add existing files to a showcase via the Files tab.
Setup
Users must be given permissions to showcase features for them to be enabled.
For assessor users:
- Go to Web User Editor on the sidebar.
- Search for and select the assessor user.
- Click Permissions to expand that section.
- Under the Files header, tick the following permissions as required:
- Access Learner Showcase Tab
- Download files from Learner Showcases
- Allow Add/Delete Showcases
- Allow Add/Edit Showcase files
- Click Save.
For employer users:
- Go to Web User Editor on the sidebar.
- Search for and select the employer user.
- Click Permissions to expand that section.
- Under the Files header, tick the following permissions as required:
- Allow Add/Delete Showcases
- Allow Add/Edit Showcase files
- Download files from Learner Showcases
- Click Custom Tabs to expand that section.
- Under the Learner Editor header, set the Showcase tab permission as required.
- Click Save.
For learner users:
- Go to Web User Editor on the sidebar.
- Search for and select the learner user.
- Click Permissions to expand that section.
- Under the Trainees header, tick the Enable Showcase Features permission.
- Click Save.
A configuration option must also be set before learners can flag showcase files in the Evidence Wizard:
- Go to Settings on the sidebar.
- Click the System configuration button.
- Go to Learner Login on the left (under the Maytas Hub Online header).
- In the Evidence Wizard section, tick the box for the Allow learners to flag showcase files in the Evidence Wizard setting on the right and ensure the toggle button is set to ON.
- Click Save.
Showcase Screen
The Showcase screen is the central point for viewing and managing a learner's showcases. Details of each showcase can be viewed, along with their associated evidence files and mappings. Files can be added to new or existing showcases using the Add File button and the Export Showcase button can be used to download a zip file containing all information and evidence associated with the selected showcase.
To view a different showcase, select it from the Select Showcase dropdown box at the top-right of the screen.
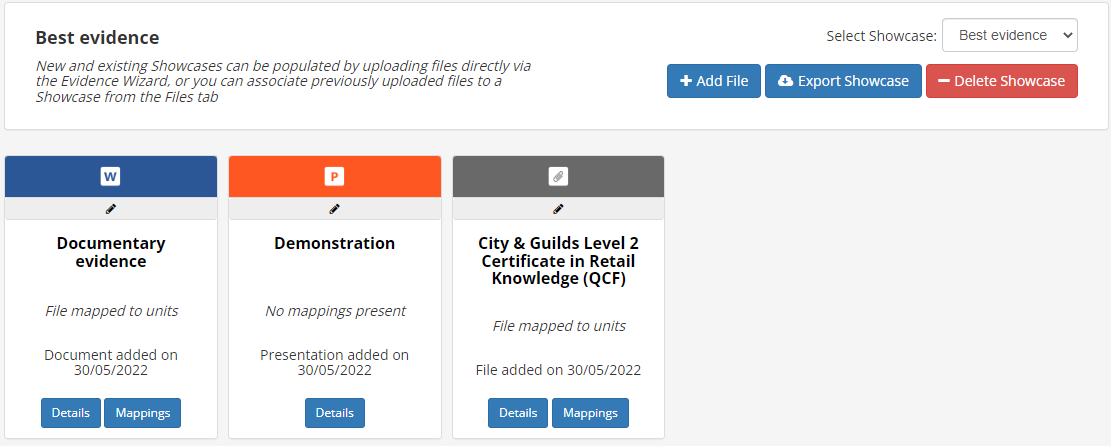
To access the screen as an assessor or employer, open a learner's record and go to the Showcase tab. To access the screen as a learner, go to Showcase on the sidebar.
Showcase screen buttons
Add File - Learners can click this button to add evidence files to a new or existing showcase via the Evidence Wizard (please see the instructions below and skip to step 2 after clicking the Add File button).
Export Showcase - Clicking this button will download a zip file that contains all information and evidence associated with the selected showcase. The showcase can then be viewed offline as follows:
- Extract the zip file to your hard drive and go to the data folder.
- Open showcase.html (you may be prompted to choose which app to use - any browser compatible with Maytas Hub will work).
-
You will then see a summary of the showcase. Clicking a Showcase File Name will open a zip file containing the associated evidence files.

Delete Showcase - Clicking this button will delete the entire showcase (you will be prompted to confirm deletion). Note that this does not delete evidence files but dissociates them from the showcase.
Viewing showcase details and mappings
To view the details of a showcase, click the Details button on one of the associated evidence collections:
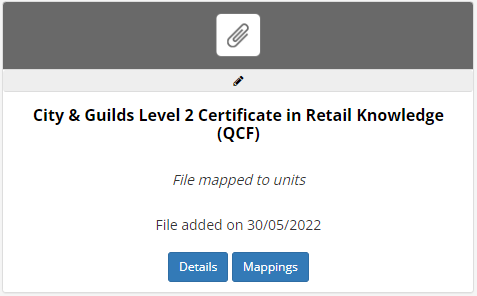
A pop-up prompt will appear.
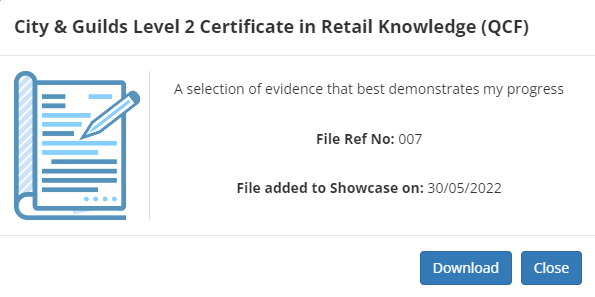
Click Download to download the associated evidence files, then click Close.
Click the Mappings button to view the objective mappings for the associated evidence (this button will not appear if the evidence was not mapped).
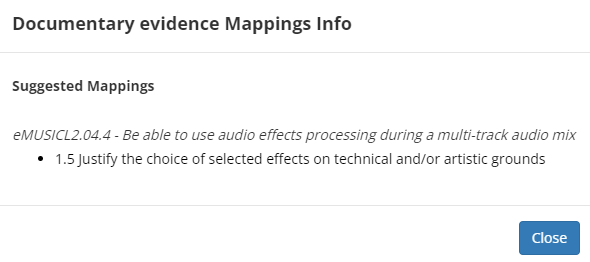
Click Close when finished.
How to flag showcase files in the Evidence Wizard
A learner can use the Evidence Wizard to add new evidence files to a new or existing showcase as follows:
- On the Maytas Hub learner home screen, click the Evidence button (in the Portfolio section). The Evidence Wizard will start.
-
On the first screen, click the Select button to add the evidence files to be uploaded, then click Next.

- On the second and third screens, map the evidence to objectives as required and click Next.
- On the fourth screen, leave a comment for the assessor if required and click Next.
-
On the fifth screen, click Yes to include the selected evidence in a showcase.

-
Additional options will appear for completion.
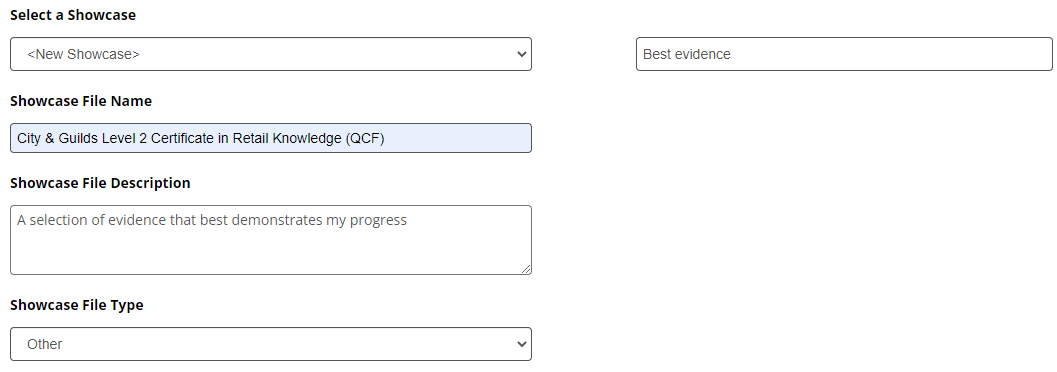
The Select a Showcase dropdown box can allow you to add the evidence to an existing showcase, or alternatively you can select <New Showcase> to add the evidence to a new showcase.
For Showcase File Name, clicking the box will display a suggested title based on objectives, and clicking the suggestion will use that title. Alternatively, a title can be entered manually.
- Once the showcase fields are completed, click Next.
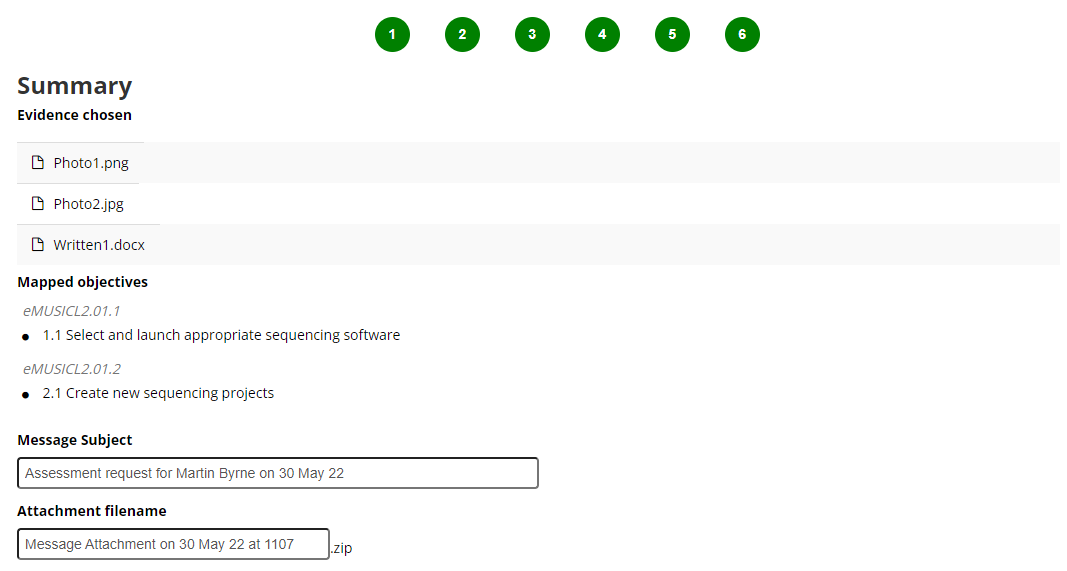
-
A summary of the evidence to be uploaded will be displayed. Click Finish to complete the wizard.
How to add existing evidence files to a showcase
Evidence files which have already been uploaded can be added to an existing showcase:
- As a learner user, go to Files on the sidebar. As an assessor or employer user with the Allow Add/Edit Showcase files permission, open a learner record and go to the Files tab.
-
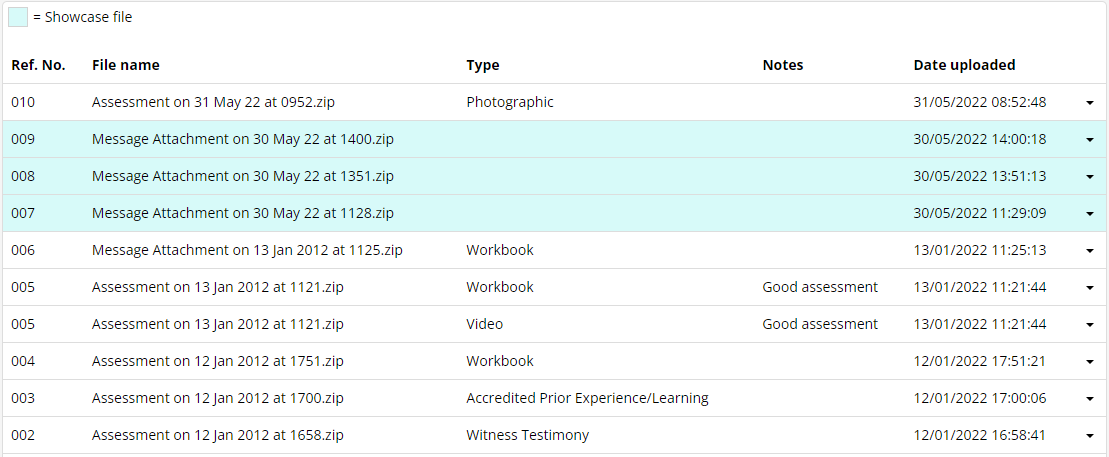
A list of uploaded files will be displayed. Files that are already associated with a showcase are highlighted in blue.
-
Click the arrow at the far right of the file you wish to add to a showcase and select Add to Showcase.

-
A pop-up screen will appear. Enter details for the file as required. The Select Showcase dropdown box can be used to select an existing showcase, or alternatively the file can be added to a new showcase by selecting the <New Showcase> option.
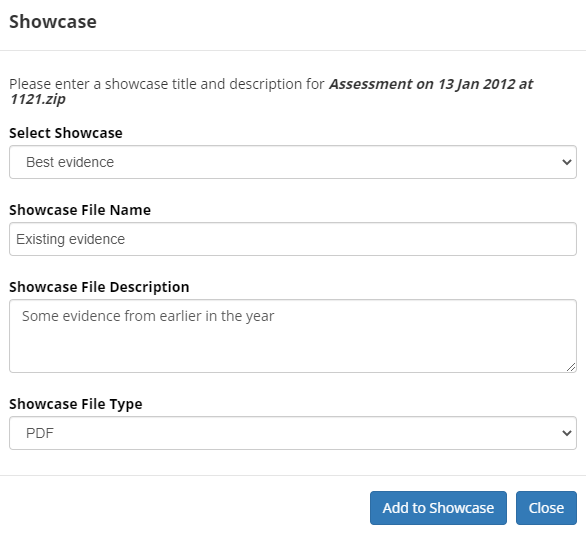
- Click Add to Showcase.
The Files screen can also be used to remove a file from a showcase:
-
Click the arrow at the far right of the file you wish to remove from a showcase and select Remove from Showcase.

- You will be prompted to confirm. Click Remove from Showcase to continue.
Dynamic Forms and Screens
Application forms and screens created in the Screen Designer and used in Maytas Hub can now dynamically show controls based on field values. For example, if a learner application form has a set of fields that are only relevant if the learner selects a particular option, the form could be designed so that those fields only display when the option is selected. Similarly, a form could have a set of fields that are conditionally hidden.
The process for making a control display or hide dynamically is as follows:
- The control is created in the Screen Designer, containing the fields that should be shown or hidden dynamically (note that a control is different to a tab - see here for details).
- The control is assigned a parent field. This is the field which will determine whether the control is shown or hidden.
- The Visibility On Value or Off Value is set on the control. This is the value in the parent field which will determine whether the control is shown or hidden. For example, if the On value is set to 1, the control will only display when the parent field has a value of 1. If the Off value is set to 1 instead, the control will only display when the parent field has a value that is NOT 1.
- The control is then added to a tab, along with the parent field. Additional dynamic controls and parent fields can be added to the tab as required.
Considerations and constraints
There are several factors that are important to consider when designing a dynamic form or screen:
- A dynamic control can only have one parent field and value to determine whether it is shown or hidden. Multiple fields and values are not currently supported.
- The parent field can either have an On value or an Off value, not both.
- If a field requires validation, the validation will still apply when a control is hidden. Therefore it is strongly advised not to include fields which required mandatory completion on dynamic controls, as this could lead to a user not being able to save or progress if a field they need to enter is not visible.
Example Dynamic Screen
In this example, we will create a learner screen where choosing a funding model of 36 will show a control with apprenticeship fields and any other funding model value will show a control with non-apprenticeship fields. Funding model (TRAINEEPOT.ILR13_FUNDMODEL) will therefore act as the parent field for both controls.
- In Maytas 5, go to Tools on the toolbar and select New / Load on the Screens panel of the ribbon.
- Select Trainee on the left, then double-click *(New User Control).
-
This will be the control that shows when funding model 36 is selected. Give the control a name (for this example we will call it Dynamic form control 1) and drag a selection of fields into the design area (the fields used are not important for the example).
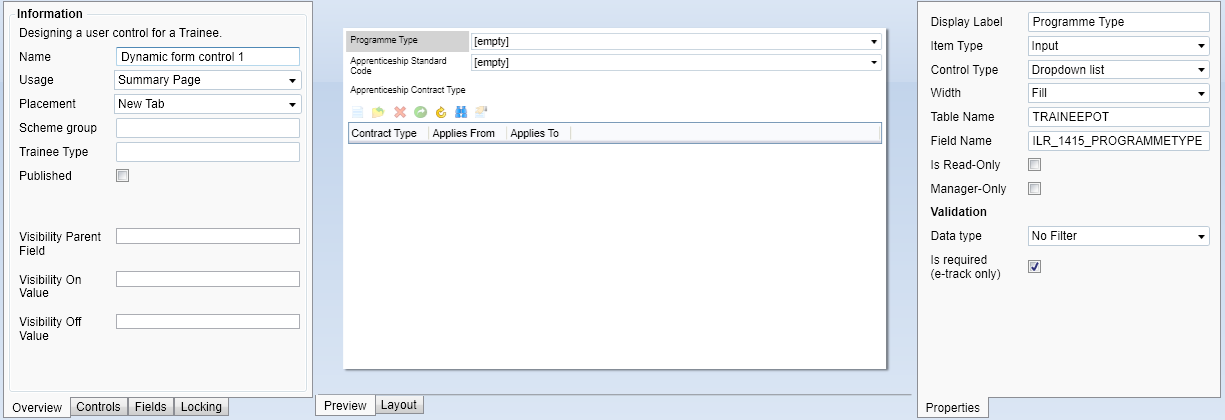
- In the Visibility Parent Field box, enter TRAINEEPOT.ILR13_FUNDMODEL.
-
In the Visibility On Value box, enter 36. This means that when the funding model field has a value of 36, the control will display.
If the parent field has lookups, the Visibility On or Off Value must be the shortstring value, not the longstring value. e.g. Enter 36 rather than 36 - Apprenticeships ( from 1 May 2017 ).

- Tick the Published box.
- Click Apply to save the control.
- Repeat steps 1 to 4 to create a second control (Dynamic form control 2) with a different selection of fields. Ensure the Visibility Parent Field is also set to TRAINEEPOT.ILR13_FUNDMODEL.
-
In the Visibility Off Value box, enter 36. This means that when the funding model field has a value of 36, the control will be hidden, otherwise it will display.

- Tick the Published box and click Apply to save the control.
- Finally, the controls must be added to a tab along with Funding Model. Go to Tools on the toolbar and select New / Load on the Screens panel of the ribbon.
- Select Trainee on the left, then double-click *(New Tab).
- Give the tab a name (for this example we will call it Dynamic Form Example).
- Go the Fields tab at the bottom-left, go to the Trainee POT section and drag the field ILR13_FUNDMODEL onto the design area.
- Go to the Controls tab at the bottom-left and expand the User section.
-
Locate the controls created above and drag them onto the design area.
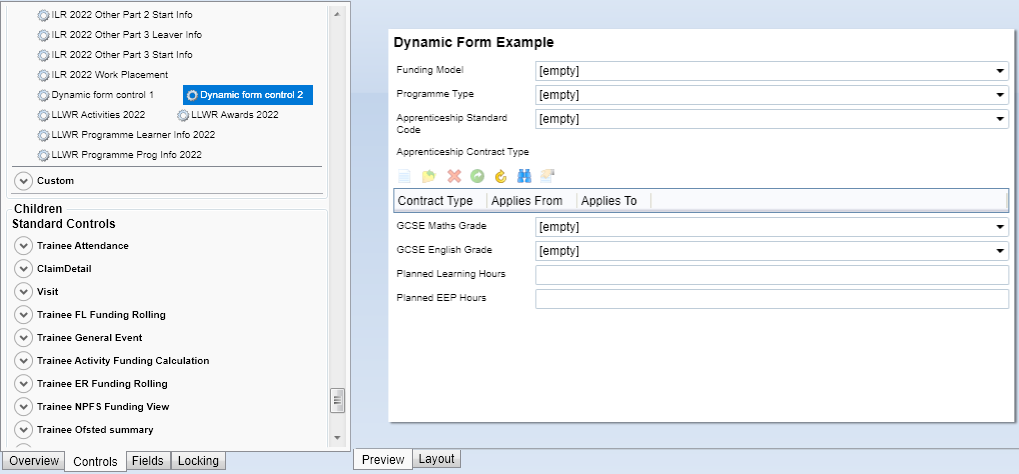
- Go to the Overview tab at the bottom-left and tick the Published box and the Trainee box (in the e-track Publish section).
- Click Apply, then go to Home on the toolbar and click the Sync button.
The screen will now appear in Maytas Hub on learner records. When Funding Model is set to 36, Dynamic form control 1 will show, otherwise Dynamic form control 2 will show.

Custom Validation in Screen Designer
The Screen Designer now allows you to add custom validation to a field that will apply when the screen is used in Maytas Hub. The validation uses basic SQL in the format of an operator and a value which is then checked against the data in the field.
This feature is intended for use by users with a basic knowledge of SQL. Please be aware that while Tribal Support may be able to assist with some SQL statements for use in validation, more complex SQL requests may require bespoke work or training in SQL.
Some common examples include:
| Validation expression | Use |
|---|---|
| = 'Y' | Checks that the field has a value of Y |
| > 0 | Checks that the field has a value greater than zero |
| >= 1 | Checks that the field has a value greater than or equal to 1 |
| < 2 | Checks that the field has a value less than 2 |
| IN ('A','B','C') | Checks that the field has a value of A, B or C |
| LIKE 'ABC%' |
Checks that the field has a value that begins with ABC |
| LIKE '%ABC' |
Checks that the field has a value that ends with ABC |
| LIKE '%ABC%' | Checks that the field value contains ABC (e.g. a value of XABCX would be valid, but XABXC would not) |
| >= '01-AUG-2022' |
Checks that a date field has a date on or after 01/08/2022 (any valid SQL date format can be used; e.g. '20220801', '01/08/2022' or '2022-08-01') |
| > GETDATE() | Checks that a date field has a date after the current date and time |
How to add custom validation to a field
- In Maytas 5, go to Tools on the toolbar and select New / Load on the Screens panel of the ribbon.
- Open or create a screen.
- Go to the Fields tab (at the bottom-left) and drag the field you wish to validate onto the design area. For this example, we will add validation to the learner postcode field (TRAINEE.POSTCODE).
- Select the field in the design area and from the Data type box on the right, choose Maytas Hub Custom Validation.
-
Enter the required validation SQL in the Validation expression box. For this example, we will enter like 'LA%' so that entered postcodes must begin with LA.
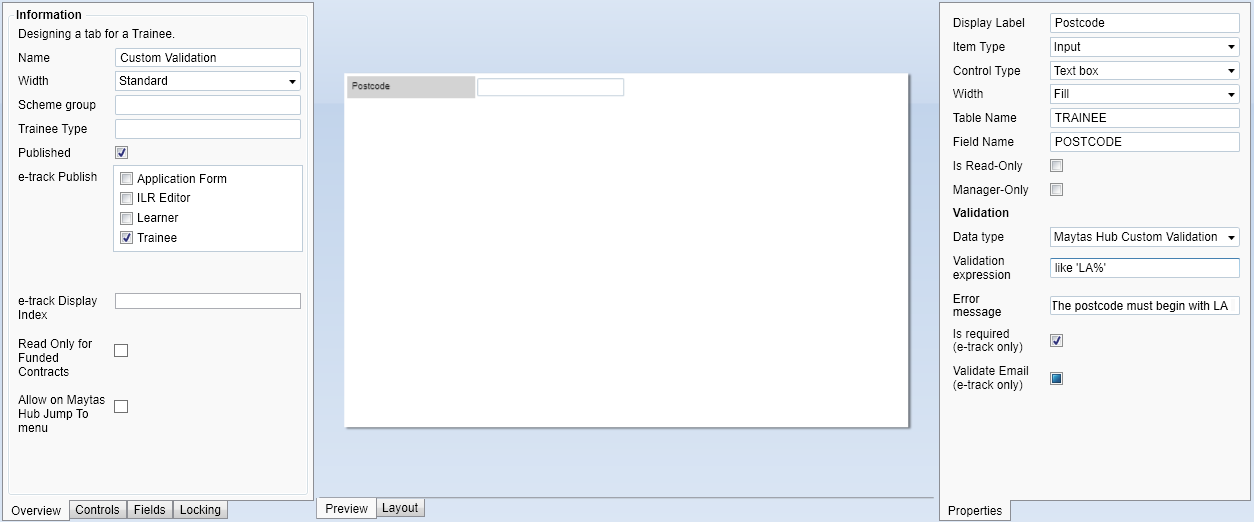
- Complete the rest of the screen as required, then click Apply. Note that the screen must be configured on the Overview tab for use in Maytas Hub, using the e-track Publish panel.
- Go to Home on the toolbar and click the Sync button.
When the screen is used in Maytas Hub, the configured field will now be validated.
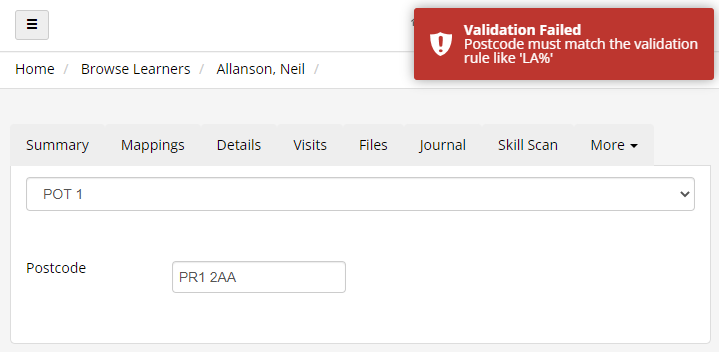
Advanced explanation of how the validation works
The validation is executed as the following SQL statement:
SELECT CASE WHEN VALUE RULE THEN 'Y' ELSE 'N' END
where VALUE is the value entered in the field and RULE is the SQL entered in the Validation expression box in the Screen Designer.
Using the previous postcode example where the validation expression was like 'LA%' and the value entered was PR1 2AA (causing the validation to fail), the SQL would be executed as:
SELECT CASE WHEN 'PR1 2AA' like 'LA%' THEN 'Y' ELSE 'N' END
This returns a result of N, which tells Maytas Hub that the entered value is not valid, as it does not begin with LA. If the entered value had been LA1 2BB, the SQL would have returned Y to indicate that the value is valid.
Employer Contacts at Branch Level
A configuration option is available which allows employer contacts to be set at branch level as well as at parent employers. Additionally, the key contact for a branch can be set to a contact at the parent employer.
To set the config:
- Go to Settings on the sidebar.
- Click the System configuration button.
- Go to Employer Login on the left (under the Maytas Hub Online header).
- In the General section, tick the box for the Allow parent employer contacts at branches setting on the right and ensure the toggle button is set to ON.
- Click Save.
Lock Accounts Until Forms Completed
Configuration options are available which will effectively lock a Maytas Hub user account from regular use when that user is sent a data collection form to complete, and then their account will be unlocked when the form is completed.
To set the configs:
- Go to Settings on the sidebar.
- Click the System configuration button.
- There are separate configs for assessor, employer and learner users.
- For assessor users, go to Assessor Login on the left (under the Maytas Hub Online header)
- For employer users, go to Employer Login on the left (under the Maytas Hub Online header).
- For learner users, go to Learner Login on the left (under the Maytas Hub Online header).
- In the Data Collection section, tick the box for the Lock accounts when sent a new form setting on the right and ensure the toggle button is set to ON.
- Click Save.
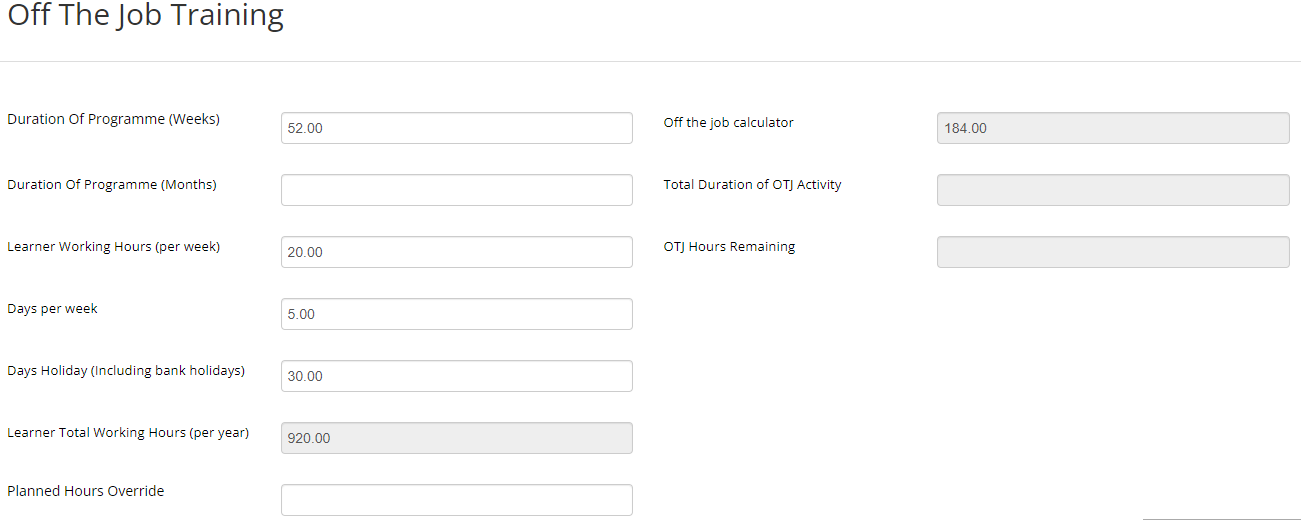
Off-the-Job (OTJ) Calculation Update
The OTJ calculation has been updated so that it can be based on weeks rather than months (divided by 4), which brings it in line with the ESFA's Apprenticeship Commitment Statement template.
If the number of planned weeks is not entered on a learner's Off the Job Training tab, the calculation will continue use the number of planned months divided by 4 instead. If both weeks and months are entered, weeks will be used in the calculation.
To use weeks in the OTJ calculation:
- Open a learner record and go to the Off the Job Training tab.
- Complete the Duration of Programme (Weeks) field.
- Click Save. The Off the job calculator field will now be updated using the entered weeks.
Custom Visit Screens for Learner and Employer Users
Custom visit screens created in the Screen Designer can now be viewed by learner and employer users. Visit screens are hidden by default from learners and employers but can be set to read-only or editable.
To set permissions for a custom visits screen:
- Go to Web User Editor on the sidebar.
- Search for and select the learner or employer user.
- Click Custom Tabs to expand that section.
- Scroll down to the Visits Editor section.
- Set the Visible dropdown box to one of the following values:
- Visible - This will make the screen editable by the user
- Read Only - This will make the screen viewable by the user but not editable.
- Hidden - This will hide the screen from the user.
- Click Save.

Jump To Menu
The Caseload and Find Learner screens now have a configurable option to directly jump to a particular screen for a learner, rather than having to open the learner record and then go to that screen. Custom learner screens can also be included in the Jump To menu.
To enable the Jump To menu:
- Go to Settings on the sidebar.
- Click the System configuration button.
- Go to Admin on the left (under the Maytas Hub Online header).
- In the General section, tick the box for the Standard trainee tabs available on the Jump To menu setting on the right.
-
Tick each option you want to include on the Jump To menu.

- Click Save.
-
The Caseload and Find Learner screens will now replace the edit button for each learner with the Jump To menu, where you can select which screen to go directly to.

To include a custom screen from the Screen Designer in the Jump To menu:
- In Maytas 5, go to Tools on the toolbar and click New / Load on the Screens panel of the ribbon.
- Open the learner screen you wish add to the Jump To menu.
-
Tick the Allow on Maytas Hub Jump To menu checkbox (at the bottom left).
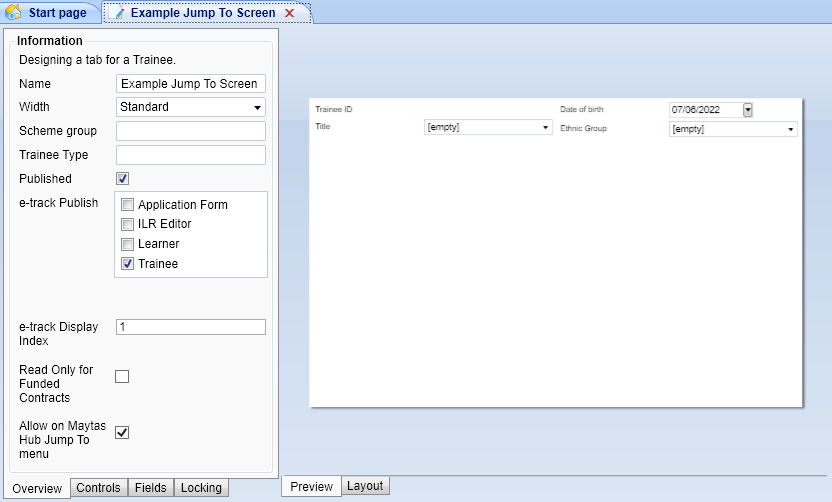
- Click Apply to save the changes.
- Go to Home on the toolbar and click the Sync button. The screen will now be available on the Jump To menu in Maytas Hub.
Ordering of Lookups with a Display Index
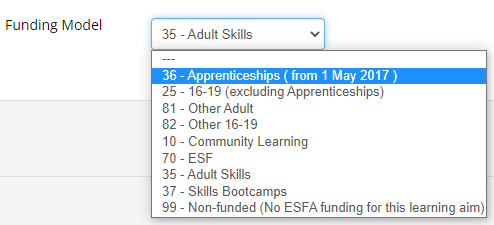
Lookups which have a display index entered against them will now be ordered in Maytas Hub based on the display index, rather than alphabetically. If no display index is set against a lookup, they will continue to be ordered alphabetically.
The display index can be set in Maytas 5 as follows:
- Go to Tools on the toolbar and click DB Schema on the General panel of the ribbon.
- Expand the table structure on the left and select the field for which you wish to set the display index.
-
Go to the Look-ups tab on the right.
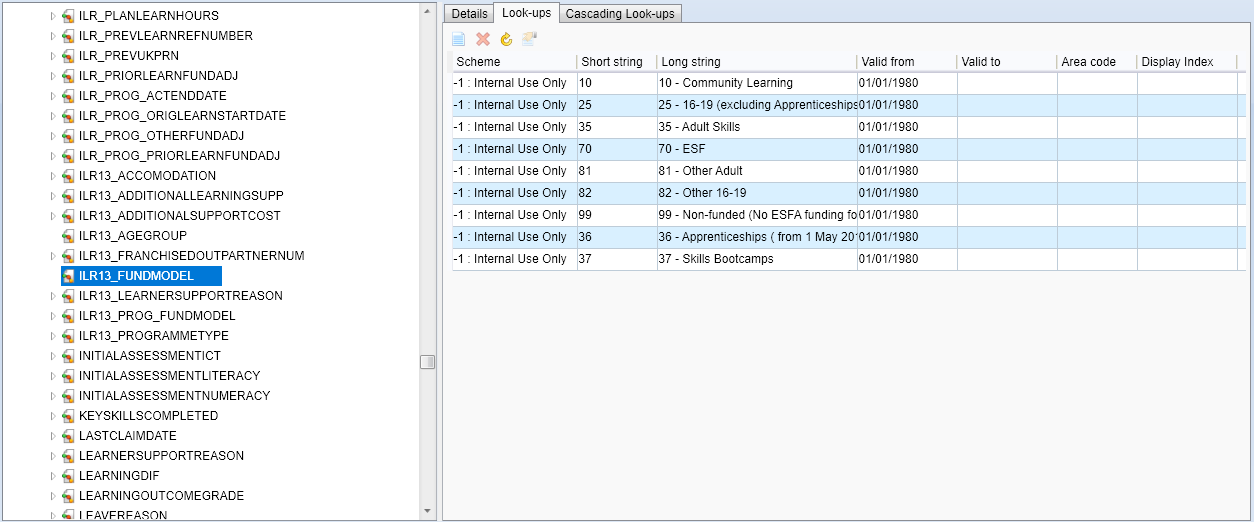
-
For each lookup, enter the Display Index. There should be a number for each row, which will determine the order of the lookups.
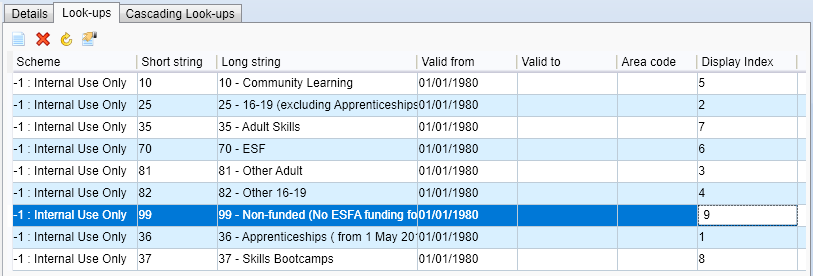
- Click Apply, then go to Home on the toolbar and click the Sync button.
The lookups will now be ordered in Maytas Hub based on the display index.
Grid Improvements
Grids on custom screens in Maytas Hub can now display a specified maximum number of rows at a time, with buttons to move between the next and previous set of rows. This is intended for use with grids where there may be a high number of rows that could impact performance.
Grids can also now be sorted by a column by clicking the column header. Clicking it once will sort it in ascending order and two clicks will sort it in descending order.
To set a grid's maximum displayed rows in the Screen Designer:
- In Maytas 5, go to Tools on the toolbar and click New / Load on the Screens panel of the ribbon.
- Open the tab containing the grid you wish to edit.
- Select the grid in the design area and click Edit Grid on the right.
-
In the Max height (rows) box, enter the maximum number of rows to show at a time.
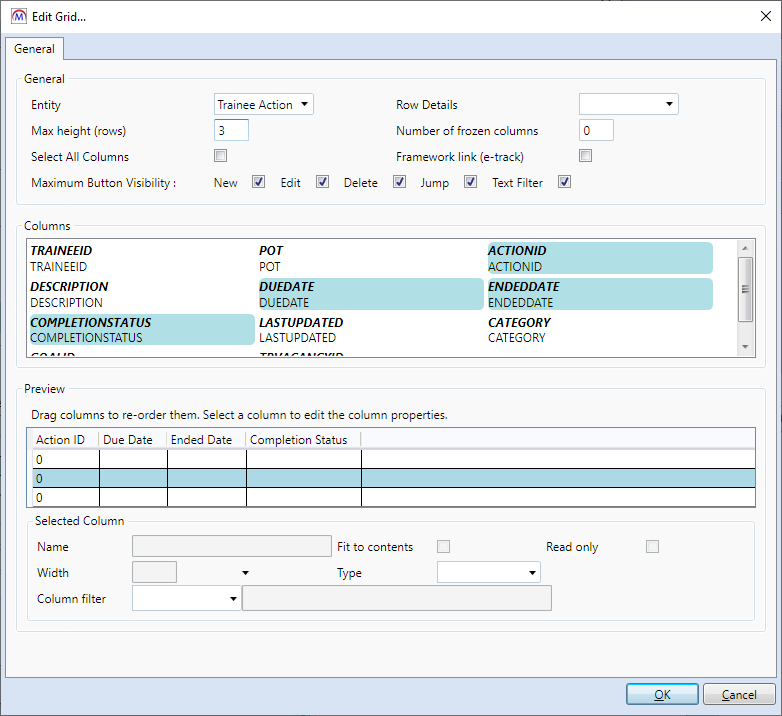
- Click OK, then click Apply.
- Go to Home on the toolbar and click the Sync button.
The grid will now be limited to showing the entered maximum number of rows at a time. The Next and Previous buttons can be used to show additional rows.

App Forms Update
Application forms which use the old .aspx format have been updated so that they are now consistent with data collection forms. While this is a background change for maintenance and support purposes which does not change the function or look of app forms, it does change the format of the app form URL. It is therefore important for customers to check if any existing app forms contain aspx in the URL and update those that do to the new URL format.
An example of the old format is:
http://www.examplewebsite.com/MaytasHub/application.aspx?th=n&App0=n&lp=n&Moduleid=A1
This would need updating to the new format as follows:
http://www.examplewebsite.com/MaytasHub/CustomTab/ApplicationForm?formid=A1
To breakdown the new URL format:
- The first part is the Maytas Hub URL (e.g. http://www.examplewebsite.com/MaytasHub/). This should use your own Maytas Hub URL.
- The middle part, CustomTab/ApplicationForm?formid=, should remain as it is.
- The final part is the application form ID that is entered in the Screen Designer (e.g. A1). This should be replaced with the app form ID you wish to use.
Additionally, if an app form uses a grid with a modal screen (i.e. a separate pop-up screen) for editing rows, the modal screen must be published with an app form ID that begins with A.
Header Warnings
If your Maytas Hub system has verbose errors or version headers enabled, you will now see a red banner warning for one or both of these at the top of the screen:

Hosted customers have these settings disabled by default. For on-premise customers, the settings can be disabled in the web.config file by following the instructions in the Maytas Hub Upgrade Guide.
ShowVerboseErrors
When an error occurs in Maytas Hub, if verbose errors are enabled then technical details of the issue will be displayed on screen, whereas if verbose errors are disabled then it will simply state that an error has occurred. Verbose errors should be considered a potential security risk in a production environment, as the nature of some errors may result in sensitive information or system details being displayed which could be used maliciously by unauthorised individuals.
EnableVersionHeader
This setting is not necessary for production environments and should be disabled, as having it enabled can present security vulnerabilities.