Maytas Hub Release Notes
Technical specification
The latest Maytas and Maytas Hub technical specification can be found here.
Maytas Hub Release Notes – Version 5.29.9110.1
Employer Application Forms - New URL Format
Employer app forms may now use the same URL format as learner and assessor app forms. While the previous URL format will continue to work, it is recommended to use the new format when linking to an app form as this supports additional app form features such as clickable hyperlinks, dynamic controls and the ability to make radio group buttons mandatory.
The new URL format is as follows:
www.examplewebsite.com/MaytasHub/CustomTab/EmployerApplicationForm?formid=P1
Replace www.examplewebsite.com/MaytasHub with your Maytas Hub website and P1 with your App Form ID.
The equivalent old URL format would be:
www.examplewebsite.com/MaytasHub/application.aspx?th=n&App0=n&lp=n&Moduleid=P1
Learner Login - Evidence Wizard Restrictions
A permission can now be set against learner users so that they are restricted to only submitting evidence against objectives or only submitting evidence against tasks:
-
Go to Web User Editor on the sidebar.
-
Search for and open the user or group that requires permission.
-
Expand the Permissions section.
-
Choose one of the following three options in the Evidence Wizard section:
-
Default (Objectives & Tasks) - This asks learners on the first step of the Evidence Wizard whether they want to submit evidence against objectives or tasks.
-
Restrict to Objectives Only - This removes the choice on the first step of the Evidence Wizard and only allows learners to submit evidence against objectives.
-
Restrict to Tasks Only - This removes the choice on the first step of the Evidence Wizard and only allows learners to submit evidence against tasks.
-
-
Click Save.
Team Caseload Screen - Extra Columns
The configuration option which allows additional columns to be displayed on an assessor's caseload screen now also applies to the Team Caseload screen for team leaders / managers.

To set the config (if it is not already set as required):
-
Go to Settings on the sidebar.
-
Click the System Configuration button.
-
Go to Assessor Login on the left (under the Maytas Hub Online header).
-
Locate the General section on the right.
-
Ensure the box is ticked for the permission List of extra columns to show on the caseload screen.
-
Select the required columns from the list.
-
Click Save.
Workflow Completion Email
When a workflow is completed, a configurable confirmation email can now be sent to all users within the workflow (including the user who invoked it) advising that it is complete, along with the date and time of completion.
To enable and configure the email:
-
Go to Settings on the sidebar.
-
Click the System Configuration button.
-
Go to Admin on the left (under the Maytas Hub Online header).
-
Locate the Data Collection section on the right.
-
Tick the boxes for the two relevant config options:
-
Email body sent to selected Workflow User types upon completion of a Workflow - Enter the body of the email you wish to be sent upon completion of a workflow.
-
List of Workflow User types to email upon completion of a Workflow - Select the user types that should receive the email.
-
-
Select the required columns from the list.
-
Click Save.
Partial Completion of Tasks
When a learner submits a file against a task through the Evidence Wizard, their assessor now has the option to mark the task as partially complete. This sets the task to incomplete, but any evidence mappings accepted by the assessor are retained. The learner is then able to re-submit new evidence for the task.
This feature must first be enabled via a configuration option:
-
In Maytas Hub, go to Settings on the sidebar.
-
Click the System configuration button.
-
Go to Assessor Login on the left (under the Maytas Hub Online header).
-
Locate the Trainee section on the right.
-
Tick the box for the Allow partial completion of Trainee tasks option and ensure the toggle button is set to ON.
-
Click Save.
When an assessor evaluates evidence in a visit that a learner has submitted against a task (via the Tasks screen on the visit), the Partially Complete button will appear when the config is enabled.
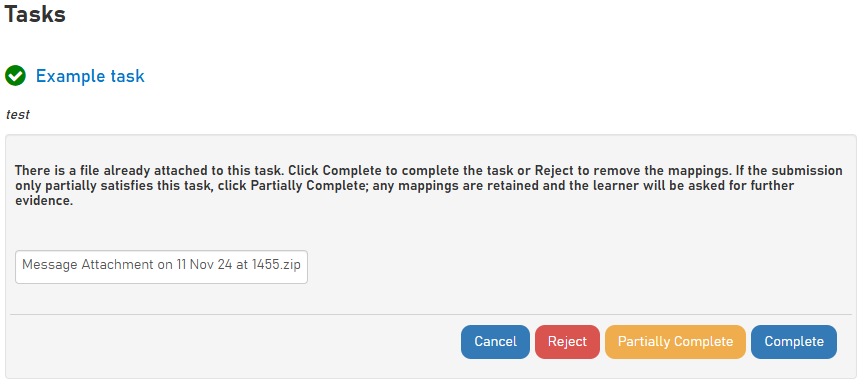
When the Partially Complete button is clicked, the assessor will be prompted to enter notes.
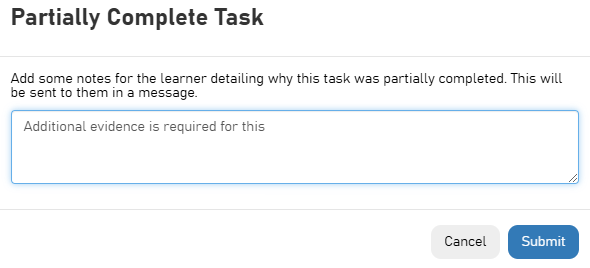
Click Submit to update the task status to partially complete.
The learner can then re-submit new or additional evidence against the task, which can be reviewed by the assessor in a visit. The visit Tasks tab will indicate how many previous evidence submissions there have been against the task.

The assessor can partially complete a task as many times as is required until they are satisfied that the evidence is suitable for the criteria.
Forms and Skill Scans on Behalf of Learners at a Branch Employer
Employer contacts associated with a parent employer can now complete forms and Skill Scans on behalf of a learner at a branch of the parent employer, providing that the configuration option Allow parent employer contacts at branches is enabled (this can be found in the Employer Login | General section of the System Configuration screen).
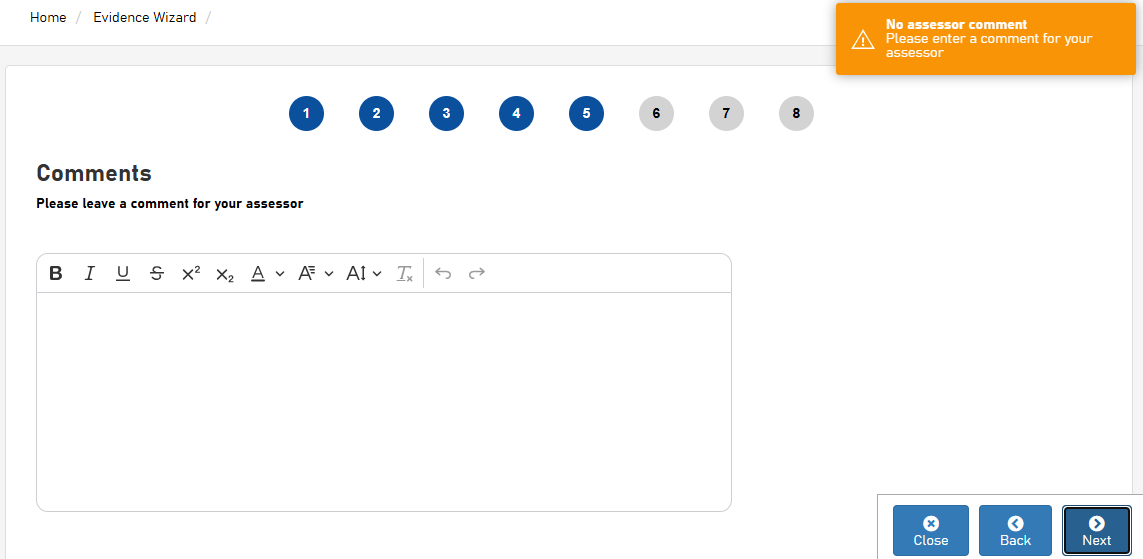
Mandatory Comments for Assessors in Evidence Wizard
A configuration option is now available which makes it mandatory for a learner to include a comment for their assessor when submitting evidence via the Evidence Wizard.
-
Go to Settings on the sidebar.
-
Click the System Configuration button.
-
Go to Learner Login on the left (under the Maytas Hub Online header).
-
Locate the Evidence Wizard section on the right.
-
Tick the box for the config Mandatory comment for assessor and ensure the toggle button is set to ON.
-
Click Save.
When a learner gets to the relevant step in the Evidence Wizard, they will no longer be asked if they wish to leave a comment and will instead be presented with the comment box. If the Next button is clicked before a comment has been entered, the learner will be notified that they must enter a comment.
POT Termination Date on Widgets and Employees Page
A configuration option is now available which determines the learners / employees to show based on the POT termination date rather than their employment end date. To enable this:
-
Go to Settings on the sidebar.
-
Click the System Configuration button.
-
Go to Employer Login on the left (under the Maytas Hub Online header).
-
Locate the General section on the right.
-
Tick the box for the config Use Termination Date for employee links and ensure the toggle button is set to ON.
-
Click Save.
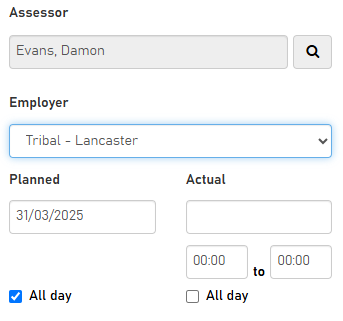
Set Employer Against Visit
Assessor users can now manage which employer (if any) is associated with a visit. This must first be enabled via a configuration option:
-
Go to Settings on the sidebar.
-
Click the System Configuration button.
-
Go to Assessor Login on the left (under the Maytas Hub Online header).
-
Locate the Visits section on the right.
-
Tick the box for the config Allow users to change the Employer linked to a visit and ensure the toggle button is set to ON.
-
Additionally, the config Automatically link employer to trainee visit (in the same section) can be set to automatically assign employers to visits. Tick the box for the config and select the default employment type to use when selecting the employer to assign to a visit. If this config is set but an employment type is not selected, the most recent employer for a learner will be used.
-
Click Save.
The Appointment tab of the visit editor will now include an Employer dropdown box, which includes the employers associated with the learner.
Option to Hide Projected Completion Date
A configuration option is now available to hide the Projected Completion Date field on the Learner Summary screen for assessor and employer users:
-
Go to Settings on the sidebar.
-
Click the System Configuration button.
-
Go to Assessor Login on the left (under the Maytas Hub Online header).
-
Locate the Progress section on the right.
-
Tick the box for the config Hide Projected Completion Dates and ensure the toggle button is set to ON.
-
Click Save.