Maytas Hub Release Notes
Technical specification
The latest Maytas and Maytas Hub technical specification can be found here.
Maytas Hub Release Notes – Version 5.30.9310.1
Default Permissions Group
Assessor, Trainee, Employer and Employer Contact user types can now be assigned a default permissions group, so that new users of that type are added to the default group. This must be enabled via a system configuration option:
-
Go to Settings on the sidebar.
-
Click the System Configuration button.
-
Go to Admin on the left (under the Maytas Hub Online header).
-
Locate the General section on the right.
-
Tick the box for the permission Apply default permission group to created users and select the user types you wish to enable the default permissions groups for.
-
Click Save.
To set a default permissions group:
-
Go to the Web User Editor on the sidebar.
-
Click the Groups tab.
-
Select the User Type you wish to set a default group for from the dropdown box.
-
A list of any existing permission groups for that user type will be displayed.
To set an existing group as the default, click the Set Default button for that group. Click OK on the confirmation message.

To create a new group and set it as the default:
-
Click the Add New Group button.
-
Enter a name and description and select the required user type, then tick the Set as Default checkbox.
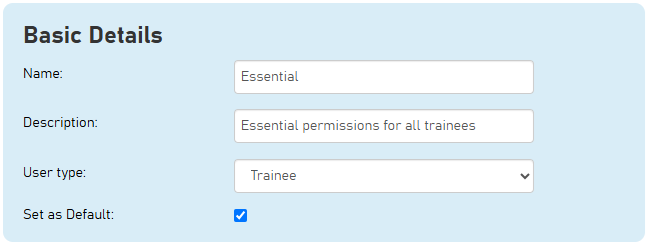
-
Click Save.
-
Set the permissions as required and click Save.
-
When you return to the Groups tab, the group will now show as the default for the relevant user type.

-
When a new user of the relevant type is created, they will now have the default permissions group assigned to them.

View Details - Resend Email
The email field that is used for determining the recipient address when sending out password reset emails can now be set in a configuration option.
By default (i.e. if the config is not set), the field TRAINEE.EMAIL is used.
Any field used for email addresses can be specified from the tables TRAINEE, TRAINEEPOT, TRAINEEPOT2, TRAINEEINFO, TRAINEEDETAILS or TRFRAMEWORK.
To specify the field to use:
-
Go to Settings on the sidebar.
-
Click the System Configuration button.
-
Go to Admin on the left (under the Maytas Hub Online header).
-
Locate the General section on the right.
-
Tick the box for the permission Trainee Resend Email Field and enter the table and field name for the email field to use as the recipient address when sending out password reset emails. This should be in the format TABLE.FIELD, e.g. TRAINEE.EMAIL.
-
Click Save.
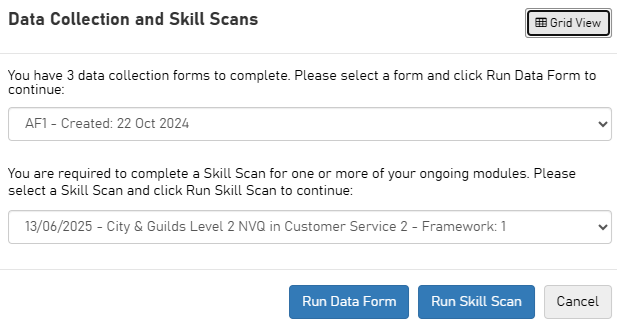
Data Collection - Default Grid View for Forms / Skill Scans to Complete
When a user has data collection forms or Skill Scans to complete and these are displayed to them in a modal pop-up window, the items to complete can now be defaulted to display in the grid view rather than the list view:
-
Go to Settings on the sidebar.
-
Click the System Configuration button.
-
Go to Admin on the left (under the Maytas Hub Online header).
-
Locate the Data Collection section on the right.
-
Tick the box for the permission Default Data Collection Modal to Grid View and ensure the toggle button is set to ON.
-
Click Save.
The pop-up window will now display in the grid view by default.
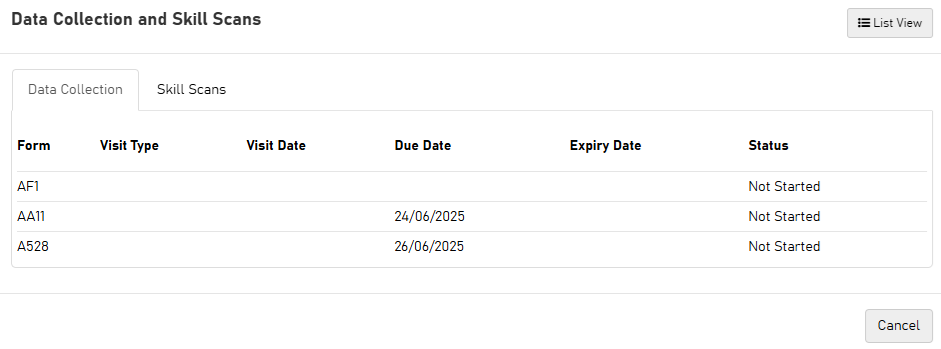
The list view can be displayed by clicking the List View button at the top-right.
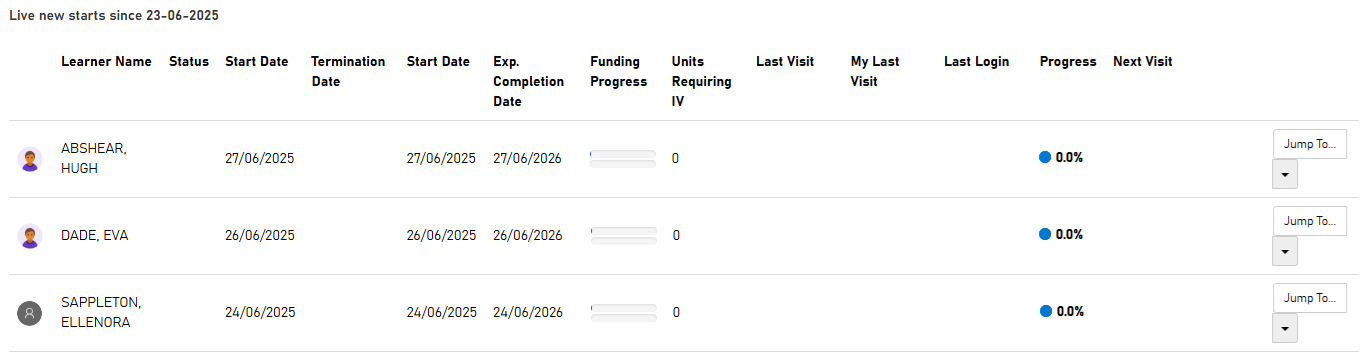
Assessor Dashboard - New Learners Widget
The assessor dashboard now includes a New Learners widget which shows how many learners have been added to the assessor's caseload recently. The dropdown box at the top-right of the widget can be used to show new learners in the last week, in the last month or since a date that the user can specify.
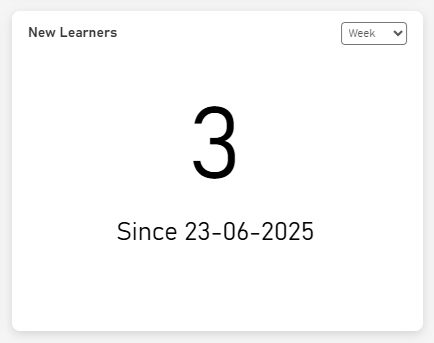
Clicking the date will show a list of the relevant learners.
Web User Editor - Reset Password
The Web User Editor now includes a Reset Password button on each user's account which will email the user a password reset link.
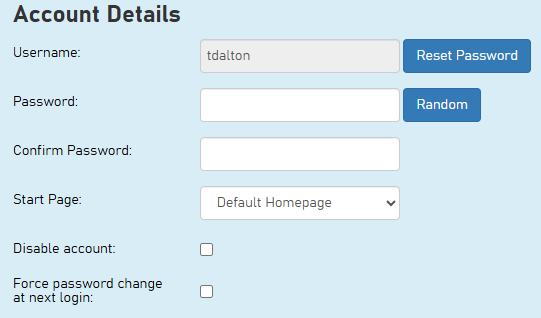
When the button is clicked, you will be asked to confirm the email address that the reset link will be sent to.
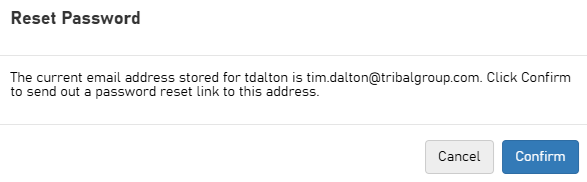
When the Confirm button is clicked, the password reset link will be emailed to the user.
The body of the email that is sent out is defined by the existing password recovery configuration option:
-
Go to Settings on the sidebar.
-
Click the System Configuration button.
-
Go to Admin on the left (under the Maytas Hub Online header).
-
Locate the General section on the right.
-
Ensure the box is ticked for the permission Email body for password recovery and edit the body as required.
-
Click Save.
Learner Journey Updates
Submitted Evidence
When evidence has been submitted against a learner's module and the required amount of evidence has been met, the module's status in the Learner Journey will now show as Submitted. Previously, this would show as Outstanding until the submission had been verified by an assessor, but this status now only used if the required evidence for the module has not been met.

Journey Items Past Planned End Date
A configuration option is available which allows the Learner Journey to show items that occurred after a learner's planned end date. When the config is enabled, the latest date the Learner Journey will show up to depends on several factors:
-
If the POT termination date is entered, the Learner Journey will show dates up until that date.
-
If the learner is still active and the learner's start date was less than a year ago, the Learner Journey will show dates up to one year after the POT start date, plus 90 days.
-
If the learner is still active and the learner's start date was a year or more ago, the Learner Journey will show dates up to the current date plus 90 days.
To set the config:
-
Go to Settings on the sidebar.
-
Click the System Configuration button.
-
Go to Learner Login on the left (under the Maytas Hub Online header).
-
Locate the General section on the right.
-
Ensure the box is ticked for the permission Extend the Learner Journey timeline past POT end date.
-
Click Save.
Data Collection - Form Information on Email
When a user is notified by email that they have a data collection form to complete, the email can now include the name of the form. This is done by including the {{FORMID}} tag in the email body configuration:
-
Go to Settings on the sidebar.
-
Click the System Configuration button.
-
Go to Assessor Login on the left (under the Maytas Hub Online header).
-
Locate the Data Collection section on the right.
-
Ensure the boxes are ticked for the following permissions:
-
Body of the email sent to existing users with a data collection form to fill out
-
Subject of the email sent to those with a data collection form to fill out
-
-
Edit the email body and subject as needed so that they include the {{FORMID}} tag, e.g.:
You are required to complete the form {{FORMID}}.The tag will retrieve the form's name from the relevant lookup. Note that a lower case {{formid}} will also work.
-
Click Save.
Re-Captcha on Application Forms
Re-captcha can be enabled on application forms to prevent spamming and malicious usage.
-
For customers whose system is hosted by Tribal, this change will automatically enabled.
-
For customers who manage their own systems on-premise, this must be enabled via an update to the web.config file (see the Maytas Hub Upgrade Guide for details).
Once enabled, application forms will have a captcha checkbox on the last page that prevents users from submitting until the captcha is verified.