Batch Profiling
Batch profiling can be used to schedule and run multiple profile measurements at once, rather than running them individually.
Please be aware that batch profiling has the potential to consume system resources, and hence could potentially affect the Maytas 5 performance for other users. In particular, it could cause slow performance if you have a large number of profiles to run, or if multiple batches were scheduled to run at the same time. In the large majority of cases we expect the impact to be negligible, but we recommend you consider this when deciding when and how to run or schedule any batch runs.
Also, we do not recommend scheduling batches which contain the same profiles to run at the same time. This should work in the majority of cases, but could cause one of the measurements to fail.
To enable batch profiling:
- Go to Tools | Edit Permissions.
- Select the appropriate user or group and select the Commands tab.
- Scroll down to the Profiling section.
- Set Batch Profiling to Visible and tick the Is Set box.
- Click Apply and restart Maytas 5 for the change to take effect.
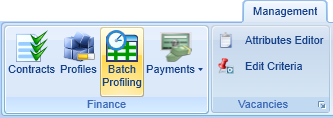
Once enabled, batch profiling can be started by going to Management on the toolbar and clicking Batch Profiling.

Create a New Batch
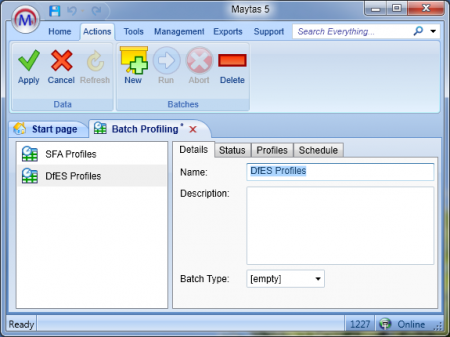
To create a new batch, click New on the ribbon. You will see the new batch appear on the left. There are four tabs for each batch:

Details
This contains the batch name and description. You can also select a batch type to optionally categorise the batch.
Status
This shows the status of batch, including whether the batch run is pending, the progress of each profile measurement in the batch and when the last run started and ended.
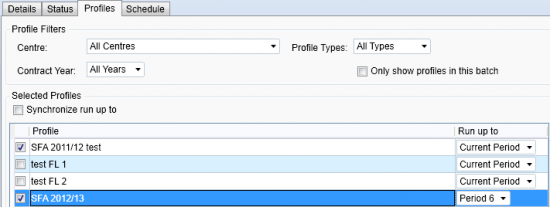
Profiles
Here you can choose which profiles to run a measurement for in the batch. When creating a new batch, ensure the Only show profiles in this batch box is un-ticked – this will list all the available profiles. You can filter down the list of profiles using the Centre, Profile Types and Contract Year filters.
Tick the boxes next to the profiles you wish to include in the batch. You can also choose which period to run a measurement up to.

Schedule
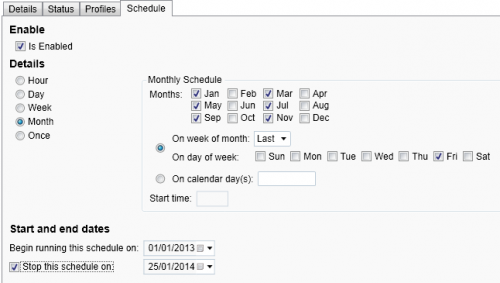
Here you can schedule when the batch will be run. Tick the Is Enabled box to enable scheduling for the batch.
Next, choose how frequently you wish to run the batch (hourly, daily, weekly, monthly or once). The timing of the schedule can then be configured – the interface for this is specific to each frequency:
- Hourly Schedule – This lets you run the batch every X hours and Y minutes. Enter the hours and minutes as required. Also enter the starting time (please note times should be entered in 24 hour clock format – e.g. 18:00).
- Daily Schedule – There are three options: Firstly, you can select which days of the week to run the batch; secondly, you can choose to run the batch every weekday; and thirdly, you can choose to run the batch every X number of days. You can also enter the time the batch should be run (please note times should be entered in 24 hour clock format – e.g. 18:00).
- Weekly Schedule – The batch can be run every X number of weeks (the default of 0 will run the batch every week). You can choose which days of the week the batch will run for each applicable week, and also the batch start time (please note times should be entered in 24 hour clock format – e.g. 18:00).
-
Monthly Schedule – Firstly, tick the months in which you wish to run the batch (i.e. Jan, Feb, Mar, etc).
Next, you can choose to run the batch for a particular week of those months (e.g. first week, second week, etc) and specify which days of that week it should run.
Alternatively, you can choose which calendar days the batch should run on the applicable months. The days should be comma-separated (e.g. 1,2,3 etc).
You can also enter the start time of the batch (please note times should be entered in 24 hour clock format – e.g. 18:00).
- One-time Schedule – This is option should be used if you want to schedule a one-time run of a batch. Simply enter the time when the batch should run (please note times should be entered in 24 hour clock format – e.g. 18:00).
Finally, enter the date from which the schedule should start and the date when the schedule should stop. If the start date is not entered, the schedule will be applied from the current date / time. Similarly, if the end date is not entered, the schedule will be applied indefinitely.

Other Features
If you wish to run a batch immediately, select the batch and click the Run button on the ribbon. Click Yes on the message which appears to confirm the batch run. You can then click the Status tab to view the progress of the batch run. Please note that this will not interfere with any scheduling which has been set for the batch.
If you wish to abort a batch run in progress, select the batch and click the Abort button on the ribbon. Click Yes on the message which appears to confirm abortion.
If you wish to delete a batch, select the batch and click the Delete button on the ribbon. Click Yes on the message which appears to confirm deletion.