Maytas 5 Basics
General Layout
Home Screen
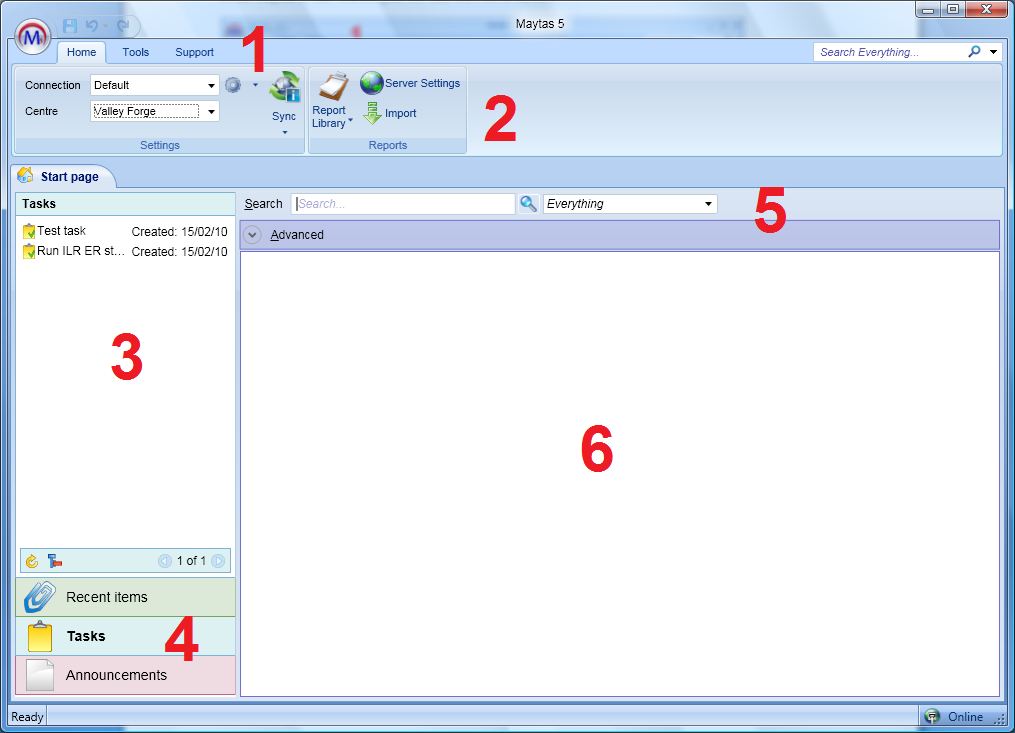
Once Maytas 5 has started you will see the Home screen:

1. The Toolbar
The toolbar contains some of the most commonly used tools in Maytas 5.
2. The Ribbon
The ribbon is a collection of tools which changes depending on which area of the system you are viewing.
3. The Start Page Panel
The Start Page panel shows one of the following sections depending on what is selected:
Recent Items
Recent Items shows a list of items that have recently been viewed. Items can include users, tabs and reports. Clicking an item in the list will open it.
Tasks
This shows a list of user-created tasks which act as a record and reminder of important and upcoming jobs to do.
Announcements
The Announcements panel can be configured to show an RSS feed from a web source of your choice.
4. The Recent Items, Tasks and Announcements Buttons
Selecting one of these will display the relevant section in the Start Page panel.
5. The Search Tool
The search tool lets you search for anything in the system, such as learners, reports or tabs. The search tool can also be found at all times at the top-right corner of Maytas 5.
6. The Results Panel
The results panel on the Home screen is where search results are shown.
The Toolbar

The toolbar is visible in Maytas 5 at all times. At the top-left corner is the M5 logo. Clicking this will open a small panel where you can:
- save work in progress.
- open recent items.
- add a new trainee, assessor, employer, task, vacancy or report to the system.
Next to the M5 logo are buttons to save work, undo an action or redo an action.
Underneath this are tabs for the different areas of the ribbon - Home, Tools, Management, Exports and Support. Selecting each of these will display a different set of options on the ribbon. Additional contextual tabs will appear when using certain parts of the system. For example, the Design tab will appear when editing a tab.
The Ribbon

The ribbon is a dynamic, contextual toolbar which resides near the top of the screen. Items on the ribbon will change depending on where you are in Maytas 5 in order to provide you with the most relevant controls to your current task. Different areas of the ribbon can be manually accessed by selecting a tab from the main toolbar (the image above is the ribbon for the Tools tab).
Each ribbon is split into panels which group buttons under topics. For example, the Screens panel shown above allows you to create or load a screen (or tab), publish or un-publish screens and import/export screens.
The Search Tool
The Maytas 5 search tool allows you to search for any item in the system, including:
To search for an item, enter your search term in the left box and click the magnifying glass (or press enter). The drop-down box on the right filters results. By default this is set to Everything, which shows all possible results, but alternatively you can choose one of the categories listed above.
Click the  button (or press enter on the keyboard) to start the search.
When searching for learners, the list of results may contain greyed-out entries. These are learners with no active POT (i.e. terminated learners).
Advanced Search

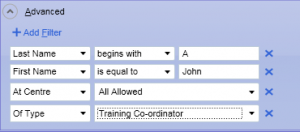
Below the main search box is an advanced filter which can be expanded by clicking Advanced. The default advanced filters differ depending on what is selected for the basic filter, and these can be added, removed or changed as required.
The filters are available for the different search types as follows:
| Personnel | Employer | Trainee | Vacancy | Remote Reports | Maytas Reports | |
|---|---|---|---|---|---|---|
| Last Name | Y | Y | ||||
| First Name | Y | Y | ||||
| NI No. | Y | |||||
| Postcode | Y | Y | Y | Y | ||
| Title | Y | Y | ||||
| DOB | Y | |||||
| In Training | Y | |||||
| On Scheme | Y | |||||
| At Centre | Y | Y | Y | |||
| Of Type | Y | Y | ||||
| Include Obsolete | Y | |||||
| Name | Y | Y | Y | |||
| Branch | Y | |||||
| Description | Y | |||||
| Location | Y | |||||
| Employer Name | Y | |||||
| Date Taken | Y | |||||
| Skills Contains | Y | |||||
| Ref | Y | |||||
| Occ Code | Y | |||||
| Category | Y | |||||
| Sub Category | Y | |||||
| ID | Y | Y | Y | Y |
Most of the filters let you choose one of the following search criteria:
- begins with
- is equal to
- contains
- is greater than
- is less than
The search term can then be entered in the third box. No wild card characters (e.g. a percentage symbol) are required in the search term.
The In Training filter requires a single date. This will filter by learners who were in training on that date (inclusive of learning start and end dates).
The On Scheme, At Centre and Of Type filters display a list of schemes, centres and types to filter by.
The Include Obsolete filter has a checkbox to indicate whether to include obsolete employers in your search results.
To add a filter, click the +Add Filter button. To remove a filter, click the X at the end of the filter.
Custom Search Fields
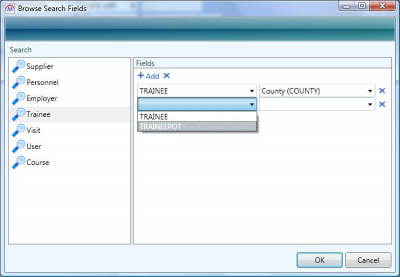
There are a wide variety of extra fields which can be added to the search filters. To add a custom search field:

- On the Maytas 5 toolbar, select Tools.
- Select Fields from the Search panel of the ribbon.
- The window that appears displays field categories on the left. Select the appropriate category.
- Click +Add.
- Choose the table from the left dropdown box and the field to search by from the right dropdown box.
- To add more search fields, click +Add again.
- To remove a field from the list, click the blue X at the end of the row.
- Click OK when finished.
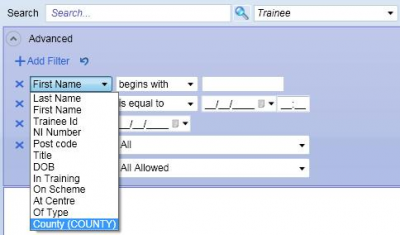
Now when you do an advanced search, the extra field will be available in the field list for filters.

You can also configure which fields are displayed for each learner in the search results (e.g. address, NI number, date of birth, etc):
- Go to Tools on the toolbar.
- Select Fields from the Search panel of the ribbon.
- Click the Returned Fields tab.
- Un-tick any fields which you do not wish to display in the search results.
- Click OK.
Keyboard Shortcuts
Toolbar options in Maytas 5 can be navigated using only the keyboard. This can aid quick navigation in many circumstances, especially for data entry users. The principles are very basic, and will be familiar to anyone who uses Microsoft Office shortcuts:
- Press Alt on your keyboard to display the shortcut prompts.
- Press the indicated key to activate a menu or button.
- Use the arrow keys and enter key to navigate menus.

As an example, here are the shortcut keys for the main toolbar options (F, H, T, M, X and S). Note that the save, forward and backward shortcuts are greyed out in this context as there is currently nothing to save or move forwards / backwards. If we press T, the Tools toolbar is selected and the following options appear:

Note that some of the shortcuts here have two letters – simply enter them both to activate that shortcut.