Contact Management
The Contact Management module requires a licence – please contact your account manager for more information.
The Contact Log allows you to maintain a comprehensive log of all contact with learners, assessors and employers. It can be opened by clicking Home on the toolbar and Contact log on the ribbon.

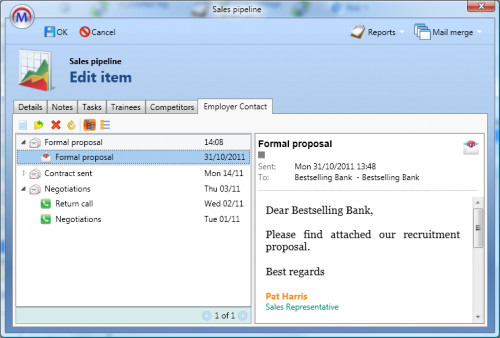
It is also integrated into the Employer Contact tab of sales pipeline opportunities, as shown below:

To add a contact entry, click the  button and choose one of the contact options:
- E-mail – This will prompt you to search for and select a recipient (trainee, assessor or employer). It will then open a new e-mail window in Microsoft Outlook (if available). Once the e-mail has been sent, it will be added automatically to the contact log. Please note that if Outlook is not available, a window will appear instead which allows you to enter the e-mail details (please note that this method simply records the e-mail rather than sending it).
- Phone – This will open a window where the details and summary of a phone call can be entered.
- SMS – This will open a window where the details and content of an SMS/text can be entered.
- Letter – This will open a window where the details and content of a letter can be entered.
- Meeting – This will open a window where the details and content of a meeting can be entered.
Once log items have been added, click the arrow to the left of a log to expand its contents. Entries can be viewed by clicking them. Additional entries can be added to an existing log by right-clicking the log and selecting Add | Current and then the type of entry you wish to add.
There is also an alternative List View which simply lists all the entries. Click the  button to view this mode. To return to the Hierarchy View, click the
  button.
To open an entry, select it and click the  button. To delete an entry, select it and click the
  button.
To refresh the list of entries, click the  button.
SMS Text Integration
Text messages can be sent directly from the contact log. Please note that this requires a TextAnywhere account – please visit http://www.textanywhere.net/ for details.
Before this feature can be used, your TextAnywhere client credentials must be entered into the system config:
- Log into Maytas as a user with access to the system config editor.
- Click the M button at the top-left and select Options.
- Select SMS Text Integration under the Maytas 5 header.
-
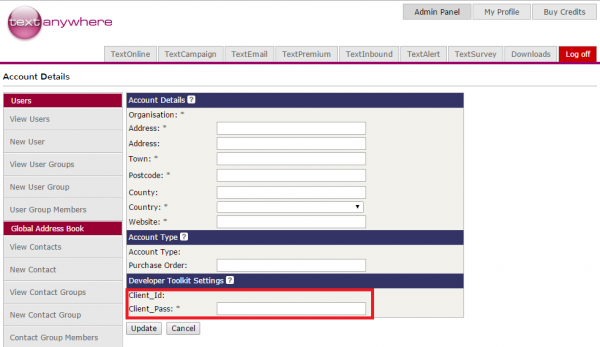
Complete the TextAnywhere username and TextAnywhere password configs with your credentials. Please note that the required credentials are not the ones you use to login to TextAnywhere - they are the Client_Id and Client_Pass values which can be found in your TextAnywhere account, in the Admin Panel under Developer Toolkit Settings.

- Click OK.
Texts can then be sent from the contact log as follows:
- On the Home screen, click Contact log.
- Click the
 button and select SMS.
 - Select the person to send the text to (this can be a learner, assessor or employer). Please note that the recipient must have a mobile number entered against their user account in the Mobile field (not the Telephone field). For employers, the mobile number of the listed assessor contact will be used.
- Enter the subject and message.
- Tick the Relay the text to SMS box and click OK. The text will then be sent.
Auto-Communication
The Reports Centre allows you to schedule a report which will automatically send an email or SMS to a list of learners, assessors or employers in the report. This is done by creating a mail merge report in Report Generator, configuring it for auto-contact and then deploying it in the Reports Centre.
For details on this, click here.