Reports Centre
The Reports Centre gives you simple but extensive control over how your reports are run. It allows you to save parameter selections, hide parameters, choose the output format and make reports available for specific individuals and groups. This applies to all reports within Maytas 5, including those created in Report Generator, the standard reports library and any bespoke reports you may have.
Report scheduling and auto-communication features have now moved from the Reports Centre to the Scheduler.
Add a Report
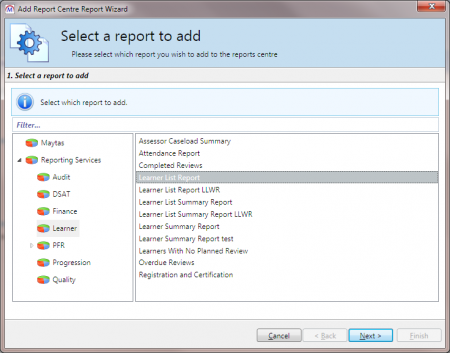
Reports can be added to the Reports Centre so that they run with your specific requirements, without having to set the parameters each time. The following example shows how to add an instance of the Learner List Report which will automatically show starters grouped by assessor for the contract year to date.
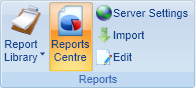
- To access the Reports Centre, click the Reports Centre button on the Home tab.
- Click Add Report at the top left of the screen.
-
You will be asked to choose a report from either the Maytas section (i.e. reports created in Report Generator) or Reporting Services (i.e. all other reports, including the reports library). This is the same set of reports that are visible in the reports library list.
For this example, click the arrow to the left of Reporting Services, click Learner and click Learner List Report on the right. Click Next when ready.
-
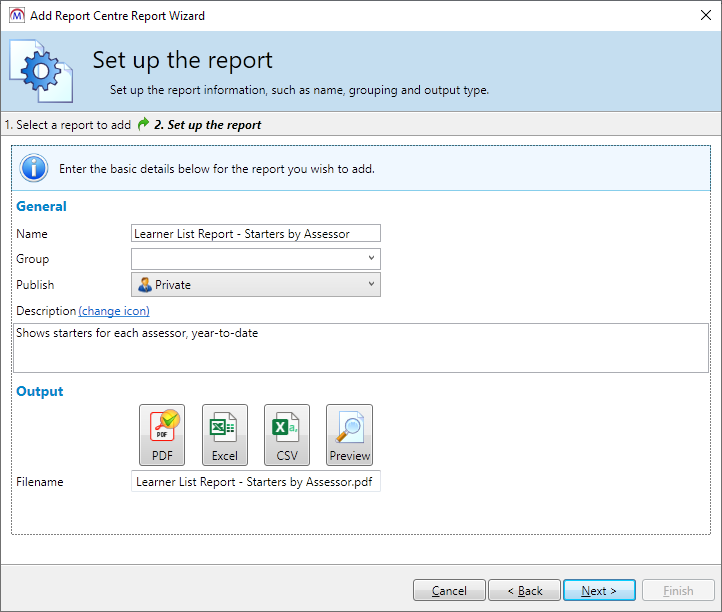
Next, the following details can be configured:
None of the below settings will affect the original version of the report. All reports added to the Reports Centre are separate instances, only available through the Reports Centre, and the original versions of the reports remain as they were in the Reports Library list.
- Name – This is the name of the report instance.
- Group – This optionally lets you select or add a header under which the report will appear. This could be used for multiple reports so that they each fall under the same header.
- Publish – This lets you choose whether to publish the report globally (i.e. for all users), to a group of users or for yourself only (Private). If you choose Group, you will be prompted to choose the user group.
- Description – A brief description of the report instance.
- Output – This lets you output the report to PDF, Excel or CSV, or a preview screen (the default option). If you choose the preview option, there is also a tick box which will open the report in a pop-up window.
These settings can be changed at any point after the report has been added. For this example we will publish the report privately and output to PDF. Click Next when ready.
-
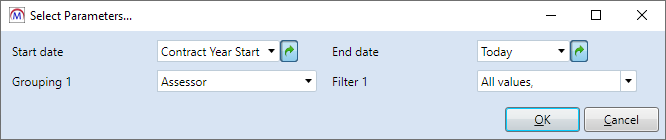
The next screen allows you to setup the parameters. There is a tick box next to each parameter – if it is ticked, this means it will be shown when the report is run. If it is un-ticked, the parameter will be hidden. This is useful if you don’t need to change the value of a parameter.
You can also change the default value of each parameter, just as you would change the parameters when running a report. However, changing them here will save your choices when the report is run from the Reports Centre.
Date parameters will default to specific dates. However, they can be setup to change the date dynamically – e.g. so that it uses the current date. To do this, click the calendar button next to the date parameter so that it changes to a green arrow. You will now be able to choose the appropriate option (e.g. today, week start, week end, month start, month end, etc.).
For this example, we will configure the parameters as follows:
- Start date – Click the calendar, then choose Contract Year Start from the dropdown list.
- End date – Click the calendar, then choose Today from the dropdown list.
- Exclude suspended learners – Leave this as the default option and un-tick the box.
- Exclude obsolete assessors – Leave this as the default option and un-tick the box.
- Grouping 1 – Choose Assessor.
- Filter 1 – Leave this as the default option.
- Grouping 2 to 5 – Choose No grouping for each of these and un-tick the boxes.
- Filter 2 to 5 – Leave these as the default option and un-tick the boxes.
- Learner type – Choose Starters and un-tick the box.
- Ready to run - Choose Yes and un-tick the box.
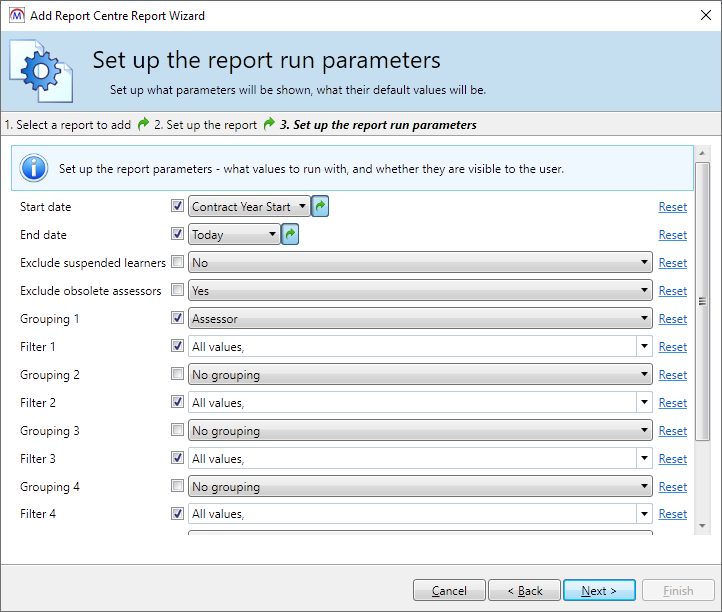
- Click Next, then click Finish.
The report will now be listed in the Reports Centre.
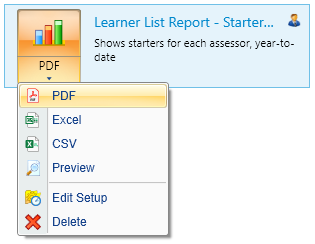
To run the report, click the graph button next to it. The parameter window will appear with the new default values and only the parameters which were left ticked.
Click OK to accept the values and run the report. Because the report was set to output as a PDF, you will be prompted to save the PDF to your hard drive. Choose a location and click Save. The report will then open.
You can also quickly export to other formats by clicking the arrow at the bottom of the report button and choosing PDF, Excel, CSV or Preview. From here you can also delete the report instance (please note that this will only delete this instance of the report from the Reports Centre – it will not delete the original report) or click Edit Setup to change any of the settings.
Auto-Communication
The Reports Centre allows you to schedule a report which will automatically send an email or SMS to a list of learners, assessors or employers in the report. This is done by creating a mail merge report in Report Generator, configuring it for auto-contact and then deploying it in the Reports Centre.
Configuration Settings
There are a number of auto-communication settings which can be configured before use:
-
In Maytas 5, click the M5 button at the top-left and select Options.
-
Select Auto Contact on the left (under the Maytas 5 header).
-
Configure the options as required:
Configuration option Details Contact Log Username If you wish to record contact log entries created by auto-comms against a specific user, enter their Maytas 5 username Message footer Enter the footer text for auto-comm messages Max Contacts in Period This sets the maximum number of auto-comm messages that can be sent to a contact in a contact period Max Contacts per run This sets the maximum number of auto-comm messages that be sent out each time an auto-comm is run Period Length (Days) This determines the length of a contact period in days, which has an impact on the Max Contacts in Period option. For example, if both options are set to 1, this means each contact will receive a maximum of one message from auto-comms per day. Scheduling Verbose Logging When enabled, additional details are included in the scheduling log. The data service should be restarted when this option is changed. -
Click OK and restart Maytas 5.
Configure the mail merge report
A report must be set up for mail merge and configured for the auto-communication settings. The report must at minimum contain the following:
- A list of learners, assessors or employers
- Their ID fields (e.g. TRAINEEID, ASSESSORID or EMPLOYERID)
- Their email addresses and/or phone numbers (depending on whether you want to send them emails or SMS, or both).
Several standard reports have been provided for this which can be used or amended as required. These can be imported as follows:
- On the Home tab, click Edit on the Reports panel of the ribbon.
- Click Import.
- Browse to the Maytas 5\Extras\Auto-communications reports folder of the upgrade.
- Select the first report and click Open.
- Click OK on the message which appears.
- Repeat steps 2 to 5 to import the remaining reports.
-
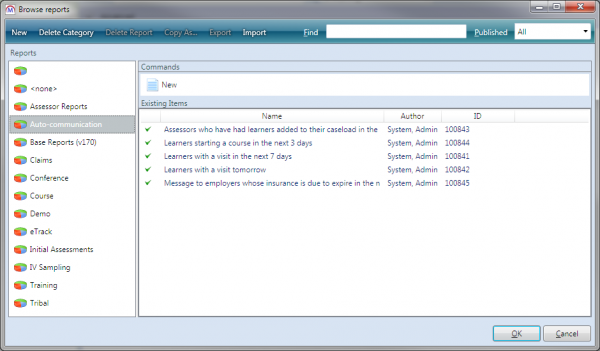
The imported reports can be found in the Auto-communication folder of the Browse Reports screen:
Once you have chosen a report, open it for editing in Report Generator:
- On the Home tab, click Edit on the Reports panel of the ribbon.
- Select the report and click OK.
- Click Run to run the report.
- To set up the report for email (this step is not required for SMS):
- Go to Mail Merge | Create new…
The mail merge document will open in the background. This document will be used to produce the email body. You can enter any text you like and then insert mail merge fields for things like the learner name and email address, which will use the relevant data when the auto-communication is sent out.
To insert a mail-merge field, click the Insert Merge Field button on the document's ribbon and select the required field.

At minimum, this requires the relevant ID field (ASSESSORID for assessors, EMPLOYERID for employers or TRAINEEID for learners) and the email field.
The available fields are determined by the fields included in the report. If additional fields are required, simply add them to the report.
An example mail merge document would be:
Dear «TRAINEE_FIRSTNAME» «TRAINEE_LASTNAME»,
Please find your details as follows.
Your ID: «TRAINEE_TRAINEEID»
Your email: «TRAINEE_EMAIL»
Once sent out to, for example, a learner named John Smith with ID 9999-0001-123456 and email address jsmith@tribalgroup.com, it would translate as follows:
Dear John Smith,
Please find your details as follows.
Your ID: 9999-0001-123456
Your email: jsmith@tribalgroup.com
- Save the document.
- When prompted, enter the mail merge name, select the action as Email, enter the email subject line and click OK.
- Sync and re-open the report editing screen.
-
Click Set up Auto Contact.
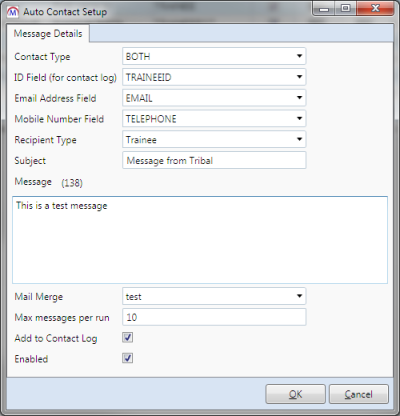
- The Contact Type lets you configure the report for sending SMS, email or both. You will not be able to select these options if the relevant system config options are not present:
- For email, the config can be found under Maytas 5 | Admin | Maintenance and is called The SMTP server for sending emails in Maytas.
For SMS, the configs under Maytas 5 | SMS Text Integration must be completed.
For this example, we will use BOTH.
- Set the ID field to the relevant ID (e.g. TRAINEEID, ASSESSORID or EMPLOYERID, although alternative ID fields can be selected if needed).
- Select the field to use for the email address and mobile number. Again, these do not necessarily need to be the standard EMAIL or TELEPHONE / MOBILE fields.
- Choose the recipient type (e.g. for a list of assessors, choose Assessor).
- Enter the subject, which is used as both the SMS and email subject.
- Enter the SMS message.
- Select the mail merge to use for the email body.
- Max messages per run determines the maximum number of messages that can be sent every time the schedule is run (if you choose BOTH rather than just email or just SMS, a max of 10 would mean a max of 10 emails and 10 SMS, not 5 of each). Amend this as required.
- If you want to add sent messages to the contact log, tick the Add to Contact Log box.
- To make the report available for scheduling, tick the Enabled box.
- Click OK, then click Apply.
Schedule the report in the Reports Centre
Once the report has been configured, it should be scheduled in the Reports Centre:
- Go to Home | Reports Centre.
- Click Auto Contact and select Create new…
-
Select the report to use and click Next.

- On this screen, amend the subject and message as required (they will default to the values entered in the Auto Contact Setup window) and click Next.
-
If the report has any parameters, set them up as required and click Next.
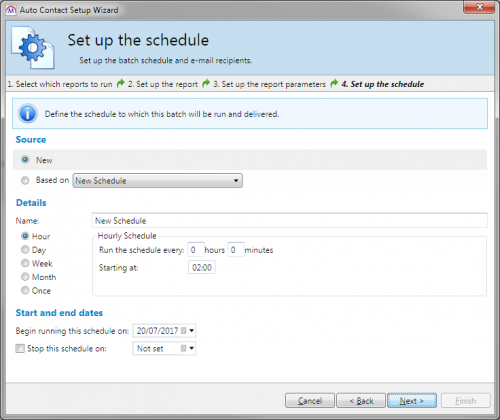
- On this screen, the schedule can be configured. If you have an existing schedule, you can choose it by clicking Based on and selecting it from the list. Otherwise select New.
- Set the schedule in the Details section. It can be set to run periodically (e.g. every hour, day, month, etc) or just once at a specified time. Please note that if you intend to start the schedule immediately, the start time should be at least 10 minutes in the future to ensure it is picked up by the system.
- Set the start date at the bottom of the window. The schedule will run indefinitely by default, but if you want the schedule to end on a particular date then tick the Stop this schedule on box and set the date.
- Click Next, then click Finish.
The schedule will now run as defined. To view or edit a schedule, click Auto Contact and click the  button next to the relevant schedule, which will take you to a screen containing the same details as the wizard.
autocomm autocomms auto-comm auto-comms