How to Create a New Vacancy
- In Maytas 5, click the M5 logo at the top-left of the screen and select New | Vacancy.
- Enter a description for the vacancy.
- If you wish to assign the vacancy to an employer, click the
 button to open the search window. Enter a search term and click the
  button to search for an employer. Select the employer from the list and click OK.
 - Click Next.
-
You will be asked if you wish to create a vacancy from a template. For this example, click No to create a new vacancy from blank. Please see the How to Create a New Vacancy from a Template tutorial if you wish to create a vacancy from a template.

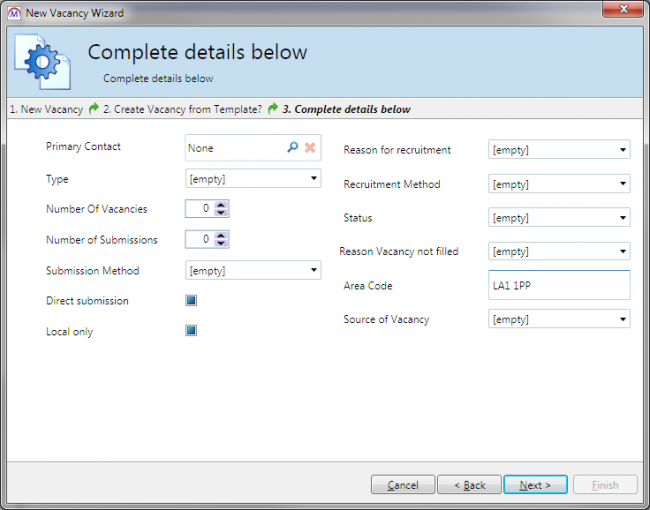
- Next, the vacancy details must be entered:
- Primary Contact – Allows you to search for and assign personnel to the vacancy.
- Type – The type of vacancy (e.g. the job title). You can either choose an option from the list or enter a new option.
- Number of Vacancies - The number of vacancies available.
- No. of Submissions – The number of submissions available.
- Submission Method – The required submission method for the vacancy. You can either choose an option from the list or enter a new option.
- Direct Submission – A tick indicates that the learner can send their application directly to the employer.
- Local Only – A tick indicates that the vacancy is only available for internal personnel.
- Reason for Recruitment – The reason for the vacancy. You can either choose an option from the list or enter a new option.
- Recruitment Method – The method of recruitment for the vacancy. You can either choose an option from the list or enter a new option.
- Status – The current status of the vacancy (open or closed).
- Reason Vacancy not Filled – The reason the vacancy has not yet been filled. You can either choose an option from the list or enter a new option.
- Area Code – This should be left blank as Maytas will complete it with the employer’s postcode.
- Source of Vacancy – The source of the vacancy. You can either choose an option from the list or enter a new option.
- Click Next then click Finish.