Vacancies
Creating Vacancies
The Vacancies module allows you to create vacancies for an employer and match learners to them based on their skills.
The following tutorials detail how to create vacancies:
How to Create a Vacancy Template
How to Create a New Vacancy from a Template
Overview
Configuring Vacancies
Job Card
Each vacancy has a job card which contains detailed information about the job, such as the job specification, required skills and qualification, pay rates and benefits.
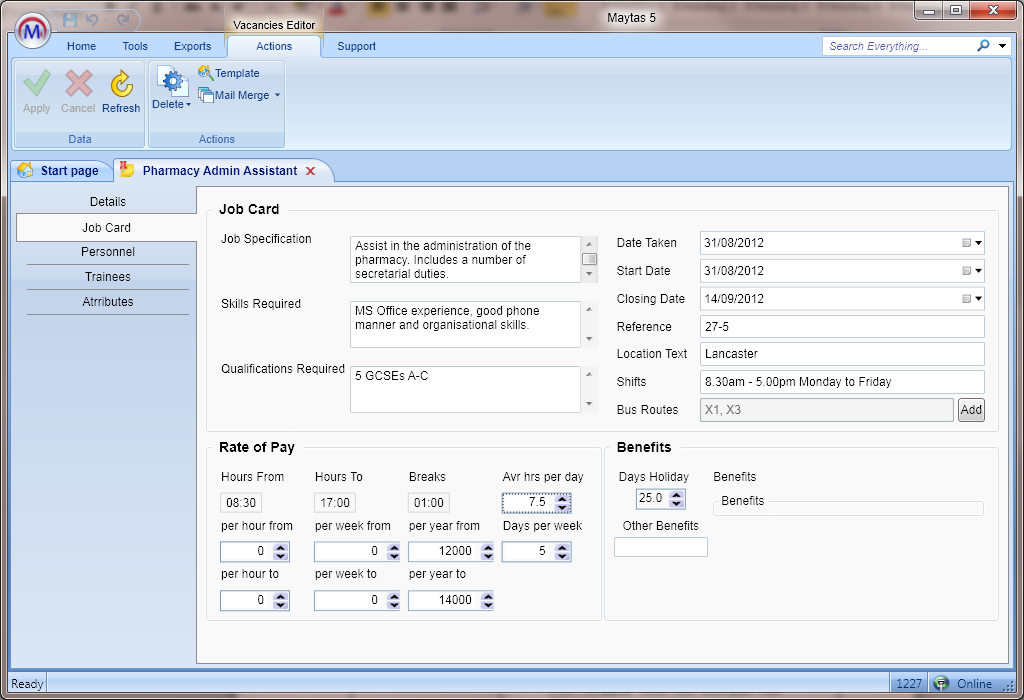
- Job Specification / Skills Required / Qualifications Required – Descriptions for the job spec and any skills/qualifications required.
- Date Taken – The date you were notified of the vacancy.
- Start Date – The date the vacancy starts.
- Closing date – The date the vacancy closes.
- Reference – This is automatically completed from the vacancy ID, but can be overwritten if required.
- Location Text – This is automatically completed with the second line from the employer’s address, but can be overwritten if required.
- Shifts – A description of the job shifts.
- Bus Routes – Allows you to specify bus routes near the vacancy (see Bus Routes).
- Hours From / To – The start and end times of each shift.
- Breaks – The length of breaks during the day (e.g. an hour lunch break would be 01:00).
- Avr hrs per day – The average number of working hours per day.
- Per hour/week/year from/to – These determine the minimum and maximum rates of pay, either by hour, week or year depending on the type of pay. For instance, to record an annual salary between £12,000 and £14,000, enter 12000 in the per year from box and 14000 in the per year to box.
- Days per week – The number of days worked each week.
- Days Holiday – The number of holiday days per year (or for the duration of the job, if temporary).
- Other Benefits – Details of any other benefits.
Bus Routes
The Job Card tab on a vacancy allows you to specify bus routes which run near the vacancy. To set up bus route details:
- On the Job Card tab, click Add next to Bus Routes.
- Click the
 button.
 -
Enter the postcode the bus route applies to and the bus service number, then click OK.
The intention is that for a certain postcode (e.g. an employer’s postcode), each bus service that goes through that postcode would be entered. The intention is not to enter a bus route and then all postcodes which that route passes through.
-
Add additional bus routes as required.
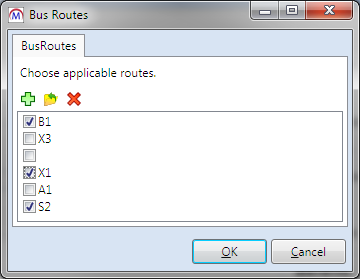
- Tick the bus routes which apply to the vacancy and click OK.
Personnel
Each vacancy allows you to assign personnel members to it via the Personnel tab. To add personnel to a vacancy:
- On the Personnel tab, click the
 button.
 - Click the
 button.
 - Enter a search term for the personnel member and click the
 button. Select the person from the list and click OK.
 - Enter the Start date for the vacancy association and, if required, the End date.
- Select the type of association, if required.
- Enter any notes regarding the association in the box at the bottom of the window.
- Click OK when finished.
Trainees
Each vacancy allows you to assign trainees to it via the Trainees screen. Here you can also search for trainees based on skills and add them to the vacancy.
Trainees Tab
To add a trainee to a vacancy:
- On the Trainees tab, click the
 button.
 - Click the
 button.
 - Enter a search term for the trainee and click the
 button. Select the trainee from the list and click OK.
 - Enter the Start date for when the trainee started the vacancy and, if required, the End date.
- Select the progress of the vacancy application, if required.
- Enter any notes in the box at the bottom of the window.
- Click the Events tab and click the
 button to add a new event. Vacancy events can be used to track the progress of a trainee’s vacancy application.
 - Choose a description for the event.
- Click the
 button to add personnel to the event if required.
 - Set the planned event start and end date/time.
- If the event has already occurred, set the actual date/time and the result. Otherwise these can be set at a later time.
- Enter any notes about the event.
- Click OK.
- Click OK to save the trainee vacancy record.
Search Tab
To search for trainees with particular attributes:
- Click the
 button under Criteria.
 - You will see a list of attributes. Tick the attributes you wish to search for.
- Click OK when finished.
- Click Search (please note that you can also tick the Ignore Termination Date box to include trainees who have left).
-
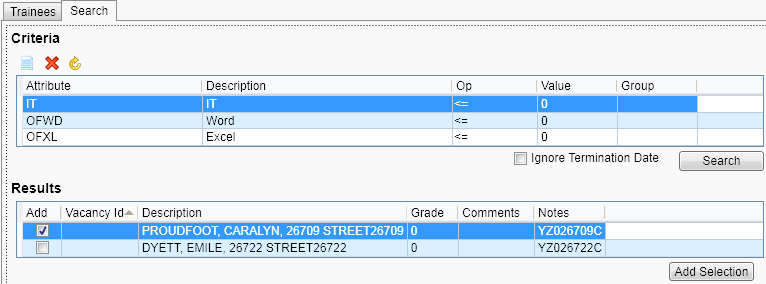
You will see a list of trainees who have any of the selected attributes assigned to them. To add trainees to the vacancy, tick the Add box to the left of the trainees and click Add Selection.
To view or edit the attributes assigned to a trainee:
- Open the trainee and go to the Vacancy screen.
- Click the Attributes tab.
- Any attributes currently assigned to the trainee will be shown here. To add new attributes, click the
 button.
 - Tick the attributes to add and click OK.
Attributes
The Attributes screen lets you assign the attribute / skill requirements for a vacancy.
- Click the
 button.
 - You will see a list of available attributes. Tick the attributes to assign to the vacancy.
- Click OK when finished.
Attributes Editor
The Attributes Editor allows you to add and manage your vacancy attributes.
To start the Attributes Editor, go to Management on the toolbar and click the Attributes Editor button.
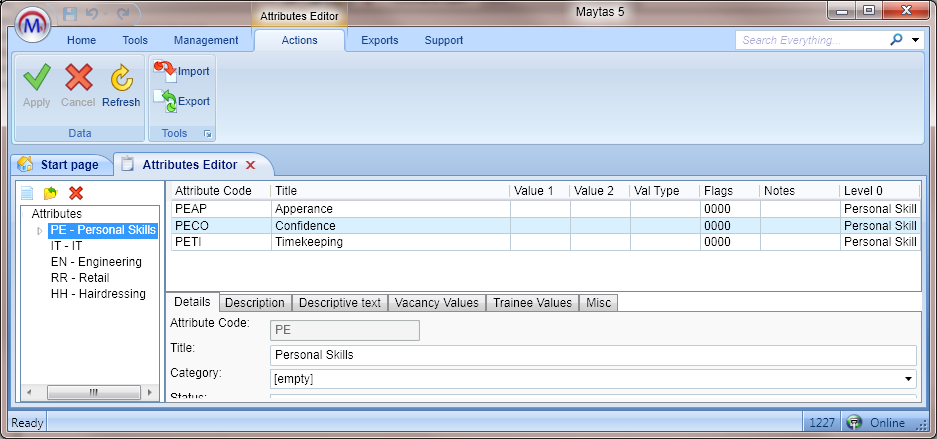
Attributes are listed on the left of the screen, and parent attributes can be expanded by clicking the arrow to the left of them. Select an attribute to see its details on the right.
How to Add a New Attribute
- In the Attributes Editor, click the
 button.
 - Complete the six tabs on the Edit Attribute window as required.
- Click Apply when finished.
Vacancy Criteria Editor
Advanced criteria can be set up for vacancy matching by going to Management on the toolbar and clicking the Edit Criteria button.
Some of the advanced features in the vacancy criteria editor are technically complex to configure and are beyond the scope of this guide. If you require further assistance, please contact Maytas Support.
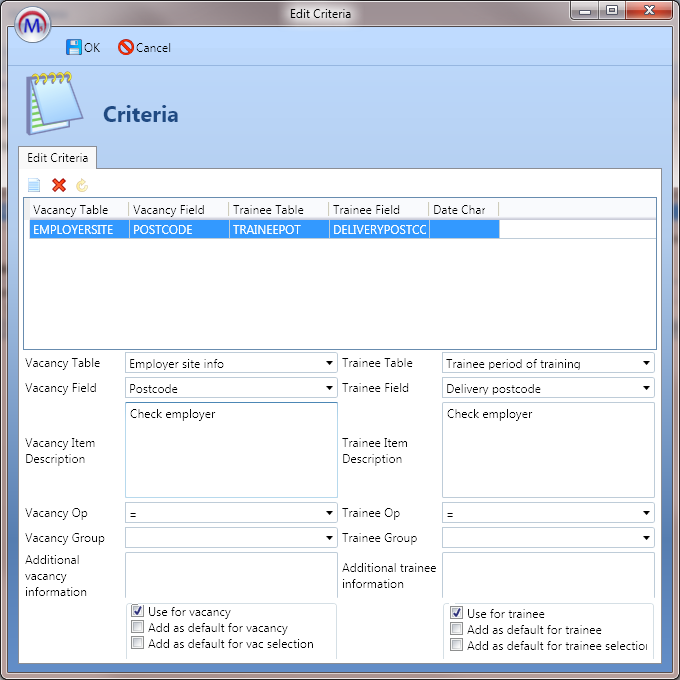
Add New Criteria
Please see the How to Add New Vacancy Criteria tutorial.
Vacancy Criteria Groups
Vacancy criteria groups can be created so that when searching for vacancies / learners, only one item must match from a group. For example, if group 1 consists of criteria A, B and C, and group 2 consists of D, E and F, only one of A, B or C and only one of D, E and F would need to be fulfilled to meet the criteria requirements.
The group value is alphanumeric and can be entered either in the Edit Criteria window or directly into the search criteria grid (shown below).
The below example shows the criteria for searching for trainees to add to a vacancy, with the criteria spread over two groups. To match, a trainee would need to have the IT attribute and one of EN, PE or ED.

Bulk Vacancy Matching
The Bulk Vacancy Matching tool allows you to match learners to vacancies in bulk. To enable this feature:
- Go to Tools | Edit Permissions.
- Select the user or group that requires the permission.
- Go to the Commands tab.
- Scroll down and expand Vacancies Module.
- Select Visible from the dropdown list for the Bulk Match Vacancies permission.
- Click Apply on the ribbon and restart Maytas.
To access Bulk Vacancy Matching, go to Management on the toolbar and click BulkMatch on the Vacancies panel of the ribbon.

The general process of bulk vacancy matching is as follows:
- Specify criteria for the vacancies to search for.
- Select the vacancy you wish to match on (or select all applicable vacancies).
- Specify criteria for the learners you wish to search for.
- Assign learners to vacancies from the results as required.
The first screen lets you specify criteria on which to filter the vacancies. Any criteria defined in the Edit Criteria screen as default for vacancies will be automatically listed. If you add no criteria, all vacancies will be listed up to the maximum number specified.
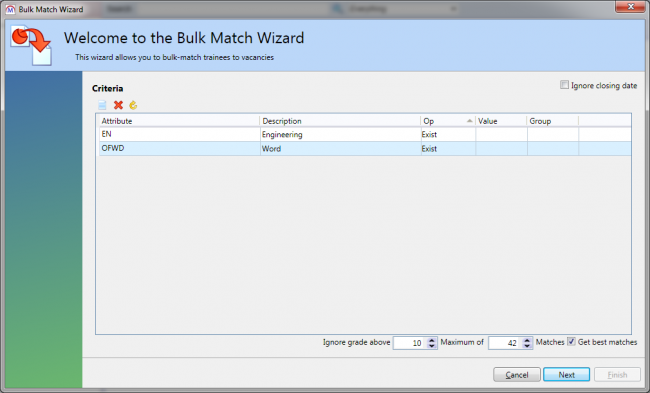
To add criteria:
- Click the
 button.
 -
The attributes window will appear. Expand the categories and select the criteria you wish to search on. Click OK when finished.
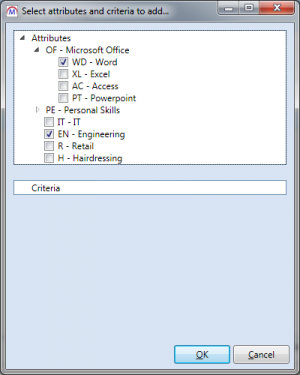
The criteria will be listed. Please note that the results will include vacancies which match ANY of the selected criteria. For example, in the above screenshot, the results would show vacancies which require engineering OR Microsoft Word.
The Group column can be used to change logic so that ALL criteria in a group must be matched. In the following example there are four pieces of criteria split into two groups:

In logical terms this means that learners must have (EN and OFWD) or (IT and OFXL) to be matched. E.g. If a learner has EN but not OFWD, they would not be matched on group 1.
To remove criteria, select it and click the  button.
If you wish to include vacancies which have gone past their closing date, tick Ignore closing date at the top-right.
The filters at the bottom allow you to ignore vacancies which are graded above a particular number (10 is the default) and only show a maximum number of results. The Get best matches option allows you to order the results by their grade.
Click Next when ready.
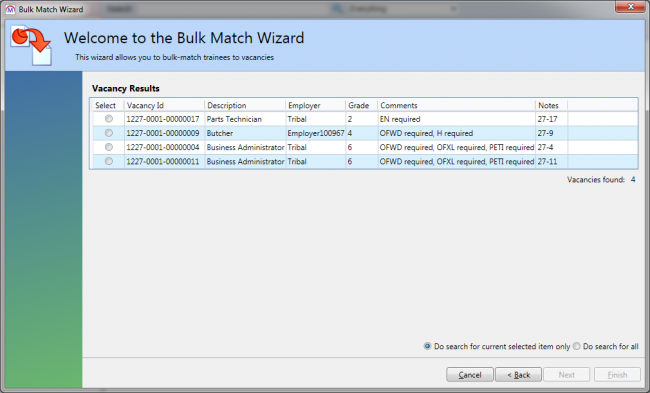
On the second screen you will see the vacancy results based on the selected criteria. If you wish to match learners to a particular vacancy, select it from the list. If you wish to match learners to any of the vacancies from the results, select Do search for all at the bottom-right.
You can view a preview of a vacancy by double-clicking it.
Click Next when ready.
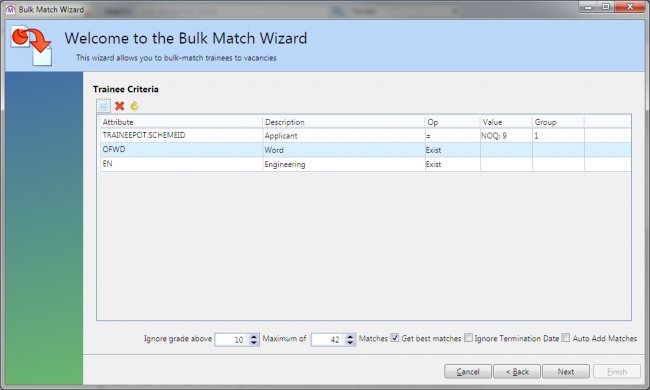
The third screen lets you specify the criteria on which to filter the learner results. If you wish to include all applicable learners, remove all criteria.
To add criteria:
- Click the
 button.
 - The attributes window will appear. Expand the categories and select the criteria you wish to search on. Click OK when finished.
As with the vacancy criteria screen, there are filters for ignoring grades above a certain level, only showing a maximum number of results and ordering by the best matches. There is also an option to automatically add any matched learners to vacancies (Auto Add Matches).
Click Next when ready.
The fourth screen will work through each vacancy in the results and check for matches from the learner results. When finished, you will automatically be taken to the fifth screen.
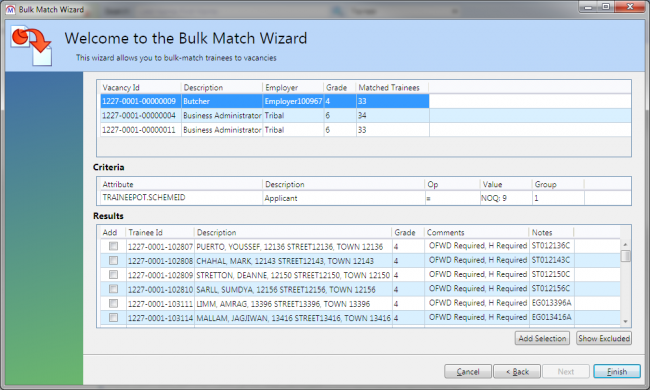
The fifth screen is where you can add learners to vacancies:
- Select a vacancy from the list at the top of the screen.
- The learners matched with that vacancy will be listed at the bottom of the screen. Tick the box (on the left) for each learner you wish to add to the selected vacancy. You can select all learners by right clicking one and selecting Select All. There is also an option when right-clicking to Select All Grade 0, which will select all learners with a match grade of zero.
- Click Add Selection.
- Repeat for each vacancy as required.
- Click Finish.
The Show Excluded button will open a list of learners who are excluded from the main results list because they are already attached to the selected vacancy.
There are two new configuration options for filtering the search results:
- In Maytas, click the M5 logo at the top-left and select Options.
- Select Vacancies under the Maytas 5 header on the left.
- The two relevant options are on the right. Tick the box next to the ones you wish to use and enter the codes as required:
- Vacancy Statues excluded from searching – If you wish to exclude certain statuses from the search results, enter the status short strings here, separated with a semi-colon (e.g. a;b;c).
- Allow existing attached trainees with the following statuses to be returned in the search results – This option allows you to include learners already attached to a vacancy to be included in the search results if they have one of the specified vacancy progress codes (from TRVACANCY.PROGRESS). For example, if a learner has a progress code of C (Closed – Manual) for a vacancy in the results, adding C to the config will allow that learner to appear in the search results and be re-added. The codes should be separated with a semi-colon.
- Click OK.