Visits Planner
The visits planner allows you to create and update visit appointments between an assessor and a learner. Each visit can be used to update the learning plan, add and update evidence and record notes.
To create a visit, open a learner record, go to the Visits tab and click Add Visit.
Edit Appointment
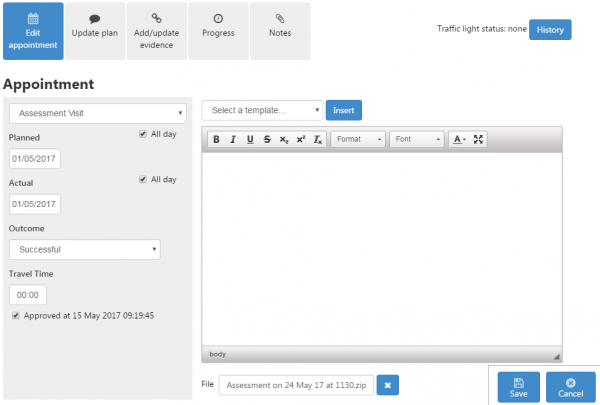
The Edit Appointment tab allows you to enter the basic details of the visit.
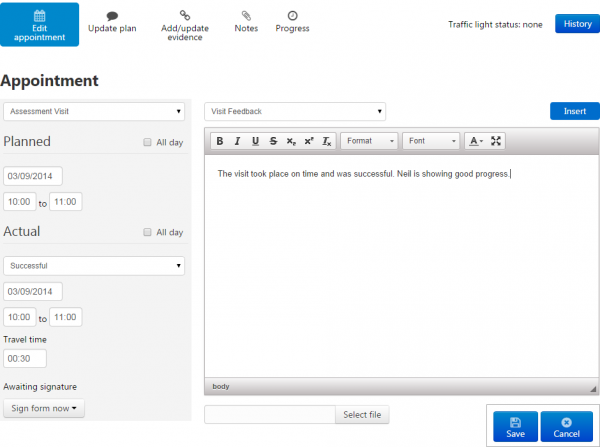
The assessment type and planned date must be entered when creating a visit. The rest of the data can be completed at a later date; for example, the visit outcome and actual date should be completed once a visit has actually taken place.
The planned and actual dates are set to all day by default (i.e. no times are specified). If you wish to record specific start and end times for the visit, un-tick the all day box and enter the times in the boxes that appear.
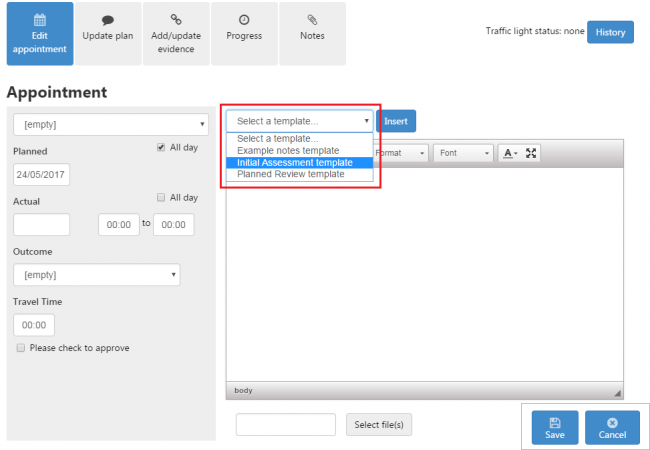
Notes for the visit can be entered on the right-hand side of the screen. If you wish to apply a notes template, choose the template from the dropdown box above the comments section and click the Insert button.
Click Save at the bottom of the screen to save any changes.
If you have the Digital Signatures module, there is an option at the bottom-left of the screen to sign a form. For example, you may wish to sign a confirmation form for the visit while on-site with a learner.
Update Plan
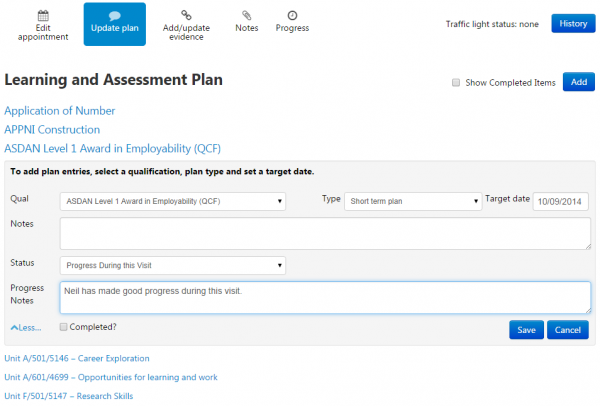
The learning plan shows a list of the learner's objectives, and notes and targeted plans can be added against each of them. Click an objective to open its details and enter notes and a target date. The plan type can be selected from the dropdown box (please note that you may wish to add or amend lookups for this via the Maytas 5 lookup editor, for table TRMODULEEVENT and field SCORE). When the plan has been completed, tick the Completed box.
Click More at the bottom left of the objective details to enter the progress status and progress notes. Click Save when finished.
Add/Update Evidence
This page lets you specify the evidence to be assessed in the visit. This is done per evidence file. The expected process for this is as follows:
- When the visit is created, one or more placeholder files are specified with details of the evidence which applies to each one.
- The visit takes place and the evidence files are obtained.
- The placeholders are then replaced with the actual evidence files.
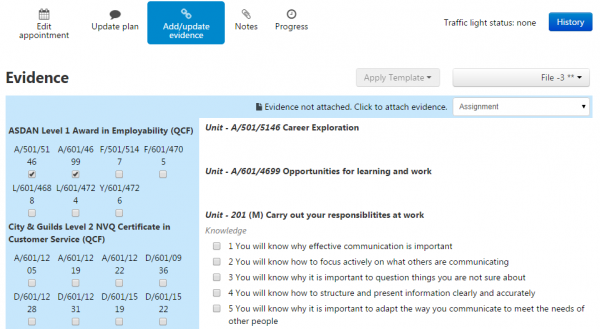
There is always one placeholder file by default. To start with, choose the evidence to be assessed for the file by ticking the appropriate objectives on the left and then ticking the relevant evidence criteria on the right (please note that at least one item of evidence criteria must be selected per file).
Next, add any additional files by clicking the file dropdown list at the top-right and selecting Add New File.
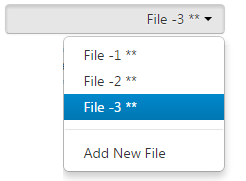
Three placeholder files
If you are unsure how many files will be assessed when setting up the placeholders, they can be added or amended as required at a later date.
Once the visit has taken place and the evidence files have been obtained by the assessor, the placeholder files can be updated to use the actual files. To do this:
- Select the relevant placeholder from the dropdown list.
- Click Evidence not attached. Click to attached evidence.
- Click Select File.
- Browse to and select the evidence file (or multiple files if they apply to the same evidence plan) and click Open.
- Click Upload.
A zip file will be created containing all selected evidence files. This will now show instead of the placeholder.
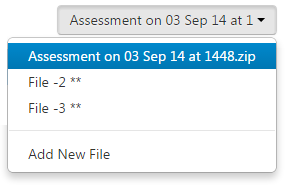
Click Save at the bottom of the screen to save any changes.
Evidence Requirements
For objectives that require multiple pieces of evidence, the required evidence count is displayed as well as the current evidence count. For example, if 2 pieces of evidence have been assessed out of a required 3 for a unit, the unit will display (2/3).
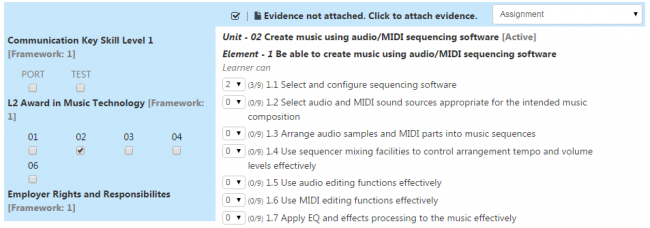
If an evidence line requires an observation, the observation count is shown after the evidence count. For example, if a unit requires three pieces of evidence and one of those must be observed, the line will display (0/3 (0/1)).
If one piece of evidence was assessed but not observed, this would change to (1/3 (0/1)).
If another piece of evidence was then assessed and also observed, this would change to (2/3 (1/1)).
Notes
This page shows comments made about the visit, grouped by IV feedback, learner feedback, counter signing, assessor feedback, second line assessors and GLH. If you wish to add a comment, click Add, choose the comment type, attach any relevant files, enter the comment and click Save.
Progress
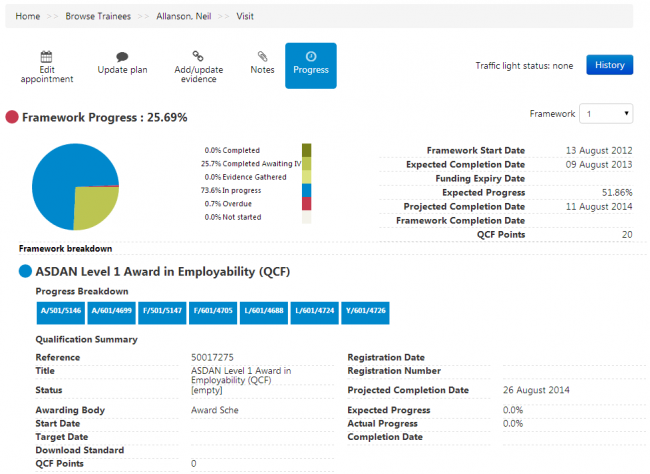
This page shows the learner's progress from within the visit, which removes the need for having to leave the visit to view progress.
Removing Visit and Evidence Files
The ability to delete visit and evidence files is controlled by permissions. To check these permissions:
- In Maytas Hub, go to Web User Editor on the toolbar.
- Search for and open the user that requires permission.
- Click Permissions to expand the section.
-
There are two relevant permissions:
Allow Delete Visit Files allows you to delete files added on the Edit appointment screen.
Allow Delete from Portfolio allows you to delete evidence files.

- Tick the permissions as required and click Save.
To delete a visit file:
- Open the visit and on the Edit appointment screen click the
 button next to the file.
 - Click Save.
To delete an evidence file:
- Open the learner's record and go to the Files tab.
-
Locate the evidence file in the list and click the Delete button.

- Click Delete to confirm. Note that you will be unable to delete the file if units in the evidence mapping for the file are set to completed.
- The file will now be removed from the list.
Visit Note Templates
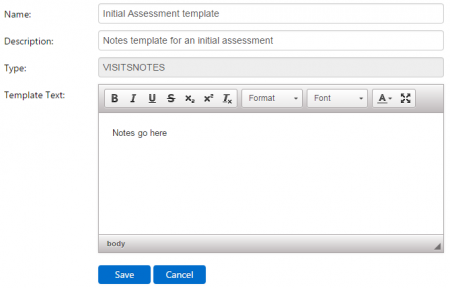
Note templates can be created for the notes editor in the visit planner. To do this:
-
Go to Settings on the toolbar and scroll down to the Templates section.

- Click the Add button.
-
Enter the name, description and notes for the template and click Save.
-
The template can now be used on the notes editor on the Edit appointment screen of the visit planner.
Evidence Wizard Confirmation Boxes
When a learner submits evidence via the evidence wizard, two confirmation boxes can be included at the end of the wizard:
- A checkbox to flag the evidence as being related to off-the-job training. If this is ticked, the learner will be redirected to the Off-the-Job Training tab when the wizard is completed with a new row ready to be edited and saved. Once this row is saved, the file ID of the submitted evidence will be recorded against the row (in the field OFF_JOB_TRAINING.FILEID).
- A checkbox with configurable text which can be used for other confirmations (e.g. to confirm the attached evidence is the learner's own work). This maps to the field TRAINEEPORTFOLIO.ISCONFIRMED.
To enable the checkboxes:
- Go to Settings on the sidebar and click System configuration.
- Go to Learner Login on the left.
- Scroll down to the Evidence Wizard section.
- To enable the off-the-job training confirmation box, tick the box next to Off The Job Confirmation and ensure the toggle button is set to ON.
-
To enable the configurable checkbox, tick the box next to Confirmation text and enter the text you want to appear next to the checkbox.

- Click Save.
The checkboxes will now appear at the end of the evidence wizard when a learner submits evidence.

Set Employer Against Visit
Assessor users can manage which employer (if any) is associated with a visit. This must first be enabled via a configuration option:
-
Go to Settings on the sidebar.
-
Click the System Configuration button.
-
Go to Assessor Login on the left (under the Maytas Hub Online header).
-
Locate the Visits section on the right.
-
Tick the box for the config Allow users to change the Employer linked to a visit and ensure the toggle button is set to ON.
-
Additionally, the config Automatically link employer to trainee visit (in the same section) can be set to automatically assign employers to visits. Tick the box for the config and select the default employment type to use when selecting the employer to assign to a visit. If this config is set but an employment type is not selected, the most recent employer for a learner will be used.
-
Click Save.
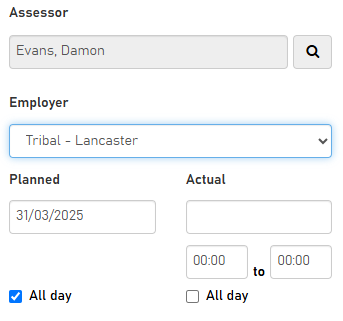
The Appointment tab of the visit editor will now include an Employer dropdown box, which includes the employers associated with the learner.
