Maytas Hub Release Notes
Technical specification
The latest Maytas and Maytas Hub technical specification can be found here.
Maytas Hub Release Notes – Version 5.27.8811.1
Visit Types used for Next Visit Column
The visit types included in the Next Visit column on the Caseload screen can now be configured:
- In Maytas Hub, go to Settings on the sidebar.
- Click the System configuration button.
- Go to Assessor Login on the left (under the Maytas Hub Online header).
- Locate the General section on the right.
- Tick the box for the Visit types included in Next Visit column option and select the required visit types from the list.
- Click Save.
The Next Visit column will then display for each learner the visit with the earliest planned date where no actual date has been entered and it is one of the specified visit types.
If the config option is not enabled, it defaults to using the Planned Review visit type.
Maytas Hub Release Notes – Version 5.27.8810.1
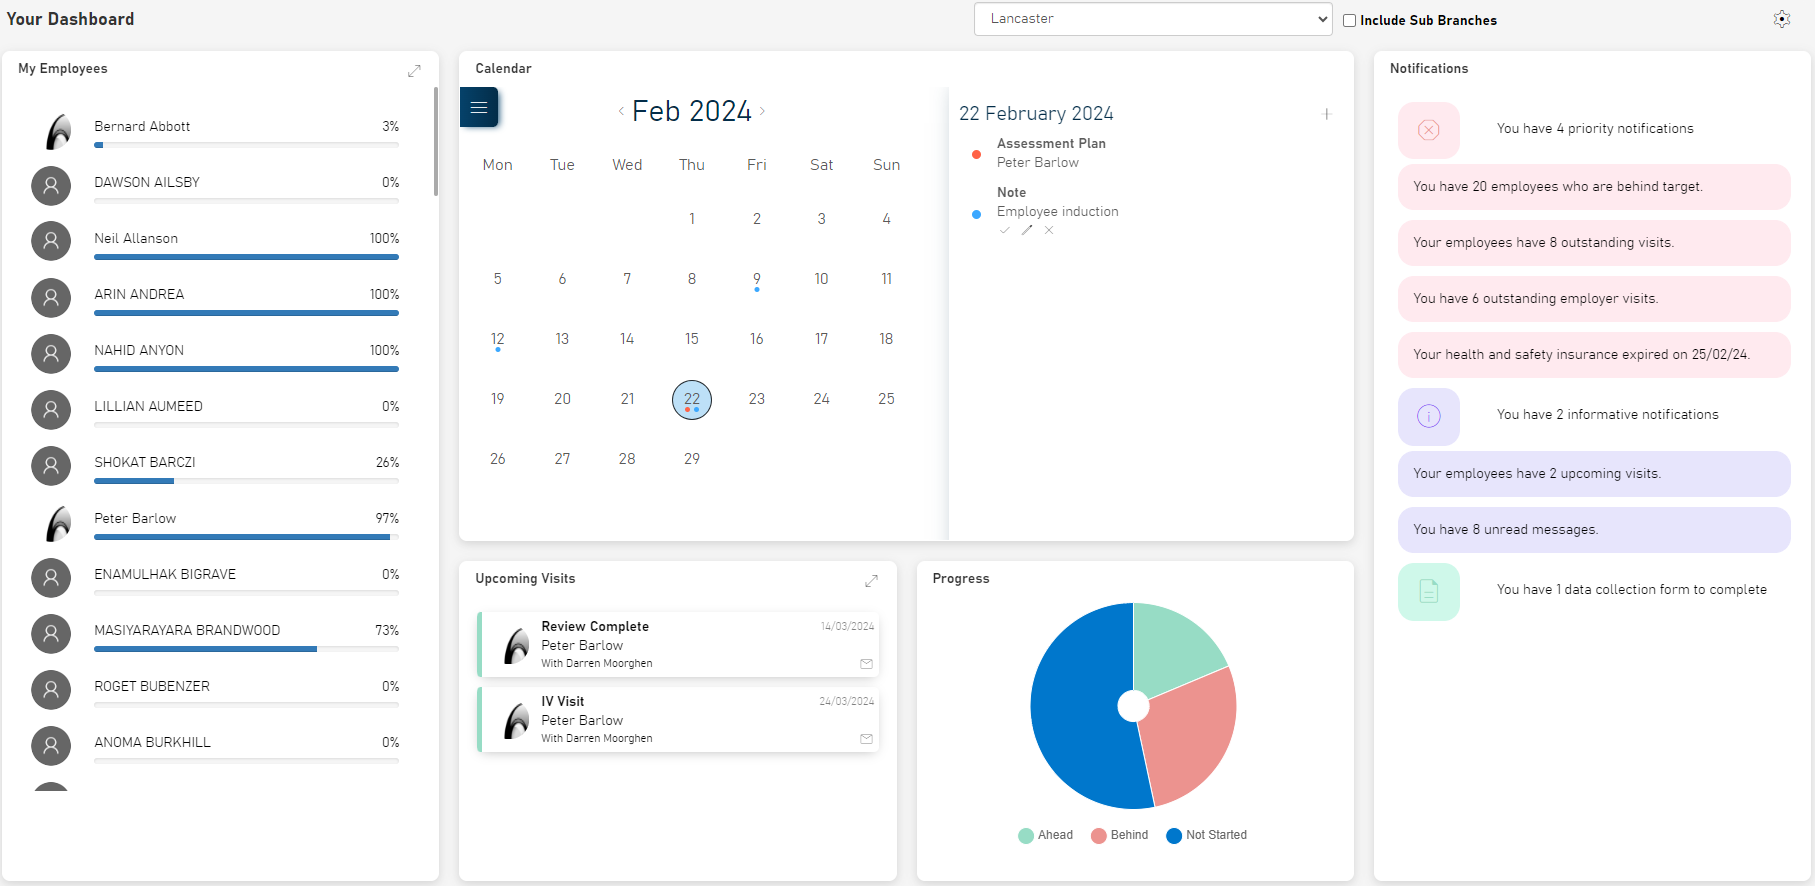
New Employer Dashboard
The dashboard for employer users and employer contact users has been overhauled so that it is more useful, configurable and easier to access key information. The new screen consists of numerous widgets, each showing a particular overview of data, which can be rearranged or removed so that the screen best suits the needs of each individual user.
User types and data visibility
There are three types of user who have access to the employer dashboard, each with different visibility of data:
| User Type | Data Visibility |
|---|---|
| Parent / top-level employer users |
By default, only data directly associated with the parent employer is displayed on the dashboard (i.e. not data from branches beneath it). The Branch Selector can be used to display data from individual branches or to include data from all branches under the parent employer. The visits displayed depend on the visit types permitted in the employer's group permissions and the configuration option List of visit types visible to employers, which can be found in the Maytas Hub Online | Employer Login | General section of the config editor. If the group permissions and the config option both permit a visit type, that visit type can be seen by the employer. This may include visits at branches beneath the parent employer, which are subject to the same criteria. |
| Employer branch users |
Only data from that branch and any sub-branches is displayed on the dashboard. The visits displayed depend on the group permissions and visit types permitted, as described for parent employers. |
| Employer contact users |
If the Restrict to Key Contacts permission is enabled, only data directly associated with the contact is displayed (e.g. visits for learners at the same employer record as the user, or at a branch beneath that record, who also have the user as their key contact). Note that the visit type criteria as described above still applies. If the permission is disabled, the visibility is equivalent to an employer branch user. |
Rearranging, removing and restoring widgets
To make any changes to the layout of the employer dashboard, click the  button at the top right. Each widget can then be changed as follows:
- To move a widget, click and drag any part of it to the desired position. Other widgets will automatically rearrange accordingly.
- To remove a widget, click the X at the top-right of the widget. It will then be greyed out, indicating it will not appear on the dfashboard.
- To restore a widget, click the + at the top-right of the widget.
After making any changes, click Save at the top-right of the screen to save them, or click Close to revert to the previous layout (note that this may require the screen to be refreshed). You can also click Reset to restore the default layout.
Branch Selector
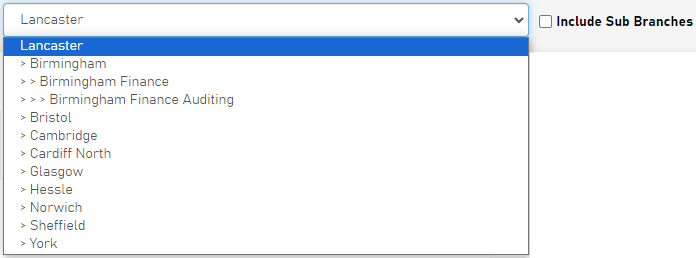
For parent / top-level employer users, there is a dropdown box at the top of the dashboard which lets you filter by individual branches within the employer you are logged in as. Branch-level employer users, top-level employer users with no branches and employer contact users with the Restrict to Key Contacts permission enabled do not see the branch selector.
By default, only data from the employer you are logged in as is displayed on the dashboard (i.e. not data from branches beneath it), but the Include Sub Branches checkbox can be ticked to also include data from all branches.
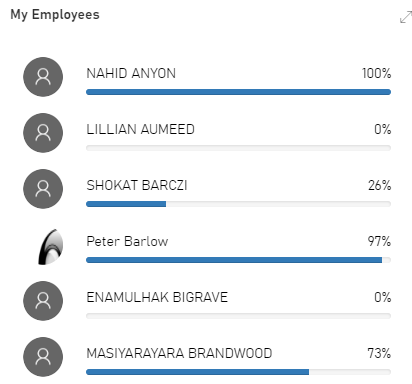
My Employees
The My Employees widget shows a list of your employees and their overall progress. Employer contact users will only see current employees that have the user as a key contact.
Clicking a learner in the list will open their record, whereas clicking the  button will open the Browse Employees screen.
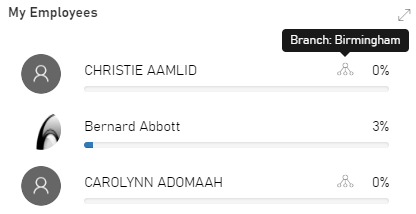
If the Include Sub Branches box is ticked for a parent employer user, employees from branches will display an  icon on their row. Hovering over the icon will display the branch they are from.
Visits widget
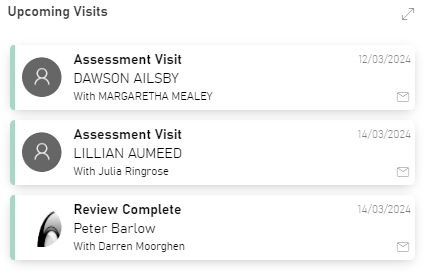
The Visits widget lists upcoming visits. Clicking a visit will show the details of that visit, whereas clicking the  button at the top right will open a screen listing all a user's upcoming visits.
Additionally, you can click the  button on a visit to send a message to the learner's assessor, who is listed underneath each learner.
For employer users, the displayed visits are those where the employer user is directly linked to the visit (i.e. the widget does not show visits for learners at the employer where the employer is not directly linked to the visit).
For employer contact users, all visits for learners where the user is the key contact are displayed.
Progress widget
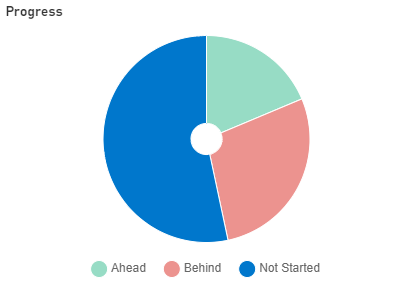
The progress widget shows the proportion of learners who are on target, ahead of target or behind target, based on a summary of overall progress against all of the objectives in each learner's framework.
Hovering over each portion will show the relevant number of learners and clicking it will open the caseload screen.
The percentages of the three segments do not necessarily add up to 100%, as they do not include learners who have not yet started their objectives.
Notifications widget
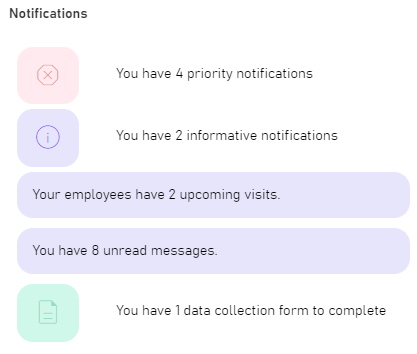
The Notifications widget shows a summary of important information.
Notifications are grouped by the following categories:
- Red - Priority notifications requiring urgent action
- Yellow - Warning notifications requiring action
- Purple - Informative notifications
- Green - Data collection form notifications
Clicking on a notification summary (e.g. You have 4 priority notifications in the image above) will show the individual notifications within that group.
Clicking on notification will show further details; for example, clicking Your employees have 2 upcoming visits in the image above lists the relevant visits and their associated learners, and clicking one opens the visit.

Calendar widget
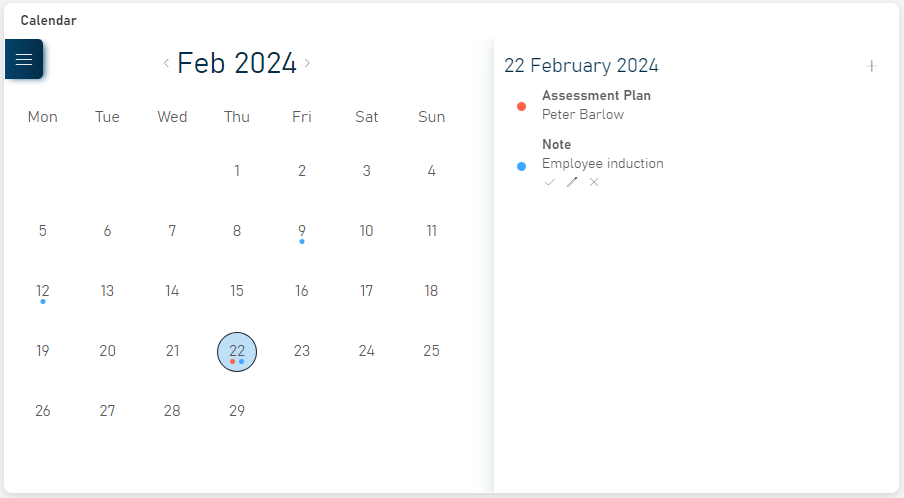
The Calendar widget shows key events and notes for each day. Selecting a date lists the activities for that day on the right, and each item can be clicked to go to the relevant page (e.g. the visits screen).
You can quickly move from month to month using the arrow buttons on either side of the month and year, or you can navigate to dates further away by clicking the  button and selecting the required month.
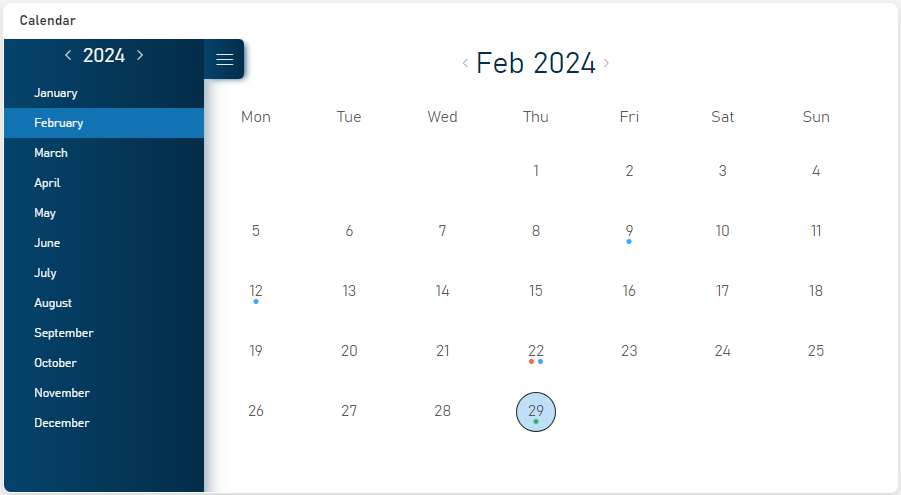
Notes can be added to a date by selecting the date and clicking the + button at the top-right of the widget.
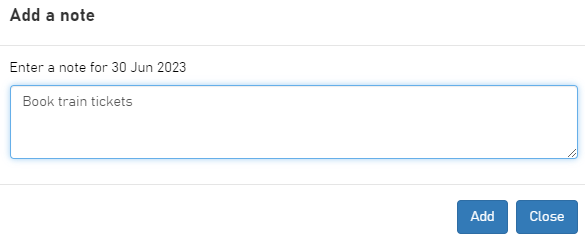
Enter the note text and click the Add button. The note will then be displayed against the date.

There are three buttons under the note:
-
 Completes the note, which changes the coloured dot from blue (outstanding) to gray (completed).
 -
 Allows you edit the note.
 -
 Deletes the note (click OK to confirm).
If the Include Sub Branches box is ticked at the top of the dashboard, events from sub branches will be displayed on the calendar, but you will not be able to take action on them (except for visits).
Visits Screen Improvements
The Visits screen has been improved with visual enhancements and new features:
-
The tab buttons at the top of the Visits planner have been restyled.

-
When the screen is not large enough to display all the tab buttons (e.g. on a mobile device), the remaining tabs are collapsed into a More button, which displays the tabs when it is clicked.

-
Improved responsiveness on mobile devices.
Visit Type-Specific Custom Tabs
Custom tabs for visits can now be made so that they only appear for one or more visit types:
-
In Maytas 5, go to Tools on the toolbar and click New / Load on the Screens panel of the ribbon.
-
Select Visit on the left and open the tab you wish to edit on the right (or create a new tab).
-
In the Visits Type box on the left, enter the short string values for the visits you wish the tab to appear for. Each value should be comma-separated (e.g. A,B,C). If the box is left empty, the tab will appear for all visits.
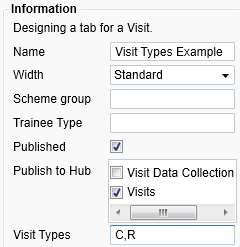
A list of the short strings for visit type lookups can be found by going to Tools | DB Schema, selecting VISITS | VISITTYPE in the tree view on the left, then clicking the Look-ups tab on the right.
-
Click Apply.
-
Go to Home on the toolbar and click the Sync button.
The tab will now appear on visits in Hub of the specified visit types. Note that when creating a new visit, the visit type must be selected and saved before the tab will appear.

ILR Validation in Hub
ILR validation can now be viewed for learners in Hub. This must first be enabled with a permission for assessor and Maytas users:
-
Go to Web User Editor on the sidebar.
-
Search for and open the learner user or group that requires permission.
-
Click Permissions to expand that section.
-
In the ILR section, tick the Allow ILR Validation permission.
-
Click Save.
The option to view the ILR validation status will now be available on the learner Summary screen for learners who have a POT on an ILR scheme linked to their framework.

Click ILR validation status. Note that initially this will have a blue icon with a question mark, indicating that one of the POTs linked to the framework does not have any saved validation results.
A validation panel will be displayed:

If the framework has multiple POTs associated with it that are on an ILR scheme, the POT dropdown box can be used to display or run the validation for each of those POTs.
Click the Run Validation button. This will generate and display the validation results for the selected POT, which are grouped by warnings (yellow) and errors (red).
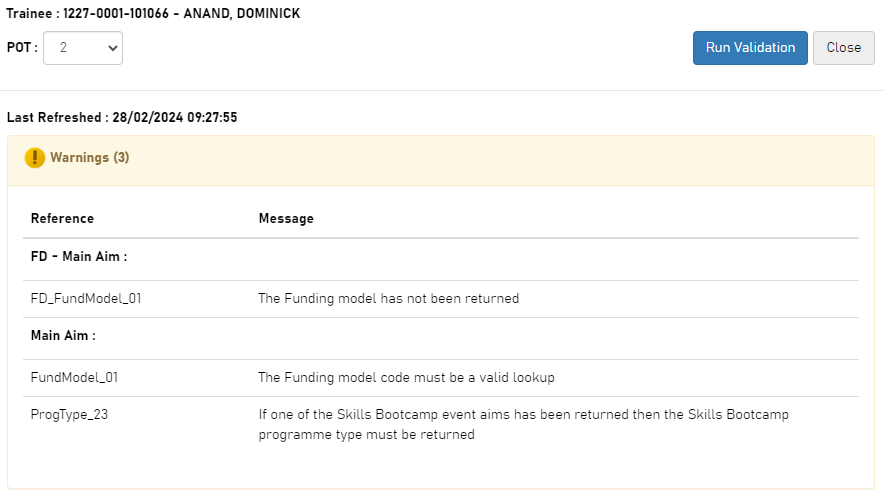
Click Close to return to the Summary screen. The ILR validation status icon will have changed to one of four statuses now that the validation has been run:
-
Blue - A POT associated with the framework does not have any saved validation results
-
Amber - All validation results for the associated POTs are warnings
-
Red - At least one validation result on the associated POTs is an error
-
Green - All associated POTs have validation results with no warnings or errors
Duplicate Learner Check on Application Forms
Application forms in Hub can now include a check to determine whether a learner already exists in the system. This first requires two configuration options to be set:
- In Maytas Hub, go to Settings on the sidebar.
- Click the System configuration button.
- Go to Admin on the left (under the Maytas Hub Online header).
- Locate the Online Applications section on the right.
- Tick the box for the Field which is checked for duplicate records when submitting an Online Application option and enter the table and field that should be checked for duplicates. This should be entered in the format TABLENAME.FIELDNAME - e.g. TRAINEE.NINUMBER.
- Tick the box for the Message shown to online applicants if duplicate records are found option and enter the message you wish to display.
- Click Save.
When an application form includes the specified field, the data entered in that field when the form is submitted will be checked against the existing data in the database to ensure it is unique. If a row is found with the same data in that field, the specified message will be displayed and the form will be prevented from submission. If no message has been specified, a default warning message will be displayed.
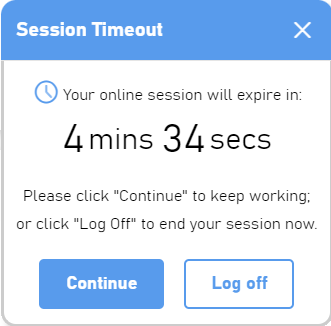
Improved Timeout Notification
The timeout notification for inactivity has been improved with the following new features:
-
An improved interface
-
A Continue button, which continues the session
-
A Log off button which manually logs the user out
Task Description in Learner Journey
Tasks in the Learner Journey will now display the task's description rather than just the title.
