5.28 SP1 Maytas ESFA Release Notes
Note regarding submissions
We would like to remind providers to create a submission early and check for any errors using reports from the FIS. After submission to the ESFA, providers should check that data has submitted correctly using the available reports. Providers should check that all their expected starts and completions are submitted correctly, and that start and outcome payments correctly match the PFR.
Our support desk gets extremely busy in the days prior to the submission deadlines, and although we try and prioritise submission-related queries, we cannot guarantee assistance if queries are sent late. If you do encounter any issues, please ensure that you contact Maytas Support as soon as possible, as we can only rectify issues of which we are aware. We also recommend checking Maytas Communities regularly for information on any known issues and solutions. Tribal cannot be held responsible for any issues caused by your failure to comply with this advice.
Technical specification
The latest Maytas and Maytas Hub technical specification can be found here.
Once the upgrade has been completed, the version number should be checked to ensure it has been successful.
- Start Maytas and go to Support on the toolbar.
- Click About.
- The version numbers should read 5.28.9020.1. If you have any other version, please ensure you have followed the upgrade instructions correctly. If you require assistance, please contact Maytas Support.
It is the responsibility of customers to ensure that users carry out any required user acceptance testing and sign off on the upgrade.
Complete the Upgrade
Features Added in the Upgrade
These are the main updates in the upgrade:
- PFR Reconcilers for 2024/25
- Updated funding calculations and Financial Planning for 2024/25
- Additional filters for bulk apply templates
- Reports Library 1.0.4.9
- Fixes to a number of issues
Import Funding Information
The process for importing the required funding information into Maytas is as follows:
- The latest LARS should be imported.
- The latest postcode data should be imported.
- Once all data has been imported, ensure that the funding cache is refreshed (either on a database schedule or a manual update out of working hours).
Import LARS
The LARS should be imported as follows:
- Download the latest LARS MDB file. This is currently version 10.
- In Maytas, go to Exports on the toolbar.
- On the ILR Tools panel of the ribbon, go to Uploads | Upload Funding Information | Upload LARS (Version 10).
- Browse to and select the downloaded LARS file and click Open.
- The file will now be imported. Click OK on the message which appears.
Progress on the import can be checked by going to Home | Server Tasks | Server Jobs. Typically it will take several minutes.
Import Postcode File
- Obtain the postcode uplift factors file - Download the zip file under 2024 to 2025 uplift factors by postcode and LLSOA: CSV files.
- In Maytas, go to Exports on the toolbar.
- On the ILR Tools panel of the ribbon, go to Uploads | Upload Postcodes| Upload Post Code Data (2024/25).
- Browse to and select the postcode uplifts zip file and click Open.
- The file will now be imported. Click OK on the message which appears.
Progress on the import can be checked by going to Home | Server Tasks | Server Jobs. Typically this will take several minutes.
Note on the Funding Cache
By default, the funding cache will update overnight so that funding information in Maytas uses the newly-imported FIS and postcode information. Please check with your system administrator if you are unsure if or when the funding cache is updated on your system. You can also manually set the funding cache to update by going to Management | Profiles and clicking the Funding Cache button, though please be aware that this may take a long time and may use a large amount of system resources, which could affect performance for other users on the system.
Import PFR Reconciler Reports
The PFR Reconciler reports for 2024/25 should be imported as follows:
- In Maytas, go to Home on the toolbar and click Import on the Reports panel of the ribbon.
- Click Add Files.
- Browse to the Maytas 5\Extras\Module Reports folder of the upgrade.
- Select PFR Reconcilers – 2425.m5rep and click Open.
- Click Finish.
- Once the reports have finished importing, click Finish.
Due to the size of the .rdl file for the FM36 PFR report, some report servers may produce the following error when importing:
Error: There was an exception running the extensions specified in the config file. —>
Maximum request length exceeded.
This means that the report server's MaxRequestLength property is configured to only allow uploads up to a certain size, and the configuration must be changed to allow larger files to be uploaded. Please contact your system administrator to do this. Please note that Maytas Support cannot offer support on how to configure a SQL Server Report Server, as these are Microsoft products.
Maytas 5 Version 5.28.9020.1 Release Notes
PFR Reconcilers 2024/25
New PFR reconciler reports are now available to work with the 2024/25 PFR files. This year there are separate reports for funding models 35/38 (now referred to as Adult Skills), 36 and 81 to reflect the substantially different formats of each PFR. The reports work the same as in previous years.
There are separate import options for each PFR file:
- Go to Management on the toolbar.
-
On the PFR section of the ribbon, click Upload and select the required 2024/25 PFR import option:
For Adult Skills, go to PFR | Upload PFR (2024/25).
For FM81, go to PFR | Upload Trailblazer PFR (2024/25).
For FM36, go to FM36 Funding Reports and choose the file type to upload.
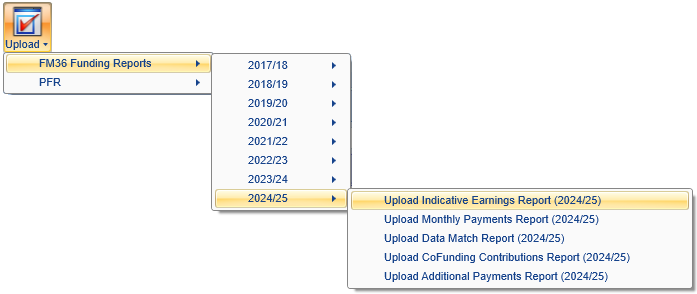
- Browse to and select the PFR file and click Open.
The file will now be imported. Click OK on the confirmation message which appears.
Adult Skills PFR Reconciler Reports
The Adult Skills PFR reconciler reports can be accessed as follows:
- On the Home tab, click Reports Library.
- Go to the Finance folder and select one of the new reports:
- PFR Reconciler Adult Skills – 2425 – This shows a summary of funding differences, as well as tables showing matched rows with funding differences, rows in Maytas but not the PFR and rows in the PFR but not in Maytas.
- PFR Reconciler Adult Skills – Non-Funding Differences – 2425 – This shows matched rows which have differences in the non-funding columns (i.e. all columns which are not the month-by-month funding columns).
-
The parameters window will appear:
PFR – Select the PFR file from the list.
ILR file – Select the corresponding ILR file from the list.
Measure up to end of – This tells the report to only reconcile funding differences up to the end of a specific month. This is because Maytas data is highly likely to be updated in the time between the PFR being produced and the report being run – for example, leavers may be entered in Maytas who were live when the PFR was produced. This can result in inaccurate comparisons. Comparing Maytas funding data up to the period in which the PFR was produced should give a more accurate comparison than comparing current Maytas data.
Note that the following two parameters do not appear on the Non-Funding Differences report.
Show Differences Threshold (pence) – This determines the threshold in pence for the funding differences to be shown in the report. For example, the default of 10 will only include rows where there is more than a 10p total difference between Maytas and the PFR.
Show missing rows with zero values – For the section at the end of the report showing rows in the PFR but not in the Maytas ILR export (and vice-versa), this allows you to hide rows which have no funding against them. By default, these rows are included.
- Click View to run the report.
The following columns have been added to the reports:
-
Applicable funding band
-
Start for funding purposes
-
Completion element (potential or actual earned cash)
-
Completion percentage (aggregated maximum value)
-
[Month] completion earned cash (one column for each month)
The following columns have been removed from the reports:
-
Earnings boost category
-
Transitional planned number of programme installments from 1 August 2013
-
Transitional start proportion
-
Traineeship work placement or work preparation
Funding Model 81 PFR Reconciler Reports
The FM81 PFR reconciler reports can be accessed as follows:
- On the Home tab, click Reports Library.
- Go to the Finance folder and select one of the new reports:
- PFR Reconciler FM81 – 2425 – This shows a summary of funding differences, as well as tables showing matched rows with funding differences, rows in Maytas but not the PFR and rows in the PFR but not in Maytas.
- PFR Reconciler FM81 – Non-Funding Differences – 2425 – This shows matched rows which have differences in the non-funding columns (i.e. all columns which are not the month-by-month funding columns).
- The parameters window will appear:
PFR – Select the PFR file from the list.
ILR file – Select the corresponding ILR file from the list.
Measure up to end of – This tells the report to only reconcile funding differences up to the end of a specific month. This is because Maytas data is highly likely to be updated in the time between the PFR being produced and the report being run – for example, leavers may be entered in Maytas who were live when the PFR was produced. This can result in inaccurate comparisons. Comparing Maytas funding data up to the period in which the PFR was produced should give a more accurate comparison than comparing current Maytas data.
Note that the following two parameters do not appear on the Non-Funding Differences report.
Show Differences Threshold (pence) – This determines the threshold in pence for the funding differences to be shown in the report. For example, the default of 10 will only include rows where there is more than a 10p total difference between Maytas and the PFR.
Show missing rows with zero values – For the section at the end of the report showing rows in the PFR but not in the Maytas ILR export (and vice-versa), this allows you to hide rows which have no funding against them. By default, these rows are included.
- Click View to run the report.
There are no column changes from the 2023/24 report.
Funding Model 36 PFR Reconciler Reports
The ESFA have only provided a .xls file for the FM36 co-investment report this year, rather than the .csv file which has been provided in previous years. As Maytas requires the imported file to be in a .csv format, the co-investment .xls file must be saved as a .csv file. Instructions for this can be found below.
The FM36 PFR reconciler reports can be accessed as follows:
- On the Home tab, click Reports Library.
- Go to the Finance folder and select one of the new reports:
- PFR Reconciler FM36 – 2425 – This shows a summary of funding differences, as well as tables showing matched rows with funding differences, rows in Maytas but not the PFR and rows in the PFR but not in Maytas.
- PFR Reconciler FM36 – Non-Funding Differences – 2425 – This shows matched rows which have differences in the non-funding columns (i.e. all columns which are not the month-by-month funding columns).
-
The parameters window will appear:
Report type – This lets you choose whether to reconcile the indicative earnings report, the monthly payments report or the co-investment payments report. Each of these will determine the available PFR files to select from and the content displayed when the report is run.
PFR – Select the PFR file from the list.
ILR file – Select the corresponding ILR file from the list.
Measure up to end of – This tells the report to only reconcile funding differences up to the end of a specific month. This is because Maytas data is highly likely to be updated in the time between the PFR being produced and the report being run – for example, leavers may be entered in Maytas who were live when the PFR was produced. This can result in inaccurate comparisons. Comparing Maytas funding data up to the period in which the PFR was produced should give a more accurate comparison than comparing current Maytas data.
Note that the following two parameters do not appear on the Non-Funding Differences report.
Show Differences Threshold (pence) – This determines the threshold in pence for the funding differences to be shown in the report. For example, the default of 10 will only include rows where there is more than a 10p total difference between Maytas and the PFR.
Show missing rows with zero values – For the section at the end of the report showing rows in the PFR but not in the Maytas ILR export (and vice-versa), this allows you to hide rows which have no funding against them. By default, these rows are included.
- Click View to run the report.
The FM36 PFR reconciler can be run against four different PFR datasets for FM36: indicative earnings, monthly payments, co-investment payments and additional payments. This can be chosen in the Report type parameter.
Of these options, we expect the indicative earnings report to match the Maytas figures the closest, as this PFR data does not depend on certain factors which must be assumed in Maytas (these factors are not available and cannot be derived before the PFR data is produced). The monthly and co-investment payments reports do depend on these factors and so are likely to match the Maytas figures less closely. In very broad terms, the indicative earnings are the 'expected' figures and the payment reports are the actual figures.
There are no column changes from the 2023/24 report.
Changing the co-investment report file type
The ESFA have only provided a .xls file for the FM36 co-investment report this year, rather than the .csv file which has been provided in previous years. As Maytas requires the imported file to be in a .csv format, the co-investment .xls file must be saved as a .csv file:
-
Open the .xls file.
-
Go to File | Save As.
-
Click the file type dropdown box and choose CSV (comma delimited) (*.csv).
-
Click Save.
-
A warning message may appear. Click OK to continue.
The .csv file can now be imported into Maytas.
Financial Planning 2024/25
The Financial Planning module now supports plans for 2024/25. After the upgrade, it is important to ensure the funding cache has been updated. In most cases this should be done automatically on a schedule (check with your system administrator), but it can also be done manually by going to Management | Profiles and clicking the Funding Cache button. This may take a long time and may use a lot of system resources, so it is strongly recommended to only update the funding cache outside of normal working hours.
To create a 2024/25 plan:
- Go to Management | Financial Plans.
- Double-click New Financial Plan.
- Select a 2024/25 contract to base the plan on and click Next.
- Enter a name for the plan and click Next.
- Select the funding models and funding line types you wish to use for the plan and click Next.
- Select the years and periods you wish to use for the plan and click Next.
- Click Finish.
The plan will now be created.
Before using any existing plans from 2023/24 and earlier or 2024/25 plans produced in the 5.28 release, you must refresh the funding cache and then refresh the current data values and what if values for the relevant plans. This can be done on each required plan by going to the Current Data Values and What If Values tabs and clicking the  button.
Bulk Apply Templates - Additional Filters
The Bulk Apply Templates process can be configured to include additional search filters:
-
Go to Tools on the toolbar and click Process Browser.
-
Select System Process on the left, then double-click Bulk Apply Templates on the right to open the process.
-
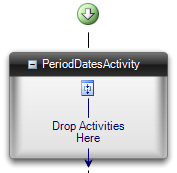
Select PeriodDatesActivity.
-
On the right, locate the property ShowAdditionalFilters and set it to True.
-
Go to Home on the toolbar and click the Sync button.
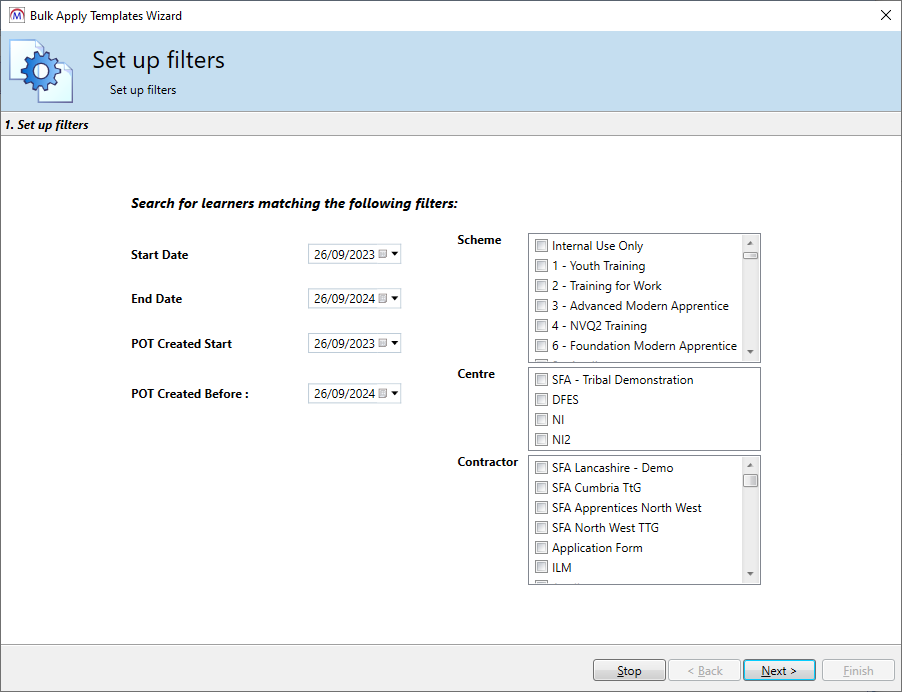
The Bulk Apply Templates wizard will now include various additional search options on the first screen to filter the learners displayed in the results.
To select or de-select all values in the Scheme, Centre and Contractor lists, right-click the list and select Select All / Deselect All.
Audit Fields for TRAINEEINFO and TRAINEEPOT3
Fields on the TRAINEEINFO and TRAINEEPOT3 tables can now be used for auditing. Previously, only fields on the TRAINEE, TRAINEEPOT and VISITS tables could be used for auditing.
When an audit confirmation field is in TRAINEEINFO or TRAINEEPOT3 and that field is updated, a row will be added to the TRAINEEINFO_AUDIT or TRAINEEPOT3_AUDIT tables respectively.
FE Workforce 2023/24
The FE Workforce module has been updated to align with the 2023/24 specification. The notable changes are:
-
Lookup changes for Main Subject Taught, Current Position Duration and Further Education Duration.
-
Main Subject Taught codes 39 and 40 are migrated to code 70. Other code changes for this field must be migrated manually.
In cases where the specification says not to migrate a field (i.e. Annual Salary, Hourly Rate and Pay Rise), these fields have been left populated for convenience. Please update these fields accordingly if required.
DfE - Funded Place
The DfE integration can now download and upload data for the Funded Place field, which is stored in TRAINEEPOT2.DFE_FUNDED_PLACE.
If a learner's Funded Place setting needs to be changed, this can be done as follows:
-
Open the learner's record in Maytas.
-
Go to DFE | Change Funded Place.
-
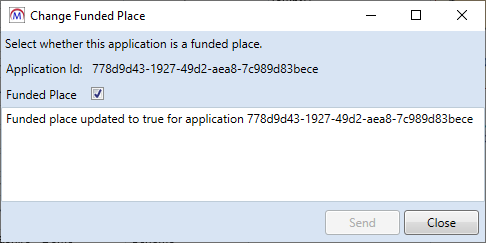
A window will appear displaying the learner's application ID and their current Funded Place setting (ticked or unticked). Change the Funded Place checkbox as required and click Send.
-
If successful, a message will appear indicating that the Funded Place has been updated in the learner's DfE record.
The Funded Place field is only relevant to learners who start from autumn 2024 onwards. If you attempt to change the Funded Place for a learner who is not eligible, the field will not be updated and a message will display stating that the field is not needed for the learner.
Reports Library 1.0.4.9
Upgrade the Reports Library
How to Upgrade the Reports Library
The Reports Library upgrade should be performed by an admin user, which will upgrade the reports for all users.
To enable to the Upgrade reports button for an admin user:
- Go to Tools | Edit Permissions.
- Select the user or group which requires permission.
- Go to the Commands tab.
- Expand the Support section.
- Set the Report SQL Upgrade permission to Visible.
- Click Apply and restart Maytas for the change to take effect.
For customers who manage their own systems on-premise, it is strongly advised to take a database backup before performing the upgrade. This is not necessary for hosted customers as backups are taken regularly.
To upgrade the Reports Library:
- Go to Support on the toolbar.
-
Click Upgrade reports.

- You will asked to confirm that you wish to perform the reports upgrade SQL. Click OK to continue.
- A message will appear saying that a task has been created. Click OK.
-
You can check that the upgrade was successful by going to Home on the toolbar and then selecting Server Tasks | View Jobs.

If the Status indicates that the upgrade has failed, please do not continue with importing the reports package and raise an incident on the Self Support Portal for assistance.
- Next, the reports package must be imported. Go to Home on the toolbar and click Import on the Reports panel on the ribbon.
- This will display the Report Import wizard. Click +Add Files.
- Browse to the Maytas 5\Extras\Reports Library folder of the upgrade, select one of the following packages and click Open:
- For all reports, select Reports Library 1.0.4.9 (all reports).
- For ESFA and general reports only, select Reports Library 1.0.4.9 (ESFA and general reports).m5rep.
- Click Finish to import the reports. This process may take a long time (potentially upwards of 30 minutes) depending on the size of the reports package.
-
When the reports have finished importing, click Finish.
The import log may display various warning messages, which are generally a result of report formatting and other factors which do not impact how a report runs (e.g. The text box ‘textbox3’ extends beyond the bottom edge of its container.). Unless a message indicates that the import has failed, these warnings can safely be ignored.
Learner Wellbeing Report
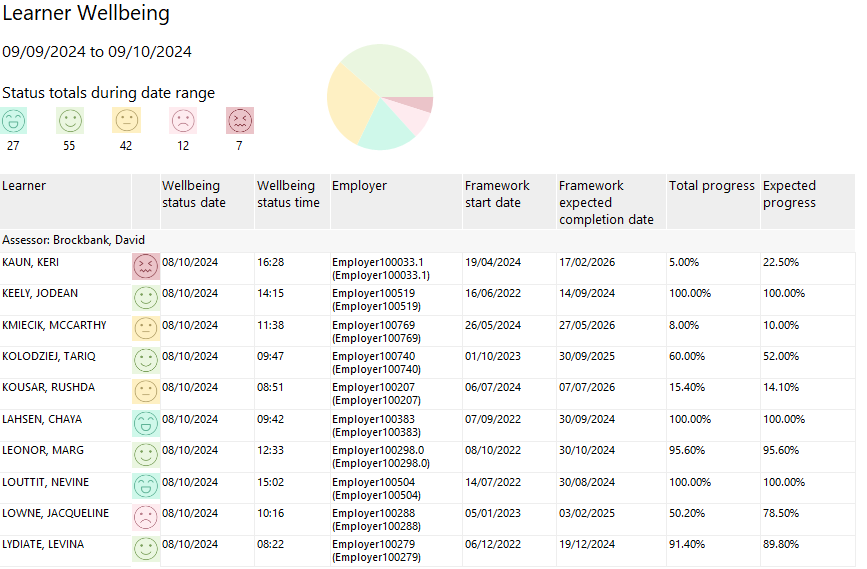
The Learner Wellbeing Report shows a summary of moods selected by learners in your caseload and your team's caseloads (if applicable) across a date range. The report also shows a list of each learner (grouped by their assessor) and their latest selected mood, and clicking a learner displays a history of all their selected moods.
The report can be accessed in Hub by going to Reports on the sidebar and selecting the Learner Wellbeing report from the dropdown list.
Parameters
-
Start / End date - The report filters by learners whose latest wellbeing status date is within this date range.
-
Assessor types - The learner-to-assessor link types to use to determine a learner's assessor.
-
Employment types - The learner-to-employer link types to user, which determines which employer (if any) shows in the Employer column.
-
Wellbeing status - Filters by the selected statuses.
-
Group by assessor - When set to Yes (the default), learners will be grouped by their assessor. When set to No, the report will list all learners from the relevant caseload(s) in a single group.
Layout
The top of the report shows a summary of the data in the date range, comprised of the number of learners for each mood (based on the learner's most recent selection in the date range) and a pie chart that shows the proportions of each mood.
The table beneath the summary lists each learner who has submitted a mood in the date range, showing their most recently submitted mood in the date range. Note that if a learner has submitted a different mood after the end of the selected date range, the most recent mood from within the date range will be shown instead.
Each row in the table also shows the date and time the mood was submitted, along with the learner's employer and an overview of key dates and progression for their framework. If a learner has multiple frameworks, their most recent one is shown.
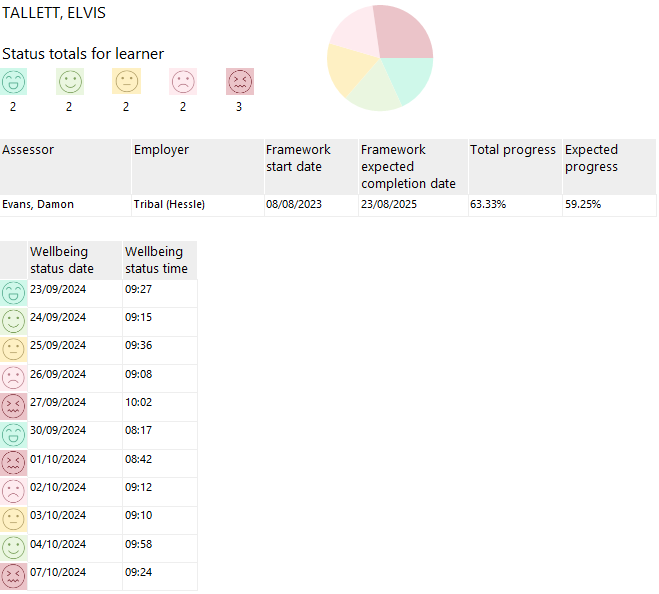
Clicking on a learner will open a drilldown report that shows a history of the learner's submitted moods (this is not limited to the date range).
Financial Plan Overview - 2024/25 Plans
The Financial Plan Overview report has been updated to support 2024/25 financial plans, including plans utilising funding model 38.
Assessor Caseload Summary - Ready to Run Parameter
The Assessor Caseload Summary report now has a Ready to run parameter, which prevents the report from automatically running on the default parameters. Once you have chosen your required parameters, select Yes from the Ready to run parameter and then run the report.