5.29 Maytas LLWR Release Notes
Note regarding submissions
We would like to remind providers to create a submission early and check for any errors using reports from LLWR-Inform. Providers should also remember to download their ULI file. After submission to the DfE, providers should check that data has submitted correctly using the available reports. Providers should check that all their expected starts and completions are submitted correctly.
Our support desk gets extremely busy in the days prior to the submission deadlines, and although we try and prioritise submission-related queries, we cannot guarantee assistance if queries are sent late. If you do encounter any issues, please ensure that you contact Maytas Support as soon as possible, as we can only rectify issues of which we are aware. We also recommend checking Maytas Communities regularly for information on any known issues and solutions. Tribal cannot be held responsible for any issues caused by your failure to comply with this advice
Technical specification
The latest Maytas and Maytas Hub technical specification can be found here.
Once the upgrade has been completed, the version number should be checked to ensure it has been successful.
- Start Maytas and go to Support on the toolbar.
- Click About.
- The version numbers should read 5.29.9110.1. If you have any other version, please ensure you have followed the upgrade instructions correctly. If you require assistance, please contact Maytas Support.
It is the responsibility of customers to ensure that users carry out any required user acceptance testing and sign off on the upgrade.
Complete the Upgrade
Features Added in the Upgrade
These are the main updates in the upgrade:
- Report Generator function to remove HTML formatting
- Publish custom views to Maytas API
- Reports Library 1.0.5.0
- Fixes to a number of issues
Maytas 5 Version 5.29.9110.1 Release Notes
Report Generator Function to Remove HTML Formatting
Report Generator now has a function which can prevent the HTML formatting on a notes field from displaying in a report. This requires a permission to be set:
-
Go to Tools | Edit Permissions.
-
Select the user or group which requires permission.
-
Go to the Commands tab.
-
Expand the Reports section.
-
Set the Edit Custom Filter and expressions permission to Visible.
-
Click Apply and restart Maytas for the change to take effect.
To prevent HTML formatting from displaying for a field in a report:
-
Go to Home on the toolbar and click Edit on the Reports panel of the ribbon.
-
Open the report you wish to edit.
-
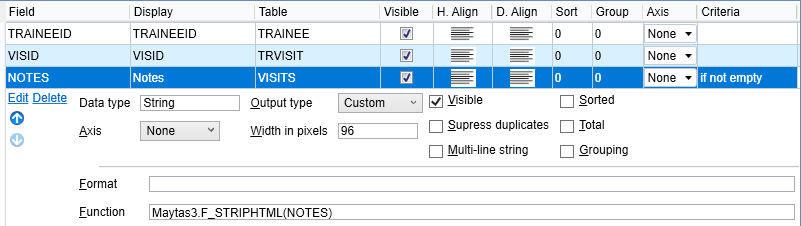
Select the notes field (for this example we will use VISITS.NOTES).
-
Set the Output type to Custom.
-
In the Function box, enter:
Maytas3.F_STRIPHTML(fieldname)where fieldname is the name of the notes field.
-
Click Apply.
Any HTML formatting on the notes field will no longer be displayed when the report is run.
Publish Custom Views to Maytas API
Custom SQL views created via Report Generator can now be published for use in the Maytas API. This must first be enabled via a permission:
-
Go to Tools | Edit Permissions.
-
Select the user or group that requires permission.
-
Go to the Commands tab.
-
Expand the Reports section.
-
Locate the permission Create and API view from a report and ensure the visibility is set to Visible.
-
Click Apply and restart Maytas for the change to take effect.
To create a custom view from a report:
-
Go to Home on the toolbar and click Edit on the Reports panel of the ribbon.
-
Open the report you wish to use or create a new report.
-
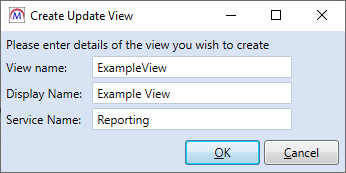
On the Actions toolbar, go to Views | Create API view.
-
Enter a name for the view (this cannot include any spaces) and the display name. The service name should be left as Reporting unless otherwise instructed.
-
Click OK.
-
Click Apply. You will be notified that there is a Maytas API view associated with the report - click Yes to update the view.
The view will now be available in the API, based on the SQL from the report.
When a view is created from a report, a performance check is run against the view. If the view takes longer than 10 seconds to run, you will be notified that it has failed the performance check and it will not be added to the API.
Workflow Completion Email
When a workflow is completed, a configurable confirmation email can now be sent to all users within the workflow (including the user who invoked it) advising that it is complete, along with the date and time of completion.
To enable and configure the email:
-
In Maytas, click the M5 button at the top left and select Options.
-
Go to Admin on the left (under the Maytas Hub Online header).
-
Locate the Data Collection section on the right.
-
Tick the boxes for the two relevant config options:
-
Email body sent to selected Workflow User types upon completion of a Workflow - Enter the body of the email you wish to be sent upon completion of a workflow.
-
List of Workflow User types to email upon completion of a Workflow - Select the user types that should receive the email.
-
-
Select the required columns from the list.
-
Click OK.
Prevention of Duplicate POTs on Course Stream
The Courses module has been updated so that when a configuration option is set, only one instance of a specific learner and POT can be added to the Space Allocation screen (this also applies when adding a learner to a course from the learner's Courses tab). By default, a learner / POT can be added more than once.
To enable this:
-
In Maytas, click the M5 button at the top left and select Options.
-
Go to Courses on the left (under the Maytas 5 header).
-
Locate the General section on the right.
-
Tick the box for the config Do not allow the same POT to be added to a Course and ensure the toggle button is set to ON.
-
Click OK.
Reports Library 1.0.5.0
Upgrade the Reports Library
How to Upgrade the Reports Library
The Reports Library upgrade should be performed by an admin user, which will upgrade the reports for all users.
To enable to the Upgrade reports button for an admin user:
- Go to Tools | Edit Permissions.
- Select the user or group which requires permission.
- Go to the Commands tab.
- Expand the Support section.
- Set the Report SQL Upgrade permission to Visible.
- Click Apply and restart Maytas for the change to take effect.
For customers who manage their own systems on-premise, it is strongly advised to take a database backup before performing the upgrade. This is not necessary for hosted customers as backups are taken regularly.
To upgrade the Reports Library:
- Go to Support on the toolbar.
-
Click Upgrade reports.

- You will asked to confirm that you wish to perform the reports upgrade SQL. Click OK to continue.
- A message will appear saying that a task has been created. Click OK.
-
You can check that the upgrade was successful by going to Home on the toolbar and then selecting Server Tasks | View Jobs.

If the Status indicates that the upgrade has failed, please do not continue with importing the reports package and raise an incident on the Self Support Portal for assistance.
- Next, the reports package must be imported. Go to Home on the toolbar and click Import on the Reports panel on the ribbon.
- This will display the Report Import wizard. Click +Add Files.
- Browse to the Maytas 5\Extras\Reports Library folder of the upgrade, select one of the following packages and click Open:
- For all reports, select Reports Library 1.0.5.0 (all reports).
- For ESFA and general reports only, select Reports Library 1.0.5.0 (ESFA and general reports).m5rep.
- Click Finish to import the reports. This process may take a long time (potentially upwards of 30 minutes) depending on the size of the reports package.
-
When the reports have finished importing, click Finish.
The import log may display various warning messages, which are generally a result of report formatting and other factors which do not impact how a report runs (e.g. The text box ‘textbox3’ extends beyond the bottom edge of its container.). Unless a message indicates that the import has failed, these warnings can safely be ignored.
Terminology Updates
The Reports Library has been updated so that references to NVQ and Framework now use more appropriate terms, or are removed if no longer relevant. The changes are as follows:
| Report | Change |
|---|---|
| Activities Nearing Completion | Removed NVQ grouping (not relevant to LLWR) |
| Learner List Report LLWR | Removed NVQ grouping (not relevant to LLWR) |
| Learner List Summary Report LLWR | Removed NVQ grouping (not relevant to LLWR) |
| Learner List Report | Renamed NVQ grouping to Qualification |
| Learner List Summary Report | Renamed NVQ grouping to Qualification |
| LLWR Missing Framework Evidence Report | Removed NVQ grouping (not relevant to LLWR) |
| NVQ Level Progressions Summary | Renamed report to Aim Level Progressions Summary |
| NVQ Level Progressions | Renamed report to Aim Level Progressions |
| QAR Apprenticeship Dataset to Excel | Renamed Framework Title column to Standard / Framework Title |
| QAR ET Dataset to Excel | Renamed Framework Title column to Standard / Framework Title |
| QAR Traineeship Dataset to Excel | Renamed Framework Title column to Standard / Framework Title |
| Achievements Due (Maytas Hub - RS-ACS-LN-AD-0201) | Renamed NVQRef column to Aim Ref. and NVQ Level to Aim Level |
| Leaver Achievement Analysis (Maytas Hub - RS-ACS-LN-AN-0101) | Renamed NVQ With/Without Framework column to Main Aim With/Without Programme |
| Leaver Achievement Analysis drilldown (Maytas Hub - RS-ACS-LN-AN-0201) | Renamed Framework Completed column to LLWR Framework Completed |
| Learner Numbers Report drilldown (Maytas Hub - RS-ACS-LN-CS-0201) | Renamed Framework Completed column to LLWR Framework Completed |
| In Learning Report (Maytas Hub - RS-ACS-TR-IT-0101) | Renamed NVQ Level column to Aim Level |
| Funded/Unfunded Report (Maytas Hub - RS-TM5-FND-FU-0102) | Renamed NVQ grouping to Qualification |