Mappings
In Maytas 5, each button on the ribbon is mapped to a process. The mappings editor allows you to re-map certain ribbon buttons or create your own buttons.
To open the mappings editor, go to Tools on the toolbar and click Command Mappings on the General panel of the ribbon.
Certain buttons cannot be re-mapped, nor can the processes for them be edited, as they are fundamental to the purpose of the system. Simply put, if you can see a mapping in the list in the mappings editor, or a process in the processes editor, it can be edited. Otherwise, it cannot.
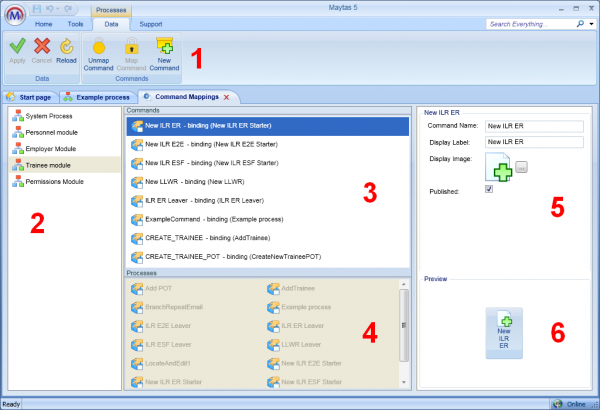
Mappings Editor Layout

-
Commands Ribbon
The Commands ribbon allows you to map/un-map a command to/from a button or create a new command.
-
Area Panel
The area panel shows different areas of the system where ribbon buttons will appear. For example, if a button is mapped in the Trainee area it will appear on the ribbon when a learner account is opened.
-
Commands
This is a list of the available ribbon buttons (or commands).
-
Processes
This is a list of the processes which can be mapped to commands.
-
Properties
These are the properties for the selected command. The command name and icon can be edited here. There is also a checkbox for publishing the command (i.e. making it available for use).
-
Preview
This shows a preview of the command as it will appear on the ribbon.
Create a New Button
This tutorial follows on directly from the Create a Process tutorial. As the purpose of a mapping is to link a button to a process, it is recommended that you follow the processes tutorial first.
- Under the Tools ribbon, click Command Mappings.
- Select the Trainee area on the left.
- Click New Command on the ribbon.
- The new command will be automatically selected. Click Unmap on the ribbon to remove the placeholder command.
- The processes panel will now become available. Locate and select the Example process created in the previous tutorial and click Map Command on the ribbon.
- On the properties panel, change the Command Name and Display Label to Example Command.
- Click
 next to Display Image, select an icon of your choice and click OK.
 - Tick the Published checkbox.
- Click Apply to save the changes.
To test that the process and mapping both work, click the preview command at the bottom-right corner. You can follow the wizard through to the end, although the preview will not save any data as it is not linked to a learner. However, as the command has been published, if you open a learner you will see the Example Command on their ribbon. To remove this, simply un-publish the command.
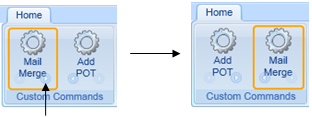
The order of custom commands on the ribbon can be changed in the Ribbon Preview panel at the bottom-centre of the screen. Select each command and move it to the desired position by clicking the left and right arrows at the bottom of the command:

Click the right arrow to move the highlighted command to the right.