5.31 Maytas LLWR Release Notes
 View contents
Note regarding submissions
We would like to remind providers to create a submission early and check for any errors using reports from LLWR-Inform. Providers should also remember to download their ULI file. After submission to the DfE, providers should check that data has submitted correctly using the available reports. Providers should check that all their expected starts and completions are submitted correctly.
Our support desk gets extremely busy in the days prior to the submission deadlines, and although we try and prioritise submission-related queries, we cannot guarantee assistance if queries are sent late. If you do encounter any issues, please ensure that you contact Maytas Support as soon as possible, as we can only rectify issues of which we are aware. We also recommend checking Maytas Communities regularly for information on any known issues and solutions. Tribal cannot be held responsible for any issues caused by your failure to comply with this advice
Technical specification
The latest Maytas and Maytas Hub technical specification can be found here.
Once the upgrade has been completed, the version number should be checked to ensure it has been successful.
- Start Maytas and go to Support on the toolbar.
- Click About.
- The version numbers should read 5.31.9510.1. If you have any other version, please ensure you have followed the upgrade instructions correctly. If you require assistance, please contact Maytas Support.
It is the responsibility of customers to ensure that users carry out any required user acceptance testing and sign off on the upgrade.
Complete the Upgrade
Features Added in the Upgrade
These are the main updates in the upgrade:
- Multiple visibility values for dynamic forms
- Improved field search in Report Generator
- Archiving of old tabs and controls
- Reports Library 1.0.5.3
- Fixes to a number of issues
Maytas 5 Version 5.31.9510.1 Release Notes
Dynamic Forms - Multiple Visibility Values
When creating dynamic forms in the Screen Designer for use in Maytas Hub, multiple values can now be entered in the Visibility On and Visibility Off fields to allow a control to be shown or hidden based on more than one field value. The values must be comma-separated (e.g. A,B,C).
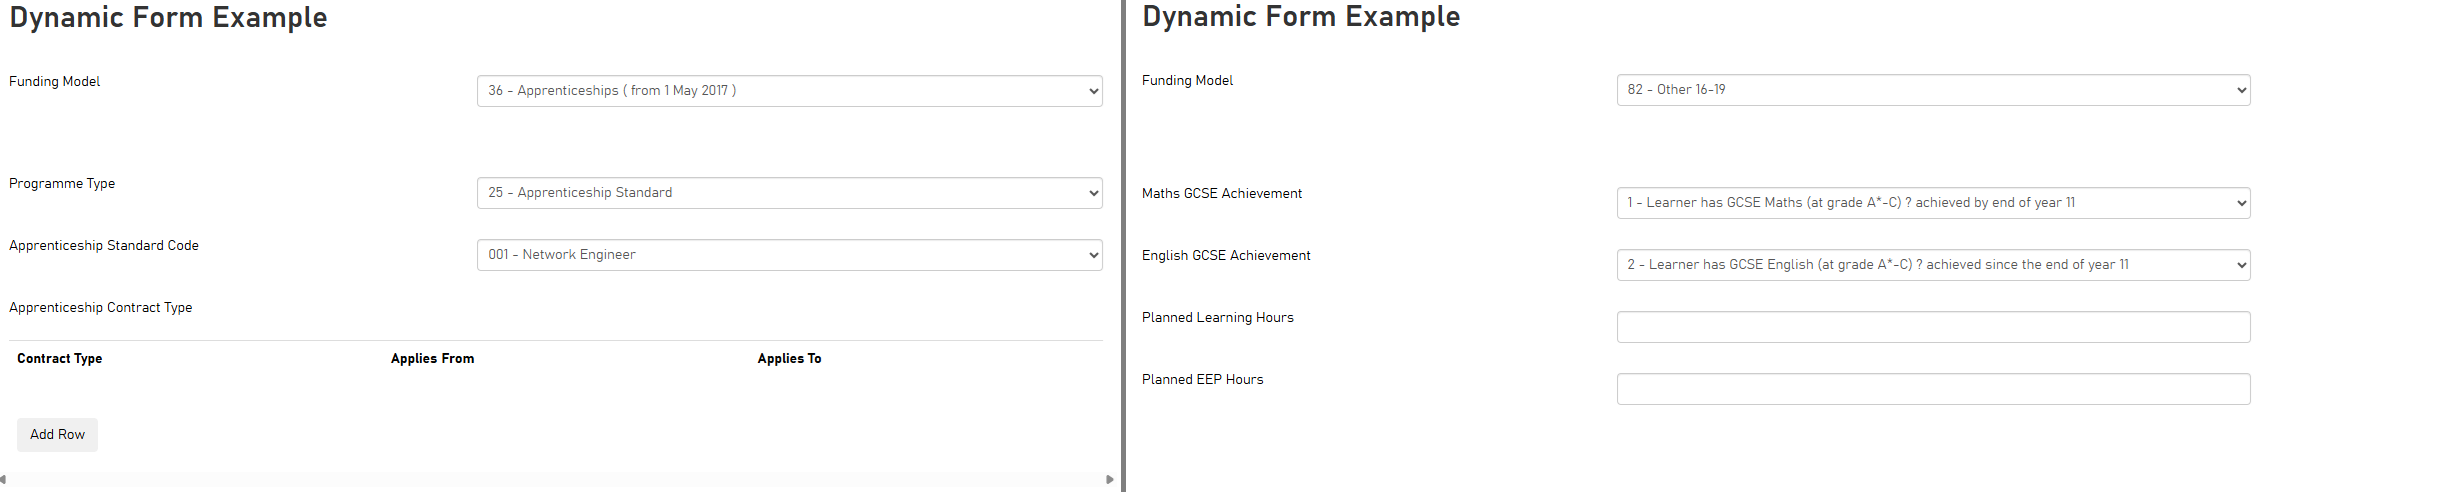
The following example shows how to implement a control that only shows on a form when funding model 35 or 36 is selected:
- In Maytas 5, go to Tools on the toolbar and select New / Load on the Screens panel of the ribbon.
- Select Trainee on the left, then double-click *(New User Control).
-
This will be the control that shows when funding model 35 or 36 is selected. Give the control a name (for this example we will call it Dynamic form control 1) and drag a selection of fields into the design area (the fields used are not important for the example).
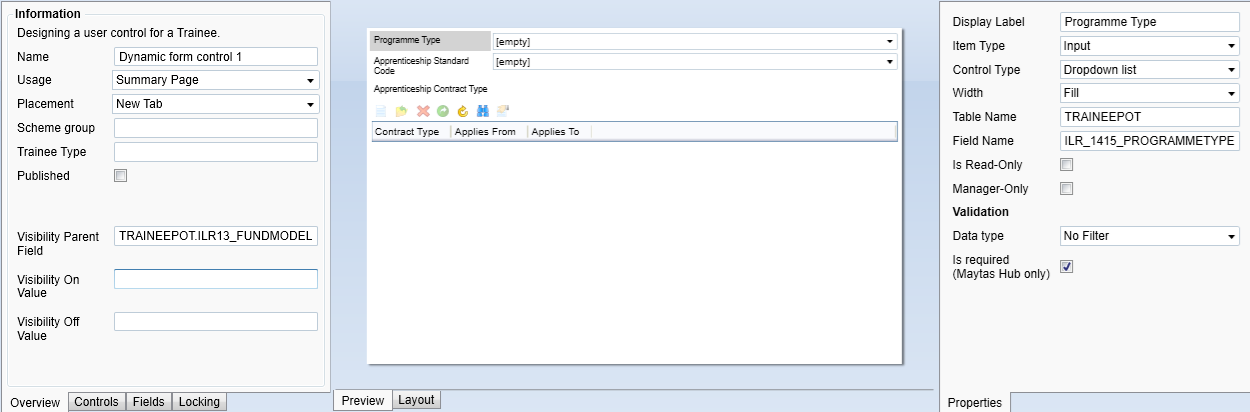
- In the Visibility Parent Field box, enter TRAINEEPOT.ILR13_FUNDMODEL.
-
In the Visibility On Value box, enter 35,36. This means that when the funding model field has a value of 35 or 36, the control will display.
If the parent field has lookups, the Visibility On or Off Value must be the shortstring value, not the longstring value. e.g. Enter 36 rather than 36 - Apprenticeships ( from 1 May 2017 ).
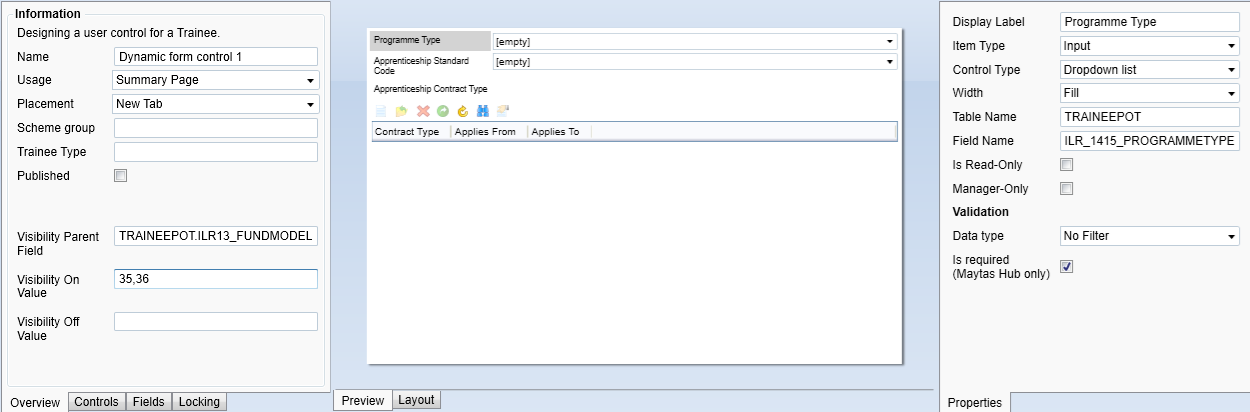
- Tick the Published box.
- Click Apply to save the control.
Next, we will create a second control that is hidden when funding model 35 or 36 is selected:
- Repeat steps 1 to 4 above to create the second control (Dynamic form control 2) with a different selection of fields. Ensure the Visibility Parent Field is also set to TRAINEEPOT.ILR13_FUNDMODEL.
-
In the Visibility Off Value box, enter 35,36. This means that when the funding model field has a value of 35 or 36, the control will be hidden, otherwise it will display.
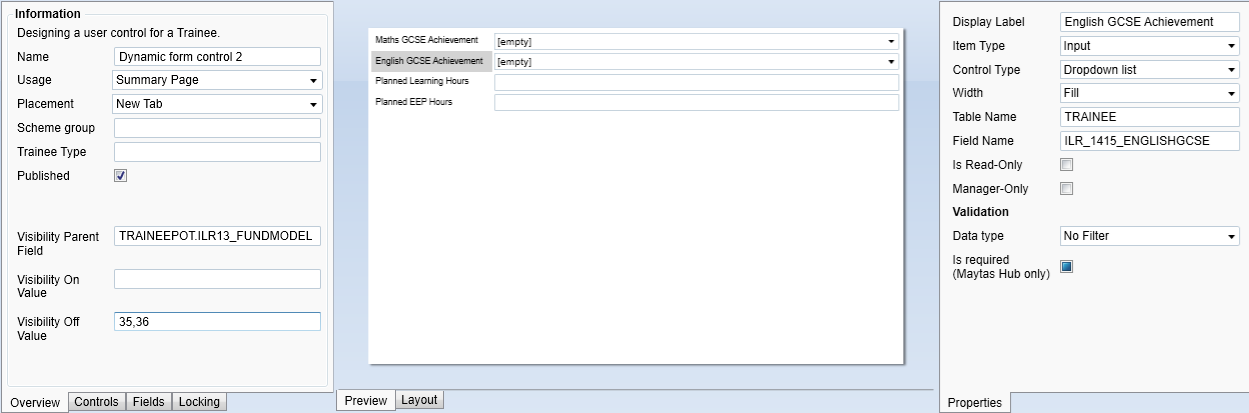
- Tick the Published box and click Apply to save the control.
Finally, the controls must be added to a tab along with Funding Model:
- Go to Tools on the toolbar and select New / Load on the Screens panel of the ribbon.
- Select Trainee on the left, then double-click *(New Tab).
- Give the tab a name (for this example we will call it Dynamic Form Example).
- Go the Fields tab at the bottom-left, go to the Trainee POT section and drag the field ILR13_FUNDMODEL onto the design area.
- Go to the Controls tab at the bottom-left and expand the User section.
-
Locate the controls created above and drag them onto the design area.
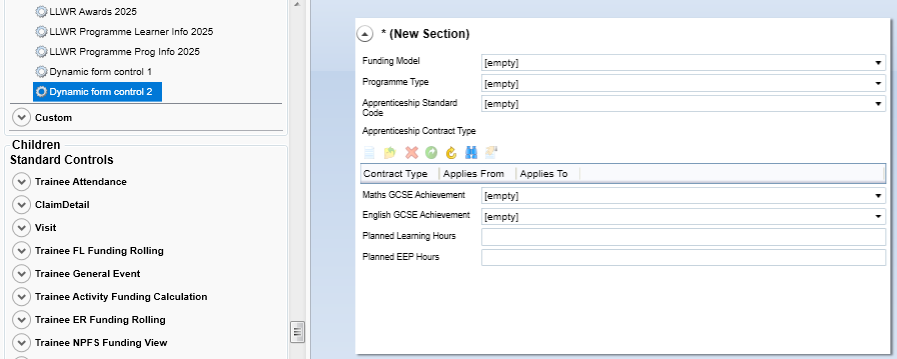
- Go to the Overview tab at the bottom-left and tick the Published box and the Trainee box (in the Publish to Hub section).
- Click Apply, then go to Home on the toolbar and click the Sync button.
The screen will now appear in Maytas Hub on learner records. When Funding Model is set to 35 or 36, Dynamic form control 1 will show, otherwise Dynamic form control 2 will show.
Learner History Improvements
Recording of Last Template Applied
The Learner History tool now includes a record of the last template that has been applied to a learner:
-
Open an ILR learner record.
-
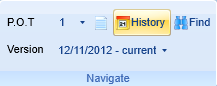
Click the History button on the Navigate panel of the ribbon.
-
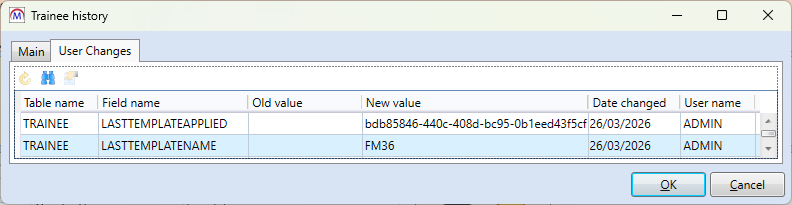
The Trainee History window will appear. Go to the User Changes tab.
-
The latest applied template will be displayed over two rows - one to show the template's ID and the other to show the template's name.
Description Field in Schema Editor
The Schema Editor now lets you optionally enter a description for a field to describe its purpose (e.g. for user-created fields):
-
Go to Tools on the toolbar and click DB Schema on the General panel of the ribbon.
-
Click the arrow to the left of Tables to expand the list of tables.

-
Click the arrow to the left of the required table to expand its list of fields.
-
Select the required field.
-
The field's details will be displayed on the right. If you see a Set button under Field Properties, click the button to show the properties.
-
Enter the description (note that this is limited to 500 characters).

-
Click Apply to save the changes.
-
Go to Home on the toolbar and click the Sync button.
The description is stored in the field M32$_FIELDATTR.DESCRIPTION.
Report Generator - Improved Field Search
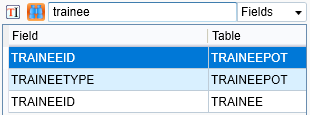
The field search tool in Report Generator has been improved so that it only looks at the field name, rather than the table name as well. For example, if you previously searched for trainee, it would have returned all fields where the table name contained trainee (such as TRAINEEPOT), whereas now it will only return fields where the name contains trainee.
Archiving of Old Tabs and Controls
The Screen Designer now includes the ability to archive old tabs and controls, as well as the option to restore tabs and controls which have been archived. All standard ILR and LLWR tabs and controls from 2019 and earlier have been automatically archived.
When a tab is archived, it is stored in the M32$_TABS_ARCHIVE table, and when a control is archived it is stored in M32$_USERCONTROLS_ARCHIVE.
Any nested controls within the selected tab or control will also be archived. Similarly, when a tab or control is restored, any nested controls will also be restored.
To archive a tab or control:
-
Click New / Load on the Screens panel of the ribbon.
-
Select the tab or control you want to archive.
-
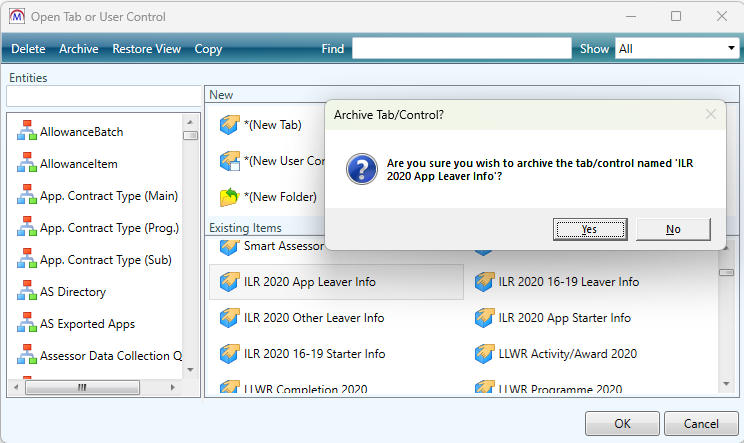
Click the Archive button at the top of the window. You will be asked to confirm this - click Yes to proceed.
-
The tab or control will now be archived.
If you attempt to archive a control that is used on a tab, the archiving will not go ahead.
To restore an archived tab or control:
-
Click New / Load on the Screens panel of the ribbon.
-
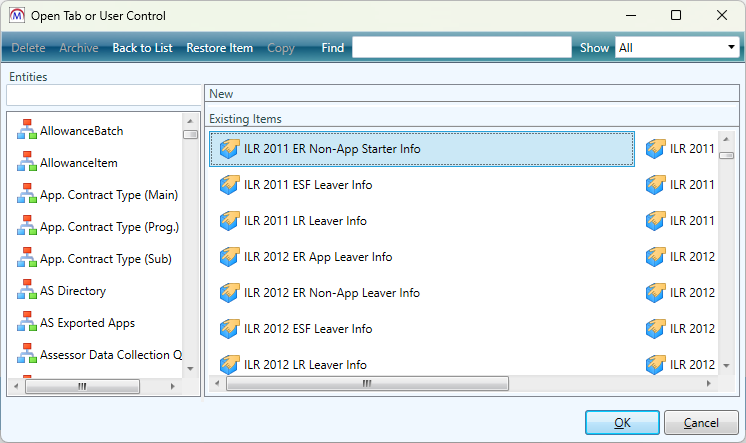
Click Restore View at the top of the window. This will display all the archived tabs and controls.
-
Select the tab or control to restore and click Restore Item at the top of the window.
-
You will be asked to confirm the restoration. Click Yes to proceed.
-
A message will appear informing you to restart Maytas. Click OK, click Cancel to close the tabs window, then go to Home on the toolbar and click Sync.
-
Restart Maytas.
You can return from the restore list to the list of active tabs by clicking Back to List at the top of the window.
Reports Library 1.0.5.3
Upgrade the Reports Library
How to Upgrade the Reports Library
The Reports Library upgrade should be performed by an admin user, which will upgrade the reports for all users.
To enable to the Upgrade reports button for an admin user:
- Go to Tools | Edit Permissions.
- Select the user or group which requires permission.
- Go to the Commands tab.
- Expand the Support section.
- Set the Report SQL Upgrade permission to Visible.
- Click Apply and restart Maytas for the change to take effect.
For customers who manage their own systems on-premise, it is strongly advised to take a database backup before performing the upgrade. This is not necessary for hosted customers as backups are taken regularly.
To upgrade the Reports Library:
- Go to Support on the toolbar.
-
Click Upgrade reports.

- You will asked to confirm that you wish to perform the reports upgrade SQL. Click OK to continue.
- A message will appear saying that a task has been created. Click OK.
-
You can check that the upgrade was successful by going to Home on the toolbar and then selecting Server Tasks | View Jobs.

If the Status indicates that the upgrade has failed, please do not continue with importing the reports package and raise an incident on the Self Service Portal for assistance.
- Next, the reports package must be imported. Go to Home on the toolbar and click Import on the Reports panel on the ribbon.
- This will display the Report Import wizard. Click +Add Files.
- Browse to the Maytas 5\Extras\Reports Library folder of the upgrade, select one of the following packages and click Open:
- For all reports, select Reports Library 1.0.5.3 (all report updates).
- For LLWR and general reports only, select Reports Library 1.0.5.3 (LLWR and general report updates).m5rep.
- Click Finish to import the reports. This process may take a long time (potentially upwards of 30 minutes) depending on the size of the reports package.
-
When the reports have finished importing, click Finish.
The import log may display various warning messages, which are generally a result of report formatting and other factors which do not impact how a report runs (e.g. The text box ‘textbox3’ extends beyond the bottom edge of its container.). Unless a message indicates that the import has failed, these warnings can safely be ignored.
Learner Wellbeing Report Improvements
The Learner Wellbeing report now has a bar chart showing the number of status submissions each week, where the submission is each learner's latest of that rating (good, bad, etc) within the selected date range. For example, if a learner submits three ratings of good in the date range, only the latest of those is shown (in the week in which it occurs).
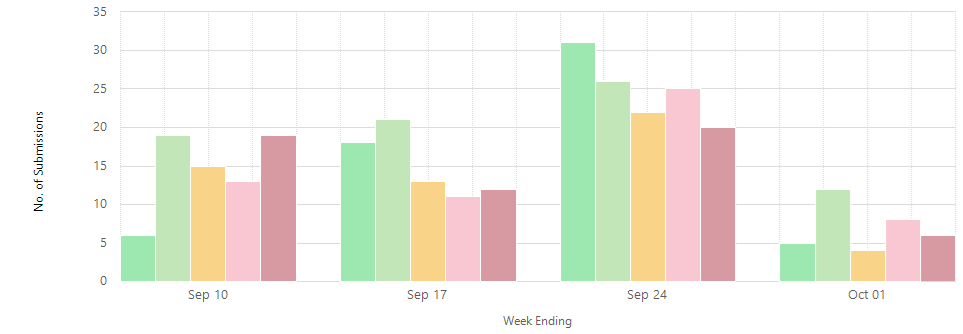
It is important to note that this is not the same as the data shown in the pie chart and in the ratings summary above the bar chart, as these count each learner's most recent status of ALL selected statuses in the date range. The bar chart shows a learner's most of recent submission of each separate status in the date range.
Additionally, the report now works in both Maytas Hub and Maytas 5. When running the report in Maytas 5, it can be found in the Maytas Hub folder of the Reports Library.
New Report - Learner Wellbeing History and Review
The Learner Wellbeing History and Review report consists of two tables which help track and review negative statuses that have been submitted by learners.
The report works in both Maytas Hub and Maytas 5. When running the report in Maytas 5, it can be found in the Maytas Hub folder of the Reports Library.
Parameters
-
Start / end date - This filters the results in the second table, where the status submission date is in the date range. Results in the first table are not affected by these dates.
-
Assessor types - The learner-assessor link types to use.
-
Tables to show - Lets you choose whether to show both tables (the default) or only one of the tables.
-
Hub username - If the report is shown in Maytas 5, the results can be filtered by a specific assessor by entering their Hub username (the default value of % shows results for all assessors). If the report is run in Maytas Hub, this parameter will be automatically populated with the username of the assessor running the report.
Negative statuses not yet reviewed
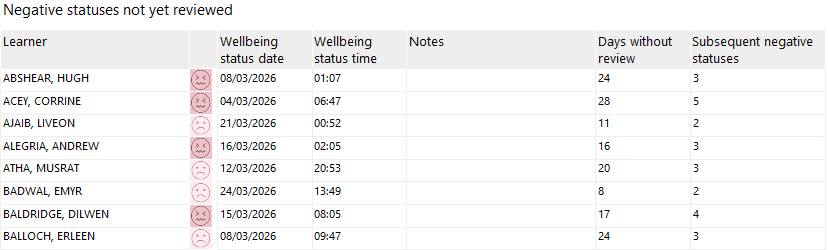
This lists all learners with a negative status that has not yet been reviewed by an assessor. If a learner has multiple negative statuses that have not been reviewed, the earliest one is shown. The results in this table are not limited by the selected date range.
-
Days without review - Counts the number of days between the earliest unreviewed negative status and the current date.
-
Subsequent negative statuses - Counts the number of additional negative statuses the learner has submitted since the one displayed.
Negative statuses with completed review
This lists negative statuses where an assessor has reviewed them, where the original status submission date is in the selected date range.

-
Review completed by - This is not necessarily the learner's assessor, but the assessor who completed the review.
-
Days between status and review - Counts the number of days between the initial negative status and the review date.