Maytas Hub Release Notes
 View contents
Technical specification
The latest Maytas and Maytas Hub technical specification can be found here.
Maytas Hub Release Notes – Version 5.32.9710.2
Learner Journey Updates
Learner Journey for employer users
Employer users can now view the Learner Journey tab on their learners' records. This must first be enabled via a permission:
-
Go to Web User Editor on the sidebar.
-
Search for and open the user or group that requires permission.
-
Expand the Custom Tabs section.
-
Locate the Learner Journey row in the Trainee Editor section and set the dropdown box to Visible.
-
Click Save.
When the employer user opens a learner record, they will now be able to access the Learner Journey tab in a read-only format. Employer users cannot edit or complete journey items.
See here for details on the Learner Journey tab.
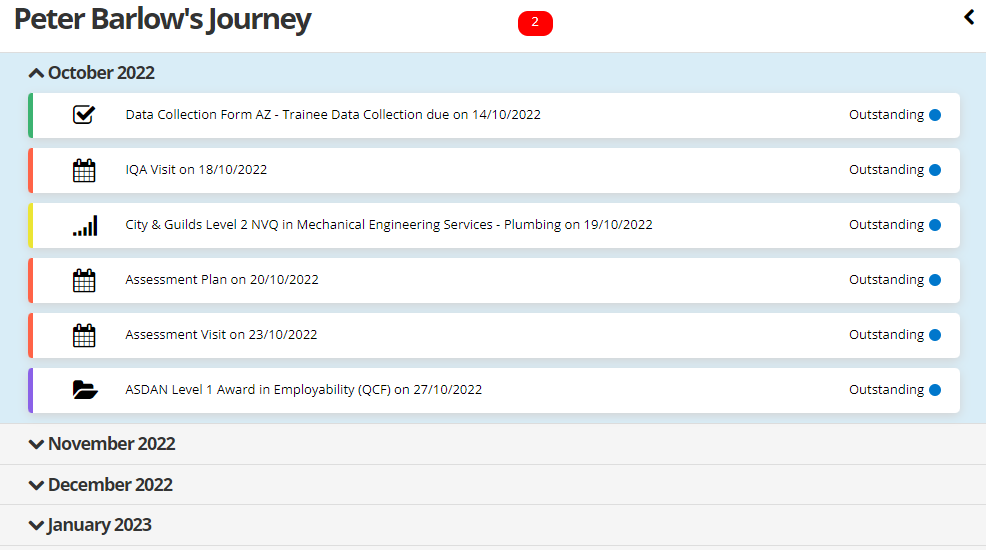
Snapshots
The Learner Journey can now include snapshot events, which occur periodically (every 12 weeks by default) and show a summary of a learner's journey status at that point in time.
This must first be enabled via configuration options:
-
Go to Settings on the sidebar.
-
Click the System Configuration button.
-
Go to Learner Journey on the left (under the Maytas Hub Online header).
-
In the Snapshots section on the right, set the config options as required:
-
Show snapshots to assessors / employers / learners - Set the toggle button to ON for the user types you want to be able to see snapshots.
-
Snapshot interval (weeks) - Enter the number of weeks between snapshots. If the config is not set, it will default to 12 weeks.
-
-
Click Save.
Snapshots will then be available in the Learner Journey for the selected user types.
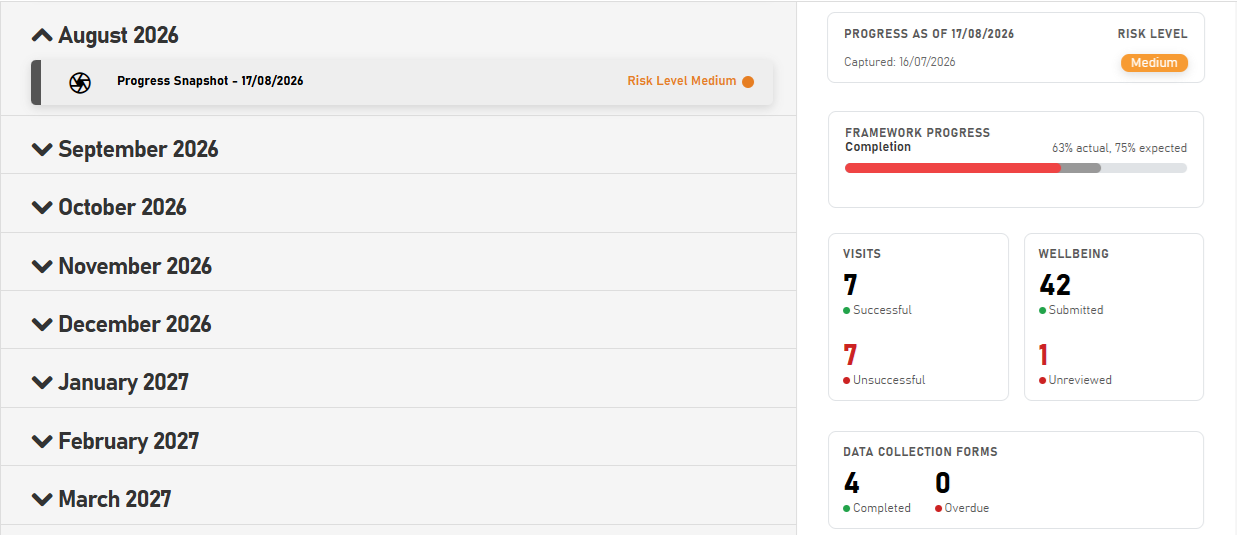
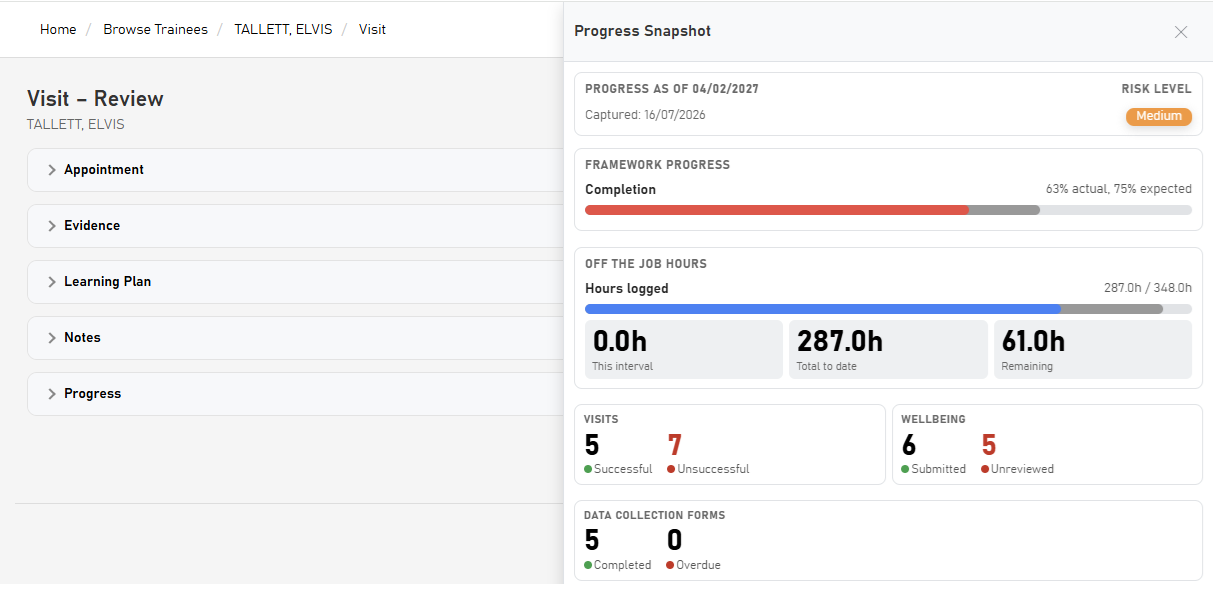
When a snapshot is selected, it shows a collection of information which covers the entire framework to that point in time:
-
Risk level - The Learner Journey calculated risk level (low, medium or high). See
-
Framework progress - The overall actual vs expected progress for the framework.
-
Visits - The number of successful and unsuccessful visits to date.
-
Wellbeing - The number of submissions and unreviewed statuses to date.
-
Data collection forms - The number of completed and overdue forms to date.
Off-the-Job Hours
The Learner Journey now includes a learner's recorded OTJ hours.
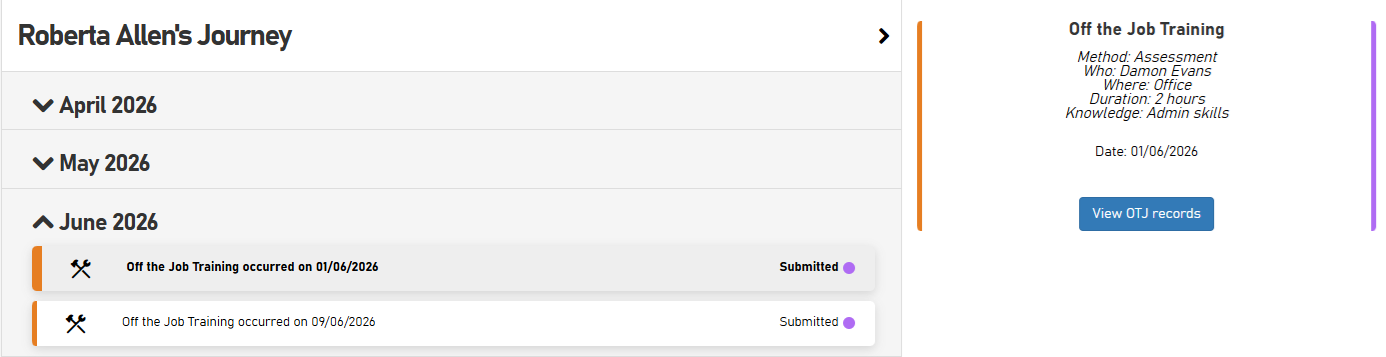
OTJ entries can be viewed in the Learner Journey by clicking the  button to open the side panel and ticking the Off the Job Training category.
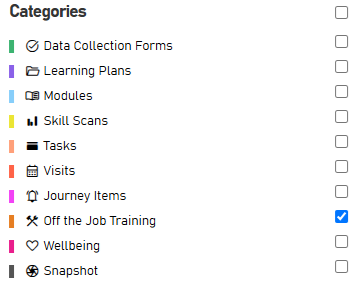
When an OTJ entry is selected, its details will be displayed on the side panel, along with a button to view the record on the Off the Job Training screen.
Wellbeing ratings and notes
The Learner Journey for assessor users now includes a learner's wellbeing ratings and any associated notes.
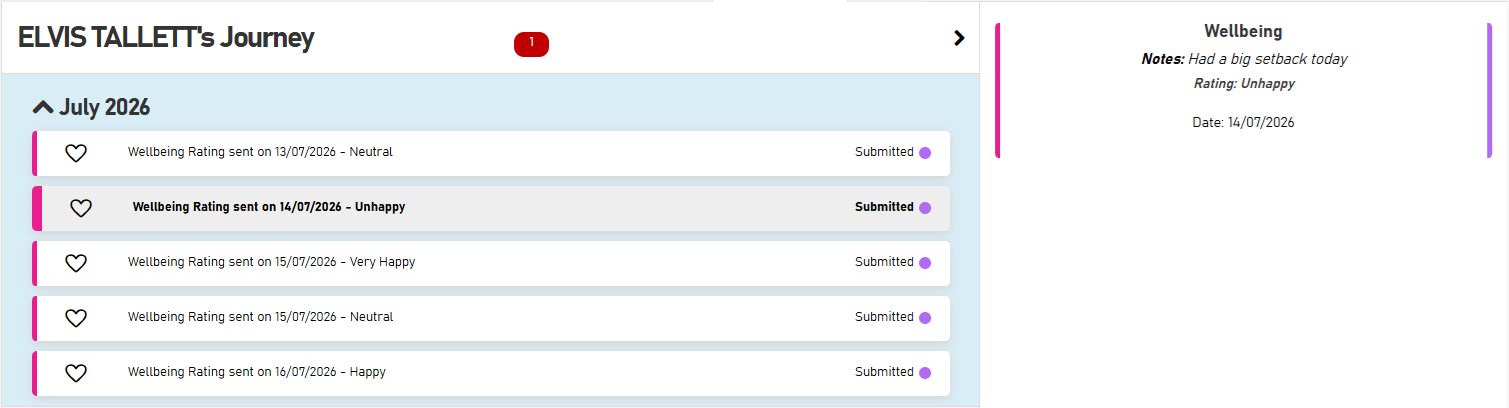
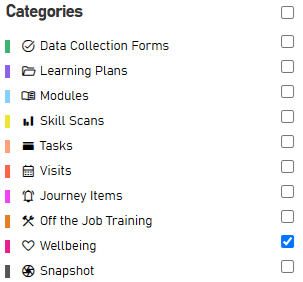
Wellbeing entries can be viewed in the Learner Journey by clicking the button to open the side panel and ticking the Wellbeing category.
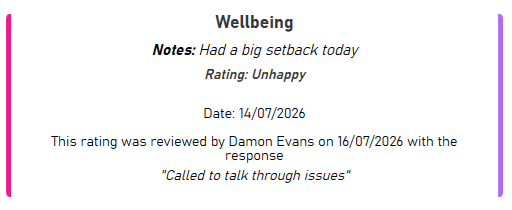
When a wellbeing entry is selected, the details will be displayed on the side panel, along with any notes associated with the entry.
If an assessor has reviewed negative feedback from a learner, this will also be included.
Learning plan events - jump to plan
When viewing learning plan events in the Learner Journey, a button to view the plan is now included on the side panel when the event is selected.

Clicking the button will open the relevant visit on the Learning Plan page.
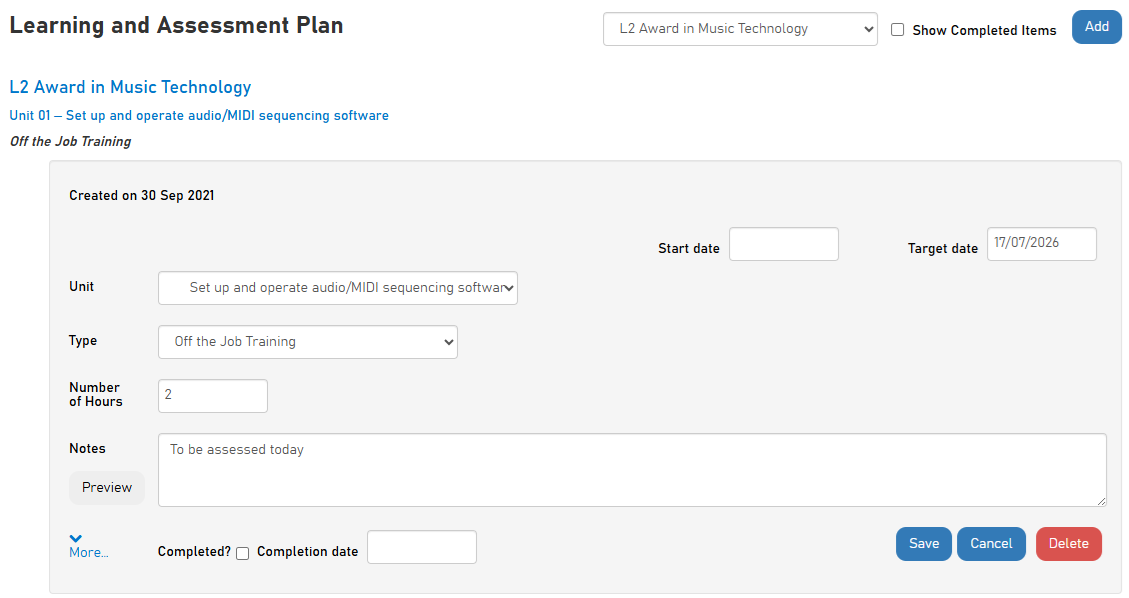
Learning Plan - Start and Completion Dates
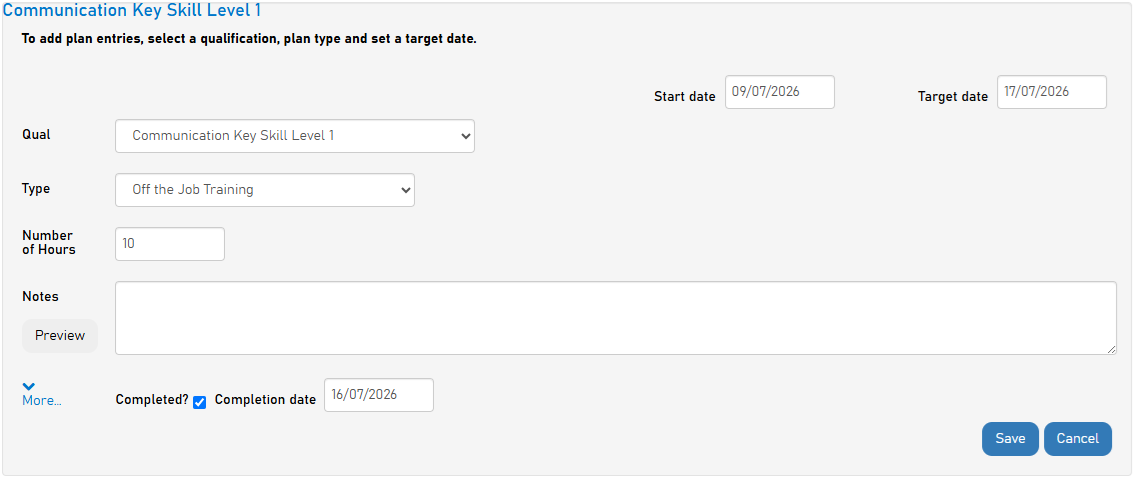
Learning plan activities now include an optional start and completion date (as well as the existing target date field) so that learners and assessors can track when an activity was started and completed.
Learning plans can be accessed via the Learning Plan page when editing a visit.
Visit Review Tab
A configuration option is available which consolidates all tabs in the visits editor onto one screen.
To enable this:
-
Go to Settings on the sidebar.
-
Click the System Configuration button.
-
Go to Assessor Login on the left (under the Maytas Hub Online header).
-
Locate the Visits section on the right.
-
Tick the box for the Use Visit Review view option and ensure the toggle button is set to ON.
-
Click Save.
Assessor users will now see one screen when editing a visit, with the usual visit tabs organised into expandable sections instead. Click a section's header to expand or collapse it.
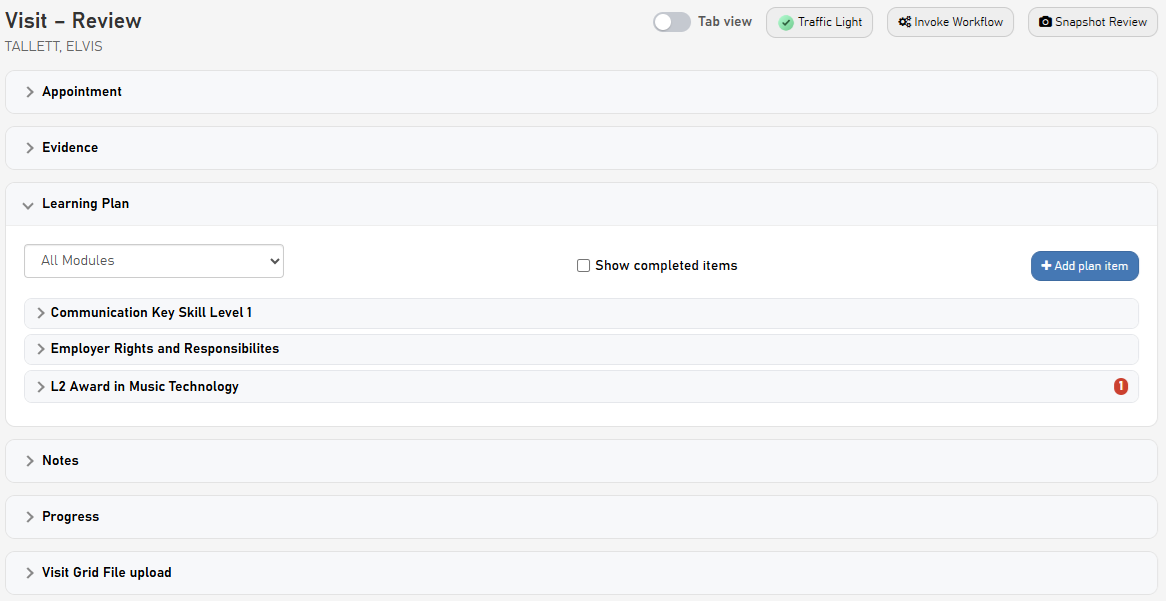
The Tab view button at the top of the screen can be used to toggle between this view and the tab view instead.
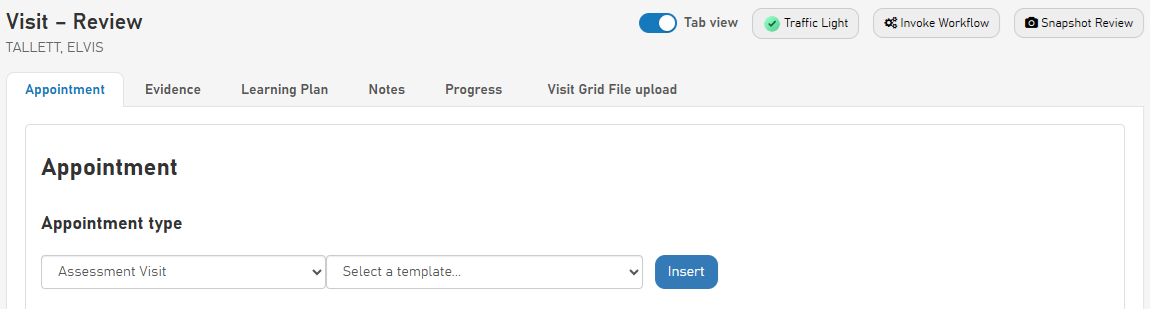
The Traffic Light button will display the learner's traffic light statuses on the sidebar. A new status can be added by clicking the Add Entry button and existing statuses can be amended by clicking the Edit button at the end of the relevant row.

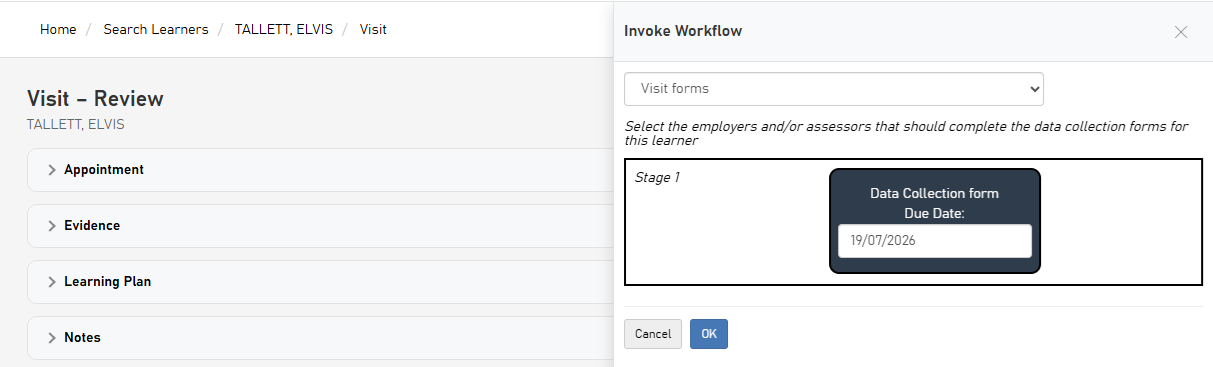
The Invoke Workflow button allows you to invoke a visit workflow against this visit. Choose the workflow from the dropdown box, amend the details as required and click OK.
The Snapshot Review button will be visible if snapshots have been enabled (see above). Clicking it shows the learner's latest snapshot summary on the sidebar.
Learner Users - New Evidence Wizard
A new, streamlined version of the evidence wizard for learner users can now be enabled via a configuration option (the existing version of the wizard remains the default). To enable this:
-
Go to Settings on the sidebar.
-
Click the System Configuration button.
-
Go to Learner Login on the left (under the Maytas Hub Online header).
-
Locate the Evidence Wizard section on the right.
-
Tick the box for the Use new Evidence Wizard option and ensure the toggle button is set to ON.
-
Click Save.
The new wizard is accessed in the same way, by clicking the Evidence button on the Actions panel of the learner dashboard.
Each step of the wizard is detailed below. Learners can see an explanation for their current step by clicking the Step guidance prompt.

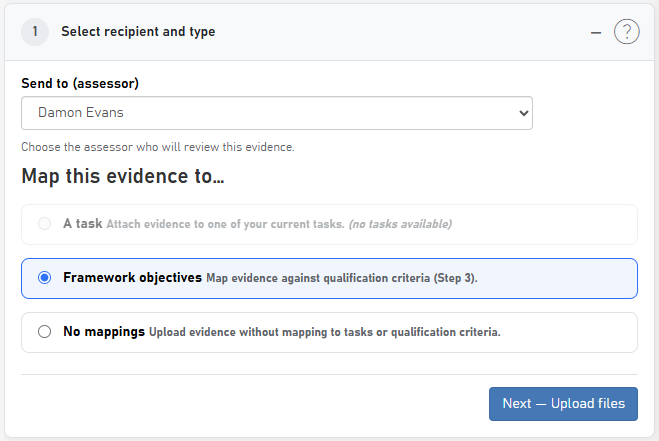
1 - Select recipient and type
First choose the assessor to receive the evidence from the dropdown box.
Next, choose whether to map the evidence against a task or objectives (if available), or alternatively choose No mappings.
When ready, click Next - Upload files to move to the next step.
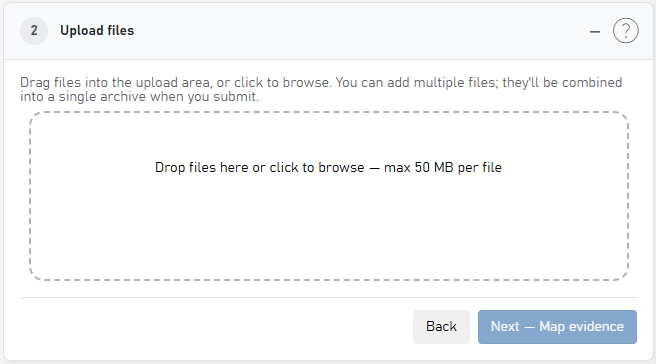
2 - Upload files
Upload one or more evidence files by clicking the upload area or dragging files to it (files must each be 50 MB or less).
When you have uploaded all files that relate to the evidence you wish to submit, you can change the display names as required. You can also remove a file by clicking the Remove button beneath it.
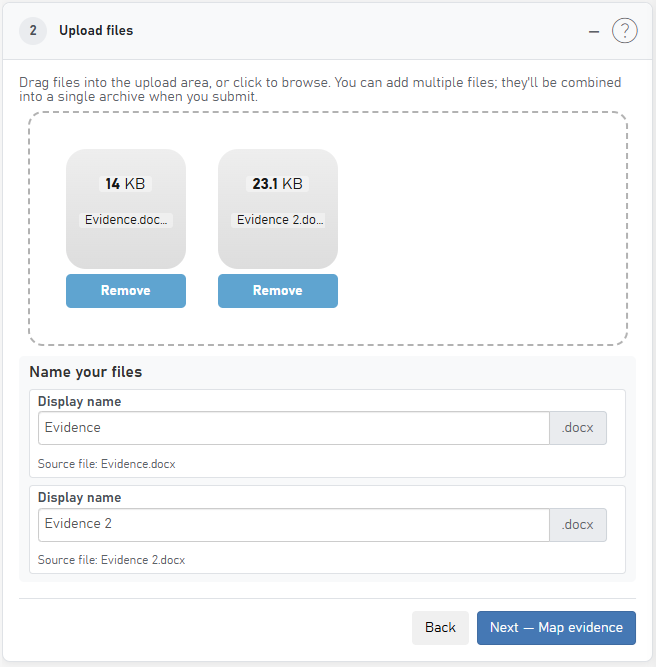
When ready, click Next - Map evidence to move to the next step.
3 - Map evidence
This step only applies when Framework objectives was selected in step 1 and is skipped for other selections.
This step lets you map evidence to objectives criteria. First, select the qualification and unit from the dropdown boxes. This will display the available criteria for that unit on the side panel.
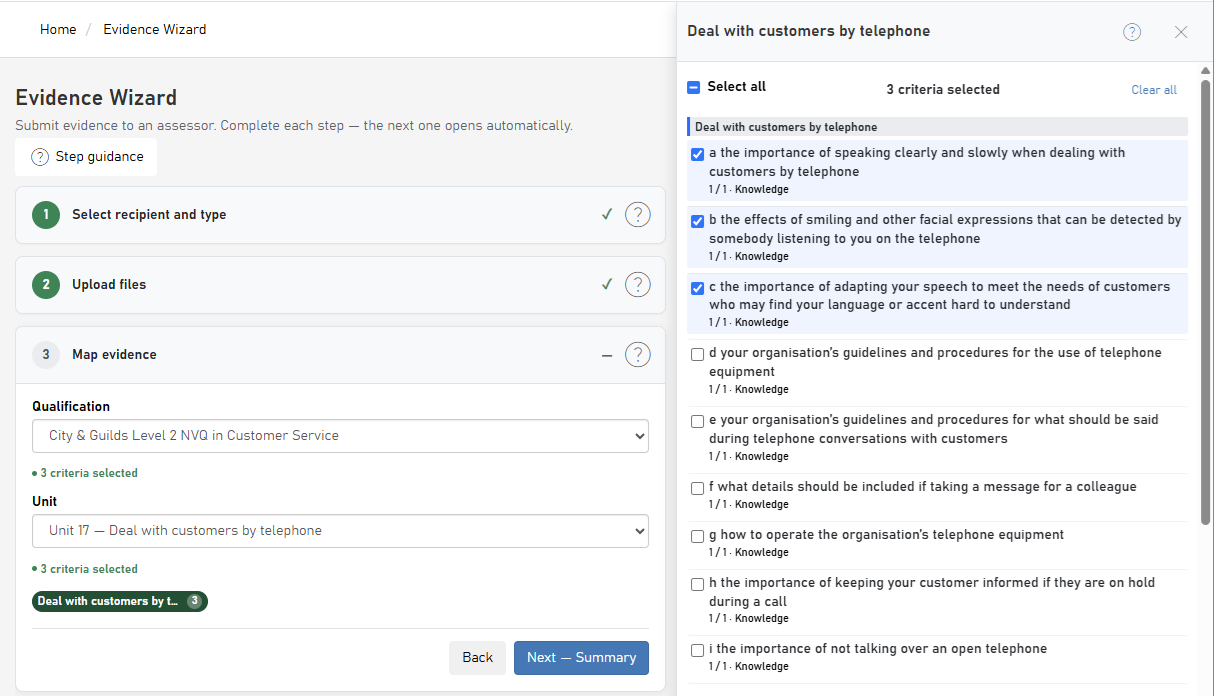
Select the criteria which relates to your evidence. You will see a summary of how many items are selected at the bottom-left.
If your evidence relates to criteria in multiple units, you can select a different unit and set the required criteria. Your selections for the first unit will be retained and summarised separately. You can quickly swap between each unit with criteria selected by clicking the green summaries at the bottom-left.
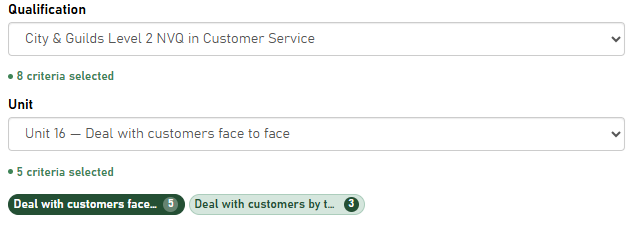
When ready, click Next - Summary to move to the next step.
4 - Summary & submit
In the final step, enter a short title in the Message subject box (minimum 10 characters) so that the assessor can identify the submission.
You can optionally also enter a file name for the downloaded assessment file associated with the submission.
Depending on your configuration options, you may also see options to add a comment for the assessor and add an off-the-job training entry associated with the submission.
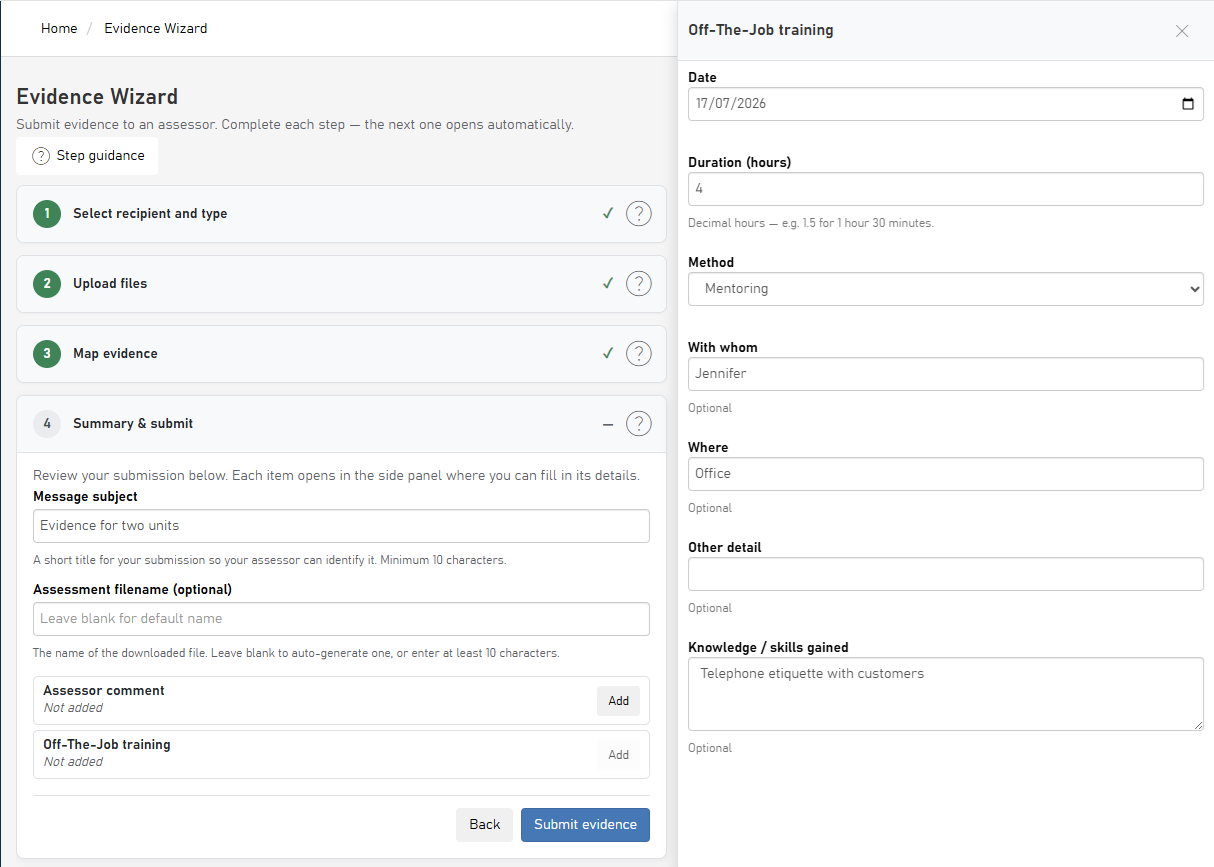
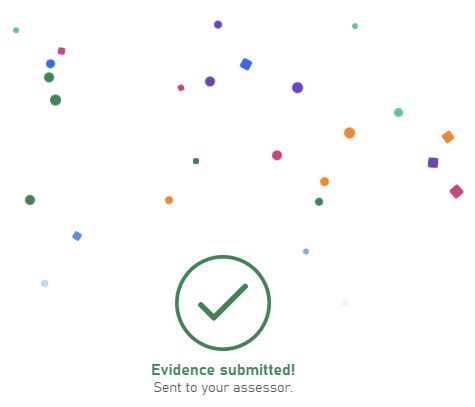
Click Submit evidence when ready. You will receive confirmation that the evidence has been successfully submitted.
Export Off-the-Job Training Activity
Off-the-job training activity can now be exported to a .csv file:
-
Open a learner's record.
-
Go to the Off-the-Job Training tab.
-
Click the Export button at the bottom of the screen.
This will download a .csv file containing all the learner's OTJ activity entries, with the columns Line No, Date, Method, Duration, Who, Where and Validated By.
Recognised Prior Learning (RPL) Beta
The RPL features included in this release should be considered a beta version and so please be aware that issues may be encountered. RPL features are also subject to change in future releases.
The RPL beta tab is now available when viewing a learner record as an assessor user. The tab is used to calculate the maximum funding to be received for each of a learner's base modules, versus the total delivery cost.
The process which produces this calculation is as follows:
Steps in the Module Editor only need to be configured once.
-
RPL bands are configured in the Module Editor. These determine funding reduction percentages to apply in the calculation based on skill scan scores.
-
The RPL tab is configured for a base module in the Module Editor. This allows you to link a module to an OTJ standard to determine the total required hours and maximum funding. You can also set the total delivery cost and the RPL banding to use.
-
Planned hours are entered against criteria for the module in the Module Editor (including criteria for units and elements).
The following steps are performed per learner.
-
A learner on the module is assigned a skill scan which is flagged as an RPL scan.
-
Once the learner has completed the skill scan, their scores are displayed to the assessor on the RPL tab on the learner's record for approval.
-
When the scores are approved, the calculation and results are shown on the RPL tab, using the details specified in the Module Editor and by applying any reductions from the RPL band that corresponds to the skill scan's average score.
Full details of these steps and the calculation can be found below.
Grant RPL Administrator permission
Assessor users must be granted permission to use the RPL features:
-
Go to Web User Editor on the sidebar.
-
Search for and open the user or group that requires permission.
-
Expand the Permissions section.
-
Tick the box for the RPL Administrator permission (under the RPL header).
-
Click Save.
RPL band configuration
RPL bands determine the funding reduction percentages to apply based on the average score that a learner submits for an RPL skill scan.
-
On the sidebar, go to Module Editor.
-
Click Configure RPL Bands.

-
Click Add Group.
-
Enter a name for the group and a description. If you want to set this group as the default, tick the checkbox. Click Save to create the group.

-
Next you must create the bands for the group. Click Add Item.

-
Enter the minimum and maximum scores for the band, as well as the reduction value (this is the percentage by which the planned hours for the module will be reduced by to determine the RPL hours). You can optionally also enter notes about the band.
Click Save to create the band.

-
Create additional bands as required. Note that bands with overlapping scores (e.g. 0-3 and 2-4) are not permitted within the same group. If a score is not covered by the bands in a group, no reductions will be applied as a result of that score.

-
The RPL banding group is now ready to be applied to a module.
Additional groups can be created as required.
Existing groups or individual bands can be edited or deleted using the buttons at the end of the relevant row.
Base module RPL configuration
Each base module that you wish to use for RPL must be configured:
-
On the sidebar, go to Module Editor.
-
Search for the module and click edit at the end of the row in the results.
-
The module structure will be displayed. Select the base module (the top entry) and click the Edit button.
-
On the side panel that appears, go to the RPL tab.

-
The Total Required OTJ Hours and Max Funding fields can be entered manually, or they can be populated by linking to an OTJ standard.
To link to a standard, enter the title or code in the search box then select the standard from the list that appears. This will populate the two fields automatically.
If you wish to override the values once they have been populated, click the Override OTJ values button and amend the values as needed.
-
Tick the Flag first Skill Scan for RPL box if you want a learner's first skill scan for the module to be flagged as an RPL scan.
-
Enter the Total Delivery Cost.
-
Select the RPL Banding Group to use from the dropdown box. If you have specified a default group, this will already be selected.
-
Click Save at the top of the side panel when finished.
Enter planned hours
The RPL calculation uses the planned hours listed against all criteria for the relevant module, including the base module, units and elements.
To enter planned hours against criteria:
-
On the sidebar, go to Module Editor.
-
Search for the module and click edit at the end of the row in the results.
-
The module structure will be displayed. Select the objective that you wish to enter planned hours against and click the Edit Criteria button.
This example assumes that the selected objective already has criteria entered against it.
-
Complete the Planned Hours column as required.

-
Click Save at the top of the screen.
Assign an RPL scan to a learner
Once a module has been configured for RPL, learners on that module can be assigned a skill scan flagged for RPL use, so that the average score of the skill scan can be used in the RPL calculation.
-
Open the learner record for a learner on an RPL-configured module.
-
Go to the Skill Scan tab.
-
Click the Add Skill Scan button.
-
Select the framework and module and select the date to schedule the scan for. Also ensure that To be completed by is set to Trainee.
-
Tick the Flag as RPL scan box. If this box is not ticked, the skill scan will not be used in RPL calculations.

-
Click Create Scan.
The RPL scan will now be assigned to the learner for completion on the scheduled date.
RPL scans appear as normal skill scans for learners and are completed in the same way.
Approve the RPL scan
Once a learner has submitted their scores for an RPL scan, the assessor must approve their scores on the RPL tab.
-
Open the learner's record and go to the RPL tab.
-
The tab shows each of a learner's base modules in collapsible sections. Click a module title to expand or collapse that section.
-
Expand the module which the learner completed the RPL scan for. You will see the learner's submitted scores for review.
If you wish to approve the scores, click the Approve RPL Scan button at the bottom.
If you wish the learner to retake the skill scan, assign another RPL scan to them. Each RPL scan for a module replaces the previous one.

-
Once you have approved the RPL scan, the results will be shown, along with the fields used for the calculation (see the next section for details).
RPL tab fields and calculation
When an RPL scan is approved, the RPL tab shows the calculated result for the maximum funding to be received, as well as the fields used to produce that figure.

The fields used in the calculation are defined as follows:
| Field | Definition |
|---|---|
| Total Reduced OTJ Hours | Total Planned Hours - Recognised Prior Learning Hours |
| Total Required Hours | Specified in the module's configuration (Total Required OTJ Hours), either entered manually or taken from a linked OTJ standard |
| Total Planned Hours | The sum of all planned hours for all criteria on the module, at all levels (base, unit and element) |
| Banding Reduction % (not shown) | The percentage reduction to apply, taken from the RPL band that corresponds to the average score in the RPL scan |
| Recognised Prior Learning Hours | Sum of planned hours for criteria in the RPL scan x Banding Reduction % |
| Total Deduction (%) | (Recognised Prior Learning Hours / Total Required Hours) x 100 |
| Maximum Funding Available (£) | Specified in the module's configuration (Max Funding), either entered manually or taken from a linked OTJ standard |
| Pricing Reduction (%) | Half of the Total Deduction percentage |
| Funding Reduction (£) | (Pricing Reduction (%) x Maximum Funding Available (£)) / 100 |
| Manual Adjustment (£) | This can optionally be entered to manually adjust the final funding value. Click Save after entering the figure, which can be positive or negative. |
| Maximum Funding to be received (£) | Maximum Funding Available (£) - Funding Reduction (£) + Manual Adjustment (£) |
| Total Delivery Cost (£) | Specified in the module's configuration |
Using the above image as an example to work through the calculation (with an RPL scan where every score was entered as 1):
-
Average RPL scan score = 1, which places it in the 0-3 band with a Banding Reduction of 20%
-
42 Total Planned Hours x 20% Banding Reduction = 8.4 RPL Hours (displayed to the nearest integer, which is 8)
-
42 Total Planned Hours - 8.4 RPL Hours = 34 Total Reduced OTJ Hours (rounded to the nearest hour)
-
(8.4 RPL Hours / 348 Total Required Hours) x 100 = 2.41% Total Deduction
-
2.41% Total Deduction / 2 = 1.21% Pricing Reduction
-
(1.21% Pricing Reduction x £4000 Maximum Funding Available) / 100 = £48 Funding Reduction (rounded to the nearest £)
-
£4000 Maximum Funding Available - £48 Funding Reduction + £100 Manual Adjustment = £4052 Maximum Funding to be received
-
£4052 Maximum Funding to be received - £3400 Total Delivery Cost = £652 surplus
If the learner were to later perform another RPL scan and submit a score of 9 for all criteria, the calculation would change as follows:
-
Average RPL scan score = 9, which places it in the 7-9 band with a Banding Reduction of 5%
-
42 Total Planned Hours x 5% Banding Reduction = 2.1 RPL Hours (displayed to the nearest integer, which is 2)
-
42 Total Planned Hours - 2.1 RPL Hours = 40 Total Reduced OTJ Hours (rounded to the nearest hour)
-
(2.1 RPL Hours / 348 Total Required Hours) x 100 = 0.6% Total Deduction
-
0.6% Total Deduction / 2 = 0.3% Pricing Reduction
-
(0.3% Pricing Reduction x £4000 Maximum Funding Available) / 100 = £12 Funding Reduction (rounded to the nearest £)
-
£4000 Maximum Funding Available - £12 Funding Reduction + £100 Manual Adjustment = £4088 Maximum Funding to be received
-
£4088 Maximum Funding to be received - £3400 Total Delivery Cost = £688 surplus
Workflow Completion Email - Full Name Parameter
When configuring the body for workflow completion emails, a new {{trainee}} parameter can be used to insert a learner's first name and surname.