Web User Editor
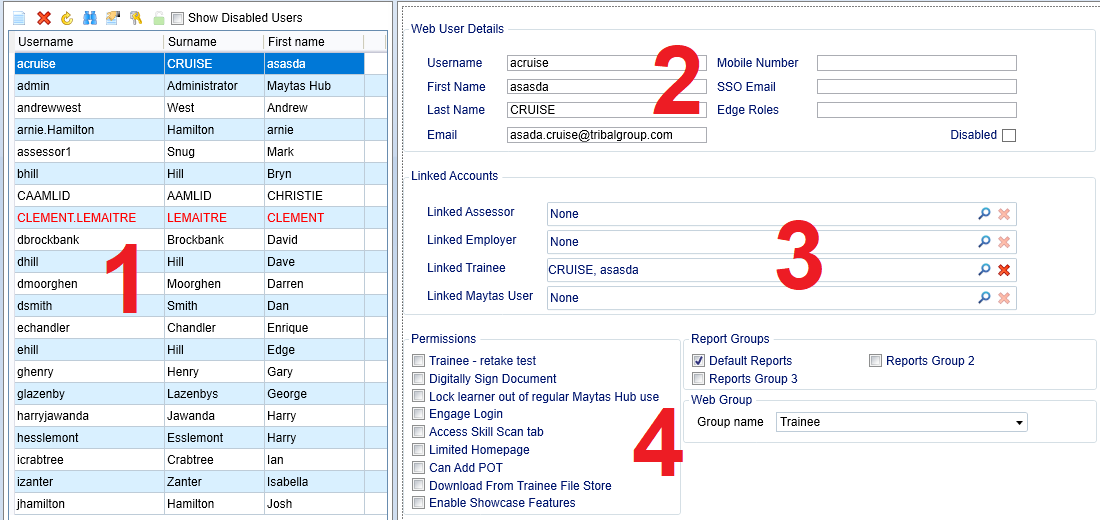
The Web User Editor allows you to create and maintain user accounts for use in Maytas Hub. To access the Web User Editor, go to Tools on the toolbar and click Web User Editor on the ribbon.


- User List – This is the list of web users.
- Web User Details – These are the details of the web user selected on the left.
- Linked Accounts - These can be used to link a web user to an assessor, employer or trainee record, or to a Maytas user.
- Permissions and Groups – These are the Maytas Hub permissions. Please note that the Report Group permissions only relate to running reports in Maytas Hub. Web permission groups can be selected at the bottom-right. Web groups are configured in Maytas Hub (see here for details) and the available groups are determined by the type of linked account.
Create and Maintain Web Users
To create a new web user:
- Click the
 button at the top of the user list.
 -
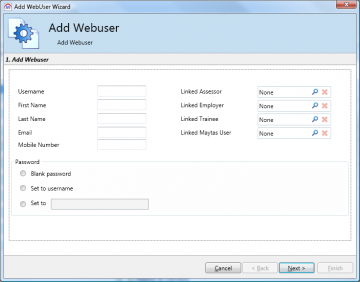
The web user wizard will appear.

Enter the username, first and last names, email address and mobile number.
- The web user can be linked to an existing assessor, employer, learner or Maytas user using the Linked fields on the right-hand side. To link a user, click the
 button. You can then search for and add the relevant assessor, employer, learner or user.
 - The password can be set to either a blank password, the same as the username or a password of your choice.
- When finished, click Next.
- Select the permissions as required. For more information on each of the permissions, please see section 2. Please note that multiple permissions can be selected. Click Next when finished.
- Choose the appropriate report groups and click Next.
- Click Finish. Please note that you will need to restart the web user editor for the new user to appear.
To change the password for a user:
- Select the user and click the
 button at the top of the user list.
 - To set a specific password, click Set to, enter the password and click OK. You can also set to a blank password or the username if required.
To delete a user:
- Select the user and click the
 button at the top of the user list.
 - Click Yes to confirm deletion.
Web User Permissions
The web user permissions allow access to various features in Maytas Hub. Multiple permissions can be added per user. Please note that your system may contain bespoke permissions additional to the default permissions below.
- Web Administrator – Allows web user creation and gives the ability to add/maintain lookups and add/edit news items.
- Allow Manage Teams – This is intended for IVs and supervisors. It allows the user to manage assessment teams.
- Internal Verifier – This gives access to IV features, such as creating sampling plans and verifying evidence.
- Assessment Approval – This is intended for second-line assessors who approve the work of other assessors.
- Course Attendance – Allows the user to mark course registers.
- Edit Templates – Allows the user to edit assessment templates.
- Edit Quals – Allows the user to edit qualifications.
- Restrict to Caseload – Prevents assessor users from seeing the caseloads of other assessors.
- Restrict to Centre – Lets assessor users only see learners in their centre.
Web User Email Address Sync
The email address associated with a web user can be automatically synced with its linked learner, assessor or employer record when the email address on that record is changed. There are three configuration options to enable syncing for learner, assessor and employer records:
- Click the M5 button at the top left and select Options.
- To enable for learner accounts:
- Go to Learner Login on the left (under the Maytas Hub Online header).
- In the Account Emails section on the right, tick the checkbox for the Sync web user email address config and ensure the toggle button is set to ON.
- To enable for assessor accounts:
- Go to Assessor Login on the left (under the Maytas Hub Online header).
- In the Account Emails section on the right, tick the checkbox for the Sync web user email address config and ensure the toggle button is set to ON.
- To enable for employer accounts:
- Go to Employer Login on the left (under the Maytas Hub Online header).
- In the Account Emails section on the right, tick the checkbox for the Sync web user email address config and ensure the toggle button is set to ON.
- Click OK.
When enabled, when the email address on a learner / assessor / employer record is changed, the new email address will be synced to the linked web user email address (M32$_WEBUSERS.EMAIL).