Maytas Hub Assessor Overview
This guide is an overview of how to use Maytas Hub as an assessor user.
Accessing Maytas Hub and viewing your caseload progress
Once you have been given your login credentials, navigate to your Maytas Hub login page and enter your username and password. Please note that your username is not case sensitive, but your password is.

Forgotten Password
If you have forgotten your password:
- Click on the Forgotten Password? link.
- Enter your username and email address.
- Click Reset Password.
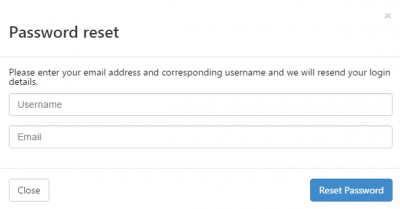
If Maytas Hub matches the username and the email address to a known account, you will be emailed a link to reset your password.
It is advisable to change your password regularly, which can be done from the Change Password option at the top-right of the screen once logged in.
Home Page
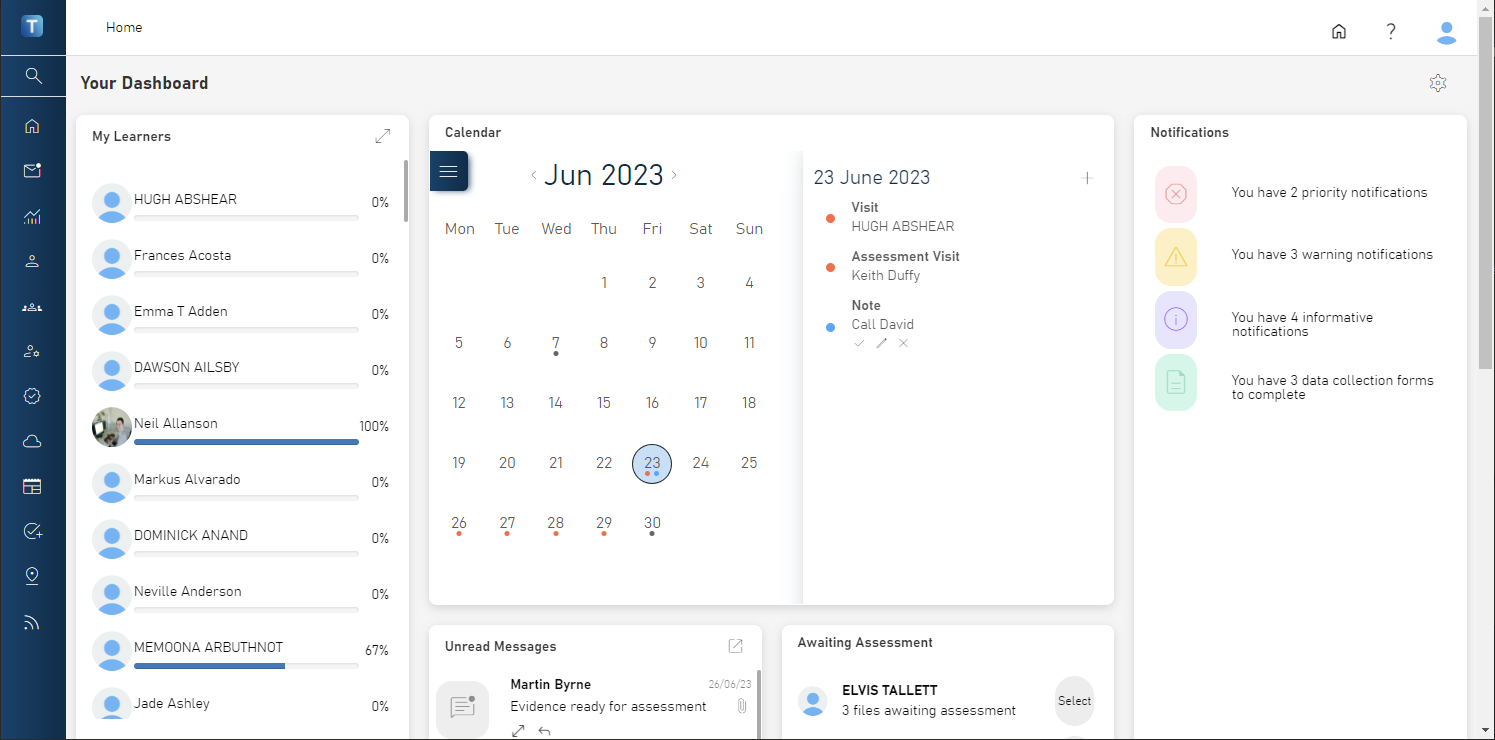
Once logged in, you will be taken to the home page. This screen is for assessors, managers and IQAs to see their caseload progress and team progress at a glance.
Rearranging, removing and restoring widgets
To make any changes to the layout of the assessor homepage, click the  button at the top right. Each widget can then be changed as follows:
- To move a widget, click and drag any part of it to the desired position. Other widgets will automatically rearrange accordingly.
- To remove a widget, click the X at the top-right of the widget. It will then be greyed out, indicating it will not appear on the homepage.
- To restore a widget, click the + at the top-right of the widget.
After making any changes, click Save at the top-right of the screen to save them, or click Close to revert to the previous layout (note that this may require the screen to be refreshed). You can also click Reset to restore the default layout.
My Learners widget
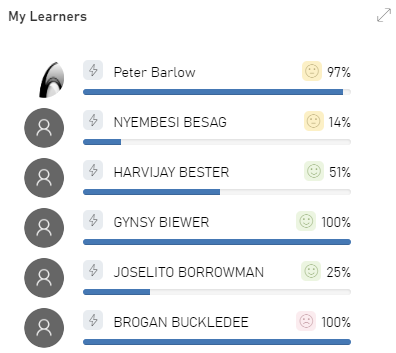
The My Learners widget shows a list of the learners in your caseload. Each learner shows their total progress (via the percentage and the progress bar) and their most recent mood. Clicking on a learner will open their record.
Additionally, each learner includes an option to jump to a specific screen on their record, as well as a quick actions menu.
Awaiting Assessment widget
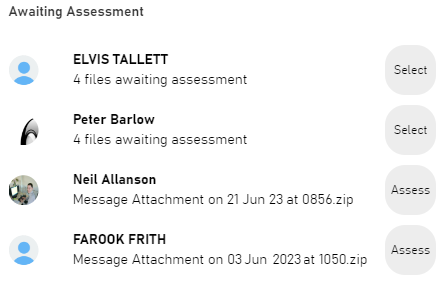
The Awaiting Assessment widget streamlines the process of assessing evidence submitted by a learner. Pending evidence is grouped by learner with a button next to them which begins the assessment process.
- Click the button next to a learner. If a learner has multiple files awaiting assessment, the button will read Select, allowing you to choose the file, otherwise for a single file it will read Assess.
-
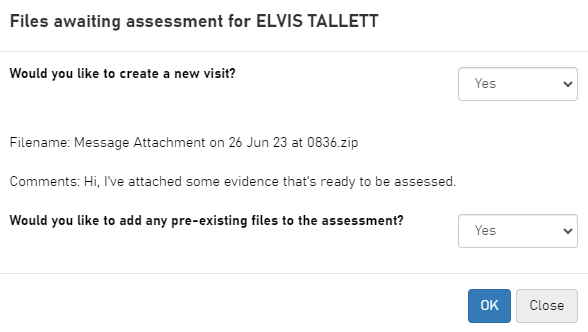
After choosing the file (if required), you will be asked if you want to create a new visit and whether to add any pre-existing files to the assessment. Choose each option as required and click OK.
-
If you chose to add additional files, you will be prompted to select which files to associate with the visit. Tick the box next to each required file and click Save.

-
If you chose to add a new visit in step 2, you will be shown the visit screen where you can complete the visit details as required. The selected files will be automatically attached and any suggested evidence mappings by the learner will be pre-selected.
If you chose not to add a new visit, you will be prompted to choose an existing visit to assign the files to. Click Open Visit next to the appropriate visit.

- Click Save after making changes to the visit.
Visits widget
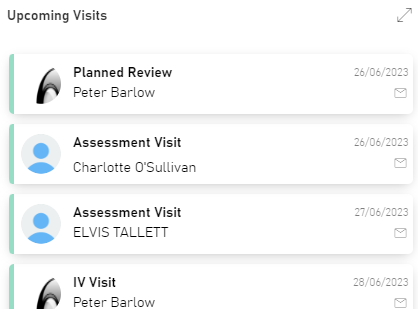
The Visits widget lists upcoming visits. Clicking a visit will show the details of that visit, whereas clicking the  button at the top right will open a screen listing all a user's upcoming visits.
Additionally, you can click the  button on a visit to send a message to the learner.
New Learners widget
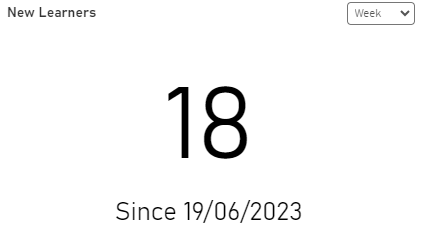
The New Learners widget shows the number of learners added to the user's caseload in the selected time period, which can be selected from the dropdown box at the top-right.
Progress widgets
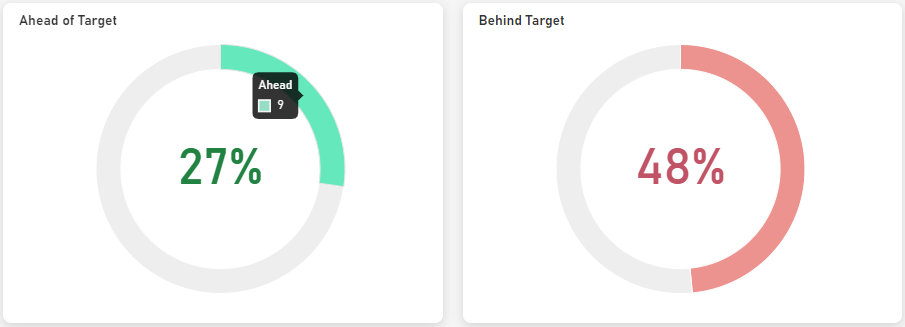
The three progress widgets show the proportion of learners in your caseload who are on target, ahead of target or behind target, based on a summary of overall progress against all of the objectives in each learner's framework.
Hovering over the coloured portion will show the relevant number of learners and clicking it will open the caseload screen.
The percentages of the three widgets do not necessarily add up to 100%, as they do not include learners in the caseload who have not yet started their objectives.
Notifications widget
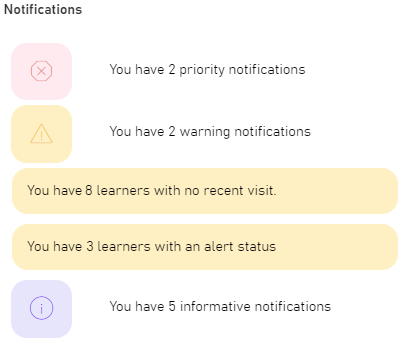
The Notifications widget shows a summary of important information relating to an assessor's caseload and team.
Notifications are grouped by the following categories:
- Red - Priority notifications requiring urgent action
- Yellow - Warning notifications requiring action
- Purple - Informative notifications
- Green - Data collection form notifications
Clicking on a notification summary (e.g. You have 2 warning notifications in the image above) will show the individual notifications within that group.
Clicking on notification will show further details; for example, clicking You have 3 learners with an alert status in the image above lists the relevant learners, and clicking a learner opens their record.

Calendar widget
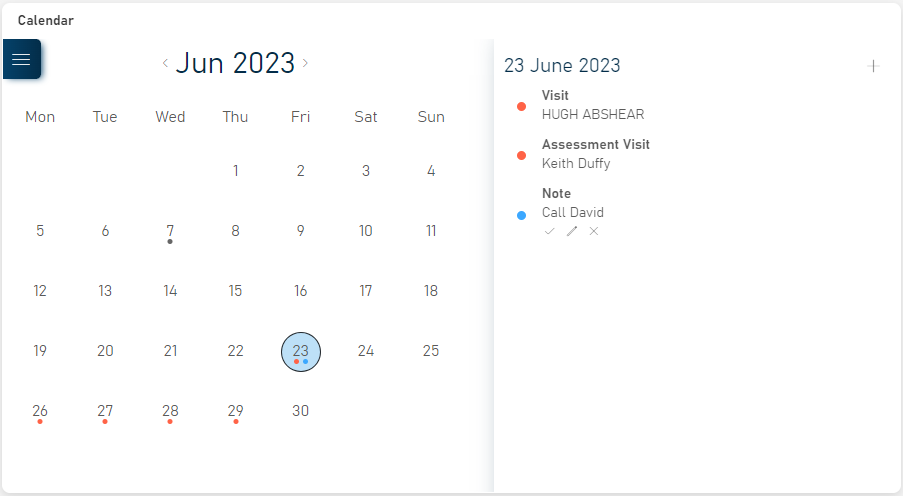
The Calendar widget shows key events and notes for each day. Selecting a date lists the activities for that day on the right, and each item can be clicked to go to the relevant page (e.g. the visits screen).
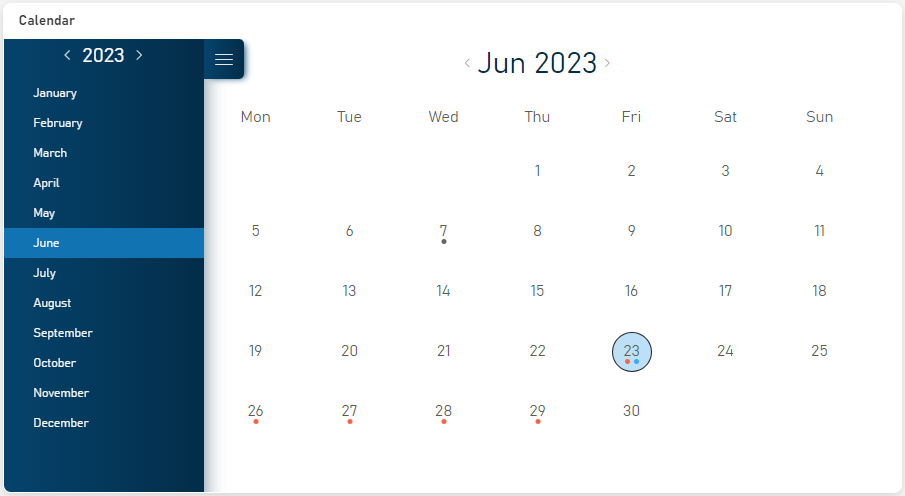
You can quickly move from month to month using the arrow buttons on either side of the month and year, or you can navigate to dates further away by clicking the  button and selecting the required month.
Notes can be added to a date by selecting the date and clicking the + button at the top-right of the widget.
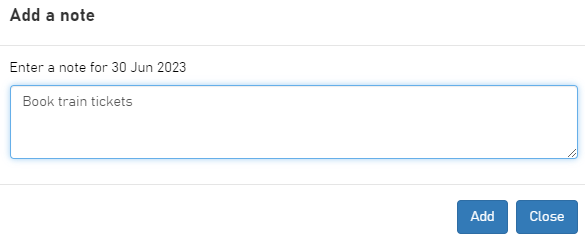
Enter the note text and click the Add button. The note will then be displayed against the date.

There are three buttons under the note:
-
 Completes the note, which changes the coloured dot from blue (outstanding) to gray (completed).
 -
 Allows you edit the note.
 -
 Deletes the note (click OK to confirm).
Off-the-Job Summary widget
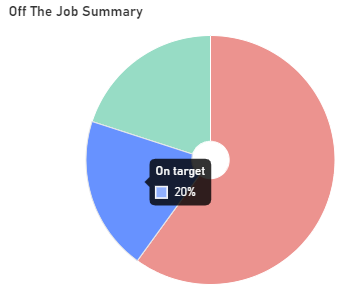
The Off-the-Job Summary widget shows the proportion of learners in the user's caseload whose OTJ hours are on target (blue), behind (red) or ahead (green), based on a learner's actual OTJ hours compared to their planned OTJ hours.
New Learners Widget
The New Learners widget shows how many learners have been added to the assessor's caseload recently. The dropdown box at the top-right of the widget can be used to show new learners in the last week, in the last month or since a date that the user can specify.
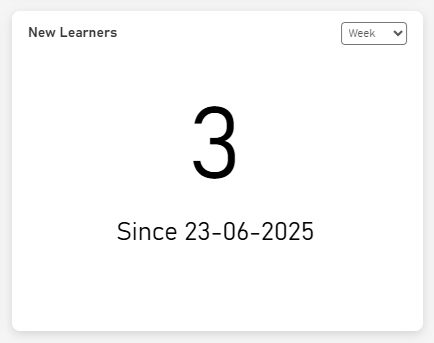
Clicking the date will show a list of the relevant learners.

Browse Learners
While this section refers to learners, your system may refer to trainees or another term, depending on your terminology settings.
To look in detail at a learner's record, click the ![]() Learners button from the menu icon on the left of the screen.
Learners button from the menu icon on the left of the screen.
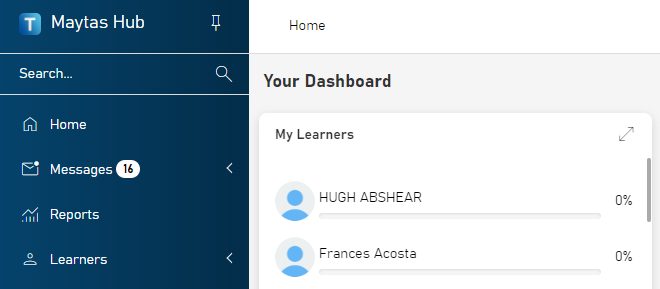
You can select the learner's name from the caseload list.
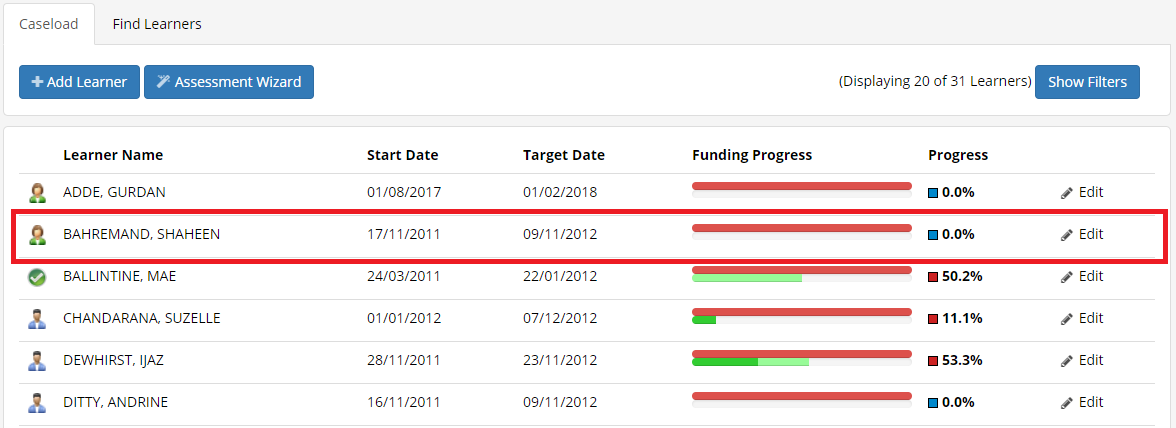
If you are not the learner's assessor (but are not restricted to only viewing your own caseload), or if you just want to quickly locate the learner, select the Find learners tab.

There are eight search options available, the most accurate of which are the NI Number and Learner ID, as they are unique to the learner.
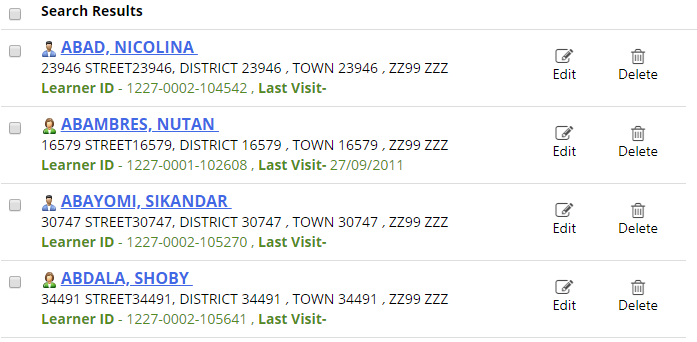
If you were to search solely by last name you may have a number of records in the results to choose from. You can enter a first name and last name to narrow the results. Click Search.

When the search results appear, select the record you wish to view by clicking on the learner's name.
This opens the Summary tab of the learner's record.
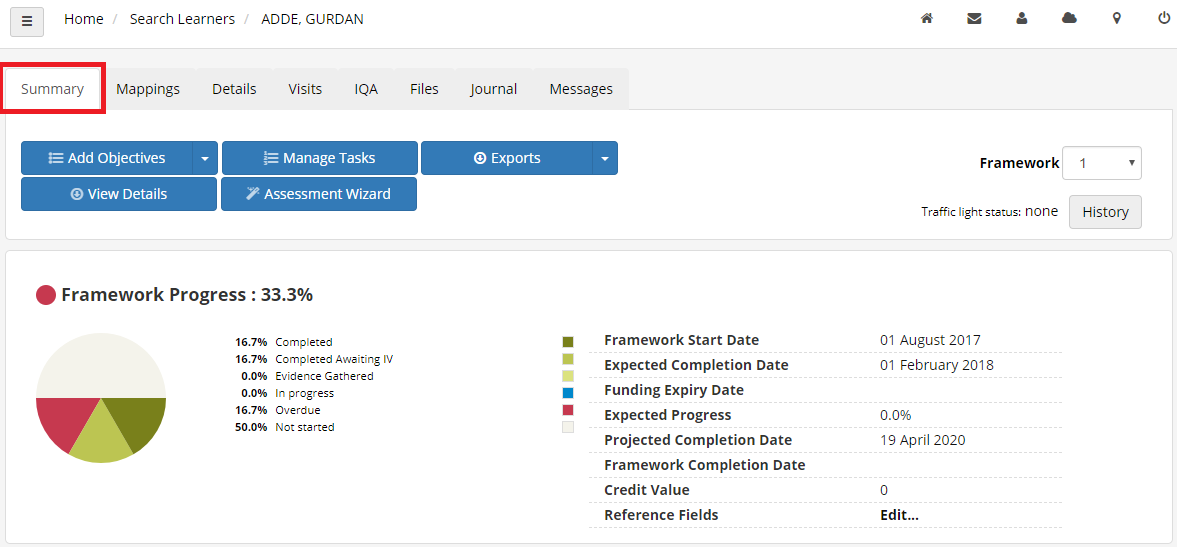
If you wish to view the history of a learner's assessor or employer details, click the View Details button.

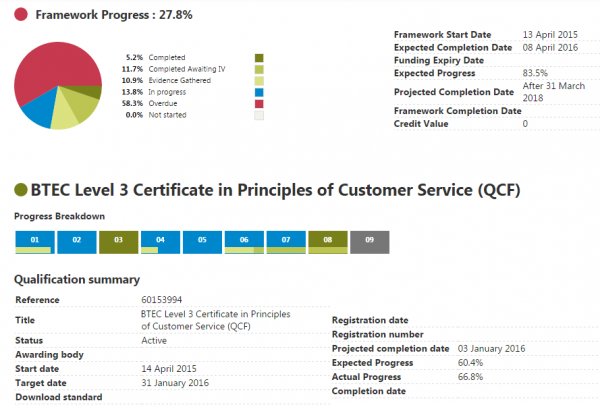
Scrolling down the page will show you start and expected end dates, progression charts and graphs. The progression charts and graphs are based on the dates set when targeting completion of units and the amount of evidence gathered to date.
- Blue = In progress
- Green = Completed
- Red = Overdue
- Grey = Exempt
Managing Objectives
Objectives Suggestions method
If a learner's ILR aim information is present in Maytas, Maytas Hub can use this information to suggest which objectives should be tracked:
-
Once you have accessed the learner's record click on the arrow next to Manage Objectives and then click Objective Suggestions.

-
You will be shown the qualifications that are present on the learner's ILR.

-
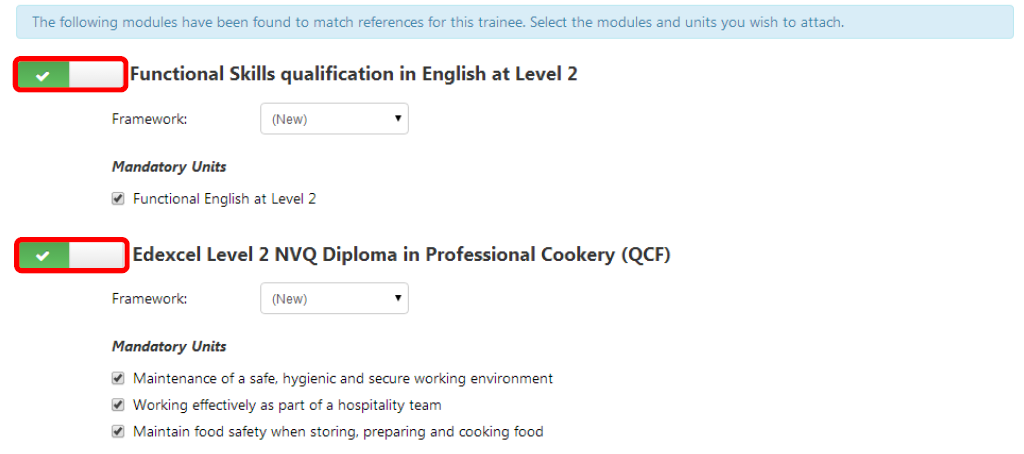
Select the qualifications that you wish to track in Maytas Hub.
-
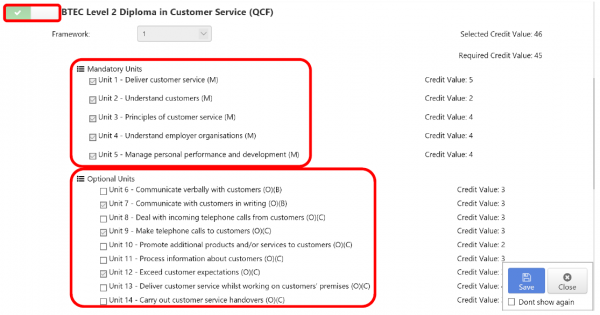
The mandatory units will automatically be selected, then select the optional units that you wish to add.
-
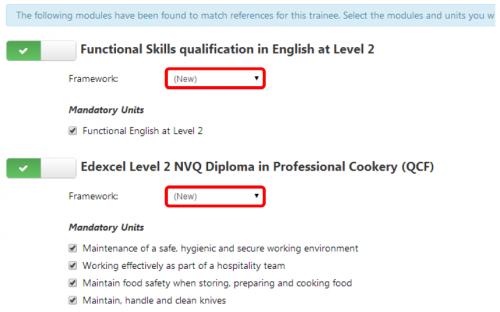
If you are adding these qualifications as a new framework, skip to step 6, otherwise select the framework number that you wish to add the qualifications to.
-
Click Save.

The qualifications and units are now added to the learner's objectives and are ready to have the start date, target date and status set.
Adding a unit - manual method
- Where qualifications do not appear on the ILR (e.g. PLTS or an ERR), this must be added manually to the learner. Please note that this method can be used for any qualification that is present in Maytas Hub.
-
To add a unit, go to the Add Objectives tab and search for the qualification by entering the qualification title and then click Search.

-
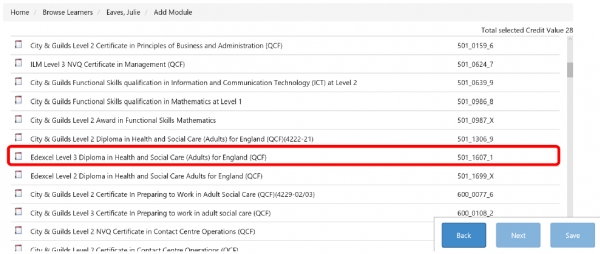
Click the qualification in the search results to highlight it.
-
Select the optional units you wish to add by ticking the relevant boxes.
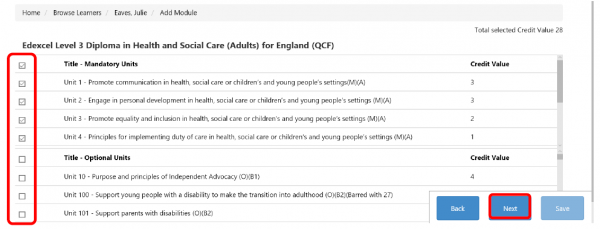
- Click Next to confirm your selection.
-
Select whether you want to add the units to a new qualification or to an existing qualification in the list.

Removing units and setting target dates
On the Details tab within a learner's record, you can manage the current objectives. This also allows you to add or remove units.
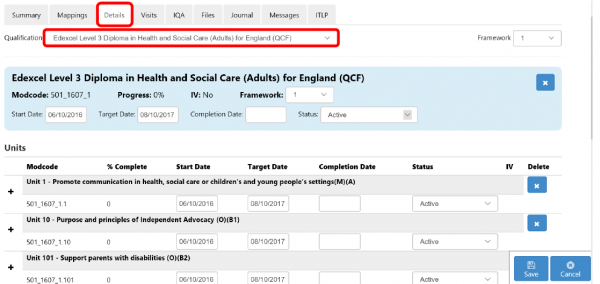
-
To remove a qualification or an individual unit, simply click the delete button. Please note that if criteria has been referenced against a unit, it cannot be deleted and must have its status set to Cancelled instead.
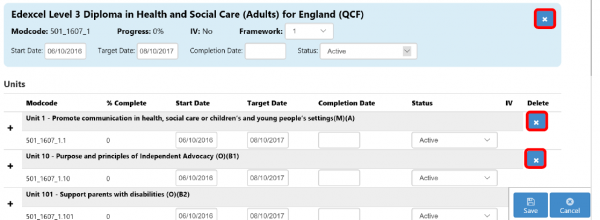
-
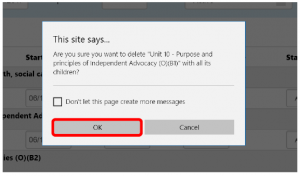
Click OK to confirm.
Setting target dates and the status
-
Click the Details button and select the qualification you wish to add the status, start date and target date to.
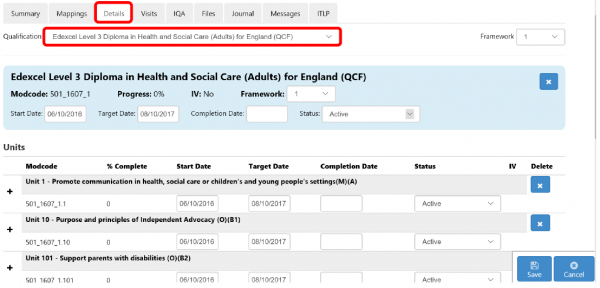
When selecting the dates or status you will be asked if you want to fill the child modules. Click OK, unless you wish to plan at the element/outcome level, which is not recommended.
-
Set the overall start date, target date and status for the qualification.

-
You can then individualise the units within the qualification.
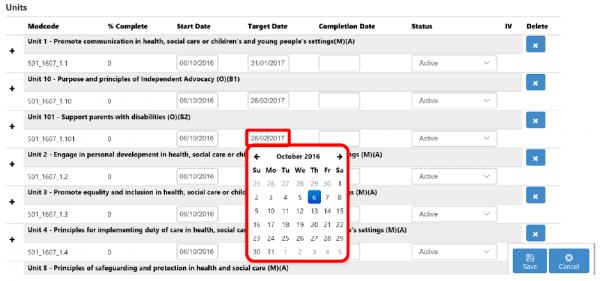
The available statuses are as follows:
- Active - Learner is working towards the completion of this qual/unit.
- Completed - Learner has completed this qual/unit.
- Exempt - Learner is exempt from this qual/unit.
- Cancelled - Learner is no longer working towards this qual/unit.
- Planned - Learner is not yet working towards this qual/unit (i.e. not yet ready for assessment).
- Click Save after the changes have been made.
Setting a unit to completed
When a unit is completed click on the Completion Date field and select the date from the calendar, then set the status to Completed.
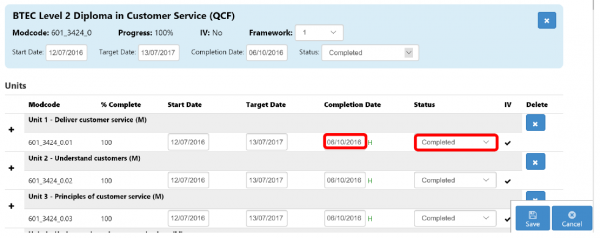
When the main aim is completed, please ensure that all of the units are also set to complete and that the status column for each component is set to Completed.

Moving qualifications between frameworks
Since learners can view their progress online, it is important that progress is as accurate as possible for their current qualification. This can be done by moving their current aim(s) to a new framework:
-
On the Details tab of your learner's portfolio, select the qualification that you wish to move and then change the framework number to move the qualification into that group.

- Select New from the framework box and click Save.
Repeat this process to move any other qualifications to a different or new framework.
Creating a visit
Planning a visit for the future
- Open a learner record and go to the Visits tab.
-
Click Add visit.

-
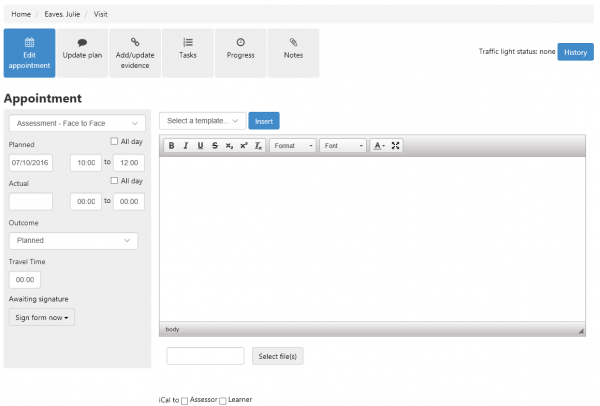
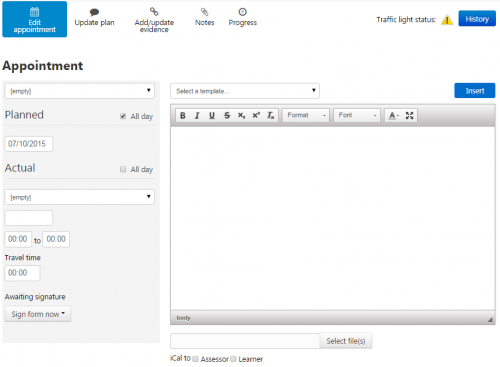
The visit screen is where you can edit appointments.
-
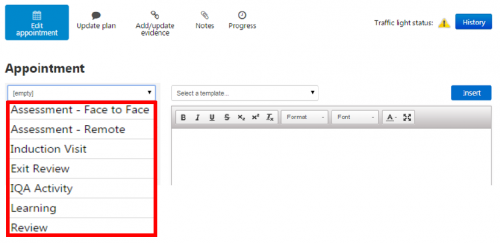
The visit requires you to set the type of visit or task being carried out. Select from the following list:
-
Enter the planned date and time of the visit in the Planned section.

-
Dates and times can be adjusted using the calendar date picker or by entering the date in DD/MM/YYYY format. Times need to be entered in 24 hour clock format (00:00, separated with a colon).
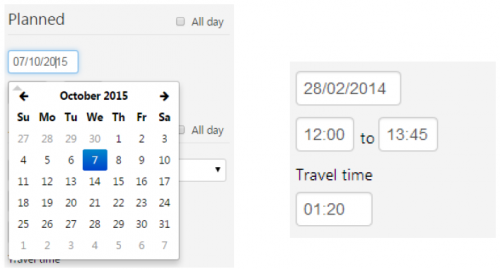
- If a visit is cancelled the planned date/time is never changed. The outcome of the visit is changed to the appropriate cancelled status and the actual date is the date on which the cancellation is made. This maintains the audit trail. Reasons for the cancellation can be entered into the notes field.
-
The Outcome field should be selected to accurately represent the status of the visit. Select Planned.
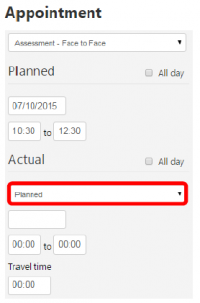
-
If you wish for an iCal calendar file to be sent via email to either yourself or the learner, tick the appropriate box(es).
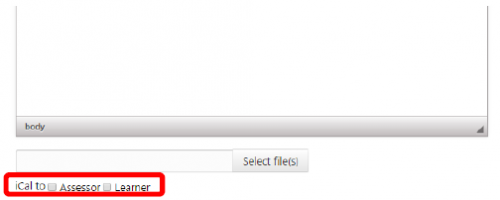
- Click Save.
Editing a visit
-
Access the visit via the home page or through the learner's record on the visits tab. Click the visit that you wish to edit.
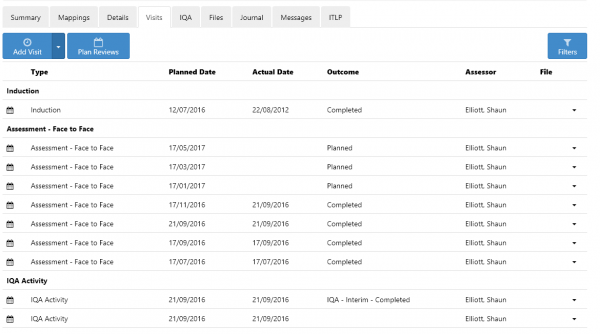
-
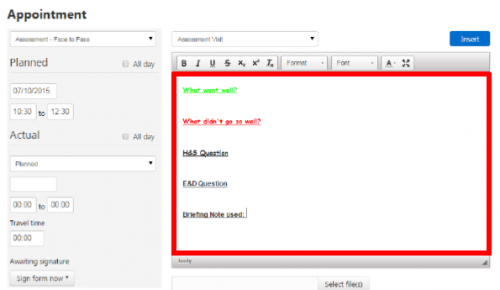
Templates can be used to ensure that all the relevant information is recorded on the visit. If present, select the appropriate template from the list and then click Insert.

-
Once a template is applied, the notes field can be edited as required.
-
To add files, e.g. Digital Voice Recording (DVR), to a visit, click Select file(s). Please note that files added here are NOT evidence and only relate to the visit itself.

-
Click Select File, browse to and select the file, then click Open.

-
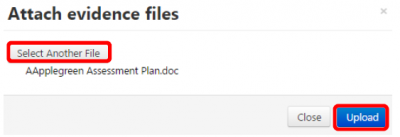
If only one file needs to be added, click Upload. If multiple files are required, click Select Another File. All attached files will be automatically zipped together.
-
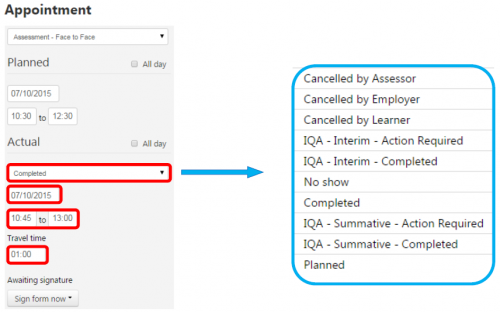
Update the Actual section, including the outcome, actual date and time and travel time where applicable.
- Click Save to complete the visit record.
A completed visit is where progress has been made and evidence of the learner's attendance can be recorded. Please note that IQA outcomes are only available to IQAs.
Using Plan Reviews
This feature helps to plan regular visits, such as reviews at regular intervals. Please note that any visit type can be planned using this method.
-
With the learner's record open, go to the Visits tab and click Plan Reviews.

-
Enter the interval in weeks and select a visit type, then click Plan Visits. Tick the boxes for iCal files to be sent to the assessor or learner as required.

- These will appear in the visit list and they can be opened for further editing by clicking the visit title. Please note that there is no way to add the outcome using this method of creation.
Assessing Evidence
-
Open or create an assessment visit for your learner.
-
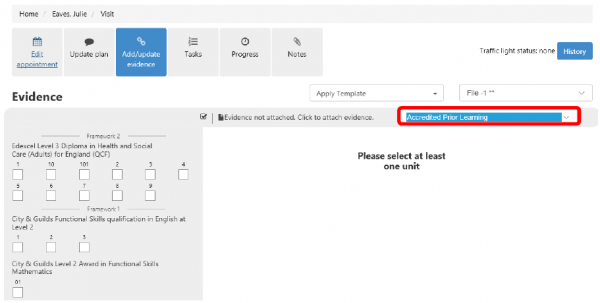
Click Add/Update Evidence and select the assessment method for the piece of evidence you wish to assess.
-
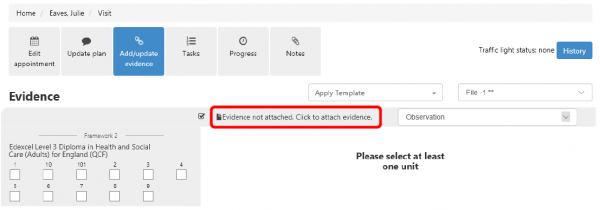
Click Evidence not attached. Click to attach evidence.
-
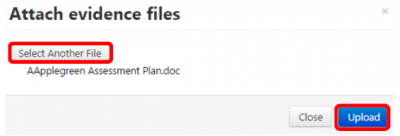
Click Select File, browse to and select the file and click Open.

-
If you wish to assess a piece of evidence with only one file, click Upload. If multiple files are being assessed for this evidence type, click Select Another File. All attached files will be automatically zipped together.
-
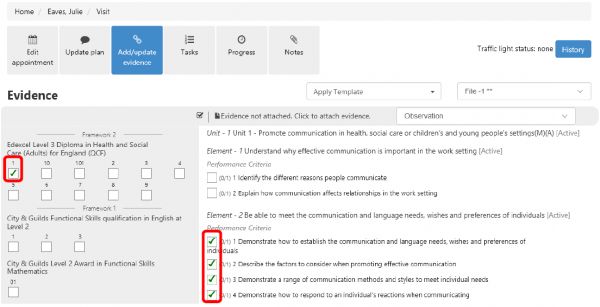
Select the qualification and the unit that the evidence relates to and select the criteria covered.
-
Select any other units or qualifications within the framework until all assessment decisions for this piece of evidence have been completed, across the whole framework.

-
If you have another piece of evidence to assess, click the assessment files box and click Add New File.

- Repeat the process until all evidence has been referenced. Click Save (please note that no confirmation box appears).
-
Learner feedback can now be given by going to the Notes tab. Files can be attached and the feedback can also be sent as a web message to your learner. Select the options as appropriate and click Save.
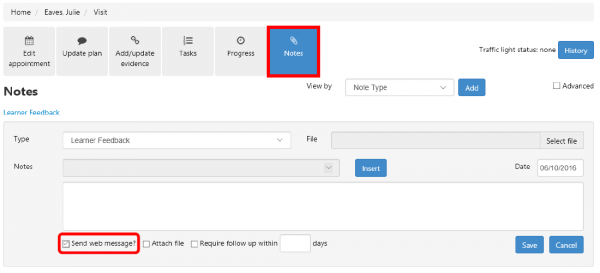
- Click the Edit appointment button to go back to the appointment screen. Update the actual information, complete the notes field if applicable and attach any relevant files to the visit.
-
Templates can be used to ensure that all the relevant information is recorded on the visit. If present, select the appropriate template from the list and click Insert.

-
Once a template is applied, the notes field can be edited as required.
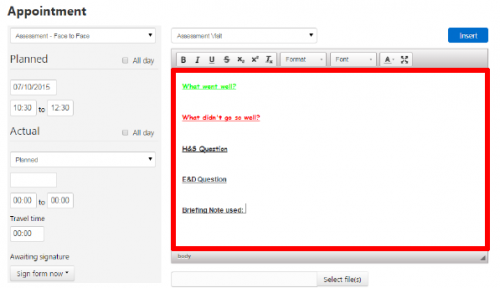
-
To add files, e.g. Digital Voice Recording (DVR), to a visit, click Select file(s). Please note that files added here are NOT evidence and only relate to the visit itself.

-
Click Select File, browse to and select the file and click Open.

-
If only one file needs to be added, click Upload. If multiple files are required, click Select Another File. All attached files will be automatically zipped together.
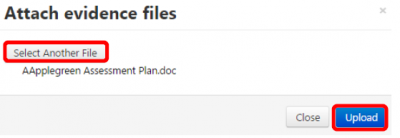
-
Update the Actual section, including the outcome, actual date and time and travel time where applicable. Digital signatures can also be obtained if part of your business process.
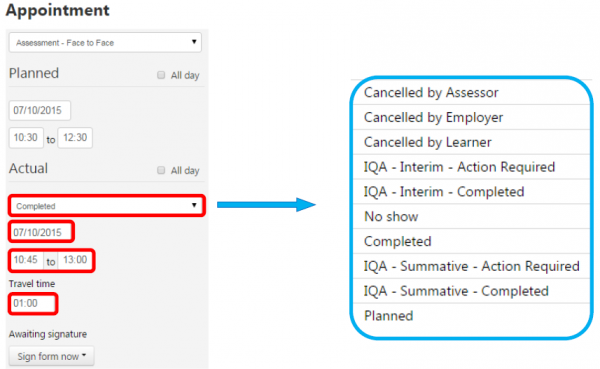
- Click Save. A completed visit is where progress has been made and evidence of the learner's attendance can be recorded.
Messaging
You don't need to be in the learner's record in order to use the messaging system. Click Messages on the toolbar.
-
The messaging centre contains your Inbox, Sent items, Trash and any Templates that you may have created. Messages can be grouped by threads and you can search your inbox easily via the search box.

-
To send a new message, click New Message on the left-hand side of the screen.

-
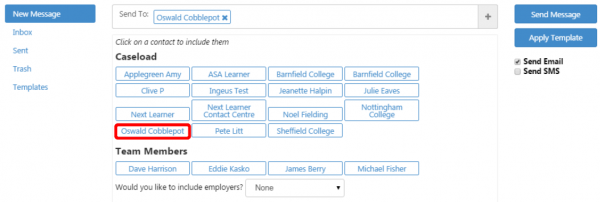
From this screen you can compose your message. Click the + button.

-
Click the recipients of the message. These can be learners on your caseload, team members or employers.
-
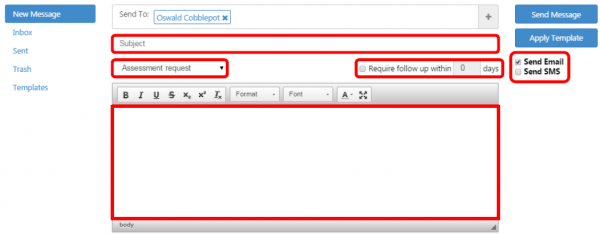
Enter the subject for the message, enter the message body and choose the message type. If you require a response within a set time-frame, you can set the number of days in which a response is required. Email notification that a message is waiting can also be sent, as well as SMS text notifications if configured.
-
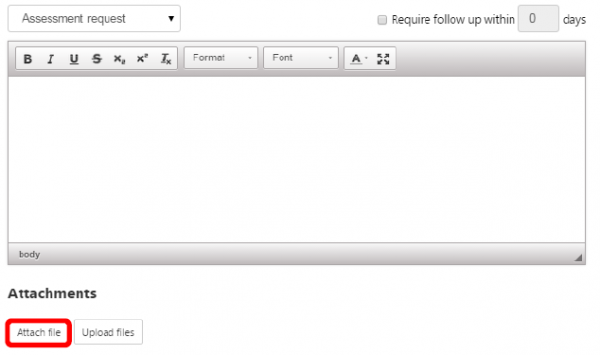
To attach a file with your message, click Attach File.
- Browse to and select the file and click Open.
-
If you need to upload multiple files, click Attach Another File. Otherwise, click Upload files.

-
Please note that unless you click Upload files, the files will not be attached and the message will be sent without them. A tick will appear when the files have been uploaded.

-
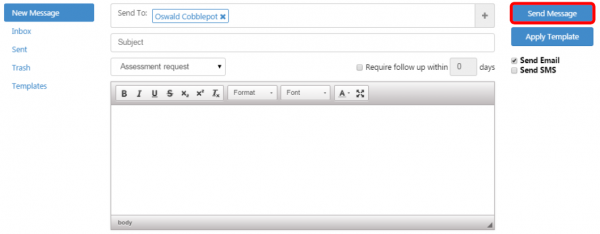
Click Send Message when you are ready to send. The recipient will receive a notification when they log into Maytas Hub and by email/SMS if selected.
Assessing evidence sent from a learner via messaging
- Access your messages by clicking Messages on the toolbar.
-
Click the message that you wish to view.

-
You can now view the contents of the message and check if the learner has suggested any mappings by clicking on Suggested Mappings.

-
Click Assess Files when you are ready.

-
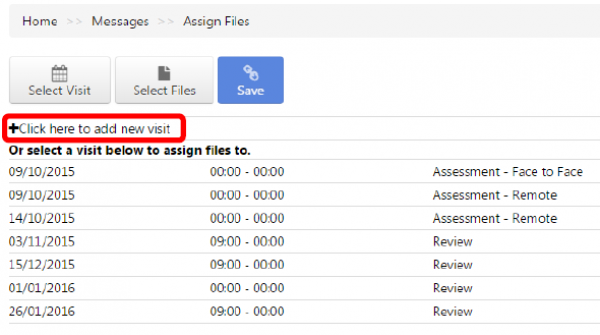
You will now see all of the learner's planned and completed visits in the list. As this is likely to be an un-planned visit, click Click here to add new visit.
-
Tick the checkboxes to select all of the attached files.

-
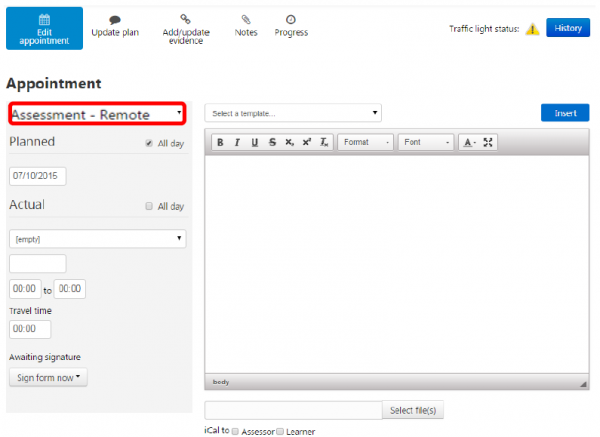
You will be taken to the Edit Appointment screen within a new visit. Select Assessment - Remote as the visit type.
-
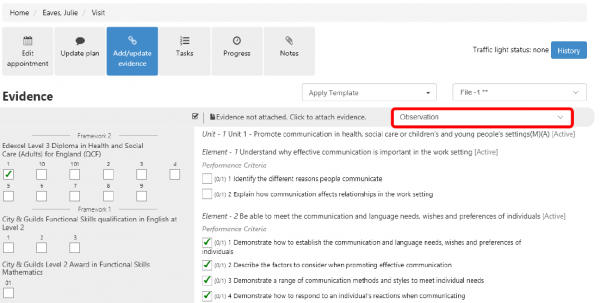
Click Add/Update Evidence and then select the assessment method for the piece of evidence provided.
-
Select the qualification/unit that you wish to check the suggested mappings for. You can then amend the evidence mappings as required.

-
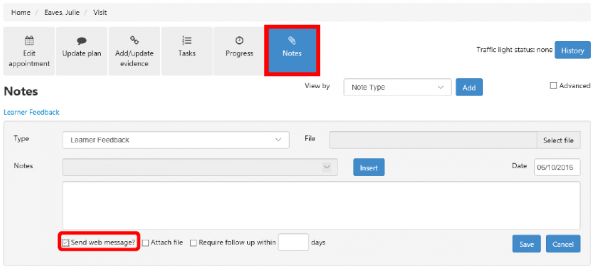
Learner feedback can now be given by going to the Notes tab. Files can be attached and the feedback can also be sent as a web message to your learner. Select the options as appropriate and then click Save.
- Click the Edit appointment button to go back to the appointment screen.
-
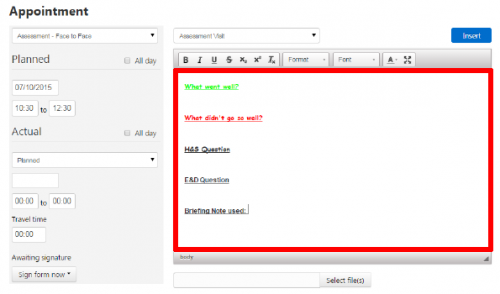
Templates can be used to ensure that all relevant information is recorded on the visit. If present, select the appropriate template from the list and click Insert.

-
Once a template is applied, the notes field can be edited as required.
-
To add files, e.g. Digital Voice Recording (DVR), to a visit, click Select file(s). Please note that files added here are NOT evidence and only relate to the visit itself.

-
Click Select File, browse to and select the file and click Open.

-
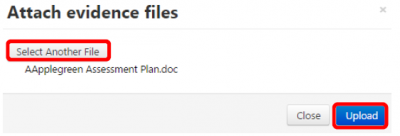
If only one file needs to be added, click Upload. If multiple files are required, click Select Another File. All attached files will be automatically zipped together.
-
Update the Actual section, including the outcome, actual date and time and travel time where applicable.
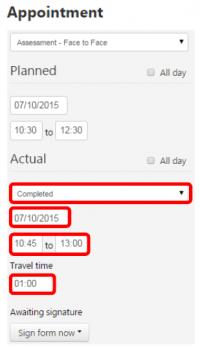
- Set the visit to Completed and click Save. A completed visit is where progress has been made and evidence of the learner's progress can be recorded.